 Skip to content

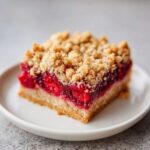
There is nothing quite like pulling a warm, golden bake out of the oven, is there? For me, that feeling—that burst of simple, pure joy—is why I started this whole journey. When my corporate burnout was at its worst, I stopped cooking because it felt like more stress. But learning to make truly exceptional comfort food, like these incredible raspberry crumble bars, was what brought the peace back into my kitchen. Forget complicated fussy desserts! This recipe is truly one of my favorites on the entire site because it nails the balance: a buttery, crisp base against the perfect sweet tart raspberry filling. Trust me, once you try this simple dessert bar recipe, you’ll wonder why you didn’t make them sooner.
You can read a little more about my philosophy over on my About page, but for now, let’s get baking!
- Why This is the Best Raspberry Crumble Bars Recipe
- Ingredients for Easy Raspberry Crumb Bars
- How to Prepare Homemade Raspberry Oat Bars Step-by-Step
- Tips for Perfect Texture Crumble Bars Success
- Ingredient Notes and Substitutions for Raspberry Crumble Bars
- Variations for Your Buttery Raspberry Crumble Dessert
- Serving Suggestions for Simple Dessert Bar Recipes
- Storage and Freezer Friendly Dessert Bars Instructions
- Frequently Asked Questions About Raspberry Crumble Bars
Why This is the Best Raspberry Crumble Bars Recipe
I’ve tried a bunch of recipes for these beauties over the years, and what makes mine the best raspberry crumble bars recipe, hand down, is the textural contrast. You want that base to be a rich, buttery shortbread, right? And then you want a filling that’s bright and slightly tart, not just a sugary mess. That’s why I focus so much on getting the ratio perfect—it’s the secret sauce for truly irresistible raspberry crumble bars. I really hope you check out the rest of my blog for more simple baking inspiration!
These taste gourmet but they are genuinely one of the quickest things you can whip up for a potluck or just selfishly eat all week. We nail that crumble texture every single time.

Achieving the Perfect Texture in Your Raspberry Crumble Bars
The magic for achieving that perfect texture crumble bars dream happens when you work with very cold butter. I can’t stress that enough! When you cut that cold butter into the flour and oats, it creates tiny pockets of fat that don’t fully combine. During baking, those pockets expand and melt, resulting in that beautifully flaky, crisp shortbread base and topping.
It’s what stops these from becoming dense, chewy bricks. We want a satisfying crunch when you bite into your raspberry crumble bars!
Ingredients for Easy Raspberry Crumb Bars
Okay, let’s talk ingredients for these easy raspberry crumb bars. I’ve kept this list short and sweet, using pantry staples you probably already have. The key here is making sure your butter is super cold when we start mixing the base, which is half the battle won.
For the crumble and base, grab:
- 1 1/2 cups all-purpose flour
- 1 cup old-fashioned rolled oats
- 1/2 cup packed light brown sugar (make sure it’s packed in so you get the right amount!)
- 1/2 teaspoon salt
- 1 cup (2 sticks) cold unsalted butter, cut into cubes
And for that fantastic, bright filling:
- 3 cups fresh or frozen raspberries
- 1/2 cup granulated sugar
- 2 tablespoons cornstarch (this is crucial to thicken things up!)
- 1 teaspoon lemon juice
If you want to see how I made something similar with apples recently, check out my apple crumb bars! They share a similar shortbread DNA.
How to Prepare Homemade Raspberry Oat Bars Step-by-Step
Alright, this is where the magic happens! Remember I said baking shouldn’t be stressful? These raspberry crumble bars are assembly assembly assembly, not complicated chemistry. We’re going to use the pan prep method I always recommend for easy weeknight bakes—just line that 9×13 baking pan with parchment, leaving that little overhang so we can lift the whole thing out later like a giant delicious tray! First things first: pop your oven on to 375 degrees F. I find if the oven is hot when that base goes in, it really snaps the edges nicely.
If you’re looking for some genuinely quick recipes for busy weeknights, I’ve got a bunch of ideas over on my weeknight dinner section!
Making the Buttery Crumble Base and Topping
In a big bowl, we whisk the dry stuff: flour, oats, brown sugar, and salt. Now, don’t rush the cold butter cubes. You need to cut them in until the mixture looks like coarse, chunky sand—or like little peas have formed. That’s the sign of a happy, buttery shortbread mix! Take two-thirds of that mixture and press it down *firmly* right into the bottom of your prepared pan. It needs to be packed tight so it holds its shape when you slice your raspberry crumble bars later.
Assembling the Sweet Tart Raspberry Filling
Keep that final third of the crumble mixture off to the side! Now for the fruit. In a separate bowl, gently toss those raspberries—fresh or frozen, it doesn’t matter—with the granulated sugar, lemon juice, and the cornstarch. That cornstarch is an absolute must-have; it pulls all that beautiful liquid out of the berries as they bake and turns it into a thick, sweet tart raspberry filling instead of a soupy mess in your raspberry crumble bars. Spread that fruit layer evenly over your pressed base.

Baking and Cooling Your Raspberry Crumble Bars
Finally, take that reserved, loose crumble and sprinkle it gently over the top of the berries. Don’t press it down this time! We want it loose and crumbly. Pop it in the preheated oven for about 35 to 40 minutes. Watch for that golden-brown topping and bubbly edges—that tells you the filling is cooked through. The hardest part about learning how to make raspberry squares successfully is the cooling. You absolutely MUST let these cool completely. If you try to cut them warm, they will fall apart. Patience, friend!
Tips for Perfect Texture Crumble Bars Success
When you’re aiming for those coveted perfect texture crumble bars, every little step counts, believe me. Like I mentioned when we were talking about the base, the cardinal rule for any buttery shortbread-style crumb is keeping that butter ice cold. If your butter starts getting soft while you’re mixing, just pop the whole bowl into the freezer for five minutes. That chilling keeps the final product crisp instead of greasy!
Also, never skip the cornstarch when you are making that sweet tart raspberry filling. That little bit of starch is what transforms the berry juices into a lovely, thick topping that sets up nicely instead of sinking your base. We want crisp edges on our raspberry crumble bars, not soggy bottoms! For a little extra richness, I sometimes swap out about a quarter of the butter for some cold coconut oil—it gives the crumble an amazing depth.
If you are interested in building up your confidence in the oven generally, check out my thoughts on baking bread; sometimes mastering the basics of dough and butter really helps everything else click!
Ingredient Notes and Substitutions for Raspberry Crumble Bars
I know everyone’s pantry looks a little different, so let’s chat about how we can adjust things without ruining the integrity of these wonderful raspberry crumble bars. The most common questions I get are about the berries and, of course, flour substitutions. Changing ingredients slightly is fine as long as you understand *why* we are adding certain things, like that cornstarch we talked about earlier!
Whether you’re sticking to the classic recipe or need an adjustment, trust me, these will still hit that sweet spot. If you’ve ever tried to perfect your sourdough starter, you know that understanding ingredients is everything! You can see my journey with incorporating sourdough into regular bakes right here.
Gluten Free Raspberry Bars Option
If you need to make gluten free raspberry bars option, it is super straightforward, thankfully! You don’t have to mess with the fruit or the sugar ratios at all. For the crumble and base, simply swap out the 1 1/2 cups of all-purpose flour for a good quality 1:1 gluten-free baking blend. Make sure the blend you choose already contains xanthan gum, as that helps bind everything together since we aren’t using traditional wheat flour.
Because the texture is so important in these raspberry crumble bars, I always recommend weighing out the GF flour blend if you have a scale, just to stay precise. But honestly, the oats and the cold butter do most of the heavy lifting here, so you should still get that gorgeous texture when you slice your finished bars.
Variations for Your Buttery Raspberry Crumble Dessert
While I adore this recipe as written—it’s the gold standard for a buttery raspberry crumble dessert—baking is all about making things your own! Once you master the base and filling ratios for these raspberry crumble bars, you can have endless fun experimenting. If you love layering flavors, I highly suggest looking at how I incorporate spices into other bakes, like my Southern peach cake recipe; similar principles apply!
Here are a few simple swaps and additions that I’ve played around with over the years to switch things up:
- Add Texture: Toss in about a half cup of chopped nuts like pecans or almonds right into the top crumble layer before baking. They toast up beautifully and give you an extra satisfying crunch.
- Spice it Up: A half teaspoon of ground cinnamon or a tiny pinch of nutmeg mixed into the dry ingredients for the crumble gives these bars a lovely warmth that pairs surprisingly well with the tart raspberries.
- Swap Your Berries: Honestly, you can use almost any firmer berry! Blackberries work wonderfully, or you can do a “mixed berry” bake using frozen strawberries and blueberries alongside your raspberries. Just make sure the total volume of fruit stays around 3 cups.
The beauty of these bar recipes is their straightforward nature. Once you nail the crust, the sky’s the limit for customizing your next batch of raspberry crumble bars!

Serving Suggestions for Simple Dessert Bar Recipes
I love that these raspberry crumble bars fall squarely into the category of simple dessert bar recipes because you can dress them up or dress them down depending on the occasion. Remember my philosophy: food is a love language, and these are perfect for sharing. Whether you are taking them to a gathering or just packing them for a midday treat, they deliver serious flavor.
If you are looking for a slightly more decadent dessert presentation, I often serve them slightly warm—not piping hot, of course, because they need to set up—with a dollop of vanilla bean ice cream or maybe just a light drizzle of honey.
When I’m planning for guests, I always make sure to use the parchment sling to lift the whole slab out perfectly before cutting. It makes presentation so much classier! For everyday snacking or packing in lunches, letting them cool completely seals in all that moisture, making them perfectly sturdy for grab-and-go.
If you are hosting a gathering and need more ideas on how to make entertaining seamless and joyful, be sure to check out my tips on easy entertaining; simple bakes like these raspberry crumble bars are always the star!
Storage and Freezer Friendly Dessert Bars Instructions
Here’s the best part about mastering any great bar recipe—they keep incredibly well! Unlike delicate cakes, these raspberry crumble bars are fantastic for making ahead because they actually get better after a day or so. For short-term storage, just keep them in an airtight container right there on the counter. If you don’t crowd them, they should stay perfectly fine for about four days. I always find snacking on the second day is the best because the flavors have really had time to mingle!
But let’s talk about the “set it and forget it” method, which makes these officially certified freezer friendly dessert bars for our busy lives. If you’ve made a double batch (and you totally should, trust me!), wrapping them up for later is a snap. Once the bars are completely cool—and I mean *cold* from the fridge—slice them into individual squares first. This makes thawing so much easier later on.
Wrap each square tightly in plastic wrap, and then pop those wrapped bars into a freezer-safe bag or container. They hold up beautifully for about three months. When you need a quick treat or an unexpected dessert, just pull one out the night before. They thaw perfectly on the counter! If you want more ideas on other simple bakes that freeze well, take a peek at my tips for no-bake chocolate oatmeal bars—those are great for those times you just can’t turn the oven on!
Frequently Asked Questions About Raspberry Crumble Bars
Whenever I share a recipe as fundamental as these raspberry crumble bars, people always have fantastic questions about tweaks! It’s totally normal. Baking is about precision, but once you trust the process, you can start asking these little adjustments. I’ve gathered a few of the most common things I hear, and I’m happy to share my thoughts!
If you can’t find answers here, feel free to reach out to me on my Facebook page!
Can I use jam instead of fresh fruit for these raspberry crumble bars?
That’s a great question about convenience, but honestly, I would urge you to stick to fresh or frozen fruit for the best possible outcome with these raspberry crumble bars. Jam is already cooked down and incredibly dense with sugar. If you substitute it directly for our fruit mixture, you risk having a filling that never sets up properly. It will likely bubble up and then ooze out the sides because it doesn’t have that raw cornstarch to work with as it bakes and thickens.
If you absolutely had to use jam, you would probably need to significantly cut back on the sugars in the recipe and likely add extra cornstarch—maybe even double the amount in the filling mixture—just to handle that extra moisture load. It becomes a different recipe then, so stick with the whole berries for that signature sweet tart punch!
How long do I need to let the bars cool before cutting?
This is the hardest part, but it is non-negotiable if you want those beautiful, clean squares. If you try to slice these while they are warm—even slightly warm—the buttery shortbread base will crumble apart, and the raspberry filling will just squirt out everywhere. It’s frustrating, I know!
For the cleanest presentation when you are trying to achieve those perfect little squares—truly nailing how to make raspberry squares neatly—you need them to cool completely to room temperature, which usually takes about two to three hours on a wire rack. Seriously, walk away! If you can’t wait that long, chill them in the refrigerator for at least an hour after they’ve come to room temperature to firm everything up. That coolness sets the fat in the base and thickens the fruit mixture perfectly for slicing.

If you need help figuring out any other step in the kitchen, please feel free to drop me a line on my contact page!
PrintBest Raspberry Crumble Bars Recipe
Make these easy raspberry crumb bars with a buttery shortbread base and a crisp oatmeal topping. This simple dessert bar recipe yields sweet tart raspberry filling perfect for snacking or sharing.
- Prep Time: 20 min
- Cook Time: 40 min
- Total Time: 60 min
- Yield: 16 bars 1x
- Category: Dessert
- Method: Baking
- Cuisine: American
- Diet: Vegetarian
Ingredients
- 1 1/2 cups all-purpose flour
- 1 cup old-fashioned rolled oats
- 1/2 cup packed light brown sugar
- 1/2 teaspoon salt
- 1 cup (2 sticks) cold unsalted butter, cut into cubes
- 3 cups fresh or frozen raspberries
- 1/2 cup granulated sugar
- 2 tablespoons cornstarch
- 1 teaspoon lemon juice
Instructions
- Preheat your oven to 375 degrees F. Line a 9×13 inch baking pan with parchment paper, leaving an overhang on the sides for easy removal.
- Prepare the crumble base: In a large bowl, whisk together the flour, rolled oats, brown sugar, and salt.
- Cut in the cold butter using a pastry blender or your fingertips until the mixture resembles coarse crumbs.
- Press two-thirds of the crumble mixture firmly and evenly into the bottom of the prepared pan to form the base.
- Prepare the filling: In a separate bowl, gently toss the raspberries with the granulated sugar, cornstarch, and lemon juice until the berries are coated.
- Spread the raspberry filling evenly over the crust layer.
- Sprinkle the remaining one-third of the crumble mixture evenly over the raspberry filling.
- Bake for 35 to 40 minutes, or until the topping is golden brown and the filling is bubbly.
- Let the bars cool completely in the pan on a wire rack before lifting them out using the parchment overhang.
- Once cool, cut into squares. These freezer friendly dessert bars are best stored in an airtight container.
Notes
- For a gluten free raspberry bars option, substitute the all-purpose flour with a 1:1 gluten-free baking blend.
- If using frozen raspberries, do not thaw them before mixing with the sugar and cornstarch.
- For a richer flavor, substitute 1/4 cup of the butter with 1/4 cup of cold coconut oil in the crumble mixture.
- These bars freeze well for up to three months. Wrap individual bars tightly before freezing.
Nutrition
- Serving Size: 1 bar
- Calories: 280
- Sugar: 18
- Sodium: 110
- Fat: 16
- Saturated Fat: 10
- Unsaturated Fat: 6
- Trans Fat: 0
- Carbohydrates: 33
- Fiber: 2
- Protein: 3
- Cholesterol: 45
