 Skip to content

If you’re anything like me, your sourdough starter sometimes just keeps growing, no matter how many loaves you bake! It feels criminal to just pour that beautiful, tangy feed waste down the sink. That’s why I’m so thrilled to share this recipe for a perfect country loaf with sourdough discard. Forget the stress of maintaining a perfectly peaked starter for this one; we are using that extra, unfed discard to create amazing depth of flavor. I remember obsessing over my starter schedule when I first started baking, and realizing I could use the discard just as effectively for an incredible artisan bake was a game-changer for my kitchen joy. This recipe proves you get rustic perfection without the fuss! You can learn more about using discard in our general sourdough discard bread recipe roundup.
- Why This Country Loaf with Sourdough Discard Works So Well
- Ingredients for Your Country Loaf with Sourdough Discard
- Step-by-Step Instructions for Your Country Style Sourdough Bake
- Managing Fermentation for a Perfect Country Loaf with Sourdough Discard
- Tips for Success with Your No Active Starter Bread Recipe
- Storage and Reheating Instructions for Homemade Country Bread Baking Guide
- Serving Suggestions for Your Rustic White Loaf Sourdough Discard
- Frequently Asked Questions About the Country Loaf with Sourdough Discard
- Share Your Country Loaf with Sourdough Discard Creations
Why This Country Loaf with Sourdough Discard Works So Well
Honestly, this method is brilliant because it tackles food waste head-on while delivering that incredible, classic artisan flavor we chase. When you’re making a country style sourdough bake, you often need an active starter, but using 100g of room-temperature discard gives us a fantastic shortcut. It still brings the necessary acidity to the party, which is crucial for texture.
Here’s why I trust this no-fuss approach:
- The discard provides a subtle tang that mimics a longer natural fermentation schedule.
- It’s the easiest way to use up that extra starter without waste!
- The structure holds up beautifully, even though we aren’t using a massive amount of starter.
Flavor Development from Sourdough Discard
Even though this recipe includes a tiny bit of yeast for insurance, that sourdough discard is doing some heavy lifting on the flavor side. Since it’s slightly acidic, it helps break down the flour proteins just enough to contribute that sought-after, mild sourdough tang. You get the complexity without needing to feed and wait for your main starter to peak.

Achieving That Rustic White Loaf Sourdough Discard Crust
If you want that crackly, deep brown crust, the key isn’t in the dough so much as it is in the heat! We rely entirely on preheating the Dutch oven until it’s screaming hot. Trapping that initial steam locks in the dough’s moisture, allowing for maximum oven spring before the crust sets. That steam is non-negotiable for a truly rustic bake.
Ingredients for Your Country Loaf with Sourdough Discard
Okay, gathering your components is where the magic starts to line up! Because we’re relying on discard, precision matters, but don’t stress—it’s all straightforward stuff you probably have right now. Here’s exactly what you need for one beautiful loaf. Pay special attention to that discard description!
- 350g bread flour (this high protein is key for structure!)
- 150g whole wheat flour
- 350g water (make sure it’s lukewarm, not hot)
- 100g sourdough discard (unfed, room temperature—this is essential!)
- 10g fine sea salt
- 2g instant dry yeast (I call this my little insurance policy if my discard is a bit sleepy.)
Ingredient Notes and Substitutions
When dealing with sourdough discard bread recipes, the discard itself is variable. If yours has been in the fridge a while and is super stiff, you might need that extra splash of water mentioned in the recipe notes—just add it slowly until the dough feels right! For structure in this rustic white loaf sourdough discard recipe, please use bread flour if you can; it handles the hydration much better than all-purpose. If you decide to skip the yeast, just plan for a slightly longer bulk fermentation time. It’s all about checking the dough, not just the clock!
Step-by-Step Instructions for Your Country Style Sourdough Bake
Alright, now for the fun part: making the dough! This is where you turn simple ingredients into something truly amazing. We aren’t rushing this part, especially since we want that great texture from our artisan bread baking adventure. Follow these timing cues closely, and you’ll have a beautiful, high-hydration loaf on your hands.
Mixing and Developing Dough Strength for this Sourdough Discard Bread Recipe
First, just combine your flours, water, and that 100g of sourdough discard until you have a shaggy mass. Cover it and walk away for 30 minutes—that’s the autolyse, letting the flour hydrate. Next, sprinkle on the salt and the optional yeast, mixing until things feel wetter and look a little smoother. Now, we build strength! Wet your hands, grab a side, pull it up high, and fold it over the middle. Do that three more times for four folds total. Cover it, wait 30 minutes, and repeat that whole folding routine three more times over the next two hours. See the dough getting smoother? That’s the strength building for your high hydration sourdough discard!
Bulk Fermentation and Shaping the Country Loaf with Sourdough Discard
After those folds, the dough needs to relax and bubble up during bulk fermentation. You’re looking for about a 30% to 50% increase in volume, and you should see bubbles peaking through the surface. Don’t panic if it takes 4 or 5 hours; temperature is everything here! Once it’s ready, gently coax the dough onto a lightly floured area. Perform a very gentle pre-shape into a round and let it rest, covered, for 20 minutes. Then, shape it tightly into your final boule shape—pulling that surface tension tight is what gives you that beautiful oven spring in your final country loaf with sourdough discard.
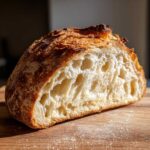
Baking: Scoring Sourdough Country Loaf and Dutch Oven Secrets
This is where we earn that incredible crust! You absolutely must preheat your Dutch oven inside the oven at 500°F for a full 45 minutes—it needs to be scorching hot. When you’re ready, gently flip that cold dough out of the banneton onto parchment paper. Take a *very* sharp blade and score the top deeply, making one confident slash. Carefully lower the dough into the hot pot using the parchment paper as a sling, pop the lid on, and bake for 20 minutes. After that, drop the heat to 450°F, remove the lid, and let it bake for another 20 to 25 minutes until it’s a deep, glorious brown. Trust me, the sound when you tap the bottom crust after cooling is pure music!

Managing Fermentation for a Perfect Country Loaf with Sourdough Discard
Listen, because this is where folks using sourdough discard can sometimes get tripped up. Since we aren’t using a vibrant, freshly fed starter—we’re using discard—the actual rising power is a little less punchy. That’s perfectly fine! It just means we need to respect the temperature of our kitchen during bulk fermentation.
If your kitchen is cool, say below 70°F, that 3 to 5-hour bulk fermentation window I mentioned? You might need 6 or even 7 hours. Don’t rush it! You are looking for visual cues more than clock-watching. If you don’t see that 30% rise and bubbly skin, the dough isn’t ready to be shaped, and forcing it means your final bread will be dense. You can read way more about timing and temperature in my post on long fermentation with discard.
Once it’s shaped and tucked into the banneton, that cold proof in the fridge is your best friend. I insist on a minimum of 12 hours, but going up to 18 hours is ideal for developing that complex flavor and helping set the structure perfectly for that open crumb we want in our sourdough discard bread recipe. That cold rest is what makes the dough easy to handle when it comes out for baking, too!
Tips for Success with Your No Active Starter Bread Recipe
I’m going to share a few secrets I learned the hard way—because, trust me, I’ve made every rookie mistake possible when trying to master the no active starter bread recipe. Getting that gorgeous structure on a country loaf can feel tricky, but these three tips are non-negotiables for making sure your effort pays off.
First up: Dough Sticking! This is the most common frustration when dealing with higher hydration loaves like this one. Since we’re using parchment paper to lower the dough into the Dutch oven, you might think you’re safe, right? Wrong! Make sure you flour your banneton *generously* before the final proof, then when you turn the dough out for scoring, handle it minimally. I once forgot to flour my cloth liner, and when I went to score it, the dough just stuck there like glue! I ended up pulling half the dough with the towel, and the resulting loaf looked more like a pancake than an artisan bake. Lesson learned: Flour that basket well!
Next, let’s talk about slicing. This is my other big “Oops” moment. You pull that beautiful, steaming loaf out—the crust is dark, it smells incredible—and you just have to slice into it immediately, right? Don’t do it! I know the temptation is powerful, but slicing hot bread releases all that trapped steam way too fast. That steam is what keeps the crumb tender. If you slice it too soon, that beautiful open crumb you worked so hard for ends up gummy and slightly wet. Let it cool completely on a wire rack, ideally for at least two hours. It’s torture, I know, but it’s worth the wait for the perfect texture on your simple sourdough loaf recipe discard.

Finally, on bulk fermentation: when in doubt, wait longer. Since discard is less predictable than dedicated starter, you cannot rely 100% on the clock. If your house is cool, give it the extra hour or two until you see that visual puffiness and bubbling activity. Better a slightly late bulk than an under-proofed loaf that collapses in the oven!
Storage and Reheating Instructions for Homemade Country Bread Baking Guide
Okay, you’ve made the perfect loaf—that deep mahogany crust, that airy interior. Now, how do we keep it tasting amazing for days? It’s all about protecting that crunchy exterior we worked so hard to achieve in the Dutch oven.
My number one rule for storing real artisan bread like this homemade country bread baking guide recipe is simple: absolutely no plastic bags! Plastic traps moisture released by the bread, and that moisture immediately turns your beautiful, crackly crust into something soft and sad overnight. I always store my country loaves cut-side down on a flat cutting board, covered loosely with a clean tea towel. If you must cover the whole loaf, use a paper bag. This allows the bread to breathe while keeping crumbs contained.
Now, let’s talk about freshness. Even the best loaf eventually gets a little softer, especially if your kitchen is humid. Don’t toss it! Reviving that crust is one of the simplest kitchen joys.
Reviving that Perfect Crust
When you’re ready for a slice a day or two later, take your entire loaf (or half a loaf) and just dampen the surface lightly with a spray bottle of water—don’t soak it, just a light misting over the crust. Pop it back into that hot Dutch oven (you don’t need to preheat nearly as long, maybe 15 minutes at 400°F is enough for the second round). Bake it, lid off, for about 8 to 10 minutes.

Watch it closely! That blast of heat re-crisps the outside beautifully, and the internal moisture stays locked in. When it comes out, let it cool on the rack for about 15 minutes before slicing. That sound of the crust snapping back into shape when you cut into it? Pure magic. That’s how you keep enjoying this amazing sourdough discard bread recipe all week long!
Serving Suggestions for Your Rustic White Loaf Sourdough Discard
I often think baking the bread is only half the fun; the other half is deciding how to enjoy that beautiful, tangy crumb! Since this rustic white loaf sourdough discard has such a wonderful, classic flavor profile, it really pairs with almost anything. My philosophy here is always to let the bread shine. We don’t need fussy toppings when the internal structure is this good.
When I pull one of these loaves out of the oven, I try to wait the requisite two hours (it’s painful, I know!). The first thing that hits the table is usually just some ridiculously good, slightly salted butter. Don’t underestimate the power of quality ingredients here; a good European-style butter spread on a thick slice, still slightly warm, is heaven sent. That’s my confession for the day—simple truly is best sometimes!
For a more savory approach, especially if you’d like to use it for dipping (which, let’s be honest, is inevitable), you have to try it with good olive oil. I actually have a fantastic little recipe for a simple homemade olive oil dip that uses herbs and a touch of balsamic vinegar. That crisp crust grabs onto the oil perfectly, and it cuts through the mild acidity of the loaf beautifully. It’s perfect for an appetizer before a bigger meal.
Of course, this country loaf is also the absolute best companion to any hearty soup or stew you’re making, especially as the weather cools off. Forget croutons; just tear off huge chunks of this bread to sop up every last bit of broth. Think French onion soup, a hearty lentil stew, or even just a sharp tomato soup. The slight chewiness holds up against liquids without immediately disintegrating, which is exactly what we want in our sourdough discard bread recipe.
Honestly, once you nail that oven spring and get that crust right, you’ll find yourself looking for excuses to bake this regularly just so you can enjoy it fresh!
Frequently Asked Questions About the Country Loaf with Sourdough Discard
Can I skip the Dutch oven when making this sourdough discard bread recipe?
Oh, that’s a tough one! You *can* technically skip the Dutch oven for this sourdough discard bread recipe, but I’m going to be honest with you: you’ll lose that signature, crackly crust. The Dutch oven traps the steam released by the dough, and steam is what keeps the crust soft enough to expand dramatically before hardening. If you must skip it, you need to introduce artificial steam. Try this: put a metal pan on the rack below your baking stone, and right before you load the loaf, pour a cup of boiling water into that pan. Be careful, that created steam is intense! But even with that trick, the crust won’t be quite as dark or shatteringly crisp as when you use the Dutch oven for your country style sourdough bake.
What is the ideal consistency for sourdough discard in this recipe?
For this recipe, since we are aiming for a relatively high hydration (around 80% if you consider the discard, which is mostly water), we want your discard to be unfed and room temperature. The ideal consistency is slightly thinner than pancake batter—maybe what I’d call ‘thick yogurt.’ If your discard is sitting on the counter and it’s slumping over like pudding, it’s probably perfect! If it’s holding a stiff peak or is so thick you have to scoop it out, you might need to thin it down with just a teaspoon or two of water to help it fully incorporate into the initial mix against the flour. Consistency matters when you are baking a rustic white loaf sourdough discard!
My loaf didn’t rise much. What went wrong with my naturally leavened country bread tutorial?
When you’re succeeding with a naturally leavened country bread tutorial using discard, the weak link is almost always temperature control during bulk fermentation. Since discard doesn’t have the same powerful lift as a recently fed starter, it needs more time to work its magic, especially if your kitchen is chilly. If the loaf came out flat, it means the yeast and bacteria in the discard didn’t have enough time or warmth to create the gas needed for puff. Did you give it those full 3 to 5 hours, watching for the 30-50% volume increase? If your kitchen was under 68°F, you probably needed to let it go longer. Rushing the bulk fermentation is the number one killer for any artisan bread endeavor!
Share Your Country Loaf with Sourdough Discard Creations
I truly hope this recipe has brought you some pure joy in the kitchen! There’s nothing better than pulling a beautiful, rustic loaf out of your own oven. Now that you’ve mastered using your extra sourdough starter to make this incredible bread, I really want to see what you’ve baked!
Did you get that deep golden crust? Did you manage to get those beautiful, open air pockets inside your country loaf with sourdough discard? I’m always so incredibly proud of everyone who tackles artisan baking, and I’d absolutely love to hear about your experience.
If you loved this simple sourdough loaf recipe, please take a moment to leave a rating on the recipe card—it helps other home cooks find their own joy right here on Pure Cooking Joy! You can always check out more of my latest bakes and kitchen experiments over on the main blog page.
And please, snap a picture of your finished bake! Tag me on social media or drop a line in the comments below and tell me how it went. I read every single comment, and nothing makes me happier than hearing that one of these recipes made your day a little tastier. We are building this community together, one delicious, low-stress bake at a time. Tag us on Facebook here—I can’t wait to see your stunning country loaves!
PrintRustic Country Loaf Using Sourdough Discard
Bake a flavorful, rustic country loaf using your extra sourdough discard. This recipe provides clear steps for achieving an open crumb and a crisp crust without needing an active starter.
- Prep Time: 30 min
- Cook Time: 45 min
- Total Time: 13 hours 15 min
- Yield: 1 loaf 1x
- Category: Bread
- Method: Baking
- Cuisine: American
- Diet: Vegetarian
Ingredients
- 350g bread flour
- 150g whole wheat flour
- 350g water (lukewarm)
- 100g sourdough discard (unfed, room temperature)
- 10g fine sea salt
- 2g instant dry yeast (optional, for insurance)
Instructions
- Mix the flours, water, and sourdough discard in a large bowl until just combined. Cover and let it rest for 30 minutes (autolyse).
- Add the salt and yeast (if using) to the dough. Mix thoroughly by hand until the salt is incorporated and the dough starts to come together.
- Perform the first set of stretch and folds: Wet your hands, grab one side of the dough, stretch it up, and fold it over the center. Rotate the bowl 90 degrees and repeat three more times (four folds total). Cover and rest for 30 minutes.
- Repeat the stretch and folds every 30 minutes for the next 2 hours (total of 4 sets of folds). The dough should become smoother and stronger.
- Let the dough bulk ferment at room temperature (around 70°F) for 3 to 5 hours, or until it has increased in volume by about 30-50% and shows some bubbles. This timing depends on your kitchen temperature.
- Gently turn the dough out onto a lightly floured surface. Pre-shape the dough into a loose round. Let it rest, covered, for 20 minutes (bench rest).
- Shape the dough tightly into your final boule shape. Place it seam-side up in a well-floured banneton or bowl lined with a floured tea towel.
- Cold proof the dough in the refrigerator for 12 to 18 hours.
- Preheat your oven to 500°F (260°C) with a Dutch oven inside for at least 45 minutes.
- Carefully remove the hot Dutch oven. Gently turn the cold dough out onto a piece of parchment paper. Score the top surface deeply with a sharp blade.
- Carefully lower the dough (using the parchment paper handles) into the hot Dutch oven. Cover with the lid.
- Bake for 20 minutes with the lid on.
- Remove the lid, reduce the oven temperature to 450°F (232°C), and bake for another 20 to 25 minutes until the crust is deep golden brown.
- Remove the loaf from the Dutch oven and cool completely on a wire rack before slicing.
Notes
- If your discard is very old or stiff, you may need to add an extra 10-20g of water to reach the correct dough consistency.
- For a more open crumb, use the optional yeast and aim for a slightly longer bulk fermentation.
- Baking in a Dutch oven traps steam, which is key for achieving a crisp, rustic crust on your country loaf.
Nutrition
- Serving Size: 1 slice
- Calories: 250
- Sugar: 0.5
- Sodium: 450
- Fat: 1.2
- Saturated Fat: 0.2
- Unsaturated Fat: 1.0
- Trans Fat: 0.0
- Carbohydrates: 52
- Fiber: 2.5
- Protein: 9
- Cholesterol: 0
