 Skip to content

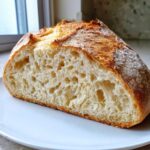
There is genuinely nothing on earth that beats the smell of fresh, homemade bread baking. Right? For the longest time, I thought that impossibly soft, pillowy texture—the kind that makes you want to close your eyes after the first bite—was something reserved for professional bakers. Nope! That feeling of burnout I had from my old job vanished the moment I pulled my first truly fluffy yeast bread recipe loaf out of the oven. I messed up so many times learning this, but I cracked the code, and now I can share the secrets to making bread that is unbelievably light and airy. Forget those hard, dense bricks; we’re making bread that feels like a cloud!
- Why This Fluffy Yeast Bread Recipe Delivers Maximum Softness
- Gathering Ingredients for Your Fluffy Yeast Bread Recipe
- Step-by-Step Instructions for the Best Fluffy White Bread
- Baking and Cooling Your Fluffy Yeast Bread Recipe Loaf
- Tips for How to Make Incredibly Soft Bread Every Time
- Troubleshooting Common Issues with Your Fluffy Yeast Bread Recipe
- Serving Suggestions for Your Soft Homemade Bread Recipe
- Storing and Reheating Your Fluffy Yeast Bread Recipe
- Frequently Asked Questions About Making Light and Airy Yeast Bread
Why This Fluffy Yeast Bread Recipe Delivers Maximum Softness
When you are aiming for that light and airy yeast bread texture, it’s not just about the yeast doing its job; it’s about what we feed that yeast and what we include in the dough! This recipe is engineered specifically to create a pillowy soft sandwich loaf every single time you bake. It’s all about technique, which I detail further on my page about making soft, fluffy loaves.

- It uses just the right amount of liquid to stay extremely hydrated without becoming a sticky mess.
- We avoid harsh mixing techniques that would develop too much gluten too soon.
- These specific ingredients coat the flour particles, leading to a softer mouthfeel.
The Role of Enriched Dough in a Fluffy Yeast Bread Recipe
What makes this dough feel rich? That’s the enrichment! It’s the name for adding fat, sugar, and dairy into a standard bread recipe. The butter, sugar, and whole milk in this formula aren’t just for flavor, though they certainly help there! These components essentially tenderize the dough by interfering with gluten development. This means the finished bread doesn’t become tough or chewy; instead, it stays wonderfully soft long after it cools down.
Gathering Ingredients for Your Fluffy Yeast Bread Recipe
Okay, let’s talk essentials! Getting the ingredients right means half the battle is already won when aiming for that soft texture. For this fluffy yeast bread recipe, precision matters, especially with the dairy and egg. You MUST use whole milk warmed up to that sweet spot between 105–115°F—that’s how we wake up the yeast! Trust me, grab a thermometer or just test it carefully. For more tips on using dairy in bread, you can check out my post on creamy, fluffy loaf recipes!
Here’s what you need:
- 1 cup whole milk, just warmed to the perfect temperature!
- 2 1/4 teaspoons active dry yeast (that’s one standard packet right there).
- 1/4 cup granulated sugar.
- 1/4 cup unsalted butter, make sure it’s softened up completely.
- 1 large egg, and this needs to be room temperature, please!
- 1 teaspoon salt.
- 3 1/2 to 4 cups all-purpose flour (we add the rest as needed later on!).
Ingredient Notes and Substitutions for the Fluffy Yeast Bread Recipe
If you only have instant yeast instead of active dry, just skip the “foaming” step and mix it right in with the dry ingredients later. Easy swap! For the flour, all-purpose works great for that soft crumb, but if you want an even better structure, you can swap about a cup of that for bread flour. The biggest non-negotiable, in my book, are the room temperature ingredients—the cold egg and milk will shock your yeast and give you a sluggish rise. We want energy, not sluggishness!
Step-by-Step Instructions for the Best Fluffy White Bread
This is the moment of truth! If you follow these steps precisely, I promise you’ll have the best fluffy white bread sitting on your counter. It all moves quickly once you get into the rhythm, and remember, we’re building confidence here. You’ll see why this is my go-to fluffy yeast bread recipe for beginner bakers, especially if you check out my tips for easy bread recipes for beginners!
Activating Yeast and Mixing the Fluffy Yeast Bread Recipe Dough
First things first: that milk. It needs to be warm, not hot! We’re looking for 105 to 115°F. Pour it in, sprinkle the yeast right on top, and just breathe for five minutes. If it gets foamy—yay! Your yeast is hungry and ready to work. If it does nothing, dump it and start that step over with warmer milk; a dead yeast packet means a flat loaf, and that’s a rookie mistake we aren’t making today!
Once you see foam, add your sugar, softened butter, the room temp egg, and the salt. Whisk it gently, just enough to get things mixed. Next, start adding your flour in stages, about 3 cups to start. Mix it with a sturdy wooden spoon until it gets too heavy to stir—that shaggy dough is what we want before we touch it!
Kneading Technique for a Perfectly Risen Yeast Bread
Turn that sticky mess out onto a lightly floured surface. This is where the magic happens for that airy structure. You need to knead with purpose for about 8 to 10 minutes. It’s going to feel sticky at first, but be brave! Only add the remaining flour one tablespoon at a time if the dough is refusing to behave and stick to everything in sight. The dough is done kneading when it feels smooth all over and you poke it lightly, and it slowly springs back at you. That indicates the gluten is developed just enough for a perfectly risen yeast bread.

Proofing Stages: Achieving the Homemade Bread with High Rise
Now we wait, but gently! Place the smooth dough ball into a lightly oiled bowl and cover it tightly. Let it hang out in a warm spot for an hour to an hour and a half until it’s completely doubled. Don’t rush this first rise; it builds all that flavor and strength. When it’s ready, punch it down gently to let the big air pockets deflate, shape it into a tight log, and pop it into your greased 9×5 loaf pan.
Cover it loosely again—it needs room to grow! This second rise takes about 30 to 45 minutes. Make sure it has crested about an inch over the top edge of the pan; that’s your visual cue for a homemade bread with high rise. Go ahead and preheat your oven to 375°F while that last rise is finishing up so the oven is ready to rock when the dough is!
Baking and Cooling Your Fluffy Yeast Bread Recipe Loaf
We’ve done all the hard work with mixing and proofing, now it’s time for the payoff! Slide that beautifully risen loaf into your preheated 375°F (190°C) oven. You’ll bake it for about 30 to 35 minutes. I always sneak a peek around the 25-minute mark to see that gorgeous golden-brown color forming. Don’t just rely on the clock, though! The absolute best way to tell if your fluffy yeast bread recipe is done is by checking the internal temperature; aim for 200 to 205°F right in the center.

Now, here is a critical step for maintaining that incredibly soft texture: don’t let it sit in the hot pan! Immediately tip that loaf out onto a wire cooling rack. If you let it sweat in the pan, the bottom crust will turn gummy, and we definitely don’t want that. You absolutely must let it cool completely on that rack before slicing. I know it’s tough waiting, but slicing into warm bread crushes those delicate air pockets we worked so hard to create. Check out some of my other baking secrets here: My guide to beautiful baking.
Tips for How to Make Incredibly Soft Bread Every Time
Okay, you’ve mastered the kneading and the rising, but these little moves here are what push this loaf from “good” to “the softest bread you ever made.” These are the small details I learned from my own frustrating failures, so please listen up! They truly help you achieve that pillowy soft sandwich loaf feeling.
If you want that crust to stay tender and not get hard and crackly, I have a brilliant finishing move for you. Literally the second the loaf comes out of the oven, while it’s still piping hot, grab a tablespoon of melted butter and brush it lightly all over the top surface. This stops any residual heat from hardening the crust and keeps it unbelievably soft.
Also, remember one of Grandma’s golden rules that I adopted for my fluffy yeast bread recipe: always use room temperature ingredients when you mix everything up. That slightly warm milk and the room temperature egg really help the yeast activate happily, which is necessary for a perfectly risen yeast bread!
Finally, if your kitchen is ever chilly—and I mean, who hasn’t tried baking on a cold winter day?—don’t let your dough sit sadly in the cold. My trick is to put the covered dough bowl right inside your oven, but don’t turn the heat on! Just turn the oven light on. That little bit of heat is enough to create the perfect cozy environment for a massive rise.
Troubleshooting Common Issues with Your Fluffy Yeast Bread Recipe
Even with the best blueprint, sometimes baking throws us a curveball! Don’t panic if your beautiful fluffy yeast bread recipe doesn’t turn out exactly as planned the first time. Most issues point right back to the beginning steps, usually involving the yeast or the kneading.
Problem 1: My loaf is dense and heavy, not airy. This is almost always a proofing issue or under-kneading. If the dough didn’t double during the first rise, the yeast wasn’t strong enough, or the environment was too cold. Next time, make sure your kitchen is warm! Also, check that you kneaded for the full 8 minutes to develop structure.
Problem 2: The dough didn’t rise enough during the second proof. Did you punch it down too aggressively? Sometimes we get overzealous and knock out all the built-up gas! Be gentle when you deflate it before shaping. If you want to learn more about building strong structures, I have a detailed guide on starter management, which helps with active long-term yeast health.
Problem 3: The crust is too hard. While I love the butter brush trick, if your crust is rock-hard, your oven might have been running a little too hot, or you skipped the initial cooling step. Remember, don’t slice it until it’s cool, and always brush with butter immediately after it comes out of the oven!
Serving Suggestions for Your Soft Homemade Bread Recipe
Now that you’ve got this unbelievably soft homemade bread recipe under your belt, the possibilities are endless! Yes, it makes the absolute best, most feather-light sandwiches you’ve ever had—no more squished bread! But don’t stop there! Because this loaf is so tender and slightly enriched, it transforms beautifully.
I adore slicing up leftover pieces and using them for French Toast the next morning; they soak up the custard without falling apart! You can easily tuck this dough into muffin tins for incredibly soft individual dinner rolls, too. And seriously, if you’re looking for a new sweet treat using that soft dough vibe, you have to check out my recipe for Cinnamon Roll Cake. It uses that same comforting, fluffy dough base!
Storing and Reheating Your Fluffy Yeast Bread Recipe
Keeping your loaf perfectly soft after the first day is key! For the best texture retention, store your cooled bread in an airtight container at room temperature. Don’t stick it in the fridge unless you absolutely must, because that’s where bread goes to get hard fast. If you find your gorgeous fluffy yeast bread recipe loaf has firmed up a bit by day two, don’t fret!
To bring back that fresh-from-the-oven softness, give it a quick zap. You can microwave a slice wrapped in a slightly damp paper towel for about 10 seconds. Or, for the *best* results, wrap the whole loaf loosely in foil and pop it into a 300°F oven for about 5 minutes. It’ll be pillowy again!
Frequently Asked Questions About Making Light and Airy Yeast Bread
I know baking bread can bring up a ton of questions, especially when you’re chasing that perfect **light and airy yeast bread** texture. Don’t worry, that’s why I’m here! I’ve gathered the ones I get asked the most about this fluffy yeast bread recipe. If you have other questions, feel free to ask them over on my Facebook page!
Can I use instant yeast instead of active dry yeast in this recipe?
Yes, you absolutely can! If you have instant yeast, you get to skip Step 1 entirely—no need to wait for that foamy bloom! Just whisk the instant yeast right in with your dry ingredients (most of the flour, salt, and sugar) before you start adding the wet ingredients. It’s one less step, but you still need to make sure you knead it long enough to get that beautiful structure that supports a **high rise**.
Why is my dough so sticky even after adding all the flour?
Sticky dough is normal at the start, but if it’s still sticky after you’ve added the full 4 cups of flour and kneaded for 8 minutes, it might be your humidity! Don’t panic and just dump sugar in there! If you live somewhere humid, your flour has absorbed more moisture already. The key to preventing a gummy loaf is to resist adding too much extra flour during the knead. If it’s just *barely* manageable, trust the process—it will tighten up nicely during the first rise. For more on texture fixes, check out my visual guide to airy bread texture!

Is this bread good for freezing?
It freezes wonderfully! This is a great feature of a sturdy, enriched loaf like ours. Once the loaf is completely cooled—and I mean fully cool—slice it up. Place parchment paper between the slices if you want to pull them out individually later. Wrap the entire stack tightly in plastic wrap first, and then foil. Freeze it for up to three months! When you want a slice, just unwrap it and microwave it briefly as I mentioned before.
How do I get that super soft crust I see in pictures?
Oh, that’s my favorite trick! That gorgeous, almost shiny soft crust comes from brushing the top immediately after it comes out of the oven with melted butter, but you have to be fast. Also, if you’re looking for an easier method for leftovers, you can connect with me and share your baking adventures over on Pure Cooking Joy on Facebook! It creates a seal that locks in moisture and keeps the exterior tender.
PrintThe Best Fluffy Yeast Bread Recipe for Incredibly Soft Loaves
Follow this detailed guide to make a light, airy, and pillowy soft homemade bread that is perfect for sandwiches or dinner rolls. This no-fail recipe builds confidence for beginners.
- Prep Time: 20 min
- Cook Time: 35 min
- Total Time: 2 hours 5 minutes
- Yield: 1 loaf 1x
- Category: Baking
- Method: Kneading and Baking
- Cuisine: American
- Diet: Vegetarian
Ingredients
- 1 cup whole milk, warmed to 105-115°F (40-46°C)
- 2 1/4 teaspoons active dry yeast (one standard packet)
- 1/4 cup granulated sugar
- 1/4 cup unsalted butter, softened
- 1 large egg, room temperature
- 1 teaspoon salt
- 3 1/2 to 4 cups all-purpose flour, plus more for dusting
Instructions
- Warm the milk in a small saucepan or microwave until it reaches 105-115°F. Pour the warm milk into a large bowl and sprinkle the yeast over the top. Let it sit for 5 to 10 minutes until foamy. This proves your yeast is active.
- Add the sugar, softened butter, egg, and salt to the yeast mixture. Whisk gently until combined.
- Gradually add 3 cups of the flour, mixing with a wooden spoon until a shaggy dough forms.
- Turn the dough out onto a lightly floured surface. Knead the dough for 8 to 10 minutes, adding the remaining flour one tablespoon at a time only as needed to prevent sticking. The dough is ready when it is smooth, elastic, and springs back slowly when poked.
- Place the dough in a lightly oiled bowl, turning it once to coat. Cover the bowl tightly with plastic wrap or a clean kitchen towel. Let the dough rise in a warm place for 1 to 1.5 hours, or until it has doubled in size. This is the first rise.
- Gently punch down the risen dough to release the air. Turn it onto a lightly floured surface. Shape the dough into a tight loaf and place it into a greased 9×5 inch loaf pan.
- Cover the pan loosely and let the dough rise again in a warm spot for 30 to 45 minutes, or until the dough has crested about 1 inch above the rim of the pan. This is the second rise. Preheat your oven to 375°F (190°C) during the last 15 minutes of the second rise.
- Bake for 30 to 35 minutes, or until the top is golden brown and the internal temperature reaches 200-205°F (93-96°C).
- Remove the bread from the pan immediately and cool completely on a wire rack before slicing for the softest texture.
Notes
- For an extra soft crust, brush the top of the loaf with melted butter immediately after removing it from the oven.
- If your kitchen is cold, place the covered dough bowl inside your oven with just the light turned on to create a warm proofing environment.
- Use room temperature ingredients, especially the egg and milk, to help the yeast activate consistently.
Nutrition
- Serving Size: 1 slice
- Calories: 150
- Sugar: 4g
- Sodium: 180mg
- Fat: 4g
- Saturated Fat: 2g
- Unsaturated Fat: 2g
- Trans Fat: 0g
- Carbohydrates: 26g
- Fiber: 1g
- Protein: 4g
- Cholesterol: 20mg
