 Skip to content

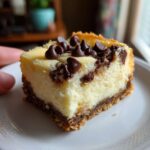
Hey there! Welcome back to Pure Cooking Joy. You know, after a long week, sometimes the best reward isn’t some complicated, multi-day baking project—it’s something simple, rich, and utterly satisfying. That’s exactly what these chocolate chip cheesecake bars are for me. We’re talking about that luxurious, creamy center hugging a buttery graham cracker base, studded with pools of melted chocolate. Trust me, these are the sweet squares that brought me genuine peace when I was first finding my footing outside the corporate world. Forget the stress; making truly decadent desserts can be easy! If you want to know more about my journey from spreadsheets to saucepans, you can check out my story right here on the about page.
- Why You Need These Easy Chocolate Chip Cheesecake Bars
- Gathering Ingredients for Perfect Chocolate Chip Cheesecake Bars
- Step-by-Step: How to Make Chocolate Chip Cheesecake Bars
- Expert Tips for Bakery Style Chocolate Chip Cheesecake Bars
- Ingredient Substitutions for Your Chocolate Chip Cheesecake Bars
- Storage and Make Ahead Tips for These Rich Chocolate Dessert Squares
- Serving Suggestions for Layered Dessert Bars
- Frequently Asked Questions About Chocolate Chip Cheesecake Bars
- Share Your Best Chocolate Chip Bars Experience
Why You Need These Easy Chocolate Chip Cheesecake Bars
If you’re looking for that perfect potluck contribution or just a simple chocolate chip baking idea that delivers big on flavor without taking all day, this is it. These aren’t just good; they are some of the best chocolate chip bars I’ve ever made. They have the rich flavor we all love.
- They offer that perfect cheesecake texture—super creamy inside—without any fuss.
- The base is basically impossible to mess up: a simple, sturdy graham cracker crust cheesecake hybrid.
- These are absolutely top-tier dessert bars for parties because they travel so well once chilled.
- They are fantastic as make ahead cheesecake desserts; the flavor deepens overnight!

Gathering Ingredients for Perfect Chocolate Chip Cheesecake Bars
You know, getting the ingredients right is half the battle won when you’re aiming for those bakery style cheesecake bars we crave. The beauty of this recipe is that it sticks mostly to standard pantry staples, which makes whipping up these rich chocolate dessert squares so approachable. Pay close attention to the texture of your cream cheese—that’s truly crucial for a smooth filling, not a lumpy one. Don’t skimp on the good chocolate chips either; they really shine through!
For the Graham Cracker Crust
This base sets up fast and provides the perfect salty-sweet contrast to the creamy top layer. Make sure you press this down *really* firmly into that parchment-lined pan. A loose crust means a messy bar later, and we want neat, beautiful squares!
- 1 1/2 cups graham cracker crumbs
- 1/4 cup granulated sugar
- 6 tablespoons unsalted butter, melted
For the Creamy Chocolate Chip Cheesecake Filling
This is where the magic happens, folks. For the best results when baking with cream cheese, take it out way ahead of time. I mean it—the cream cheese needs to be fully softened to room temperature. If you try to beat cold cream cheese, you’re going to end up with little annoying clumps, and we want that texture seamless and dreamy.
- 16 ounces cream cheese, softened
- 1 cup granulated sugar
- 1 teaspoon vanilla extract
- 3 large eggs
- 1 cup semi-sweet chocolate chips
Step-by-Step: How to Make Chocolate Chip Cheesecake Bars
Okay, we have our fantastic ingredients ready to go, and I promise this is the easy part! We’re going to move quickly but deliberately here, especially when mixing the filling, because technique is everything when you’re aiming for that ideal texture in these baked cheesecake bars. Remember that loaf of bread I struggled with? Well, overmixing is like over-kneading for bread—it develops too much structure and ruins the gentle creaminess we need here. We’re treating this batter tenderly, just like we learned to develop a gentle hand with dough! If you want a peek at my bread journey, check it out!
Preparing the Crust and Preheating
First things first: get that oven humming at 350 degrees F. Before anything else, prepare your 9×13 pan by lining it with parchment paper. You want a good overhang on two sides—this is our handle later! Mix those graham cracker crumbs, the tiny bit of sugar for the crust, and the melted butter until it looks like wet sand. Press it down firmly into the bottom of your prepared pan. Pop that crust into the oven for exactly 10 minutes. This sets it up so it doesn’t get soggy when the wet filling goes on top.
Mixing the Creamy Chocolate Chip Cheesecake Filling
Time to get that mixer out for the filling. Start with the softened cream cheese—make sure it’s completely soft! Beat it until it’s gloriously smooth. Then, slowly add the cup of sugar and the vanilla, beating until it’s light and fluffy, just like frosting. Now, here’s the important part for that perfect cheesecake texture: add the eggs one at a time. You must mix *just* until the yolk disappears before adding the next one. I can’t stress this enough: **Do not overmix the batter** once those eggs are in; we want smooth, not airy and crackly!
Baking and Slow Cooling for Perfect Cheesecake Texture
Gently fold in those semi-sweet chocolate chips. Don’t use the mixer for this—use a spatula! Pour that creamy mixture right over your warm, pre-baked crust. Slide it into the oven and bake for about 30 to 35 minutes. You want the edges set firm, but the very center should still have a tiny bit of wobble when you gently shake the pan. Once it hits that point, turn the oven *off*. Prop the door open slightly with a wooden spoon or oven mitt. Let the bars cool slowly inside the oven for a full hour. This gradual temperature drop is the secret weapon against the dreaded cheesecake crack!

Chilling and Serving Your Chocolate Chip Cheesecake Bars
After the hour in the warm oven, take them out completely and let them cool on the counter until they reach room temp. Seriously, they need time to settle before chilling. Once fully cooled, cover the pan and move them to the refrigerator. They *must* chill for at least 4 hours, but honestly, they are infinitely better if you leave them overnight. When it’s time to cut your beautiful rich chocolate dessert squares, use those parchment overhangs to lift the entire block out onto a cutting board. Slice them carefully, and wow—pure joy right there!
Expert Tips for Bakery Style Chocolate Chip Cheesecake Bars
Achieving true bakery style cheesecake bars requires a little dance between heat and patience. I remember the first time I tried baking these years ago; I pulled them out too soon, and the center looked like soup! But I’ve learned a few tricks since then to guarantee that dreamy, creamy chocolate chip cheesecake filling. If you’re aiming for a professional look, focus heavily on the temperature control during baking and cooling. That slow cool-down is non-negotiable for perfect results in these baked cheesecake bars.
Don’t forget that the quality of your chocolate matters immensely here. While using standard chips works great, if you want to elevate this into a more gourmet dessert bar experience, reach for chopped high-quality dark chocolate instead. It melts a bit differently and adds a complexity that just sings against the sweet cream cheese base. I found a fantastic resource on avoiding cracks if you’re worried about surface tension!

Ingredient Substitutions for Your Chocolate Chip Cheesecake Bars
Sometimes we look in the pantry and realize we’re missing that one specific item, or maybe we just want to change things up a little! That’s perfectly fine. Part of finding joy in cooking is adapting recipes to what you have on hand or what you’re craving. While this recipe sings with standard ingredients, here are a few swaps you can make without ruining the final product.
Let’s talk crust first. If you don’t have graham crackers, don’t panic! You can absolutely use substitute cookies for the graham cracker crust cheesecake base. Shortbread cookies or vanilla wafers work beautifully; just pulse them in your food processor until they resemble fine crumbs and use them in place of the graham crackers. You might need to slightly adjust the amount of melted butter if the crumbs are drier or more absorbent, so keep an eye on that crumbly texture.
Now for the chocolate chips; this is fun because you can customize it so much! If semi-sweet is too intense for you, go for milk chocolate chips for a sweeter overall result. If you’re feeling fancy and want those decadent dessert squares, grab some dark chocolate or even high-quality chopped chocolate bars. Another fun option is to use mini chocolate chips, which tend to distribute more evenly throughout the filling, giving you a bite of chocolate in almost every square.
For just a subtle flavor twist, you could trade out half of the vanilla extract for almond extract, but use it sparingly—a little goes a long way! These small changes allow you to make this recipe truly your own for your next batch of sweet square recipes.
Storage and Make Ahead Tips for These Rich Chocolate Dessert Squares
The best part about these decadent squares? They are fantastic make ahead cheesecake desserts! You can totally bake them on a Friday and they’ll taste even better by Saturday afternoon. Once they are completely chilled—and I mean *cold*—wrap the entire slab tightly in plastic wrap, then maybe another layer of foil. Keep them in the fridge for up to four days. Honestly, they are best served straight from that chill. If you must freeze them, wrap them extra securely, but I find the texture is just unbeatable when fresh from the fridge. We want to keep that creamy bite intact!
If you decide to freeze them, just transfer the wrapped bars to an airtight container. Check out some more of my favorite make ahead recipes here. Do yourself a favor and plan to bake these the day before you need them!
Serving Suggestions for Layered Dessert Bars
Once these beauties have chilled perfectly and you’ve used that parchment overhang to lift out the whole block, the presentation step is where you can add a little extra flair for your guests. Since these are already rich and packed with flavor from the chocolate chips, you don’t need complicated toppings. We’re aiming for easy entertaining, remember?
My favorite way to serve these when I have company over is with a simple, crisp contrast. A small, light dollop of homemade whipped cream right on top of each square pulls the richness back perfectly. If you happen to have some fresh berries lying around—raspberries or maybe some sliced strawberries—just toss a couple on the side of the plate. The tartness cuts through the sweet cream cheese beautifully.
For a really quick and elegant finish, especially if you’re serving them on a platter, take a small fine-mesh sieve and just lightly dust the tops with unsweetened cocoa powder. It looks incredibly professional, like something you picked up from a fancy bakery, but it took you literally ten seconds! It’s all about little touches like that to make your dessert bars for parties shine. For more inspiration on simple ways to dress up snacks for guests, take a peek at my tips for easy entertaining!

Frequently Asked Questions About Chocolate Chip Cheesecake Bars
I usually get a flood of questions after a recipe like this goes live because everyone wants to make sure their baked cheesecake bars come out flawless! Cheesecake can feel intimidating, but trust me, with these tips, you’ll master it. We want maximum flavor and zero stress. If you have more cooking questions after this, you can always browse my latest posts on the main blog page!
What is the secret to achieving a creamy chocolate chip cheesecake texture?
This is the most common question, and it comes down to two things we talked about! First, your cream cheese absolutely must be fully softened to room temperature—no cheating here! Second, once you add the eggs, you stop trying to whip air into it. Only mix until the egg is barely incorporated. Overbeating after the eggs go in is what creates air bubbles that collapse during cooling, leading to a grainy or cracked top instead of that gorgeous, creamy chocolate chip cheesecake filling.
Are these the best chocolate chip bars for potlucks?
Oh, without a doubt! I consider them some of the best dessert bars for parties, hands down. Unlike a full cheesecake that you have to carefully transport on a precarious platter, these are sturdy. Because we baked them in a 9×13 pan and made sure to chill them thoroughly, they cut cleanly into firm squares. You can stack them easily in a container, and they hold up beautifully on a buffet table for hours!
Can I use a water bath for these bars?
That’s a great question for anyone nervous about cracking! For a traditional tall New York cheesecake, I always recommend a water bath, but honestly, for these thinner easy cheesecake dessert bars, I skip it. Relying on the slow cooling process inside the turned-off oven (remember Step 6?) gives you the same crack prevention benefit without the hassle of wrapping your pan in foil and dealing with messy water!
Why should I chill them overnight instead of just 4 hours?
While four hours *will* set them enough to cut, chilling overnight truly transforms these treats. When they set overnight, the flavors meld perfectly, and that graham cracker crust gets the right amount of moisture absorption without becoming soggy. It makes the bars taste so much richer, crossing over into that decadent square territory!
Share Your Best Chocolate Chip Bars Experience
If these squares brought a little joy to your kitchen, I’d absolutely love to hear about it! Please leave a star rating below and tell me how they turned out in the comments. Seeing your creations makes my day! You can also tag me in your photos over on Facebook if you share your photo online!
PrintEasy Chocolate Chip Cheesecake Bars
Make rich, creamy chocolate chip cheesecake bars with a simple graham cracker crust. This recipe delivers bakery style cheesecake bars perfect for parties or make ahead desserts.
- Prep Time: 20 min
- Cook Time: 35 min
- Total Time: 4 hours 55 min
- Yield: 24 servings 1x
- Category: Dessert
- Method: Baking
- Cuisine: American
- Diet: Vegetarian
Ingredients
- 1 1/2 cups graham cracker crumbs
- 1/4 cup granulated sugar (for crust)
- 6 tablespoons unsalted butter, melted
- 16 ounces cream cheese, softened
- 1 cup granulated sugar (for filling)
- 1 teaspoon vanilla extract
- 3 large eggs
- 1 cup semi-sweet chocolate chips
Instructions
- Preheat your oven to 350 degrees F. Line a 9×13 inch baking pan with parchment paper, leaving an overhang for easy removal.
- Prepare the crust: In a medium bowl, mix the graham cracker crumbs, 1/4 cup sugar, and melted butter until combined. Press the mixture firmly and evenly into the bottom of the prepared pan. Bake for 10 minutes. Remove from the oven and set aside.
- Prepare the filling: In a large bowl, beat the softened cream cheese with an electric mixer until smooth. Gradually add the 1 cup of sugar and beat until light and fluffy. Mix in the vanilla extract.
- Beat in the eggs one at a time, mixing just until each egg is incorporated. Do not overmix the batter.
- Gently fold in the chocolate chips. Pour the cheesecake filling over the warm crust.
- Bake for 30 to 35 minutes, or until the edges are set and the center is mostly firm but still slightly jiggly.
- Turn off the oven, prop the door open slightly, and let the bars cool inside the oven for 1 hour. This slow cooling helps prevent cracking and achieves a perfect cheesecake texture.
- Remove the pan from the oven and let it cool completely on a wire rack. Once cool, chill in the refrigerator for at least 4 hours, or preferably overnight, before cutting into squares.
Notes
- For easy cutting, use the parchment paper overhang to lift the entire chilled block out of the pan before slicing.
- If you prefer a slightly more gourmet dessert bars experience, use high-quality dark chocolate chips.
- To achieve a creamy chocolate chip cheesecake filling, make sure your cream cheese is fully softened to room temperature before mixing.
Nutrition
- Serving Size: 1 bar
- Calories: 250
- Sugar: 20g
- Sodium: 150mg
- Fat: 16g
- Saturated Fat: 10g
- Unsaturated Fat: 6g
- Trans Fat: 0g
- Carbohydrates: 24g
- Fiber: 1g
- Protein: 4g
- Cholesterol: 55mg
