 Skip to content

Got way too much zucchini from the garden? I totally get it! That feeling of being absolutely buried in zucchini is so real, and trust me, I’ve been there. My kitchen used to be the last place I wanted to be when I was stressed from my old corporate job, but discovering how to make simple, delicious food changed everything for me. It brought pure joy, just like this recipe for sweet zucchini relish!
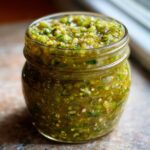
When I first started cooking, I wanted recipes that were easy but packed with flavor, and that’s exactly what this zucchini relish is. It’s that classic, old-fashioned zucchini relish you remember, but with a tested balance of sweet and tangy notes that’s just perfect. It’s amazing for preserving all that garden goodness, turning a surplus harvest into a flavorful condiment you’ll want to use all year long. It’s one of those simple wins that makes you feel so good about what you’ve created!

- Why You'll Love This Zucchini Relish Recipe
- Ingredients for Your Garden Zucchini Relish
- How to Prepare Your Zucchini Relish
- Tips for Perfect Old-Fashioned Zucchini Relish
- Serving Your Sweet Zucchini Relish
- Low-Sugar Zucchini Relish Variations
- Frequently Asked Questions About Zucchini Relish
- Storing Your Homemade Zucchini Relish
- Share Your Zucchini Relish Creations!
Why You’ll Love This Zucchini Relish Recipe
Seriously, this zucchini relish is a game-changer for your garden surplus! Here’s why it’s so great:
- Super Simple to Make: Even if you’re new to canning, this recipe is totally approachable. You can make a big batch without fuss!
- That Perfect Sweet & Tangy Flavor: It’s got that classic old-fashioned taste that’s just *chef’s kiss* – not too sweet, not too sour, just right!
- So Versatile: Honestly, it goes with EVERYTHING. Burgers, hot dogs, sandwiches, grilled chicken, even on a cheese board. It’s a flavor booster!
- Preserves Your Harvest: It’s the perfect way to use up all that zucchini and have a delicious homemade condiment all year round.
Ingredients for Your Garden Zucchini Relish
Alright, let’s get down to what you’ll need for this fabulous garden zucchini relish. It’s pretty straightforward and uses stuff you probably already have in your pantry!
- 6 cups chopped zucchini (about 2 lbs): Make sure you chop it pretty small, like half-inch pieces. Fresh home-grown zucchini is best, but whatever you’ve got will work!
- 2 cups chopped onion (about 1 large): I usually just use a yellow onion, but a sweet onion is great too. Chop it up nice and fine.
- 1/2 cup salt: Don’t worry, we rinse most of this out later! It’s key for pulling moisture out of the zucchini so your relish isn’t watery.
- 3 cups granulated sugar: Yep, that’s a good amount, but it’s what makes it that classic sweet relish. We’ll talk about tweaking it later!
- 1 1/2 cups white vinegar: This gives it that zippy tang and acts as a preservative.
- 1 tablespoon mustard seed: For that little pop of flavor and texture.
- 1 teaspoon celery seed: Adds a lovely, subtle aroma and taste.
- 1 teaspoon turmeric: This gives our relish that beautiful golden color!
- 1/2 teaspoon black pepper: Just a hint of warmth.

How to Prepare Your Zucchini Relish
Okay, getting this sweet zucchini relish made is really pretty easy once you know the steps. It’s more about a little patience and following along. Trust me, the end result is SO worth it for that homemade, old-fashioned zucchini relish taste!
Step 1: Preparing the Zucchini and Onion
First things first, get your zucchini and onion chopped up small. Then, we’re going to toss them in a big bowl with that 1/2 cup of salt. Give it a good mix so everything’s coated. Now, here’s the important part: let it sit for about 2 hours. This is going to pull out all the extra water from the veggies, which is exactly what we want so our relish isn’t watery. After those 2 hours, you’ll want to drain it really, really well. I usually rinse it under cold water a couple of times to get the salt off, and then squeeze out as much liquid as you can. Squeeze it good!
Step 2: Cooking the Zucchini Relish
Now for the fun part – turning all those veggies into delicious relish! Grab a nice big pot because this will bubble up a bit. Dump in your drained zucchini and onion. Then, add all that sugar (don’t worry, we’ll talk about tweaking it later!), the vinegar, mustard seed, celery seed, turmeric (hello, gorgeous color!), and black pepper. Give it all a good stir to make sure the sugar starts to dissolve.
Turn the heat up to medium-high and bring it all to a boil, stirring pretty often. Once it’s boiling, turn the heat down to low so it’s just simmering. Let it simmer uncovered for about 20 minutes. You’ll see it start to bubble and thicken up a bit. Just stir it every so often so nothing sticks to the bottom. It should smell absolutely amazing at this point!
Step 3: Canning Your Zucchini Relish
Alright, if you’re canning this (which I highly recommend for preserving all that yummy goodness!), now’s the time to get your jars ready. Make sure they and the lids are super clean and hot – follow the canning kit directions for that. Carefully ladle the hot relish into your hot jars, leaving about a half-inch of space at the top. This is called headspace, and it’s important!
Run a little knife or a clean skewer around the inside of the jar to pop any air bubbles you see. Wipe the rims of the jars really well with a clean cloth; any little bit of relish on the rim can stop them from sealing. Then, put the lids on and screw them down finger-tight. Pop them into your boiling water bath canner, making sure they’re covered with water, and boil them for the time it says in the recipe (10 minutes usually, but check if you’re at a higher altitude!).
Once they’re done processing, carefully take the jars out and let them cool completely on a towel-lined counter. You’ll usually hear them pop as they seal, which is such a satisfying sound! Just double-check that the lids are sucked down firmly before storing them.

Tips for Perfect Old-Fashioned Zucchini Relish
You know, making this zucchini relish is pretty foolproof, but I’ve picked up a few little tricks over the years that really make it shine. It’s all about those simple things that ensure you get that perfect taste and texture every single time you make this old-fashioned zucchini relish!
First off, when you’re picking your zucchini, try to use younger, smaller ones if you can. They tend to have fewer seeds and less water, which means you get a thicker, more flavorful relish. And remember that draining and rinsing step for the zucchini and onion? Don’t skip it, and really squeeze that water out! It’s probably the most important part for getting a nice, thick relish instead of a watery sauce. For canning, make absolutely sure your jars and lids are super clean and hot; this is what helps them seal properly and keeps your delicious relish safe to enjoy later!
Serving Your Sweet Zucchini Relish
This sweet zucchini relish is SO good on just about everything! My favorite way to use it is on a classic hot dog or a juicy burger – it adds that perfect zing. But don’t stop there! It’s also amazing with grilled chicken or pork, mixed into a tuna salad sandwich, or even spooned over some creamy Havarti cheese. Seriously, it’s a little jar of pure deliciousness that makes everything taste better!
Low-Sugar Zucchini Relish Variations
You know, sometimes you want that amazing sweet zucchini relish flavor but are trying to cut back on sugar. I totally get it! You can definitely make a lower-sugar version of this recipe. Just try reducing the sugar to about 2 cups instead of 3. It will still be delicious and have that great tangy kick from the vinegar!
Now, a little heads-up: using less sugar might change how long the relish stays perfectly preserved when canning, and it can subtly change the flavor profile too, making it a bit more tart. But honestly, it’s still fantastic, especially if you plan to keep it in the fridge and use it up within a few weeks instead of long-term canning!
Frequently Asked Questions About Zucchini Relish
Got questions about making this sweet zucchini relish? I’ve got answers! It’s totally normal to wonder about the bits and pieces, especially when you’re canning. Let’s clear a few things up so you feel super confident!
Can I make zucchini relish without canning?
Oh, absolutely! If you’re not canning or can’t get to it right away, you can totally make a smaller batch or just store the finished relish in the fridge. Keep it in an airtight container, and it should last a good 3-4 weeks. It’s still super delicious on burgers and hot dogs!
How long does homemade zucchini relish last?
When you can it properly using the boiling water bath method, this old-fashioned zucchini relish is good on the shelf for about a year, maybe even longer! Always check that the lid is still sealed tight before you open it, though. If you store it in the fridge, aim to use it within a month or so.
My zucchini relish seems a bit watery. What did I do wrong?
That’s a common thing! The biggest culprit is usually not draining and squeezing out enough liquid from the zucchini and onion after the initial salting. Really give those veggies a good squeeze to get as much moisture out as possible before you cook it. Also, make sure you simmer it uncovered as the recipe says; that helps the excess moisture evaporate.
Can I use different types of vinegar for zucchini relish?
While white vinegar is classic and gives it that perfect tang that also helps preserve it, some people like experimenting. Apple cider vinegar could give it a slightly fruity note, but white vinegar is really the go-to for that classic sweet pickle relish flavor and reliable preservation. Stick with white vinegar for this recipe, especially if you’re canning!

Storing Your Homemade Zucchini Relish
Okay, so you’ve gone through all the steps, and you’ve got these beautiful jars of homemade zucchini relish! Now, how do you keep that deliciousness fresh? First, always double-check that the lids are sealed tight – when you press the center, it shouldn’t flex at all. If a jar didn’t seal, just pop it in the fridge and use it up within a few weeks! For the sealed jars, store them in a cool, dark place like your pantry. They’ll stay amazing on the shelf for about a year, maybe even longer!
Share Your Zucchini Relish Creations!
I just LOVE hearing from you all! Have you made this sweet zucchini relish? What did you serve it on? I’d be so thrilled if you’d leave a comment below or share your experience below. Your feedback makes my day and helps other cooks too!
PrintSweet Zucchini Relish for Canning
A sweet and tangy zucchini relish perfect for canning. Use your garden surplus to create a delicious condiment for hot dogs, burgers, and more.
- Prep Time: 30 min
- Cook Time: 30 min
- Total Time: 2 hr 30 min
- Yield: About 6 pints 1x
- Category: Condiments
- Method: Canning
- Cuisine: American
- Diet: Vegetarian
Ingredients
- 6 cups chopped zucchini (about 2 lbs)
- 2 cups chopped onion (about 1 large)
- 1/2 cup salt
- 3 cups granulated sugar
- 1 1/2 cups white vinegar
- 1 tablespoon mustard seed
- 1 teaspoon celery seed
- 1 teaspoon turmeric
- 1/2 teaspoon black pepper
Instructions
- Combine chopped zucchini and onion in a large bowl. Sprinkle with salt and toss to coat. Let stand for 2 hours.
- Drain the zucchini and onion mixture. Rinse thoroughly under cold water and drain again very well.
- In a large pot, combine the drained zucchini and onion with sugar, vinegar, mustard seed, celery seed, turmeric, and black pepper.
- Bring the mixture to a boil over medium-high heat, stirring to dissolve the sugar.
- Reduce heat and simmer for 20 minutes, stirring occasionally, until the relish has thickened slightly.
- While the relish simmers, prepare your canning jars and lids according to manufacturer instructions.
- Ladle the hot relish into hot canning jars, leaving 1/2 inch headspace. Remove air bubbles.
- Wipe jar rims and screw on lids fingertip tight.
- Process jars in a boiling water bath for 10 minutes (adjust for altitude if necessary).
- Remove jars from canner and let cool completely on a towel-lined counter. Check seals.
Notes
- For a lower-sugar version, you can reduce the sugar to 2 cups, but this may affect the preservation quality.
- This relish is excellent on hot dogs, burgers, sandwiches, or served with grilled meats.
- Ensure your canning equipment is clean and sterilized to prevent spoilage.
Nutrition
- Serving Size: 2 tablespoons
- Calories: 50
- Sugar: 12g
- Sodium: 200mg
- Fat: 0g
- Saturated Fat: 0g
- Unsaturated Fat: 0g
- Trans Fat: 0g
- Carbohydrates: 13g
- Fiber: 0g
- Protein: 0g
- Cholesterol: 0mg
