 Skip to content
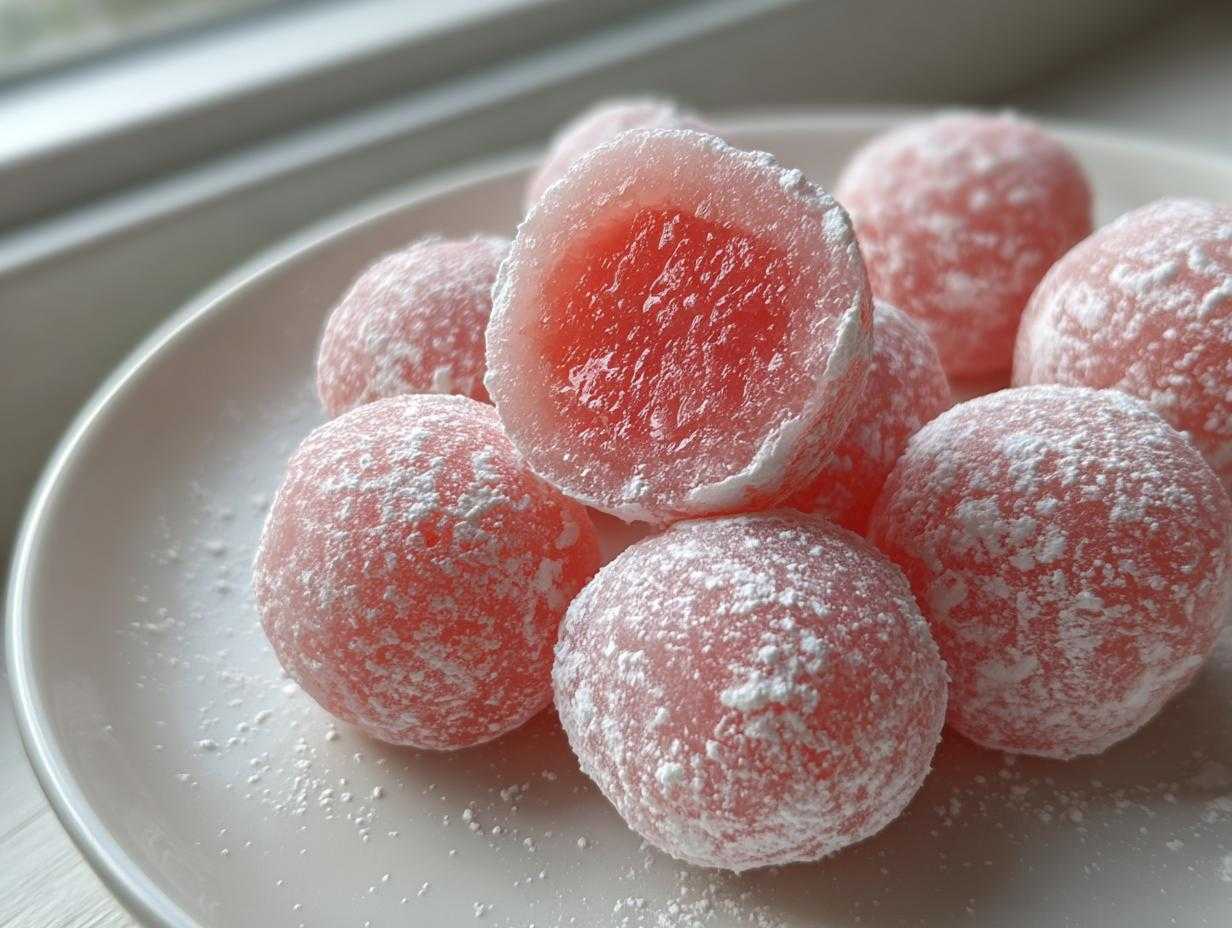

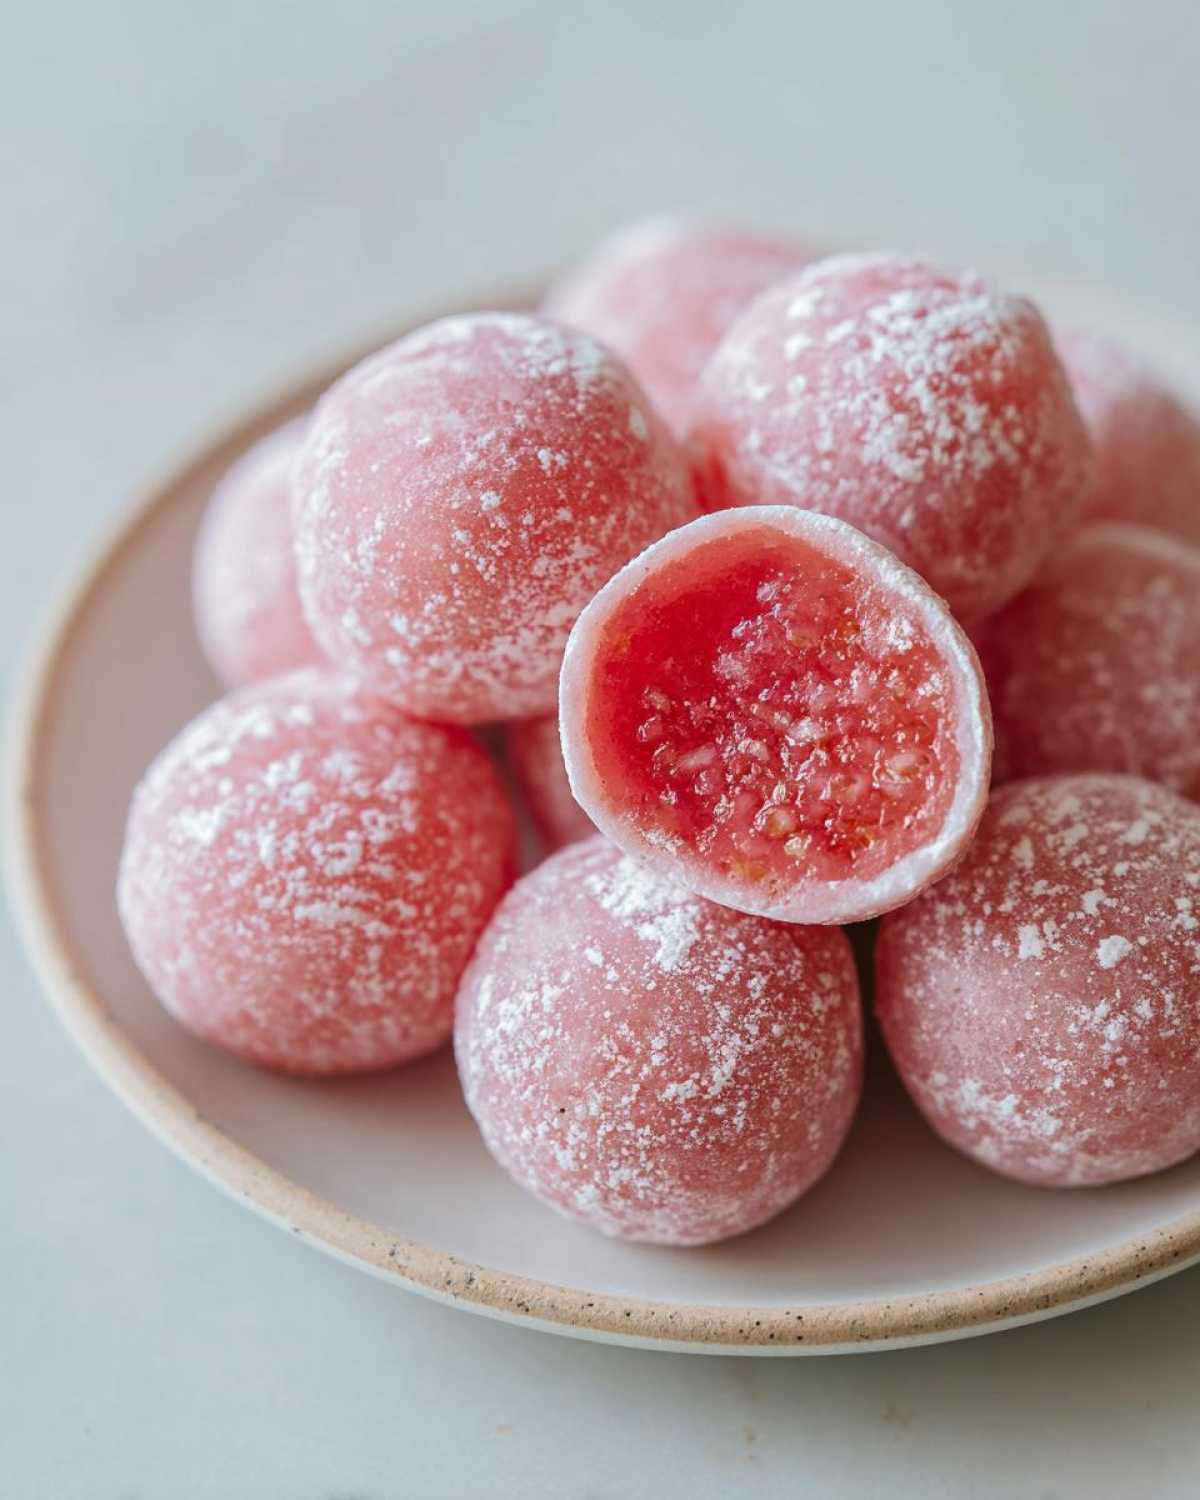
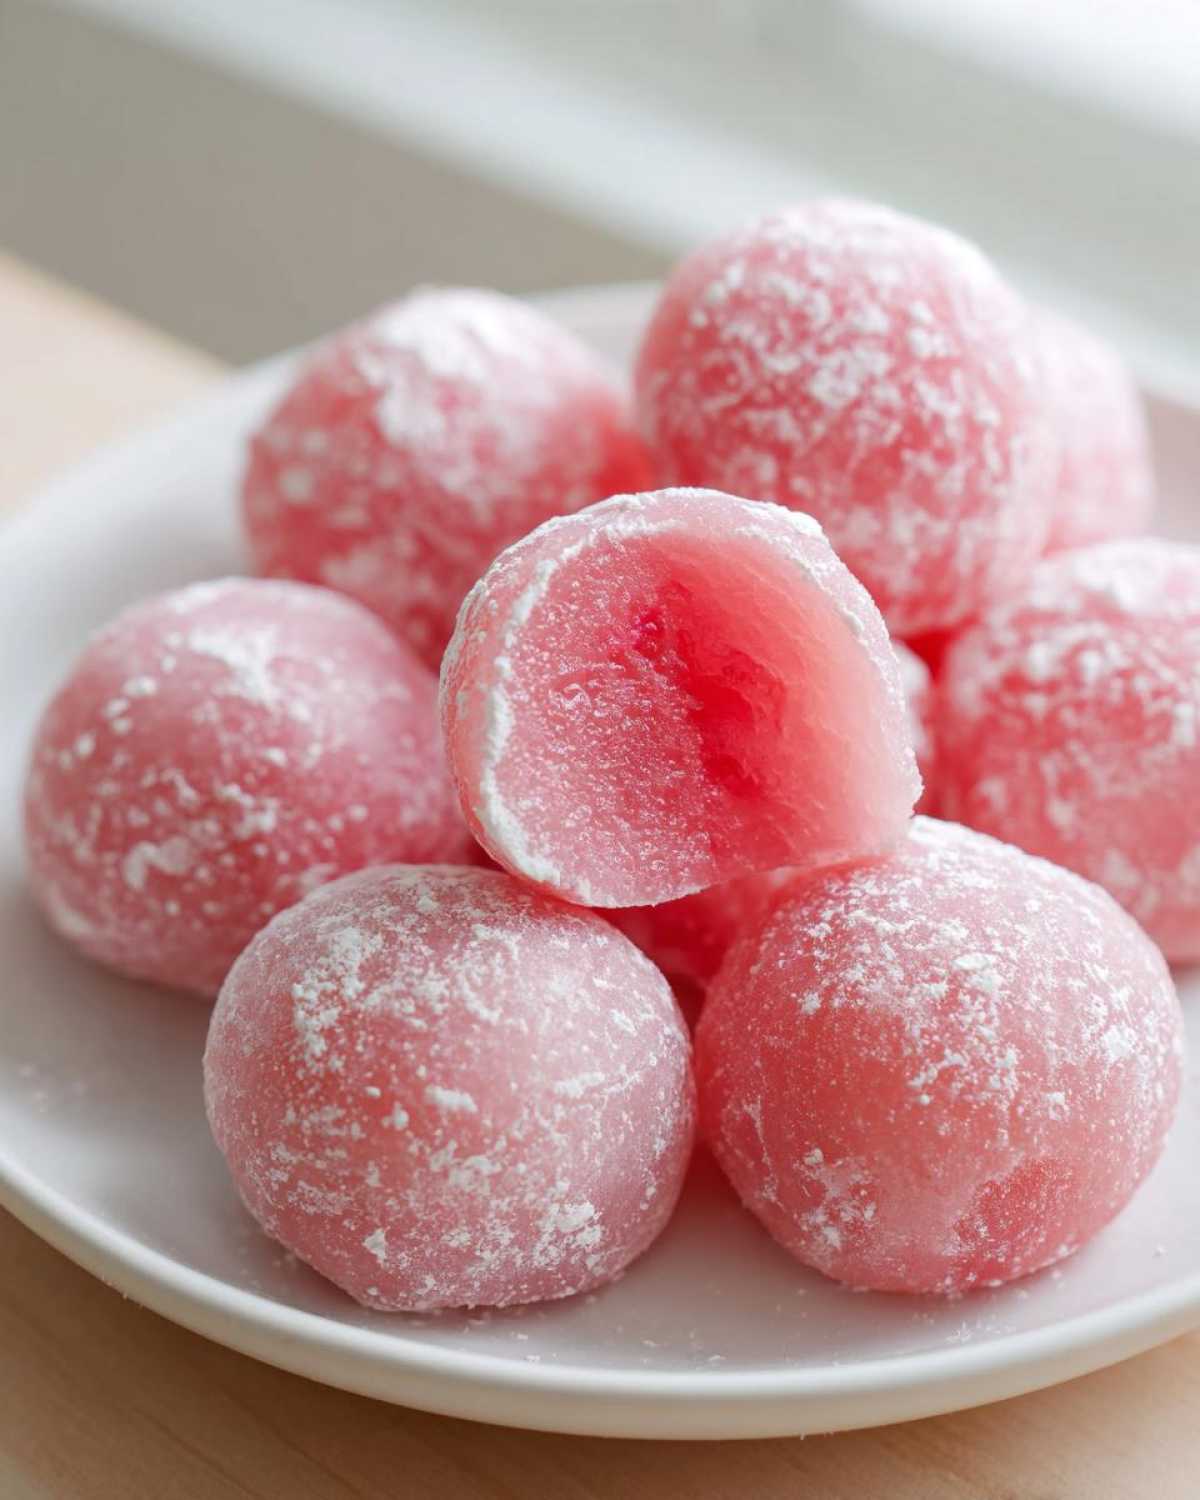
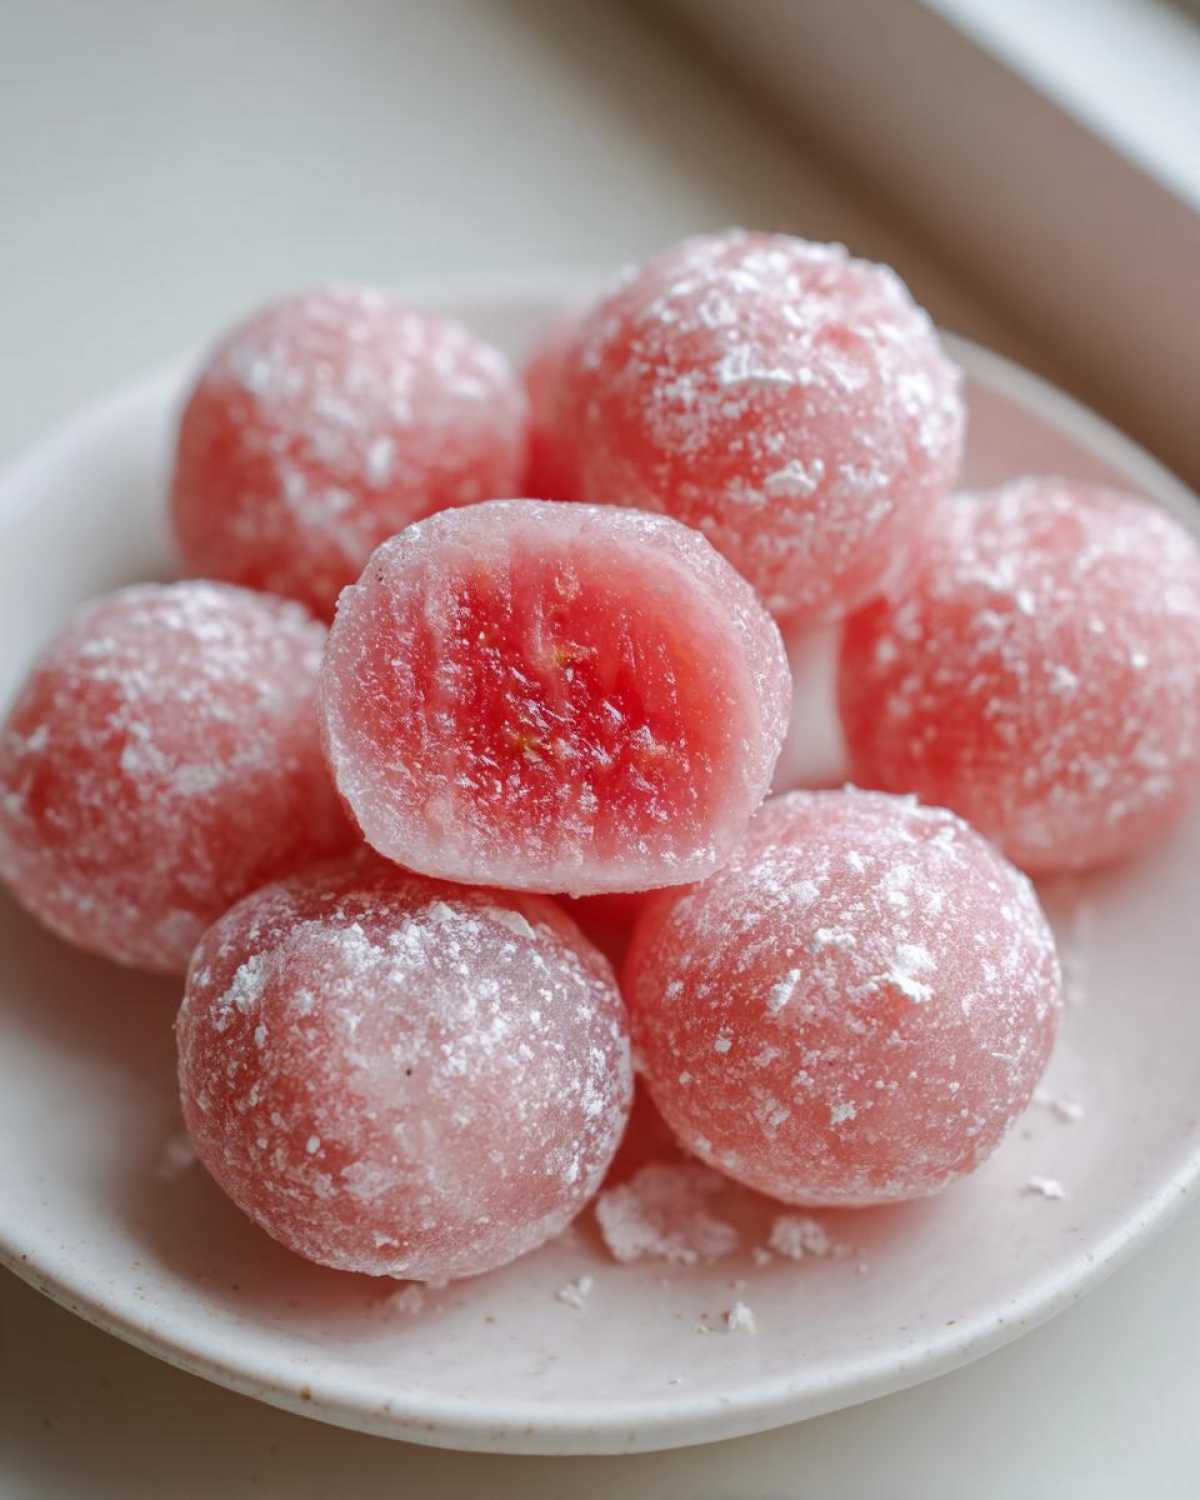
Oh, summer, when the heat is cranking up and all you want is something cool, light, and ridiculously easy to make! I know those busy days when standing over a stove feels like too much effort, but that doesn’t mean we skip dessert, right? That’s when I turn to beautiful, chewy treats that require very little fuss. I am so thrilled you stopped by, because today we are making the ultimate **watermelon mochi**. Trust me, achieving that perfect soft, pillow-like, chewy texture with a burst of real fruit flavor is easier than you think. This recipe is pure joy in a tiny bite—proof that exceptional food doesn’t need to be complicated. After stepping away from the corporate burnout, finding peace in simple, refreshing recipes like this is exactly what I want to share with you all on Pure Cooking Joy.
- Why This Watermelon Mochi Recipe Delivers Refreshing Summer Mochi
- Gathering Ingredients for Your Watermelon Mochi Recipe
- How to Make Mochi at Home: Step-by-Step Watermelon Mochi Instructions
- Tips for Perfect Watermelon Mochi Success
- Serving Suggestions for Refreshing Summer Mochi
- Storage and Reheating Instructions for Watermelon Mochi
- Frequently Asked Questions About Watermelon Mochi
- Estimated Nutritional Data for Watermelon Mochi
- Share Your Homemade Mochi Bites!
Why This Watermelon Mochi Recipe Delivers Refreshing Summer Mochi
I’m not kidding when I say this recipe hits every single mark for summer snacking. If you’re searching for that perfect cool-down dessert, this is it. It’s the kind of treat that makes you stop what you’re doing and say, “Wow, I made that?” No complicated steamers or long kneading sessions needed for these delightful **Watermelon Mochi** bites!
- Stays wonderfully chewy even after chilling.
- Uses actual fruit juice for authentic flavor.
- It’s incredibly forgiving, even for beginners.
- Perfectly bite-sized—great for parties!
Key Attributes of Our Chewy Watermelon Treats
You know that sadness when a fruit dessert tastes totally artificial? We certainly don’t have that problem here! This is a true **watermelon mochi** that tastes authentically like biting into a slice of cold fruit. The texture is the star, though; it’s soft, wonderfully yielding, and has that classic, satisfying chew that makes mochi so addicting. It’s truly the best sweet snack for a hot afternoon.
Gathering Ingredients for Your Watermelon Mochi Recipe
Okay, let’s talk supplies! You don’t need a specialty Asian grocery run for this batch; we’re keeping everything super accessible for your first try at making these delightful **Easy Mochi Dessert** bites. The key here is precision with the juice—you need pure, strained liquid to get the ratio right for that perfect soft texture. And remember, cornstarch isn’t just for thickening; it’s our best friend for keeping things from sticking everywhere!
Ingredient Notes and Substitutions for Soft Rice Cake Recipe
The one ingredient you absolutely cannot skip, no matter what, is glutinous rice flour. If you grab regular rice flour, you’ll end up with something crumbly, not wonderfully chewy! This flour is what gives us that signature soft rice cake stretch. If your watermelon juice isn’t quite the vibrant pink you were hoping for, don’t worry! A tiny drop of natural red food coloring works wonders to make these visually pop, but I always try to start with the natural color first.
How to Make Mochi at Home: Step-by-Step Watermelon Mochi Instructions
Alright, time to get cooking! Making **Watermelon Mochi** at home using the microwave method is fast, but you have to respect the process. It gets hot, and the dough transforms quickly, so keep your eye on it. We’re aiming for that smooth, stretchy dough that signals perfect chewy texture later on. Don’t rush the stirring part—that’s where the magic of even cooking happens!
Microwaving the Watermelon Mochi Dough
First, combine your rice flour and sugar in that microwave-safe bowl, then whisk in that cool watermelon juice until it’s silky smooth. See how it looks like thin pancake batter? Perfect! Cover it loosely with plastic wrap—we don’t want steam escaping completely, but we need a little vent. Blast it for one minute. Now, be careful, because this is hot! Give it a really good stir, scraping down the sides. Cover it and microwave for another minute. Stir again. You’ll notice it’s getting thick now. Keep microwaving in 30-second bursts, stirring well in between, until the dough is sticky, thick, and starts looking translucent. If you look over at my latest post on the blog, you can see pictures of exactly what that “translucent” stage looks like!
Shaping Your Homemade Mochi Bites
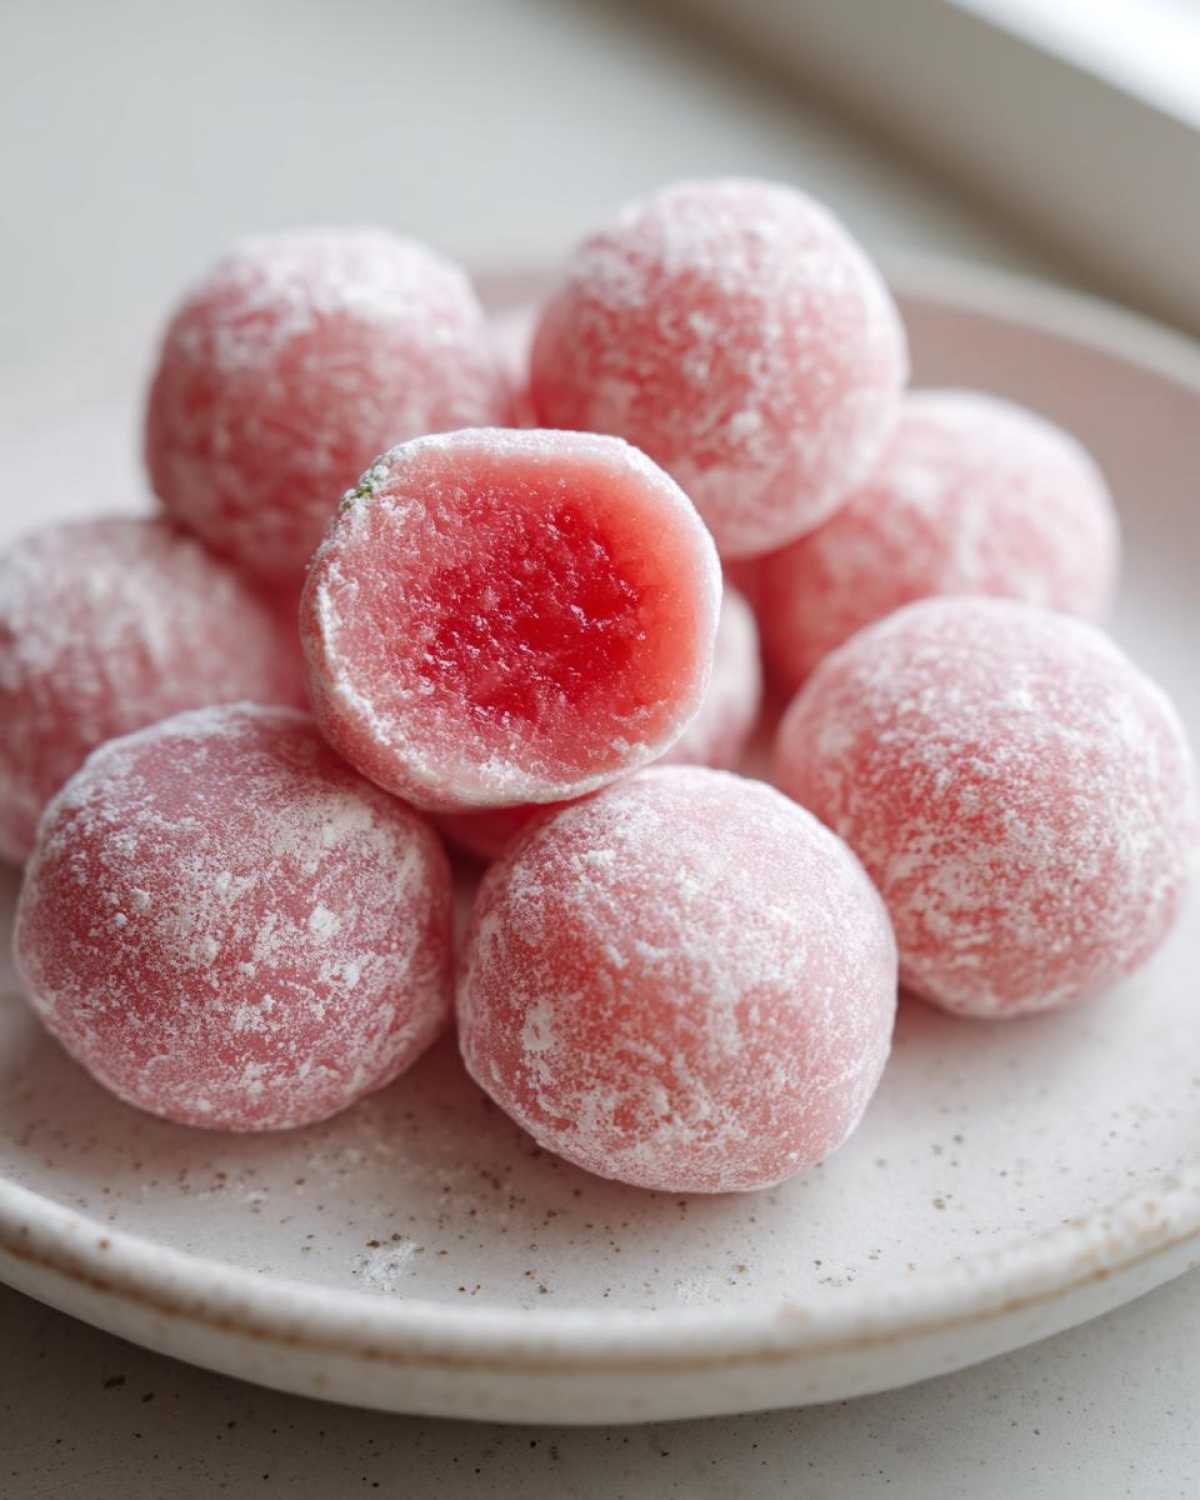
Once it’s cooked, you need cornstarch everywhere! Seriously, dust your counter generously, dust the top of the dough. Scrape that sticky glob out onto the starch while it’s still warm—it’ll be almost too sticky to handle at first. Let it cool for about 10 minutes until you can touch it without instantly needing an ice bath. Dust your hands heavily! Flatten the dough into a square and slice it into 12 pieces. If you’re adding a surprise chilled cube of actual watermelon inside, flatten a piece of dough into a small disc, pop the cold fruit in, and pinch the seams closed tightly. Roll it gently between your palms until you have beautiful, smooth **Homemade Mochi Bites**. Make sure you keep your hands dusted constantly so they don’t just glue themselves to you!
Tips for Perfect Watermelon Mochi Success
Getting that wonderful, soft, chewy texture for your **Watermelon Mochi** is all about respecting the dough, especially when it cools down. I remember my first batch—I thought I had cooked it perfectly, but when I came back after stepping away for five minutes, it had turned into this stiff, tacky mess that just wouldn’t stay round! The trick I learned? Don’t let it cool completely on the counter uncovered. You want it to cool just enough to handle, and then you work fast, keeping everything dusted liberally with cornstarch.
If your dough feels *too* sticky when kneading, add a tiny bit more cornstarch to your hands, but be careful not to incorporate too much, or your final product will get tough. A little bit of stickiness is how you know you’ve nailed the hydration for the best chew. If it feels dry when you try to shape it, I sometimes warm my hands up first or even rub a tiny bit of neutral oil on my palms before coating them in starch. That little bit of moisture helps keep the dough pliable. For the absolute best result, you’ve got to look at how I make my crunchy side dishes—it’s all about precise layering!
Serving Suggestions for Refreshing Summer Mochi
These little gems are wonderful all on their own, honestly! But since we’re in the light and breezy summer mood, we need some other dishes that won’t weigh us down after enjoying these chewy bites. Since they are so refreshing, anything slightly tart or creamy works beautifully alongside them. Think about serving them post-barbecue when everyone is looking for that last sweet spot of the evening.
Pairing with Other Fruity Japanese Dessert Options
If you want to maximize the fun and keep the light feeling going, you have so many easy options! I absolutely love making a big batch of my no-churn strawberry ice cream right alongside these. The combination of cold, creamy dairy (or a non-dairy alternative!) against the soft, room-temperature mochi is heavenly. You could also serve these small treats next to some lightened-up shaved ice or perhaps even some yuzu gelatin for a double dose of bright, fruity Japanese dessert flavor.
Storage and Reheating Instructions for Watermelon Mochi
Now, here’s a little reality check about mochi: it’s definitely best eaten the day you make it. That perfect, soft, yielding chew starts to stiffen up pretty quickly once it hits the fridge air—it’s just the nature of the rice flour!
If you have leftover **Watermelon Mochi**, you absolutely must store them in an airtight container. I mean, really airtight—I often layer mine between sheets of parchment paper inside a container so they don’t touch, and then I seal the lid tightly. This keeps the air out, which is the enemy of chewiness. You’ll want to eat them within two days max, though; after that, they tend to get a little firmer than I like.
Reheating is kind of tricky because you risk melting the shape if you go too hot. I don’t recommend the microwave if they’ve been chilled, because it can make them rubbery. If they’ve firmed up slightly, just letting them sit on the counter for about 20 minutes before you plan to eat them usually brings back most of that beautiful, soft texture we worked so hard to create. They truly are an Asian Summer Sweet that sings when fresh!
Frequently Asked Questions About Watermelon Mochi
Can I use watermelon powder instead of fresh juice for this Watermelon Mochi Recipe?
You totally can, but be warned: the flavor depth won’t be the same as using fresh juice. If you rely on powder, you’ll lose some of that beautiful, juicy essence that makes this treat so refreshing. If you do use powder, make sure you follow the package directions to reconstitute it, and then proceed with the recipe as written, aiming to get that required 1 cup of liquid. If the color is too faint, this is when you might want to add that tiny drop of color we talked about earlier, since the powder color can be subtle.
Is this considered a Gluten Free Mochi Idea?
Yes, absolutely! This **Gluten Free Mochi Idea** works because we are using glutinous rice flour (sometimes called sweet rice flour or *mochiko*). Rice, by nature, is naturally gluten-free. On top of that, this recipe uses no dairy anywhere in the dough, so it’s naturally dairy-free too! It’s a fantastic choice when you’re cooking for guests with common dietary needs, as long as you ensure your brand of glutinous rice flour is certified GF if cross-contamination is a big concern for them.
What if I want to make Simple 3 Ingredient Mochi without added sugar?
That’s an interesting challenge! Sugar does more than just sweeten; it actually helps keep the mochi soft and pliable by interfering with how the starch molecules bind together—it keeps things chewy! If you want to try making a **Simple 3 Ingredient Mochi** variation and skip the granulated sugar, you need to be ready to use the dough quickly, as it will firm up faster. You might also need slightly less juice, as the sugar adds bulk to your liquid measurements. Start by reducing the juice by about two tablespoons, mix, and see how the texture looks before microwaving. It’s worth experimenting with!
Estimated Nutritional Data for Watermelon Mochi
I know that for many of us, knowing what’s in our food is just as important as how delicious it tastes! When you’re whipping up these delightful **Chewy Watermelon Treats**, it’s good to have a ballpark idea of the stats. Remember, these numbers are based on the recipe as written, assuming standard measurements and using fresh watermelon juice.
If you decide to add honey instead of sugar, or if you’re using store-bought juice that might have extra syrups added, these figures will shift a bit. That’s why I always caution people about nutrition panels—they are guidelines, not gospel, especially in home cooking! You can always find more updates on our general approach to cooking and sharing over on our Facebook page.
Here’s the estimated breakdown per single piece of mochi:
- Serving Size: 1 piece
- Calories: 75
- Sugar: 8g
- Sodium: 2mg
- Fat: 0g
- Saturated Fat: 0g
- Carbohydrates: 18g
- Protein: 1g
- Cholesterol: 0mg
So, you see? These are wonderfully light, almost fat-free bites packed with just enough clean sugar to feel like a proper treat. They really fit in perfectly when you need a **Bite Sized Fruit Snack** that isn’t heavy!
Share Your Homemade Mochi Bites!
I really hope you loved spending time in the kitchen making this Watermelon Mochi! Seriously, seeing your finished creations brightens my day more than you know. Since this is such a fun, colorful recipe, I would be thrilled if you came back and let me know how it went.
Did you manage to get that perfect chewy texture on your first try? Did you opt for the plain bites or wrap them around a tiny cube of fresh, chilled watermelon? Please drop a star rating right down below—it helps other home cooks like you feel confident jumping in!
And please, if you snapped a picture of your beautiful, bright pink **Homemade Mochi Bites**, tag me on social media! You can always reach out directly through my contact page if you have questions or just want to share a success story. Happy cooking, everyone!
PrintEasy Watermelon Mochi Recipe: Soft, Chewy Summer Treats

I am so glad you are here to make this soft and chewy Watermelon Mochi. This refreshing dessert blends juicy fruit flavor with classic Japanese rice dough, making it ideal for homemade mochi bites and light summer sweets.
- Prep Time: 10 min
- Cook Time: 5 min
- Total Time: 45 min
- Yield: 12 servings 1x
- Category: Dessert
- Method: Microwave
- Cuisine: Japanese
- Diet: Gluten Free
Ingredients
- 1 cup fresh watermelon juice (strained)
- 1 cup glutinous rice flour (sweet rice flour)
- 1/4 cup granulated sugar
- 1 tablespoon cornstarch (for dusting)
Instructions
- Prepare the watermelon juice. Measure 1 cup of strained, fresh watermelon juice. If the juice is thin, you can reduce it slightly by simmering it for 5 minutes until you have 1 cup of liquid. Let it cool.
- Mix the dough. In a microwave-safe bowl, whisk together the glutinous rice flour and granulated sugar. Gradually whisk in the cooled watermelon juice until you have a smooth, lump-free batter.
- Cook the mochi dough. Cover the bowl loosely with plastic wrap. Microwave on high for 1 minute. Stir the mixture well. Cover and microwave for another 1 minute. Stir again. Continue microwaving in 30-second intervals, stirring between each, until the dough becomes thick, sticky, and translucent (this usually takes 3 to 4 minutes total, depending on your microwave).
- Cool the dough. Lightly dust a clean work surface with cornstarch. Carefully scrape the hot mochi dough onto the cornstarch. Dust the top of the dough lightly with more cornstarch.
- Shape the mochi. Allow the dough to cool for about 10 minutes until it is safe to handle. Dust your hands with cornstarch. Gently flatten the dough into a rough rectangle. Cut the dough into 12 equal pieces.
- Form the bites. Take one piece of dough and gently stretch or roll it into a small ball. If you want a filling, flatten the dough into a small disc, place a small piece of chilled watermelon in the center, and carefully pinch the edges closed around the fruit, rolling it gently into a smooth ball.
- Chill and serve. Place the finished Watermelon Mochi bites on a plate dusted with cornstarch to prevent sticking. Chill them in the refrigerator for at least 30 minutes before serving for the best soft, chewy texture.
Notes
- You can achieve a deeper pink color by adding 1 drop of red food coloring, but fresh watermelon juice provides a lovely natural hue.
- Store leftover mochi in an airtight container in the refrigerator for up to 2 days. They taste best the day they are made.
- If you prefer a thicker dough, increase the glutinous rice flour by 1 tablespoon.
Nutrition
- Serving Size: 1 piece
- Calories: 75
- Sugar: 8
- Sodium: 2
- Fat: 0
- Saturated Fat: 0
- Unsaturated Fat: 0
- Trans Fat: 0
- Carbohydrates: 18
- Fiber: 0
- Protein: 1
- Cholesterol: 0
