 Skip to content

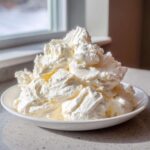
If you’ve ever stared down a cupcake tower right before a party, feeling that familiar dread because your frosting is too soft, too grainy, or just plain *sad*, I get it. Cooking should bring joy, not stress! That’s why I spent way too much time testing and perfecting this one recipe that I truly believe is the key to everything sweet you ever bake. Forget those complicated crisco-based messes. This is my **Ultimate Stable & Fluffy vanilla buttercream frosting** recipe. Honestly, you can whip this up in about 10 minutes—yes, ten minutes!—and it gives you that dreamy, bakery-style finish every single time. It’s smooth, it holds its shape like a champion, and the flavor is pure, rich vanilla bliss. If you want to know more about my whole philosophy on finding that joy in the kitchen, check out my About Page! Let’s get you frosting like a pro, stress-free!
- Why This is Your Ultimate Vanilla Buttercream Frosting Recipe
- Gathering Ingredients for Perfect Vanilla Buttercream Frosting
- How to Make Buttercream: The Easy Buttercream Tutorial Steps
- No Grainy Buttercream Tips for American Buttercream Recipe Perfection
- Using Your Vanilla Frosting for Cakes and Desserts
- Storage and Reheating Instructions for Vanilla Buttercream Frosting
- Frequently Asked Questions About Creamy Homemade Icing
- Estimated Nutritional Data for This Sweet Vanilla Topping
- Share Your Best Frosting Consistency Creations
Why This is Your Ultimate Vanilla Buttercream Frosting Recipe
Look, I’m not going to waste your time with a recipe that takes an hour just to cream ingredients. My goal here is to give you a showstopping topping that’s ready before the cake has even cooled completely. This American buttercream recipe is the one I rely on when I’m decorating for friends or just having a serious cupcake craving on a Tuesday night. It just *works*.

- It’s lightning fast—ready to use in about 10 minutes flat!
- It’s unbelievably fluffy because we beat the air in properly.
- It sets up beautifully, giving you that stable frosting for piping you always wanted.
- Zero fuss, maximum rich vanilla flavor. It’s simply the best.
Achieving the Fluffy Frosting Recipe Texture Fast
The beauty of this specific technique is the air incorporation. We’re not just mixing; we’re whipping! By beating the softened butter aggressively first, and then beating the whole mixture on high speed right near the end, we create microscopic air pockets. This air is what makes it light and fluffy, not heavy and greasy. Trust me, this is the key to feeling like you’re working at a real bakery. It’s seriously the best quick vanilla frosting you’ll ever try.
The Secret to Smooth Buttercream Consistency
I’ve battled grainy frosting more times than I care to admit. The way we conquer that is twofold: first, always, always sift your powdered sugar—no excuses! Second, pay attention to the final beating time once the liquids go in. That extra two or three minutes on high speed isn’t just for fluff; it’s literally dissolving those final sugar crystals. That’s how you guarantee that perfectly creamy homemade icing consistency that looks like velvet.
Gathering Ingredients for Perfect Vanilla Buttercream Frosting
Okay, so the magic of this **vanilla buttercream frosting** doesn’t rely on six different specialty extracts—it relies on quality ingredients handled correctly! Because we are moving so fast (remember, 10 minutes!), having everything measured and ready to go is super important. Don’t substitute the butter; it’s not worth it! Here are the simple building blocks for your ultimate topping. Once you have these ready, you are moments away from frosting heaven. If you’re looking for something similar but a little sweeter and thinner, you might want to check out my cookie icing recipe later!
- 1 cup (2 sticks) unsalted butter, softened to room temperature
- 4 cups powdered sugar, sifted
- 1 teaspoon pure vanilla extract
- 3-4 tablespoons heavy cream or whole milk
- 1/4 teaspoon salt
Ingredient Notes and Best Vanilla Buttercream Substitutions
Let’s talk temperature first because it determines everything. That butter? It cannot be greasy or melted; it needs to be soft enough to easily leave an indent when you press it gently, but still cool to the touch. If your butter is too warm, your final product will be soupy, and we absolutely can’t have that when we’re aiming for stable frosting for piping. Also, for that deep, authentic taste, please use pure vanilla extract, not imitation. If you want to go next-level for that rich vanilla flavor frosting, grab some vanilla bean paste instead—wow, that changes things!
How to Make Buttercream: The Easy Buttercream Tutorial Steps
Alright, deep breath! This is where we bring those perfect ingredients together. Don’t panic about the mixer; we’re using the paddle attachment here—it’s what gives us that dense-but-creamy structure we love in American buttercream. And remember the number one rule when mixing anything in a stand mixer: scrape down the bowl! Seriously, I stop at least three times just to make sure everything gets incorporated. We are aiming for ultimate smoothness, and this whipping process is the secret sauce. If you’ve ever wanted a recipe that’s truly rock-solid reliable, especially when it comes to dips and spreads, check out this whipped ricotta dip—it uses similar mixing principles!
Step 1: Creaming the Butter for Vanilla Buttercream Frosting
First things first, we beat the butter. Remember how soft it needed to be? On medium speed, beat that butter until it looks genuinely smooth, like silk in the bowl. This takes about two minutes. If yours still looks chunky or streaky, keep going! This initial step creates the base texture and ensures we won’t end up with lumps in our final **smooth buttercream**. Scrape the sides and bottom thoroughly before moving on.
Step 2: Incorporating Sugar and Achieving Fluffy Frosting Recipe Volume
Now, slow that mixer way down, or you’ll wear powdered sugar! Add your sifted sugar one cup at a time, mixing just until it disappears into the butter before you add the next batch. Once all the sugar is in, dump in your vanilla and salt. Then, crank that speed up to medium-high! Beat it hard for a full three minutes. This is where we start building volume and getting that **fluffy frosting recipe** texture we’re aiming for.

Step 3: Adjusting Liquid for Stable Frosting for Piping
Time for the liquid magic! Start by adding just 3 tablespoons of heavy cream. Let that mix on medium-high for another 2 to 3 minutes. You should see it get noticeably lighter in color and start holding stiff peaks—that’s your cue for excellent **cupcake decorating icing**! If it seems a little too stiff to spread easily, add that last tablespoon of cream, just a tiny bit at a time, until it looks perfect for you.
No Grainy Buttercream Tips for American Buttercream Recipe Perfection
If you’ve followed my step-by-step guide, you *should* be completely grain-free, but sometimes, even with sifted sugar, you get a little grit. Don’t throw that beautiful frosting away! That grainy feeling means those sugar crystals haven’t fully dissolved into the fat yet. It’s a super common issue with any basic **American buttercream recipe**. The fix is actually incredibly simple, and it doesn’t require adding any extra powdered sugar, which would just make it stiffer.
The answer is friction and time! If you notice any texture issues after Step 3, just turn your mixer up to medium-high and let it run for another 3 to 5 minutes. That extra mixing time is crucial. The friction created by the paddle whipping the butter, sugar, and liquid together gradually melts those tiny edges off the sugar crystals, incorporating them smoothly into the fat. It’s pure kitchen science! I learned this trick making a giant batch for a wedding cake years ago—it was too stiff, so I just kept beating it, and suddenly, it turned into the most gorgeous, creamy homemade icing.

If you happen to have time to spare when you mix, I always recommend giving your frosting an extra minute or two beyond what the recipe asks for. After all, if you’re making a really cool decoration, you need that perfect texture, and I promise, an extra five minutes now saves you hours of frustration later! For more tips on nailing those foundational recipes, you absolutely have to look at my recipe for the easy classic cheese ball!
Using Your Vanilla Frosting for Cakes and Desserts
Now that you have this perfectly smooth, gorgeously fluffy **vanilla buttercream frosting**, what are you going to do with it? The best part is the versatility! Since this American buttercream is so stable, it handles everything thrown at it. I’ve used it for a quick swirl on a batch of cookies when guests unexpectedly showed up, piped perfect rosettes on a huge tray of vanilla cupcakes, and, most importantly, layered it onto ridiculously tall cakes.
I remember frosting my nephew Leo’s fifth birthday cake last year—it was a tricky dinosaur theme. I was worried the spikes would droop, but I piped them all on, and they held their shape perfectly even after sitting on the counter during the celebration. That was the moment I truly realized this recipe was special; it took the stress out of building something big! If you’re looking for a wonderfully moist base to put this gorgeous topping on, you have to check out my coconut cupcakes recipe.
Tips for Buttercream for Layer Cakes Decoration
When you’re aiming for those crisp, sharp edges on a layer cake, stability is everything. Because we beat so much air in and used the right amount of sugar and butter, this **classic vanilla icing** sets up beautifully, almost like it has a structure of its own. For spreading, I start with a small offset spatula to apply a thick layer over the whole cake. Then, grab a bench scraper, hold it perpendicular to the cake board, and gently spin the cake turntable. This smooths the sides quickly, giving you those professional, clean lines.

If you are piping, make sure your tip is clean and your frosting hasn’t warmed up too much in your hands. For stars and rosettes, use a larger tip—it flows better and hides any minor imperfections in your technique if you’re new to decorating. Because this frosting is so rich, a little bit goes a long way, and it tastes amazing even in thin layers!
Storage and Reheating Instructions for Vanilla Buttercream Frosting
So, you’ve made this divine batch of **vanilla buttercream frosting**, and guess what? You don’t have to use it all right now! You can absolutely keep this masterpiece for later. If you plan to use it within a couple of days, an airtight container on the counter is totally fine. However, if you need it to last longer, pop it into the fridge. Before you refrigerate it, make sure you press a piece of plastic wrap right onto the surface of the icing—this stops a crust from forming.
When you pull it out of the fridge later, don’t panic if it looks stiff and slightly separated! That’s normal. Let it sit on the counter for about an hour to warm up slightly. Then, the trick is to give it a quick re-whip in your mixer for just 30 seconds. This reintroduces the air and brings back that perfect, fluffy texture. It’s almost like frosting fresh out of the oven! Once it’s smooth again, you can use it on those lovely Linzer cookies!
Frequently Asked Questions About Creamy Homemade Icing
I always get so many questions once people try to make this frosting for the first time, which is great! It just shows everyone wants the best possible result. Here are the ones I hear most often when people are trying to nail that perfect **creamy homemade icing** for the first time.
Can I use salted butter in this vanilla buttercream frosting?
Oh, absolutely you can! I generally prefer unsalted because it lets me control the precise amount of salt, but if all you have is salted, go for it. The only thing you have to remember is to cut back drastically on the added salt in the recipe. Instead of 1/4 teaspoon, try just an eighth of a teaspoon, or even just a tiny pinch. Salt isn’t just for reducing sweetness; it actually enhances flavor, so leaving too much in might make your beautiful **vanilla buttercream frosting** taste a little too savory!
How do I get pure white vanilla buttercream frosting?
This is a fantastic question, especially if you’re trying to frost a cake for a very formal event or a winter theme! The yellowness in any buttercream comes from two places: the butter itself and the vanilla extract. Butter, even the palest one, has a tinge of yellow. To get it truly white, you need to use clear vanilla extract instead of the standard brown stuff. Also, make sure you are beating that butter for those full two minutes until it’s pale yellow before you even think about adding sugar—the more air you whip in, the whiter it gets! If you want to experiment more, my chocolate chip cheesecake recipe is a great place to start if you’re playing around with pure white toppings.
If you are aiming for a specific color and need a neutral base, this **ultimate vanilla frosting** is perfect as a blank canvas. You can also visit me over on Facebook and show me what colors you’re trying to achieve!
Estimated Nutritional Data for This Sweet Vanilla Topping
You know me, I focus way more on flavor than counting carbs, but I know some of you lovely bakers like to keep track! Since this is a rich topping made primarily of butter and sugar, it’s definitely meant for special treats, not for eating with a spoon straight from the bowl (though I’ve been guilty of it!).
Because every kitchen uses slightly different brands of butter and sugar, these numbers are just an estimate based on the standard ingredient list and the serving size we agreed upon. Think of this as a helpful guide for your sweet vanilla topping!
Here is the general breakdown:
- Serving Size: 1/4 cup
- Calories: 350
- Sugar: 45g
- Fat: 18g
- Saturated Fat: 11g
- Protein: 1g
Just a quick heads-up: these amounts are calculated based on the recipe as written, using standard measurements. If you swap out heavy cream for half-and-half, or use a different type of butter, the numbers change a bit! For more general baking wisdom and fun culinary ideas, feel free to browse my main blog page!
Share Your Best Frosting Consistency Creations
That’s it! You’ve officially mastered what I consider the ultimate vanilla frosting. Whether you used it to frost a towering cake or just enjoyed a little bit with a knife (don’t judge, I do it all the time!), I really want to hear about it. Baking is so much more fun when we can share the successes, right?
Please, come back here and leave a star rating for this **vanilla buttercream frosting** recipe. Your feedback helps other bakers know they can trust this recipe to deliver that perfect, **best frosting consistency**.
And if you snapped a picture of what you made—maybe an incredibly sharp edge on a layer cake or the fluffiest swirls you’ve ever piped—I absolutely want to see it! Tag me on social media or reach out to me through my Contact Page. I love seeing my recipes out in the world bringing joy to your tables!
PrintThe Ultimate 10-Minute Fluffy Vanilla Buttercream Frosting Recipe
You need this recipe for the best vanilla buttercream. It creates a creamy, smooth, stable texture perfect for piping cakes and cookies. This is the no-fail, bakery-style homemade vanilla icing you need for stress-free decorating.
- Prep Time: 10 min
- Cook Time: 0 min
- Total Time: 10 min
- Yield: About 3 cups 1x
- Category: Dessert Topping
- Method: Mixing
- Cuisine: American
- Diet: Vegetarian
Ingredients
- 1 cup (2 sticks) unsalted butter, softened to room temperature
- 4 cups powdered sugar, sifted
- 1 teaspoon pure vanilla extract
- 3–4 tablespoons heavy cream or whole milk
- 1/4 teaspoon salt
Instructions
- Place the softened butter into the bowl of a stand mixer fitted with the paddle attachment. Beat the butter on medium speed until it is completely smooth and creamy, about 2 minutes. Scrape down the sides of the bowl.
- Gradually add the sifted powdered sugar, one cup at a time, mixing on low speed until just combined after each addition. This prevents the sugar from flying out.
- Add the vanilla extract and salt. Increase the mixer speed to medium-high and beat for 3 minutes. This step incorporates air, making the frosting fluffy.
- Add 3 tablespoons of heavy cream or milk. Beat on medium-high speed for another 2-3 minutes until the frosting is light, smooth, and holds stiff peaks. If the frosting seems too stiff for your needs, add the remaining tablespoon of cream, one teaspoon at a time, until you reach your desired consistency for piping.
- If you notice any graininess, continue beating for an additional 3-5 minutes. The friction and air incorporation will dissolve any remaining sugar crystals, resulting in a smooth buttercream.
- Use immediately to frost cakes, cupcakes, or cookies.
Notes
- For the smoothest results, always sift your powdered sugar before adding it to the butter.
- If your butter is too warm, your frosting will be soupy. If it is too cold, the frosting will be stiff and hard to mix. Room temperature is key.
- This American buttercream recipe holds its shape well for piping intricate designs on layer cakes.
- If you want a richer vanilla flavor, substitute the vanilla extract with vanilla bean paste.
Nutrition
- Serving Size: 1/4 cup
- Calories: 350
- Sugar: 45g
- Sodium: 55mg
- Fat: 18g
- Saturated Fat: 11g
- Unsaturated Fat: 7g
- Trans Fat: 0.5g
- Carbohydrates: 48g
- Fiber: 0g
- Protein: 1g
- Cholesterol: 45mg
