 Skip to content

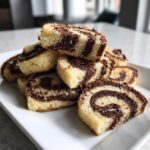
Hi there, I’m Alex, and I’m so glad you’re here! You know, sometimes you want a cookie that really shows off without needing hours of fiddly detail work? That’s where these beauties come in. There’s just something magical about slicing into a log and seeing that perfect spiral emerge. It brings me pure joy, honestly!
Forget complicated cutters or messy icing; we’re leaning into the easiest impressive bake there is: the classic pinwheel cookies. This is my ultimate Easy Pinwheel Cookie Recipe because we use the genius slice-and-bake method. This keeps the dough manageable and guarantees you end up with soft, buttery cookies every single time. They look fancy, but trust me, making them is one of the most satisfying, low-stress baking projects you can tackle.
- Why This Easy Pinwheel Cookie Recipe is a Keeper
- Gathering Ingredients for Perfect Pinwheel Cookies
- How to Prepare Classic Chocolate Vanilla Swirl Cookies
- Chilling and Slicing Your Pinwheel Cookie Dough
- Baking Tips for Soft Pinwheel Cookies
- Making Ahead and Freezing Pinwheel Cookies
- Holiday Pinwheel Cookie Ideas and Variations
- Frequently Asked Questions About Pinwheel Cookies
- Approximate Nutritional Data for Pinwheel Cookies
Why This Easy Pinwheel Cookie Recipe is a Keeper
I created this recipe specifically because I wanted cookies that looked like they took forever but secretly didn’t. If you’re like me and balancing life with baking goals, these are your new best friends. They’re gorgeous, easy as pie, and taste phenomenal.
- They look visually stunning—all those neat swirls are just breathtaking on a platter!
- The dough freezes beautifully, meaning you can bake fresh cookies whenever you need them.
- The final texture is exactly what I aim for: soft, chewy, and deeply buttery. If you want crisp edges, check out my soft cut-out sugar cookies instead. These are pure comfort.
Slice and Bake Swirl Cookies Convenience
Forget scooping dough! The real magic here is that once you’ve rolled your two dough layers together, you wrap it up, and it goes straight into the fridge. Having that log ready means you can pull it out on a random Tuesday night when you just need a little homemade treat. That’s the beauty of Slice and Bake Swirl Cookies.
Buttery Spiral Cookies Texture
We aren’t aiming for hard little biscuits here, no way! The goal is rich, tender sweetness. Thanks to the high butter content and balancing the flour just right, you get these incredibly satisfying, Buttery Spiral Cookies. They melt in your mouth the second you take a bite.

Gathering Ingredients for Perfect Pinwheel Cookies
Before we get to the rolling and swirling fun, we need to gather our supplies! I love this base recipe because it uses pantry staples. We start with the standard components for a rich sugar cookie, but we’ll divide that dough later to add our chocolate punch. Whether you end up making these classic flavors or turning them into festive Red and Green Swirl Cookies, the structure starts here.
I always keep my ingredients at the right temperature—super soft butter is key for creaming. If you ever need a stellar buttercream to top other cookies, check out my tips for making fluffy vanilla buttercream.
Vanilla Dough Base Ingredients
This is the foundation for both halves of our cookie. Make sure you have:
- 1 cup (2 sticks) unsalted butter, softened
- 1 cup granulated sugar
- 2 large eggs (don’t substitute these!)
- 1 teaspoon vanilla extract
- 3 cups all-purpose flour, plus more for dusting
- 1 teaspoon baking powder
- 1/2 teaspoon salt
- 2 tablespoons milk
Chocolate Dough Flavoring Ingredients
To create that contrast, you only need a few things to transform half the base dough:
- 1/4 cup unsweetened cocoa powder
- 1 teaspoon chocolate extract (optional, but it really deepens the flavor!)
How to Prepare Classic Chocolate Vanilla Swirl Cookies
Okay, this is the part where the magic happens! We need to mix patiently but stop mixing at just the right time. If you overwork the dough, your pinwheel cookies will end up tough instead of soft, and that’s a baking tragedy, right? This process is straightforward, but paying attention to those little details is what makes them the absolute best. If you have any doubts about making great chocolate bases, remember how intense my easy no-bake chocolate mousse is—it’s all about getting that intensity right!
Mixing the Base Dough for Pinwheel Cookies
First things first, you need that foundation. Start by creaming together your softened butter and sugar until it looks light and fluffy—you want it pale yellow. Then, beat in those eggs one at a time, followed by the vanilla. In a separate bowl, whisk your dry ingredients (flour, leavening, salt). Now, add the dry mixture to the wet ingredients gradually. Mix until it’s *almost* combined, then toss in the milk and gently mix until a soft dough just starts to come together. Don’t keep going! Seriously, stop as soon as you don’t see streaks of dry flour anymore.
Creating the Two-Tone Doughs
Now, you’ll divide that gorgeous base dough evenly into two bowls. In one bowl, mix in your cocoa powder and that optional chocolate extract until everything is perfectly uniform brown. The other bowl stays plain—that’s our vanilla dough. You should have two equally sized balls of dough. I sometimes chill these halves for just 10 minutes here, just to make them easier to handle before flattening.
Achieving the Perfect Pinwheel Cookie Swirl
Time to build the layers! Place parchment paper on your counter, and roll out that vanilla dough into a flat rectangle, about half an inch thick. Do the exact same thing with the chocolate dough. Lay the chocolate rectangle directly on top of the vanilla one, pressing gently so they stick together neatly. Now, starting from one long edge, you need to roll this layered dough tightly into a log. When rolling the log, use a piece of parchment paper to help guide a very tight, even cylinder. This prevents air pockets and guarantees a beautiful spiral in your final pinwheel cookies. Once rolled, wrap it up tight, and into the fridge it goes for chilling!

Chilling and Slicing Your Pinwheel Cookie Dough
The chilling step is non-negotiable, folks! I know patience isn’t always fun when cookies are calling your name, but this step is what separates a great cookie from one that tries to spread out into a flat, shapeless blob in the oven. You need that log of layered dough to chill for at least two hours, but honestly, three hours is even better. It needs to be firm enough that when you take a sharp knife to it, the layers don’t squish or smudge together. That firmness is key to How to Make Pinwheel Cookies look perfectly patterned!
Once it’s rock solid, unwrap that beautiful log. Preheat your oven to 375°F (190°C) and get your baking sheets ready with parchment paper—I hate scrubbing baked-on cookie bits, don’t you? Slice the log into rounds about 1/4 inch thick. If you want truly uniform cookies that look amazing lined up next to each other, try to keep your slices consistent. If you get one side that’s a little thick, don’t panic; just try to even out the rest of the log. If I’m making a big batch, sometimes I’ll line the sliced cookies up on a clean sheet pan, cover that sheet loosely, and pop it back in the fridge for 15 minutes while I finish slicing the rest. Keeps the first batch nice and cold!
These cookies are amazing because the dough holds up so well, much like the stability of this easy fudge recipe I love in the winter. A well-chilled dough gives you that beautiful definition when you bake.

Baking Tips for Soft Pinwheel Cookies
Alright, the dough is sliced, lined up, and looking gorgeous. Now for the crucial part: getting them baked just right so they stay soft! First, make sure your oven is fully preheated to 375°F (190°C). There’s nothing worse than putting delicate cookies into a lukewarm oven, which guarantees spreading.
I line my baking sheets with parchment paper every single time—it guarantees easy cleanup, which is essential for me! Place your chilly slices about 2 inches apart because they spread just a tiny bit. The baking time is short, usually just 8 to 10 minutes. You’re looking for the edges to just barely look set. Seriously, pull them out when they look barely done! If you wait until they are deeply golden brown, you’ve gone too far, and they’ll lose that melt-in-your-mouth texture we worked so hard to achieve.
Let them rest on the hot sheet for about five minutes after you pull them out. They firm up just enough to handle. Then, transfer gently to a wire rack to cool completely. Enjoy that amazing swirl!
Making Ahead and Freezing Pinwheel Cookies
If there is one thing I preach on this site, it’s planning ahead! Life gets hectic, and nobody wants to start from scratch when a cookie craving hits at 9 PM. The wonderful structure of this dough makes it perfect for busy weeks!
Because we made a tight, firm log of dough, these are some of the best Make Ahead Cookie Dough options available. You can easily prepare this dough log completely, wrap it tightly in plastic wrap (I usually double-wrap mine for freezer burn protection), and store it away. The recipe notes mention you can keep it frozen for up to 3 months, which is fantastic for holiday prep!
When you’re ready to bake, you don’t even need to thaw it out! Just pull that wrapped log straight from the freezer. You’ll need to add a little extra time in the oven—usually about 1 to 2 minutes more per batch—to account for the deep chill. Slice them as thinly as you can manage while they’re still partially frozen, and bake them straight away on your prepared sheets. It’s foolproof!
Being able to pull out a beautiful, ready-to-slice cookie log is such a lifesaver. If you want more great tips on handling dough that you need to stash away, I cover all my best practices for preparing make-ahead cookie dough right here on the blog.
Holiday Pinwheel Cookie Ideas and Variations
The best part about this recipe? It’s a total chameleon! While I love the classic chocolate and vanilla combo, these pinwheel cookies truly shine when you dress them up for holidays. If you’re gearing up for Christmas, you can easily create those stunning Red and Green Swirl Cookies. Simply take your vanilla dough, divide it in half again, and mix red food coloring into one half and green into the other. You layer red, white, and green, and roll! It looks so festive.
For Valentine’s Day, you can skip the green and just color both halves of the dough a lovely pink for perfect Valentine Pinwheel Desserts. For extra flair, you can roll the outside of the dough log in sanding sugar before chilling. It really captures that festive look. If you love these ideas, you should also check out my recipe for easy and chewy Christmas sprinkle cookies for a different kind of holiday sparkle. And for more festive inspiration, I always reference this great guide on making festive pinwheels!
Kid Friendly Cookie Baking Fun
If you have little helpers, this is the recipe to pull out! Coloring the dough is so much fun, and kids genuinely enjoy watching the colors transform when you mix them in. Once the dough is chilling and firm enough, slicing is a great job for older kids, but kneading the food coloring into the small dough balls is perfect for younger bakers. They get so proud seeing their very own swirl shape emerge when you bake them!

Frequently Asked Questions About Pinwheel Cookies
I always get so many great questions when people first try making these beauties! It’s so much easier than it looks, but a few quick tips can guarantee your success. If you’ve ever struggled with making traditional wafer cookies, you’ll find these much more forgiving. Speaking of other wafer styles, if you ever want to try a crispy cookie, my Pizzelle recipe with vanilla and anise is a classic!
Can I use different extracts in my pinwheel cookies?
Absolutely! That’s part of the fun of customizing them for different holidays or tastes. The vanilla extract in the base dough is really versatile. If you’re making Christmas cookies, try swapping it out for peppermint extract. For a deeper, warmer flavor, almond extract works beautifully instead of vanilla. You just need to make sure the replacement extract measures the same one teaspoon, so you don’t mess up the dough structure too much.
What makes these the Best Pinwheel Cookies?
In my opinion, what makes these the Best Pinwheel Cookies is the combination of visual wow-factor and textural perfection. They are incredibly soft and profoundly buttery—that’s what people always comment on. They don’t turn into hard crisps; they stay tender. It comes down to using real butter and making sure you don’t overbake them by even thirty seconds! That soft structure is what makes them a cookie exchange favorite.
How do I prevent the colors from bleeding together during chilling?
This is a common worry, especially when you’re trying to get those vibrant red and green holiday swirls! The most important steps involve chilling and wrapping. Make sure your dough is chilled until it is very firm before you even start slicing. When you wrap the completed log, don’t skimp on the plastic wrap; wrap it tightly around the log. I usually do one layer of plastic wrap, followed by a layer of foil for extra security. This pressure helps hold those layers distinct while they chill completely, keeping those swirls sharp!
Approximate Nutritional Data for Pinwheel Cookies
Now, I always like to include a little note about nutrition, mostly because I’m curious! But please remember, while I take great care in writing these recipes, the exact values can shift based on the brands you use—like the difference between regular and organic butter, or exact measurements in the cocoa powder.
The data below is an honest estimate based on the recipe provided, calculated per cookie serving. If you’re after some other wonderfully rich options, you simply must check out my recipe for cream cheese chocolate chip cookies, which have a different flavor profile entirely!
- Serving Size: 1 cookie
- Calories: 135
- Sugar: 11g
- Sodium: 65mg
- Fat: 7g
- Saturated Fat: 4g
- Carbohydrates: 17g
- Protein: 2g
- Cholesterol: 35mg
This is just a guideline, of course. When we bake for love, we aren’t focused on spreadsheets, we’re focused on smiles. Don’t let these numbers stop you from sharing a few batches!
PrintEasy Slice and Bake Vanilla and Chocolate Pinwheel Cookies
Make these classic pinwheel cookies using a simple slice-and-bake method. You combine vanilla and chocolate doughs to create beautiful, buttery spiral cookies perfect for any occasion.
- Prep Time: 30 min
- Cook Time: 10 min
- Total Time: 2 hours 40 min
- Yield: 3 dozen cookies 1x
- Category: Dessert
- Method: Baking
- Cuisine: American
- Diet: Vegetarian
Ingredients
- 1 cup (2 sticks) unsalted butter, softened
- 1 cup granulated sugar
- 2 large eggs
- 1 teaspoon vanilla extract
- 3 cups all-purpose flour, plus more for dusting
- 1 teaspoon baking powder
- 1/2 teaspoon salt
- 2 tablespoons milk
- 1/4 cup unsweetened cocoa powder
- 1 teaspoon chocolate extract (optional, for stronger flavor)
Instructions
- In a large bowl, cream together the softened butter and sugar until light and fluffy. Beat in the eggs one at a time, then mix in the vanilla extract.
- In a separate bowl, whisk together the flour, baking powder, and salt. Gradually add the dry ingredients to the wet ingredients, mixing until just combined. Add the milk and mix until a soft dough forms.
- Divide the dough evenly into two separate bowls. In one bowl, mix in the cocoa powder and chocolate extract (if using) until the dough is uniformly chocolate colored. Leave the other half plain (vanilla dough).
- Shape each dough portion into a flat rectangle, about 1/2 inch thick. Place the chocolate rectangle directly on top of the vanilla rectangle. Gently press the two layers together.
- Starting from one long edge, tightly roll the layered dough into a log. Wrap the log tightly in plastic wrap. Chill the dough in the refrigerator for at least 2 hours, or until firm enough to slice easily.
- Preheat your oven to 375°F (190°C). Line baking sheets with parchment paper.
- Remove the chilled dough log and slice it into rounds about 1/4 inch thick. Place the slices onto the prepared baking sheets, leaving about 2 inches between each cookie.
- Bake for 8 to 10 minutes, or until the edges are lightly set. Do not overbake; these cookies should remain soft.
- Let the cookies cool on the baking sheet for 5 minutes before transferring them to a wire rack to cool completely.
Notes
- For festive holiday pinwheel cookies, divide the vanilla dough in half before adding cocoa. Color one half red and the other half green, then layer and roll as directed.
- To achieve the best swirl, make sure both doughs are chilled equally before layering. Roll the log as tightly as you can without tearing the dough.
- You can freeze the wrapped dough log for up to 3 months. Slice and bake directly from frozen, adding 1-2 minutes to the baking time.
Nutrition
- Serving Size: 1 cookie
- Calories: 135
- Sugar: 11
- Sodium: 65
- Fat: 7
- Saturated Fat: 4
- Unsaturated Fat: 3
- Trans Fat: 0
- Carbohydrates: 17
- Fiber: 0
- Protein: 2
- Cholesterol: 35
