 Skip to content

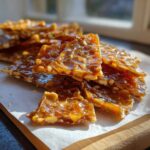
If you’re like me, you’ve probably bought those beautiful, shimmering, amber-colored candies and wondered, “How on earth do they get that perfect, shattering crunch?” I used to think making homemade peanut brittle was reserved for candy store savants, but trust me, it isn’t! I’m Alex, and if you want to learn more about my journey from corporate stress to pure cooking joy, you can check out my story right here. After way too many attempts that turned out sticky instead of snappy, I finally cracked the code. My ultimate **peanut brittle recipe** hinges entirely on one thing: temperature control. If you get the sugar to that magical ‘hard crack’ stage, you’re guaranteed that incredible *snap* every single time. Forget chewy disasters; this is the nostalgic, sweet and salty snack you’ve been searching for.
- Why This Old Fashioned Peanut Brittle Recipe Guarantees a Perfect Snap
- Gathering Simple Pantry Ingredients for Your Peanut Brittle Recipe
- Step-by-Step Instructions for the Best Peanut Brittle Recipe
- Tips for Success Making Homemade Peanut Brittle
- Making This Peanut Brittle Recipe Ideal for Holiday Candy Recipes
- Storage and Keeping Your Peanut Brittle Recipe Fresh
- Understanding the Nutrition in This Buttery Peanut Brittle
- Frequently Asked Questions About the Peanut Brittle Recipe
- Share Your Homemade Peanut Brittle Success
Why This Old Fashioned Peanut Brittle Recipe Guarantees a Perfect Snap
I know your biggest fear when making this confection, and I completely share it: that disappointing, sticky result. That’s the enemy of a truly great **old fashioned candy**! Most recipes fail because they rely on intuition for the sugar temperature, which just doesn’t cut it when you need that perfect, glass-like shatter. We are going for **no chew peanut brittle** here, folks, and that means avoiding anything that sets up soft.
What makes this version the **best peanut brittle recipe**? It’s the unwavering commitment to precision, especially during the boiling process. When you nail that final temperature, the sugar structure is locked in place, creating rigid bonds instead of pliable ones. That’s how you get that unmistakable, loud *snap* everyone loves.
Mastering the Hard Crack Stage: Your Key to Crunchy Candy Recipe Success
The magic word here is “hard crack.” For anyone new to **candy making for beginners**, this term refers to the exact point where boiled sugar becomes completely rigid when cooled. For us, that target temperature on the thermometer is 300 degrees Fahrenheit (or 149 Celsius). You absolutely need a reliable candy thermometer guide.
If you stop even 10 degrees early—say, at 290°F—you end up in the soft-crack zone. That soft stage means the sugar stays slightly flexible, which translates directly into sticky, chewy brittle instead of that glorious, airy crunch. We’re creating a pure **caramelized sugar candy** fortress, and 300°F is the only gate that locks properly.
Gathering Simple Pantry Ingredients for Your Peanut Brittle Recipe
The incredible thing about this classic **peanut brittle recipe** is that the ingredients list is unbelievably short! We aren’t dealing with fancy extracts or specialty items here; this truly is a **simple pantry ingredient candy** that tastes gourmet. I’ve laid out exactly what you need below for that perfect batch. Keep everything measured out and ready to go—seriously, once the heat is on, you won’t have time to hunt for a measuring cup, which is essential when we start making this **homemade peanut brittle**.
- 2 cups granulated sugar
- 1 cup light corn syrup
- 1 cup water
- 2 cups roasted, unsalted peanuts
- 2 tablespoons unsalted butter, softened
- 1 tablespoon baking soda
- 1 teaspoon vanilla extract
Ingredient Notes and Simple Substitutions
Now, even though the list is short, quality matters! For the peanuts, please use roasted and unsalted. If you only have raw ones, toast them gently in a dry skillet first until fragrant—it makes a huge difference in the final flavor. Also, don’t skimp on the butter; we want that rich, **buttery peanut brittle** flavor, so skip the margarine substitutes we talked about earlier!
The unsung hero here is the baking soda. Make sure yours is fresh! Old, tired baking soda won’t foam up correctly when we add it in at the very end, and that foam is what creates those lovely air pockets for a lighter texture. If your baking soda is ancient, toss it and grab a new box, trust me. This technique is a cornerstone of making great **crunchy candy recipe**.
Step-by-Step Instructions for the Best Peanut Brittle Recipe
Okay, deep breaths! This is where we put all that prep work to the test. Follow these steps exactly if you want that ultimate texture in your **peanut brittle recipe**. Honestly, the mixing part is quick, but you have to be ready to move fast when we hit that last crucial temperature. Don’t worry, I’ll walk you through the timing. If you want to see some of my other quick guides on how to make life easier in the kitchen, I post regularly on my blog here: my recipe journal!
Preparing the Surface and Initial Syrup Cook
First things first: set up your workstation! You absolutely must have your pan ready *before* the sugar starts boiling. Lightly grease a big baking sheet, or better yet, line it with parchment paper or a silicone baking mat—that makes cleanup a dream. Next, grab a heavy-bottomed saucepan. This is my biggest expert tip for you: thin pans create hot spots, and burnt sugar tastes bitter! You want that heat distributed evenly.
In that heavy pan, gently combine the sugar, corn syrup, and water. We stir this part just until the sugar dissolves, making sure no crystals are sticking to the sides, but stop stirring as soon as it starts bubbling. Pop your candy thermometer right in there, making sure the tip isn’t touching the very bottom of the pan. We’re aiming for smooth cooking now!
Reaching Critical Temperatures for Peanut Brittle Recipe
Time to bring the heat up to medium-high—we need some serious action here! Keep boiling, but seriously, don’t stir it anymore once it gets going. We need the mixture to hit 250°F (121°C). That’s the soft-ball stage, where the sugar is getting concentrated. Don’t panic when it hits that mark; we’re not done yet.
Now, stir in your roasted peanuts gently. Continue cooking until the thermometer screams, “We’re at 300°F (149°C)!” This is our lifeline! This is the hard crack stage, and consulting your **candy thermometer guide** here is non-negotiable for a **perfect brittle snap**. If you pull it off the heat even a hair too soon, you’ll skip the right structure entirely. Keep stirring occasionally to make sure nothing scorches while you climb to that 300-degree peak!

The Final Mix and Spreading Your Crunchy Candy Recipe
The second you hit 300°F, yank that pan off the burner! Seriously, move fast! Immediately stir in the softened butter, the vanilla, and the baking soda all at once. Oh boy, does this part surprise people! I remember the first time I tried this, the mixture foamed up at least three times its size right under my nose. It was alarming! But that massive foam is necessary because it traps all that air, making our **crunchy candy recipe** light and brittle, not a dense puck.

Stir just until everything is incorporated—don’t beat it! Pour that bubbling mess immediately onto your prepared sheet. Use a heatproof spatula to quickly spread it thin. I mean *thin*—the thinner it is, the finer the snap! Then, leave it alone! Let it cool completely for about half an hour until you can tap it and it sounds rock hard before you break it into those beautiful, irregular shards for gifting.
Tips for Success Making Homemade Peanut Brittle
Look, even with the best **peanut brittle recipe**, candy making can throw curveballs. If you’re new to this game—and I remember being there when I started **candy making for beginners**—a couple of environmental factors can throw off your sugar temperature. The biggest culprit? Humidity! If it’s raining or super muggy outside, the sugar struggles to evaporate water, and you might need to cook the syrup a few extra degrees past 300°F to compensate. Test your candy in the least humid part of your house!

Also, remember that heavy-bottomed pan I mentioned? It really is non-negotiable for that **old fashioned candy** texture. Think of it as investing in your brittle’s future! For easy cleanup later, I often place a sheet of parchment paper on top of my greased baking sheet—it keeps the mess contained and ensures I’m not desperately scraping sticky sugar off the metal. Check out some of my favorite snack recipes for when you need a quick sweet fix that doesn’t involve the stove!
Making This Peanut Brittle Recipe Ideal for Holiday Candy Recipes
Listen, if you make a batch of this perfect, crunchy brittle, you can’t possibly keep it all to yourself! This is truly the king of **holiday candy recipes**. There’s nothing better than giving someone a tin of **Christmas brittle** that you made totally from scratch. It feels so much more personal than anything store-bought, doesn’t it?
When you’re ready to package these up as **homemade holiday gifts**, I love breaking them into large, shiny pieces and lining a small metal tin with tissue paper—it looks so festive! You can even tie a little ribbon around the tin. If you want another super easy recipe that’s perfect for gifting right alongside the brittle, you should check out my hot cocoa mix guide. If you end up sharing your brittle success, tag me over on Facebook at my page; I love seeing your pictures!
Storage and Keeping Your Peanut Brittle Recipe Fresh
This **peanut brittle recipe** is so wonderful, but it has one major weakness: humidity! Sugar is basically a magnet for moisture, and even a little dampness will turn your beautifully crunchy confection soft and sad overnight. Don’t let that happen!

Once it’s completely cooled—and I mean totally cool to the touch—you need to get it into airtight containers immediately. Think sturdy plastic containers with tight-fitting lids or even heavy-duty zip-top bags with all the air pressed out. Store those containers in a cool, dry pantry. Resist the urge to put it in the fridge; that tends to introduce moisture, and we want that *snap* to last for days!
Understanding the Nutrition in This Buttery Peanut Brittle
Now, I know some of you are tracking every little thing, and while this **buttery peanut brittle** is certainly a treat, I have to give you my usual disclaimer right upfront. Since we are making this fantastic confection right here in our own kitchens, the exact nutritional amounts can swing wildly based on the peanuts or the sugar we use. Any data you see summarized for this recipe is just an estimate, not a scientific guarantee!
For the most accurate breakdown of calories, sugar, and fat, you’d need to look at the specific brands of corn syrup and peanuts you buy. You can find more about how I handle these details on my disclosure policy page right here. Enjoy this tasty snack responsibly!
Frequently Asked Questions About the Peanut Brittle Recipe
I always get questions whenever I share this incredible **peanut brittle recipe**, primarily because candy making feels a little intimidating at first. Don’t worry, though! Remember, I used to burn toast, so if I can nail this **classic brittle dessert**, you absolutely can too. Here are the things everyone asks me about to nail that perfect texture and make some fantastic **homemade holiday gifts**.
My brittle turned out chewy instead of having that perfect brittle snap. What went wrong?
Ugh, the dreaded chew! This is almost always because the sugar didn’t reach the correct temperature; it’s the number one issue with *any* **no chew peanut brittle** attempt. You absolutely must hit that hard crack stage, which is 300°F (149°C). If you pulled it off the heat at 295°F, for example, the sugar molecules didn’t lock into that rigid, crystalline structure needed for that satisfying crack. Next time, trust the thermometer and give it that extra minute to climb!
Can I make this easy peanut brittle recipe without a candy thermometer?
Oh, I really, *really* wish I could say yes so this could be the ultimate **easy peanut brittle recipe** for everyone, but for true candy success, you really shouldn’t. Guessing leads to sadness, trust me. Before I got my first reliable thermometer, I tried the ‘cold water test,’ where you drop a little syrup into ice water to see if it forms hard threads. Honestly? It’s so unreliable with humidity fluctuations, and it wastes time. If you want that guaranteed **perfect brittle snap**, investing in a good, easy-to-read candy thermometer is the single best step you can take for **candy making for beginners**.
If you have any other burning questions about how to make this **sweet and salty snack**, please don’t hesitate to reach out to me over on my contact page. I’m happy to help you troubleshoot your way to success!
Share Your Homemade Peanut Brittle Success
Now that you’ve got that glossy, perfectly snappy candy in your hands, I would absolutely *love* to see what you created! Did you manage that shattering crunch on your first try? Please rate this **peanut brittle recipe** down below and leave a comment telling me how it turned out. And if you snapped a picture of your beautiful **homemade peanut brittle**, tag me on social media—it just makes my day to see my recipes out in the wild! If you need to review how I protect your information while you’re browsing, you can check out my privacy policy here.
PrintThe Ultimate Easy Old-Fashioned Peanut Brittle Recipe: Perfect Snap Guaranteed
I am Alex, and I am happy you are here. This recipe shows you how to make classic homemade peanut brittle with that perfect snap. We focus on hitting the hard crack stage using a candy thermometer so your brittle is never chewy. This sweet and salty snack uses simple pantry ingredients and is ideal for holiday candy or gifting.
- Prep Time: 10 min
- Cook Time: 20 min
- Total Time: 40 min
- Yield: About 1 pound 1x
- Category: Dessert
- Method: Stovetop Cooking
- Cuisine: American
- Diet: Vegetarian
Ingredients
- 2 cups granulated sugar
- 1 cup light corn syrup
- 1 cup water
- 2 cups roasted, unsalted peanuts
- 2 tablespoons unsalted butter, softened
- 1 tablespoon baking soda
- 1 teaspoon vanilla extract
Instructions
- Prepare your baking surface: Lightly grease a large baking sheet or line it with parchment paper or a silicone mat. Set aside.
- Combine sugar, corn syrup, and water in a heavy-bottomed, 3-quart saucepan. Stir gently over medium heat until the sugar dissolves.
- Insert a candy thermometer into the mixture, avoiding the bottom of the pan.
- Increase heat to medium-high. Boil the mixture without stirring until it reaches 250 degrees Fahrenheit (121 degrees Celsius), the soft-ball stage. Watch this closely.
- Add the roasted peanuts to the boiling syrup. Stir them in gently.
- Continue to cook the mixture, stirring occasionally to prevent scorching, until the temperature reaches 300 degrees Fahrenheit (149 degrees Celsius). This is the hard crack stage. This step is critical for a perfect brittle snap.
- Immediately remove the saucepan from the heat. Quickly stir in the butter, baking soda, and vanilla extract. The mixture will foam up rapidly. Stir just until combined. Do not overmix.
- Pour the hot mixture onto the prepared baking sheet. Use a heat-safe spatula to spread it thinly and evenly. Work quickly, as it hardens fast.
- Let the brittle cool completely at room temperature for at least 30 minutes until hard.
- Once fully cooled, break the peanut brittle into irregular pieces. Store in an airtight container.
Notes
- Use a candy thermometer for accuracy; guessing the temperature leads to chewy brittle.
- Ensure your baking soda is fresh; old baking soda will not create the necessary airy texture.
- If you do not have roasted peanuts, you can toast raw peanuts in a dry skillet over medium heat until fragrant before starting the recipe.
- This recipe is excellent for making homemade holiday gifts.
Nutrition
- Serving Size: 1 ounce
- Calories: 180
- Sugar: 18
- Sodium: 35
- Fat: 9
- Saturated Fat: 2
- Unsaturated Fat: 7
- Trans Fat: 0
- Carbohydrates: 24
- Fiber: 1
- Protein: 4
- Cholesterol: 5
