 Skip to content
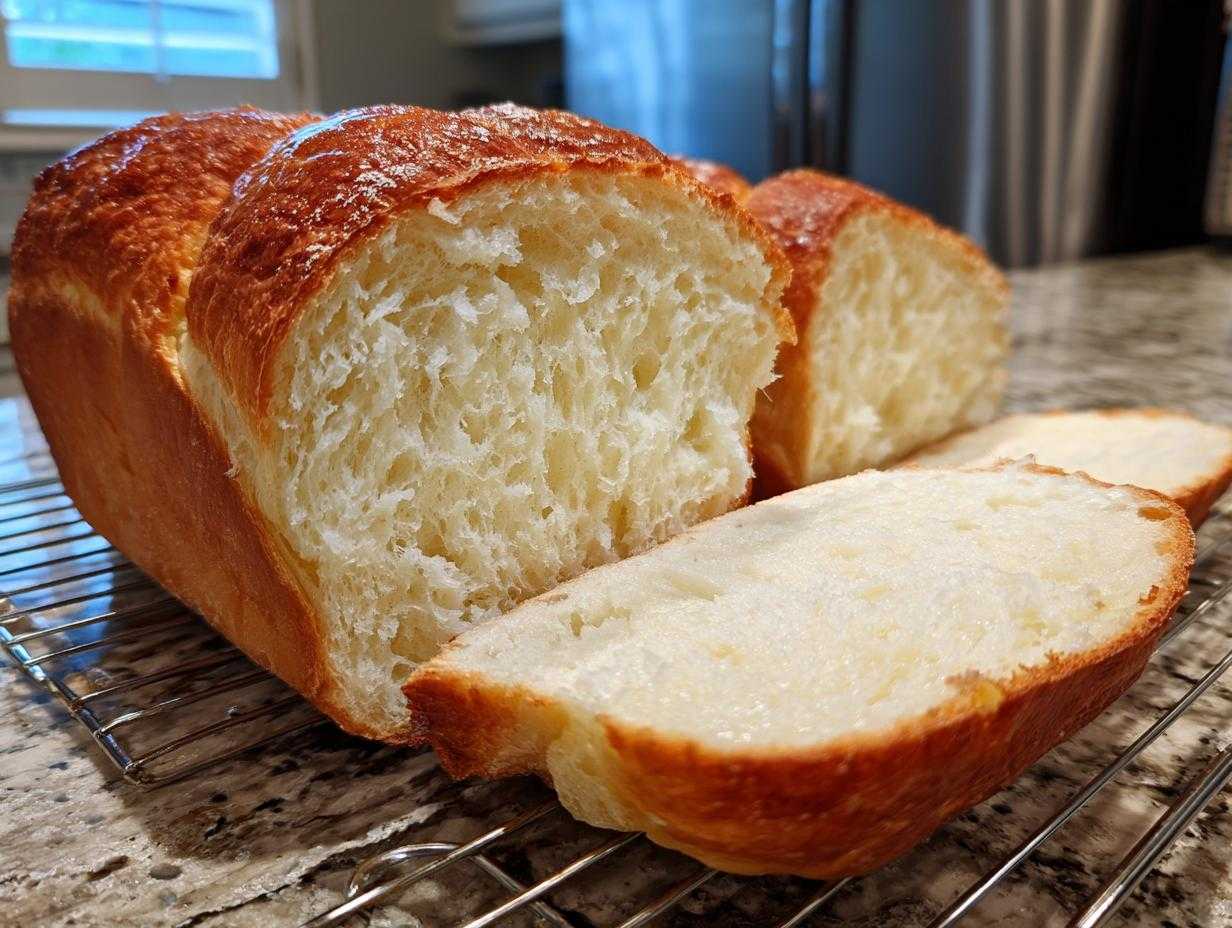

You know that bakery loaf that’s so soft it practically melts when you press it? The one that makes even the most basic sandwich feel like a treat? I used to think that level of perfection was impossible to achieve outside a professional kitchen. I spent years chasing spreadsheets in my corporate life, and the kitchen felt intimidating! But learning to bake bread—starting with this very recipe—was the spark that brought me pure joy. Trust me, this Ultra-Soft Homemade Milk Bread Loaf is shockingly easy. It’s pillowy, tender, and truly the best homemade loaf, even if you’ve never touched yeast before. Let’s get baking!
- Why This Ultra-Soft Milk Bread Recipe Works So Well
- Gathering Ingredients for Your Milk Bread Loaf
- Step-by-Step Instructions for Fluffy Homemade Bread
- Baking Your Bakery Style Bread at Home
- Tips for the Best Homemade Loaf Success
- Making This Milk Bread for Sandwiches and Toast
- Storage and Reheating Instructions
- Frequently Asked Questions About Making Milk Bread
- Sharing Your Delicious Milk Bread Creations
Why This Ultra-Soft Milk Bread Recipe Works So Well
Whenever I talk to people about making bread, especially if it’s for dinner or a simple breakfast, the first thing they ask is: “Is it going to be THAT soft?” With this milk bread, the answer is an emphatic yes! I used to think that level of perfection was impossible to achieve outside a professional kitchen. I spent years chasing spreadsheets in my corporate life, and the kitchen felt intimidating! But learning to bake bread—starting with this very recipe—was the spark that brought me pure joy. Trust me, this Ultra-Soft Homemade Milk Bread Loaf is shockingly easy. It’s pillowy, tender, and truly the best homemade loaf, even if you’ve never touched yeast before. If you want to stop stressing over meal planning and just bake something amazing, this is your bread!
We aim for that gorgeous, light texture that makes our meals feel instantly gourmet. If you want fluffy homemade bread that rivals your favorite bakery, this is the one you need saved.
Achieving Pillowy Soft Bread Texture
So, what’s the trick to this incredible softness? It comes down to a few key players. First, we are using bread flour. It has a higher protein content, which helps develop tons of gluten, giving us that satisfying, stretchy crumb. This is how we get that wonderful, pillowy soft bread we’re aiming for! Think about how bread should feel: elastic, tender, and light. The inclusion of softened butter and whole milk in the dough adds richness and moisture that just sitting on the oven won’t dry out.
An Easy Milk Bread Recipe for Beginners
Don’t let the idea of yeast scare you off! Seriously, this is one of the most straightforward, easy milk bread recipes you will ever attempt. I made sure to break down the kneading and the rising times very clearly in the steps below. We skip the fancy techniques for simplicity, relying on quality ingredients and proper kneading time to achieve that famous light texture. If you’re a beginner, this recipe builds confidence fast. You get results that look complex, but the steps themselves are totally smooth sailing!
Gathering Ingredients for Your Milk Bread Loaf
To get that gorgeous, bakery-quality loaf, we need to have our ingredients prepped before we even think about mixing! When I first started, I used to forget things left and right—always ending up with dry yeast or cold butter, which totally ruins the texture of this tender yeast bread. Not this time! For this ultra-soft milk bread, precision matters, even though the recipe itself is simple. We are using bread flour because it’s key to getting that perfect, springy structure.
Ingredient Checklist and Preparation Notes
Go ahead and pull everything out. Here’s exactly what you need for one fantastic loaf:
- 1 cup whole milk, warmed slightly (Don’t microwave it hot—it needs to be lukewarm for the yeast!)
- 2 tablespoons granulated sugar
- 1 packet (2 1/4 teaspoons) active dry yeast
- 3 1/2 cups bread flour, plus more for dusting (Seriously, try the bread flour for the fluffiest results!)
- 1 teaspoon salt
- 1 large egg, lightly beaten
- 4 tablespoons unsalted butter, softened (It should give easily when you press it, but not be oily.)
- 1 egg yolk mixed with 1 teaspoon water (This is just for a gorgeous golden egg wash later.)
Make sure that milk is just warm enough to feel cozy—around 105-115°F. If it’s too hot, it kills the yeast, and then we’re starting from scratch! I always check the temperature carefully so we can activate that yeast right away.
Step-by-Step Instructions for Fluffy Homemade Bread
Now that we have our ingredients ready—and remember, no stress!—we just follow the rhythm. Baking this milk bread loaf is relaxing once you get into the flow. We need two rises, which gives us that characteristic airy, melt-in-your-mouth texture. It’s a little patience that pays off big time in flavor and fluffiness, honestly. You’ll be amazed at how easy it is to make bakery-quality bread right on your counter!
Activating Yeast and Mixing the Milk Bread Dough
First things first, we have to wake up that yeast! Take your lukewarm milk—it should feel pleasant to the touch, not hot—and stir in your sugar and yeast. Let this sit on the counter for about 5 to 10 minutes. If you see foam building up on top, you’re good to go! That beautiful foam means your yeast is alive and ready to work its magic on this soft bread recipe.
While that’s happening, grab a separate bowl and whisk your bread flour and salt together. Once the yeast is foamy, pour in your beaten egg and the softened butter right into the milk mixture. Then, we start adding the flour mix gradually. You’ll mix it until it looks like a shaggy, messy ball. Don’t worry about how ugly it looks right now. That’s totally normal before we get kneading!
Kneading Technique for Tender Yeast Bread
Time to get our hands dirty! Turn that shaggy dough onto a lightly floured surface. You need to knead this dough for a good 8 to 10 minutes. I know, it feels like forever, but this develops the gluten structure that makes this dough so amazing. Keep pushing, folding, and turning. You’re looking for a dough that transforms from sticky and rough into something smooth, soft, and elastic. This is how you ensure you get that wonderfully tender yeast bread.
To check if you’ve hit the sweet spot, try the windowpane test. Gently stretch a small piece of dough between your fingers. If it stretches thin enough to see light through it without tearing immediately—perfect! If it rips instantly, knead for another minute or two.
Proofing and Shaping Your Milk Bread
When the dough passes the kneading test, place it in an oiled bowl, cover it snugly, and let it rise in a warm, draft-free spot for about an hour and a half, or until it’s doubled. The warmer your kitchen, the faster this happens!
Once it’s doubled—wow!—gently punch the air out. Divide the dough into three equal portions. Roll each piece into a tight log shape. Then, arrange those three rolls side-by-side in your greased 9×5 inch loaf pan. Cover that pan again, and let it happily proof for another 45 to 60 minutes. You want the dough to nearly be cresting over the top of the pan before it heads into the oven. That second rise is key for that iconic tall, fluffy homemade bread look!
Baking Your Bakery Style Bread at Home
Okay, the hard work of mixing and kneading is done! Now we transform this soft milk bread dough into that gorgeous, bakery style bread at home we’ve been dreaming about. This is where the real magic happens, but you have to make sure that oven is ready and waiting. I always preheat my oven to 350°F (175°C) while the dough is finishing its second rise because the second it’s ready to bake, I want it in there!
Before it goes in, we need to give it a beautiful golden finish. Take that little egg yolk wash you mixed up earlier—it’s just one yolk and a teaspoon of water—and gently brush it over the top of the dough. Don’t let it drip down the sides, just a nice, thin coat over the top surface. This gives the finished loaf that deep, rich color that screams quality. If you are interested in other baking projects that demand this kind of precision, make sure you check out my guide on foolproof Yorkshire pudding, because temperature control is everything there too!
Slide the pan carefully into the preheated oven. Bake for about 30 to 35 minutes. Now, while golden brown is the goal, I always trust my thermometer more than my eyes, especially with a thick loaf like this milk bread. You are looking for an internal temperature of 200°F (about 93°C) right in the center. Once you hit that temperature, pull it out immediately!
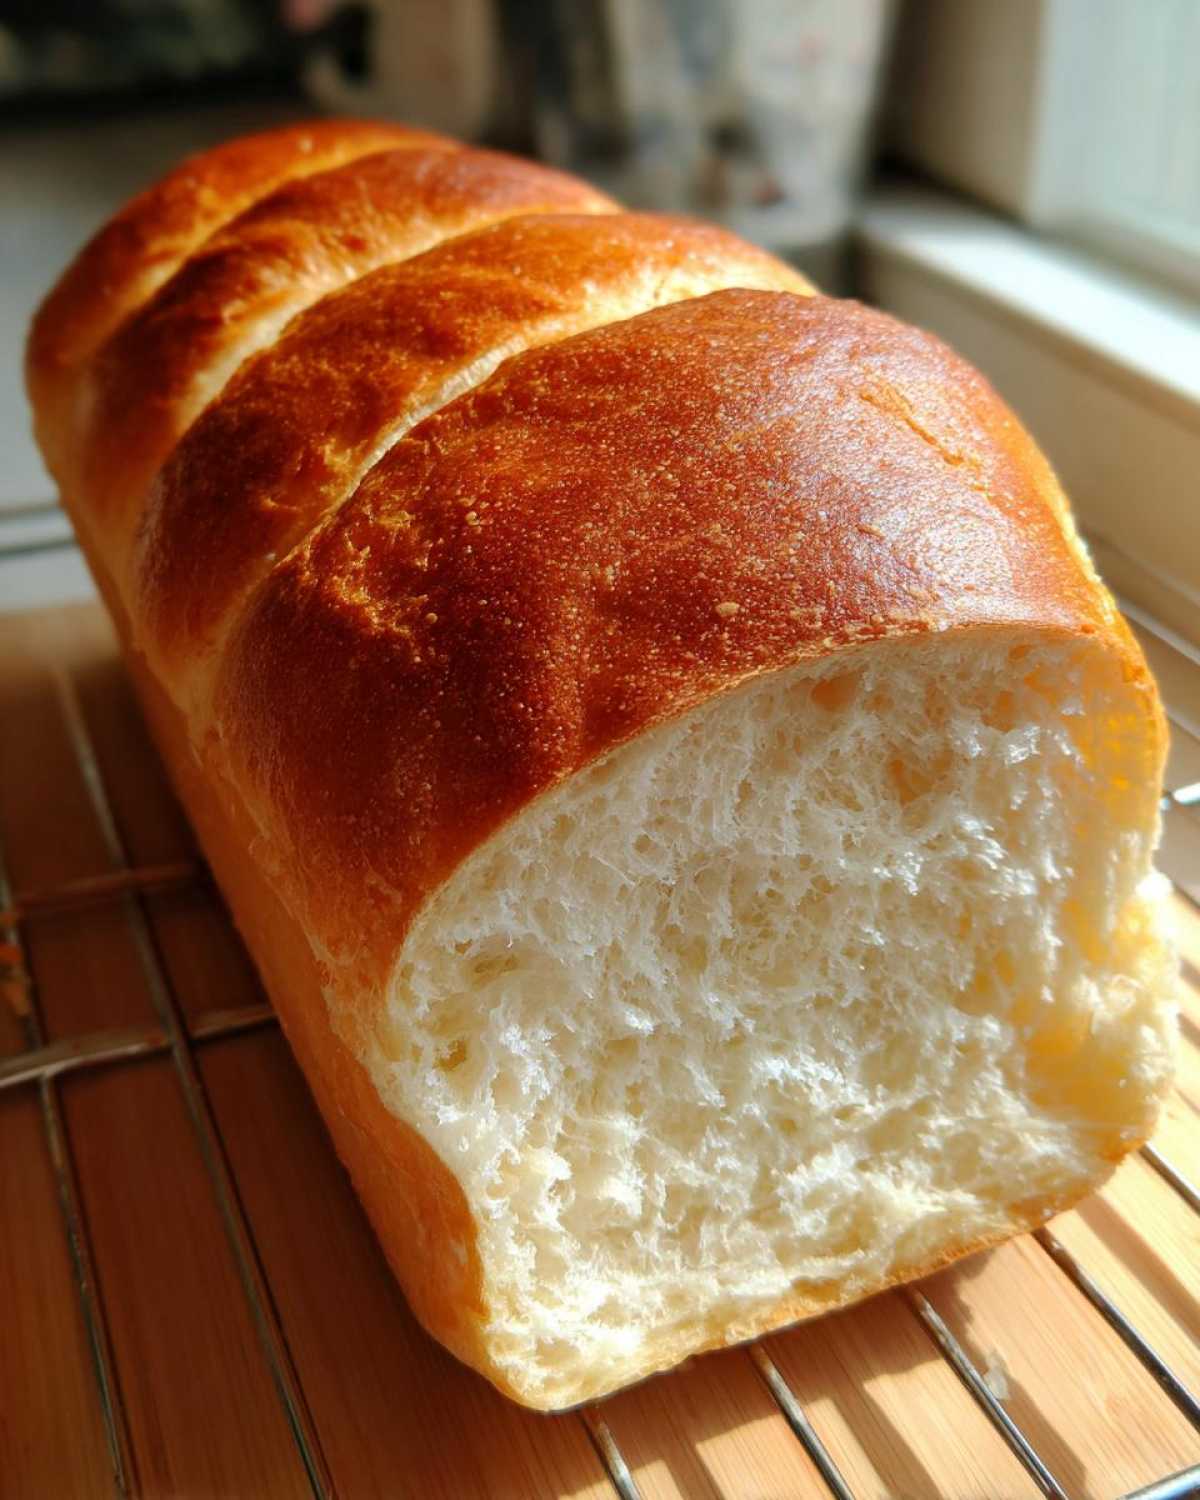
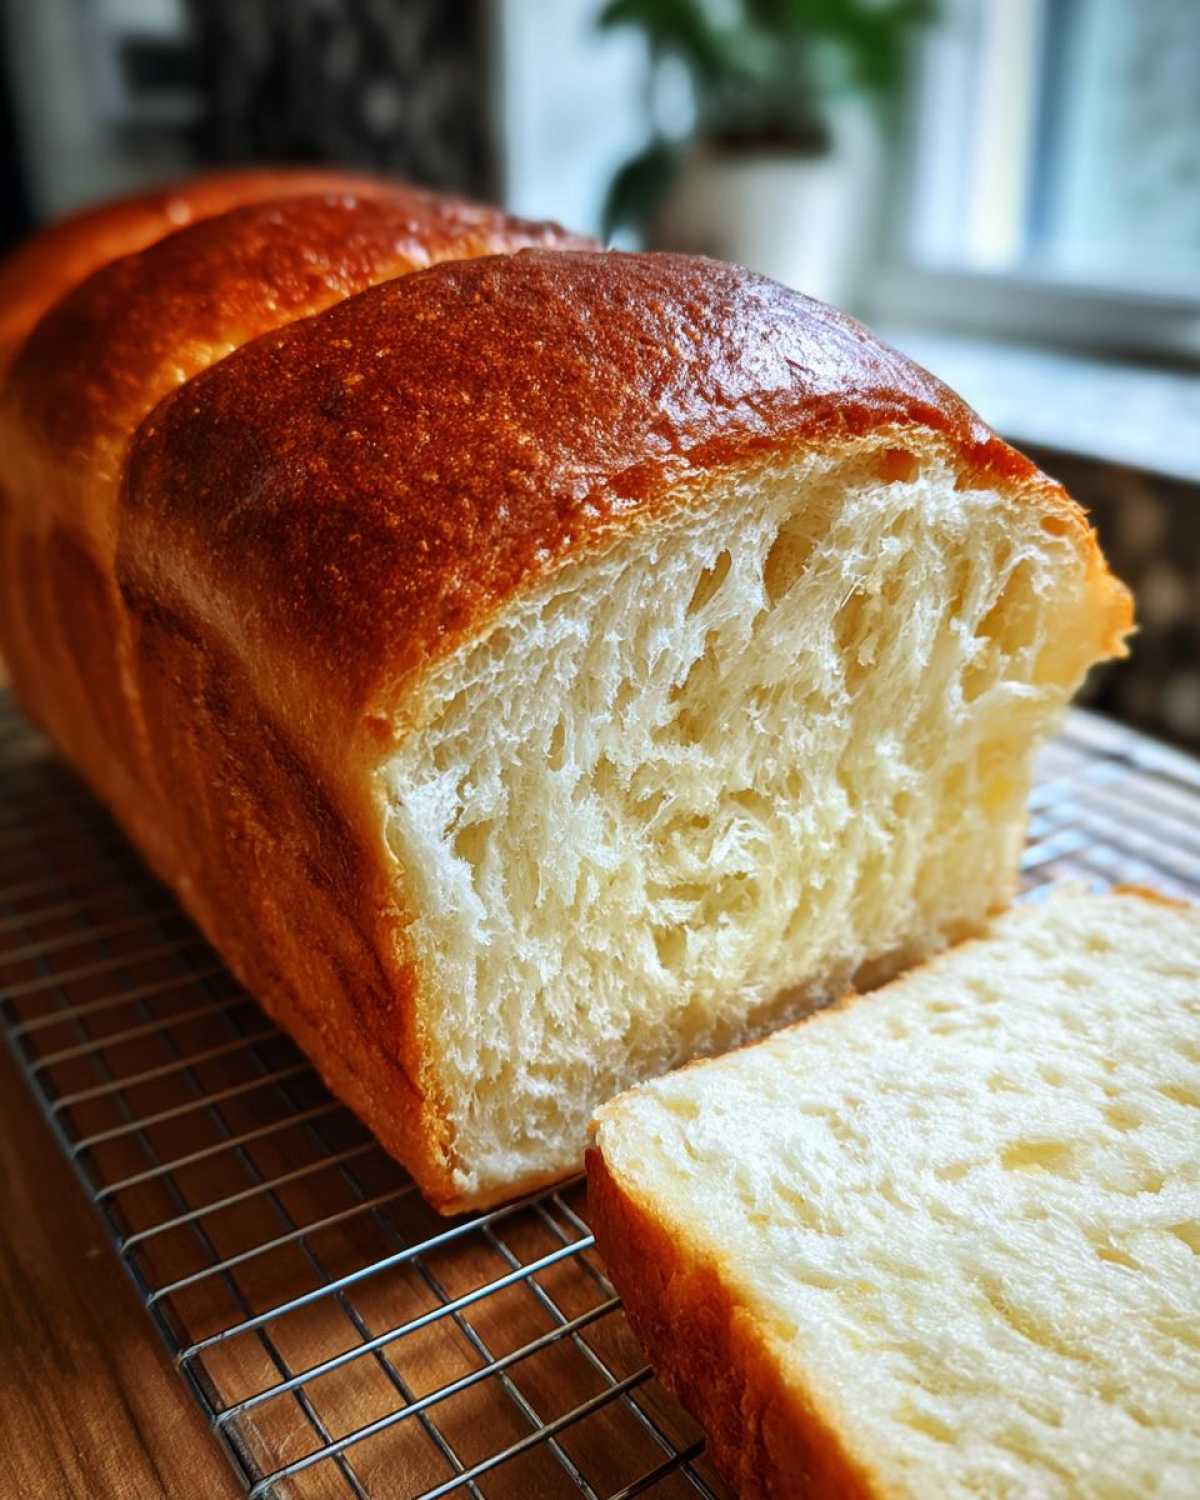
Don’t wait! The final step is crucial for texture. As soon as it’s done, turn the loaf out onto a wire rack immediately. If you leave it sitting in that hot pan, it will steam itself and lose some of that beautiful fluffiness we worked so hard to achieve. We need air circulation all around to set that crust perfectly.

Tips for the Best Homemade Loaf Success
We’ve baked the bread, it looks gorgeous, and now we have to stick the landing! Following these final steps ensures that this milk bread truly lives up to its promise of being the softest loaf you’ve ever made. Seriously, don’t skip the cooling time; I learned that the hard way when I was rushing back to my corporate job. I tried slicing into a loaf while it was still hot, and I ended up with a squished, gummy mess. It was a tragedy!
Cooling and Slicing Your Milk Bread
Remember Step 11? Let it cool completely on a wire rack! If you slice into this loaf while it’s warm, the steam trapped inside rushes out, and the tender crumb collapses on itself. Patience is key to maintaining that pillowy soft bread texture. Once it’s fully cool—and I mean actually cool to the touch, maybe an hour or two—use a sharp, serrated knife to slice it evenly. It glides right through the crust like warm butter, I promise!
Variations: Condensed Milk Bread Options
This basic milk bread is fantastic as is, but if you’re craving something a little richer or sweeter—maybe you want that lovely condensed milk bread flavor that’s popular—you can easily adjust. Instead of using all whole milk, try substituting maybe half a cup of the milk measurement with sweetened condensed milk. It adds a little extra sweetness and moisture right into the dough base. Just be careful not to over-knead if you do this, as the added sugar can sometimes interfere with gluten development slightly. It’s a fun twist when you want a sweeter breakfast bread!
For more ideas and inspiration on stepping up your baking game, always feel free to check out everything else I share over on the Pure Cooking Joy blog!
Making This Milk Bread for Sandwiches and Toast
I always tell people that while this loaf is heavenly warm with just a smear of butter, the real test of a great milk bread is how it performs the next day as sandwich bread. Unlike regular store-bought white bread, which disintegrates if you look at it wrong, this loaf holds up beautifully!
Because we worked hard to develop that strong but tender gluten network, this milk bread acts as the ultimate versatile sandwich bread. It’s soft enough to squish nicely around your fillings, but it won’t tear when you load it up with peanut butter or your favorite lunch meats. Seriously, try turning the leftover slices into something amazing, like my suggestion for Texas Toast Sloppy Joes!
When you toast it, that rich butter and milk content makes the edges just slightly crisp while the inside stays incredibly moist. It’s almost like eating a cloud. If you need a reliable, fluffy homemade bread that delivers gorgeous results every single time, stick to this recipe. It’s my guaranteed favorite for breakfast toast!
Storage and Reheating Instructions
We all know the real success of a moist bread loaf is how long it stays that way! This milk bread is surprisingly resilient, but because it’s so soft, it can dry out faster than chewy artisan loaves if left exposed. My best advice? Don’t wrap it up until it is completely cool, not even slightly warm. Once cooled, seal it tightly.
I usually just use a large zip-top plastic bag or wrap the whole loaf tightly in plastic wrap, pressing out as much air as possible before sealing. Stored like this at room temperature, it stays incredibly soft for about three days. It really won’t last much longer than that in my house, that’s how good it is!
If you know you won’t finish it quickly, freezing is the way to go. Slice the loaf first, and then wrap the individual slices tightly in plastic wrap, and then tuck them inside a freezer-safe bag. Slices freeze beautifully, and it means you always have a perfect slice ready to go!
Need to revive a slice that’s maybe a day or two old? Don’t just pop it in the toaster! While toasting is great, for that true melt-in-your-mouth experience, try microwaving a wrapped slice for about 10 seconds. Or, if you have time, brush the slice very lightly with a tiny bit of milk or melted butter and warm it in a 300°F oven for about five minutes. It brings back that incredible, just-baked fluffiness instantly. You’ll forget it was ever sitting on the counter!
Frequently Asked Questions About Making Milk Bread
When I first started baking this gorgeous loaf, I had a million questions buzzing around in my head! People always ask me things about technique, flour, and that famous fluffy homemade bread longevity. Don’t worry if you’re unsure about an ingredient or a step; I’ve collected the most common things folks ask me about this milk bread here. Hopefully, this clears everything up so you can focus on enjoying the process!
Can I make this Japanese Milk Bread using the Yudane method instead?
That’s a great question! Japanese Milk Bread, or Shokupan, is often made famous by the Yudane or Tangzhong methods. Right now, this recipe uses a slightly simpler starting point by just warming the milk and mixing the wet and dry ingredients together—which still yields amazing results, by the way! The Yudane method involves cooking a small portion of the flour and water into a thick paste first, which results in an extremely moist texture that stays soft for days. While this recipe keeps things easy for beginners, you absolutely can adapt it! If you prefer that next-level, archival softness, look into Yudane techniques; they are fantastic for achieving the ultimate soft bread recipe.
What kind of flour is best for this soft bread recipe?
If you take one piece of advice from me, make it this: please use bread flour if you possibly can! I know all-purpose flour seems easier to grab, but bread flour has a higher protein content, usually around 12% or more. That extra protein is what develops the strong gluten network when we knead. That’s the exact network responsible for trapping the gases and giving us that tall, fluffy profile and that wonderful, soft bread recipe texture.

If you use all-purpose flour, your milk bread will still bake up fine—it will just be less chewy, slightly more crumbly, and probably won’t rise quite as high. For the absolute best homemade loaf that feels like it came from a specialty shop, stick to bread flour!
How long does this fluffy homemade bread stay fresh?
Because of the fat content from the butter and the richness from the milk, this bread stays delightfully moist longer than your average homemade loaf, but it’s still fresh bread, right? If you store it correctly—wrapped tightly in plastic wrap or in an airtight container at room temperature—you can expect it to stay really soft and perfect for about three days. After day three, it might start losing a little of that fresh-baked springiness. That’s why freezing slices is always my backup plan!
Sharing Your Delicious Milk Bread Creations
Wow, you made it! You tackled the yeast, you watched it rise, and now you hold a genuine loaf of ultra-soft milk bread. That is awesome! Honestly, seeing your beautiful, fluffy creations is the pure cooking joy I live for. Knowing that my journey from burnt toast to this perfect loaf can inspire yours is why I put all these steps out here.
I’d feel so honored if you took a second to tell me how it went! Did you make it for a special breakfast? Did you try toasting it later in the week? Leave a rating right down below so other beginners feel confident trying this recipe next. It really helps me know which recipes are working great for everyone!
If you snap a picture of your glorious loaf—maybe stacked up next to your favorite morning coffee—I would absolutely love to see it! Tag me on social media, or send a message through my contact page. I’m always looking for new ways to use this versatile loaf, maybe even as a base for some amazing meal planning inspiration for next week!
Happy baking, friends. I hope this sweet breakfast bread brings as much peace to your kitchen as it does to mine!
PrintUltra-Soft Homemade Milk Bread Loaf (Beginner Friendly)

Bake a loaf of incredibly soft, pillowy milk bread that is perfect for sandwiches or toast. This recipe uses simple steps to give you bakery-quality results, proving great food does not need to be complicated.
- Prep Time: 25 min
- Cook Time: 35 min
- Total Time: 2 hr 40 min
- Yield: 1 loaf 1x
- Category: Baking
- Method: Kneading and Baking
- Cuisine: American/General
- Diet: Vegetarian
Ingredients
- 1 cup whole milk, warmed slightly
- 2 tablespoons granulated sugar
- 1 packet (2 1/4 teaspoons) active dry yeast
- 3 1/2 cups bread flour, plus more for dusting
- 1 teaspoon salt
- 1 large egg, lightly beaten
- 4 tablespoons unsalted butter, softened
- 1 egg yolk mixed with 1 teaspoon water (for egg wash)
Instructions
- Warm the milk until it is lukewarm (about 105-115°F). Pour the milk into a large bowl and stir in the sugar and yeast. Let this mixture sit for 5 to 10 minutes until it becomes foamy.
- In a separate bowl, whisk together the bread flour and salt.
- Add the beaten egg and softened butter to the yeast mixture. Gradually add the flour mixture to the wet ingredients, mixing until a shaggy dough forms.
- Turn the dough out onto a lightly floured surface. Knead for 8 to 10 minutes until the dough is smooth and elastic. It should pass the windowpane test.
- Place the dough in a lightly oiled bowl, turning to coat. Cover the bowl with plastic wrap or a clean towel and let it rise in a warm place for 1 to 1.5 hours, or until doubled in size.
- Gently punch down the risen dough. Divide the dough into three equal pieces. Roll each piece into a smooth log shape.
- Place the three logs side-by-side in a greased 9×5 inch loaf pan.
- Cover the pan loosely and let the dough proof for a second time for 45 to 60 minutes, or until the dough has nearly doubled and crests over the top of the pan.
- Preheat your oven to 350°F (175°C). Brush the top of the dough lightly with the egg yolk wash.
- Bake for 30 to 35 minutes, or until the top is golden brown and the internal temperature reaches 200°F.
- Remove the bread from the oven and immediately turn it out onto a wire rack to cool completely before slicing.
Notes
- If you are looking for quick weeknight meals, using store-bought bread is fine, but baking this loaf yourself provides a superior texture.
- For an extra soft crust, brush the top of the loaf with melted butter immediately after removing it from the oven.
- This bread is excellent for making sandwiches; its soft crumb holds up well to fillings without tearing.
Nutrition
- Serving Size: 1 slice
- Calories: 180
- Sugar: 4
- Sodium: 250
- Fat: 4
- Saturated Fat: 2
- Unsaturated Fat: 2
- Trans Fat: 0
- Carbohydrates: 31
- Fiber: 1
- Protein: 5
- Cholesterol: 30
