 Skip to content

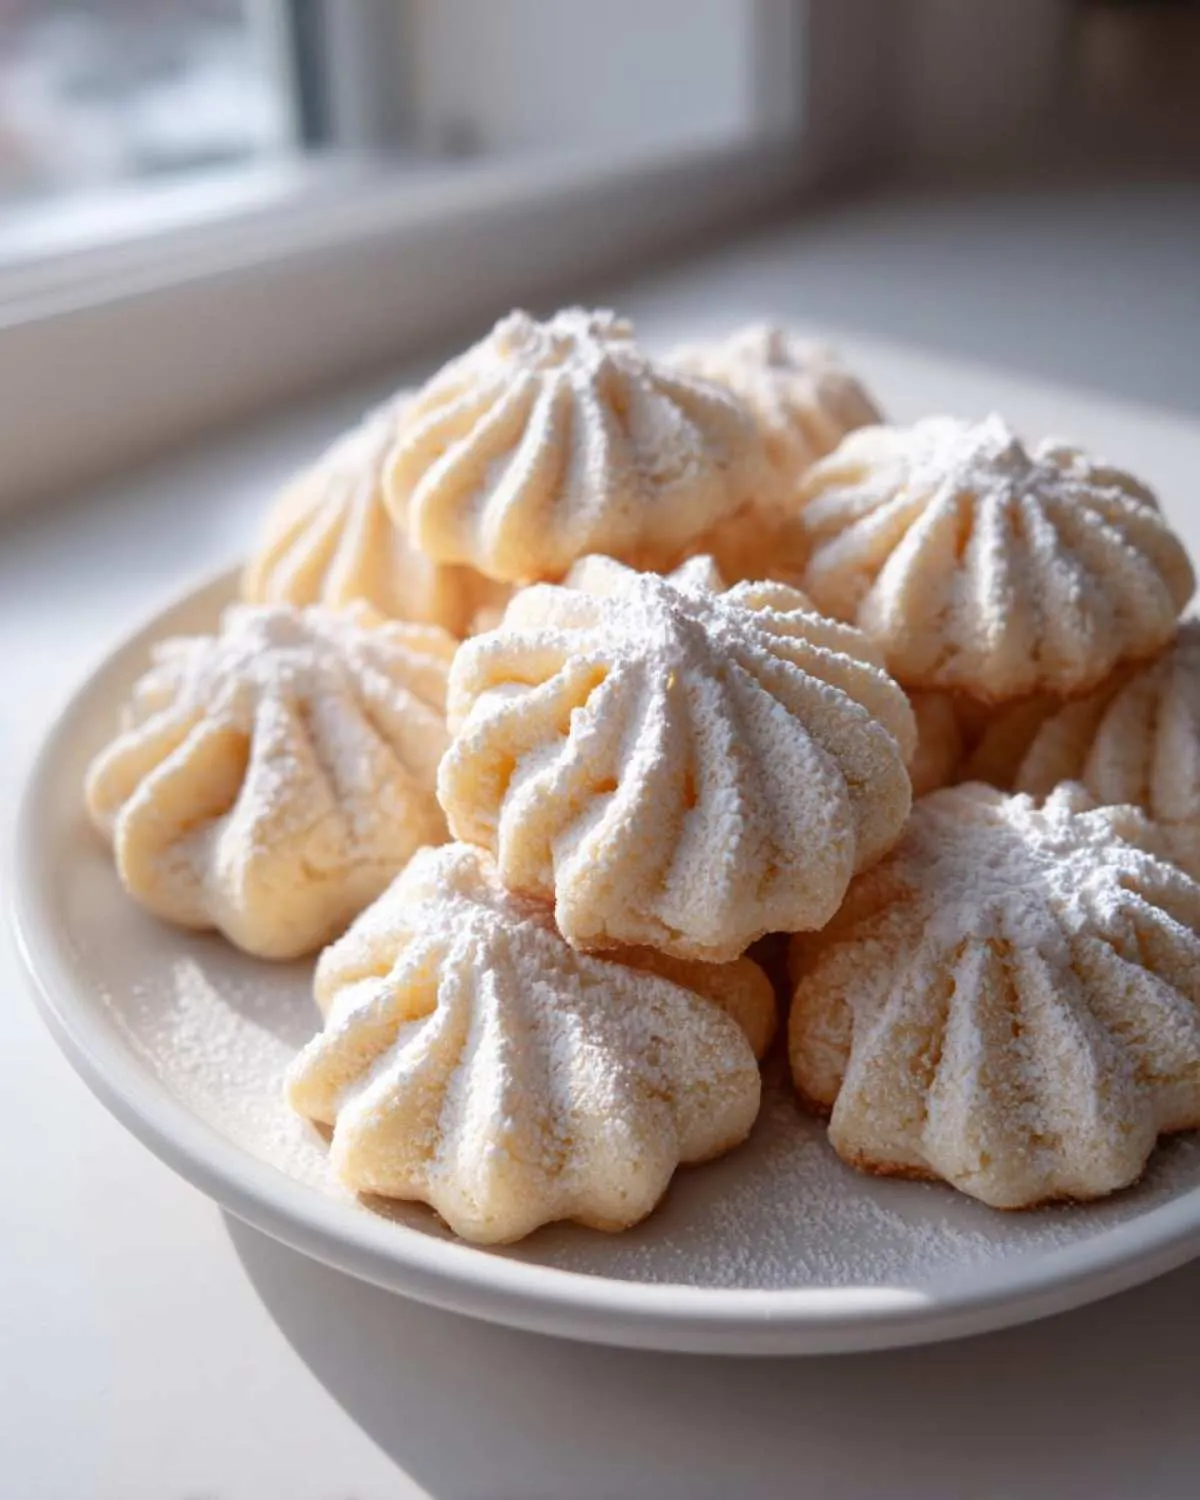
Do you ever walk into an old-school bakery and just stare at those perfect, piped cookies dusted with sugar? I used to press my face right up against the glass, convinced those delicate, buttery swirls were impossible to recreate at home. Well, let me tell you, that changes today! These amazing italian butter cookies taste exactly like the pastry shop classics—buttery, delicate, and true melt-in-your-mouth cookies. Coming from someone who used to find cooking stressful, I promise you, bringing this kind of joy home doesn’t require complicated steps. We’re going to achieve bakery-style perfection with simple methods that bring pure cooking joy!
- Why These Are the Best italian butter cookies You Will Ever Make
- Gathering Ingredients for Your italian butter cookies Recipe
- Step-by-Step Instructions for Perfect Piped italian butter cookies
- Baking and Cooling Your italian butter cookies
- Decorating Your Soft Buttery Cookies: Jam, Chocolate, and More
- Tips for Success Making Classic italian butter cookies
- Storage and Making Ahead for italian butter cookies
- Frequently Asked Questions About italian butter cookies
- Nutritional Estimate for This Classic Italian Baking Treat
- Share Your Pure Cooking Joy
Why These Are the Best italian butter cookies You Will Ever Make
When I started baking these instead of buying them, I couldn’t believe the difference. These italian butter cookies are genuinely superior to anything you grab off the shelf. They are soft, incredibly buttery, and designed specifically to dissolve perfectly the second they hit your tongue. Forget hard, crumbly spritz cookies; we are aiming for pure tenderness here!
- True Bakery Style Butter Cookies you make yourself!
- Incredibly Soft Buttery Cookies; they aren’t crunchy at all.
- They have that amazing, signature melt-in-your-mouth quality.
- This dough comes together quickly—no chilling needed!
Texture and Flavor Profile of Authentic italian butter cookies
The secret to that buttery perfection comes down to two things: powdered sugar instead of granulated, and using a full cup of softened, quality butter. The high fat content, combined with the way we mix it, creates a structure that yields the ultimate tender crumb. They aren’t just sweet; they have a deep, creamy vanilla flavor that sings.
Gathering Ingredients for Your italian butter cookies Recipe
Okay, let’s talk about what you need. For these italian butter cookies, we keep the ingredient list short because we want that pure butter flavor to shine through. Remember, we are aiming for softness, so precision matters here, even though the process is easy!
You will need:
- 1 cup unsalted butter, softened
- 2/3 cup powdered sugar
- 1 large egg
- 2 teaspoons vanilla extract
- 2 cups all-purpose flour
- 1/4 teaspoon salt
And don’t forget the optional toppings! You’ll see later why melted chocolate and chopped pistachios make these look utterly professional.
Ingredient Notes and Easy Substitutions
The most important thing, hands down, is your butter. It must be truly softened—think easy to press your finger into but not greasy or melted. If it’s too warm, the dough won’t pipe correctly. For the flour, I really recommend taking five seconds to sift it with the salt. It helps keep the final dough light, which is key for this No Chill Butter Cookie Recipe.
Also, we use powdered sugar, not granulated. The powdered sugar melts right into the dough, giving us that smooth, tender vanilla cookies feel we’re looking for, whereas granulated sugar could make them gritty.
Step-by-Step Instructions for Perfect Piped italian butter cookies
Alright, this is where the magic happens! Don’t let the piping part scare you; these are truly some of the most Easy Piped Cookies you’ll ever make. The dough is really cooperative, which is fantastic when you’re trying to get those beautiful swirls. We need to follow the order exactly to make sure we get that soft texture rather than a hard biscuit.
Mixing the Best Butter Cookie Dough
In your big bowl, get that softened butter and the powdered sugar together. I use my electric mixer for this part, but you can totally do it by hand if you want a good arm workout! Beat them together until they look light, fluffy, and pale yellow. It should look creamy, almost like a frosting base. Then, beat in your egg and vanilla until they’re just combined. This is what builds the foundation for the Best Butter Cookie Dough!
Now, the important part: add your sifted flour and salt all at once. Mix this on low speed, or stir by hand gently, just until the streaks of flour disappear. Seriously, I mean it—stop right there! Overmixing that flour develops the gluten and ruins the tender texture. We want soft, not tough cookies!
Piping Techniques for Bakery Style Butter Cookies
Time to load up the piping bag. Make sure it’s fitted with a nice, large star tip—like a Wilton 1M, that big open one. You want a generous opening so the dough flows easily. Fill your bag about two-thirds full; don’t overstuff it or it gets hard to handle. For perfect Bakery Style Butter Cookies, hold the bag straight up and down, start squeezing gently to form a base, and then swirl outward in whatever pattern you like—simple rings or rosettes work beautifully. When you finish the shape, stop squeezing *before* you lift the tip away. That keeps your shapes neat.
You should be able to fit about eight cookies per sheet, spaced nicely apart. If you’re looking for more quick inspiration on mixing doughs, I have some great stuff over on my soft chocolate chip cookies post that covers creaming techniques!
Baking and Cooling Your italian butter cookies
Now that your beautiful little butter swirls are lined up perfectly on the baking sheet, it’s time for the bake! The best part about these is that they are such a Quick Cookie Baking project. Trust me, you’ll be done faster than you can decide which topping to use first.
Make sure your oven is fully preheated to 350°F (175°C). If the oven isn’t hot enough, the butter starts to melt before the cookie structure sets up, and you’ll end up with buttery puddles instead of pretty shapes. On the baking sheet, they generally take between 10 and 12 minutes. Don’t look for them to get dark brown—that’s not what we want for that soft, tender vanilla cookies look.
Watch the edges! You are looking for the very slightest hint of light gold creeping around the perimeter. That’s your signal. When they look light golden, pull them out!

Here’s the part where patience pays off: cooling. You absolutely must let these italian butter cookies cool down right there on the baking sheet for a good five to ten minutes. If you try to gently move these soft guys immediately, they will bend and likely crack or break. They need that initial rest period to firm up just enough so we can move them over to the cooling rack without incident. A slightly broken cookie is still delicious, but we are going for that perfect pastry shop look, remember?
Decorating Your Soft Buttery Cookies: Jam, Chocolate, and More
Now that we have these gorgeous, tender italian butter cookies cooling down, we get to the fun part—decorating! This is how you take them from “homemade treat” to looking exactly like those beautiful ones you see in the storefront windows. Because these are such Classic Italian Baking staples, you have a few wonderful ways to finish them off.
The easiest way, which I always do for a simple presentation, is just a generous dusting of powdered sugar right after they’ve cooled a bit. It looks elegant and adds just a touch more sweetness.

If you want that true Italian shop vibe, you need to try dipping them. Melt some bittersweet or semi-sweet chocolate—I usually do this right in the microwave in 30-second bursts, stirring in between—and dip just one end of the cookie into the chocolate. Before the chocolate sets, sprinkle on some finely chopped pistachios for color and crunch. These Cookies Dipped in Chocolate are always the first ones gone!
Here’s my secret for next-level presentation: the sandwich! Take two cooled cookies, and spread a thin layer of your favorite raspberry jam or even a smear of melted chocolate in between. They hold together perfectly and create such a satisfying bite. If you’re looking for other fun ways to make things look professional without much effort, check out my guide on one-bowl moist chocolate chip banana bread; easy assembly is key to joy in the kitchen!
Tips for Success Making Classic italian butter cookies
Even though this recipe for italian butter cookies is straightforward—there’s no chilling, which is a huge win for busy cooks—there are a few little tricks I learned the hard way that you should know about. These tips help you nail that authentic bakery look every single time, which makes them perfect additions to any of your Simple Holiday Cookie Recipes!
First, let’s talk about dough consistency again because this is the make-or-break moment for piping. If you find your dough is too stiff right out of the mixer to push through your piping bag without your arm screaming, don’t panic! This happens sometimes based on the humidity that day.
My fix is simple: just let the bowl of dough sit on the counter for five to ten minutes. Seriously, that’s it. Letting it warm up just slightly softens the butter enough that the stiffness eases right off. I remember the first time I tried piping these, I wrestled with the bag for five minutes until I almost threw it across the kitchen! Then I remembered my Aunt Lena telling me about letting the dough ‘relax.’ As soon as I waited those few minutes, the dough flowed out like silk, and I managed to pipe the prettiest little rings. Pure joy right there!
Another quick tip for that professional finish: make sure your baking sheets are lined with parchment paper, not wax paper! Wax paper can melt and actually stick to the bottom of the cookies, which ruins that clean release we want. A little extra attention to your liners ensures you get those perfect bottoms, ready for presentation or wrapping up as gifts. If you love seeing my latest baking experiments, check out my main blog page for what’s fresh out of the oven!
Storage and Making Ahead for italian butter cookies
One of the best things about these tender vanilla cookies is that they are fantastic candidates for making ahead, especially if you are getting ready for a big holiday tray or need gifts ready to go! Since we used powdered sugar and a high butter content, they naturally stay softer than a standard shortbread.
The absolute must-do for storage is keeping them in an airtight container. If they sit out too long, they will start to dry out, and we want to preserve that perfect melt-in-your-mouth texture. I usually layer them—if they aren’t decorated with chocolate or jam—with parchment paper in between the layers. This stops them from sticking together, which is super important if you’ve dusted them heavily with powdered sugar.

You can easily keep these italian butter cookies at cool room temperature for up to a week. Honestly, I think they are actually even better on day two! The flavors settle in, and the texture firms up just enough to make them wonderfully sturdy for handling, but they still break apart beautifully when you bite into them. Don’t bother hiding them in the fridge; the cold air tends to wick away moisture and makes them taste stale faster. Keep them on the counter, tucked away in your prettiest cookie tin, and they’ll be ready whenever company drops by!
Frequently Asked Questions About italian butter cookies
I know baking can bring up questions, especially when you’re trying to achieve that specific bakery style perfection! Don’t worry; I’ve tried every mistake in the book so you don’t have to. Here are the things folks ask me most often about getting these soft buttery cookies just right. If you have more questions after baking, please feel free to reach out on my contact page!
Can I make these italian butter cookies without a piping bag?
That’s a great question! Piping is what gives us that signature look—those beautiful ridges are part of what makes them authentic Italian Pastry Shop Cookies. If you absolutely don’t have a piping bag, you can try pressing the dough balls down slightly with the bottom of a glass dipped in sugar. They will flatten out more and spread a bit wider, developing more like a traditional drop cookie. Just know that you will lose some of that delicate, lofty interior structure that piping provides. They will still taste amazing, but the texture won’t be quite the same melt in your mouth experience.
How do I get the ‘melt in your mouth’ texture in these cookies?
This is the magic of the recipe, and it boils down to how you mix! To ensure you get those incredible melt in your mouth cookies, you have to focus on two ingredients. First, always use powdered sugar, not granulated. Powdered sugar dissolves instantly and helps keep the dough light. Second, you absolutely must cream your softened butter and that powdered sugar until it’s legitimately light and fluffy, usually for a good few minutes. This process whips air into the fat. Those tiny air pockets are what make the final cookie fall apart tenderly when you eat it. It’s the key to Classic Italian Baking success!
Are these cookies similar to Homemade Spritz Cookies?
Yes and no! If you think of Homemade Spritz Cookies, you’re right on track regarding the method—we’re both using a press or a piping bag to shape the soft dough before baking. However, the flavor profile is different. Spritz cookies often rely more heavily on almond extract or lemon, and they tend to bake up slightly crisper or drier. These italian butter cookies focus much more heavily on the pure, rich flavor of creamed butter and vanilla, ensuring they stay softer and have that deep, comforting quality that makes them truly special as an Authentic Italian Dessert.
Nutritional Estimate for This Classic Italian Baking Treat
Hey, I’m Alex, and while my whole philosophy here at Pure Cooking Joy is making sure food brings you happiness—not stress—I know some of you like to keep track of what you’re eating. Even when we are indulging in the best italian butter cookies, it’s good to know what’s on the plate!
Keep in mind these numbers are estimates based on the recipe provided. I always say planning ahead for treats is just as important as structured meal planning for your weeknight dinners. You can enjoy things guilt-free when you know the whole picture!
Here is the estimated breakdown, per one of these soft, buttery cookies:
- Serving Size: 1 cookie
- Calories: About 90
- Fat: 6g (with 3.5g saturated)
- Carbohydrates: 8g
- Sugar: 4g
- Protein: 1g
See? Not too bad for such a rich, melt-in-your-mouth treat when you think about it! It’s the perfect sweet finish to a meal, and since we used powdered sugar and quality ingredients, it feels like such a necessary indulgence. Remember, food is meant to be enjoyed, and these delicious homemade spritz cookies are certainly worth it!
Share Your Pure Cooking Joy
Now that you’ve created these gorgeous, delicate italian butter cookies right in your own kitchen, I truly hope you felt that sense of pure cooking joy I talked about in my story! Baking shouldn’t be a chore; it should be a delightful process that results in something wonderful like these soft, buttery treats.
I would absolutely love to hear how they turned out for you. Did you go for the classic powdered sugar dusting? Or did you get fancy and dip the ends in melted chocolate and pistachios? Don’t be shy—the decorating is half the fun!
Please take a moment to leave a star rating right below the recipe card. It helps other home cooks who are looking for reliable, easy recipes find their way here. And if you snap a picture of your perfect piped swirls, tag me on social media! I love seeing your beautiful results. You can connect with me and share your culinary victories over on my Facebook page at Pure Cooking Joy on Facebook. Happy baking, friends!
PrintBakery-Style Italian Butter Cookies: Soft and Melt-in-Your-Mouth

Make tender, buttery Italian cookies that taste like they came from a pastry shop. This recipe uses simple steps to create soft, piped cookies perfect for gifting or enjoying with coffee.
- Prep Time: 15 min
- Cook Time: 12 min
- Total Time: 27 min
- Yield: About 24 cookies 1x
- Category: Dessert
- Method: Baking
- Cuisine: Italian
- Diet: Vegetarian
Ingredients
- 1 cup unsalted butter, softened
- 2/3 cup powdered sugar
- 1 large egg
- 2 teaspoons vanilla extract
- 2 cups all-purpose flour
- 1/4 teaspoon salt
- Optional toppings: melted chocolate, chopped pistachios, powdered sugar
Instructions
- Preheat your oven to 350°F (175°C). Line a baking sheet with parchment paper.
- In a large bowl, beat the softened butter and powdered sugar together until the mixture is light and creamy.
- Add the egg and vanilla extract, mixing until everything is well combined.
- Sift the flour and salt into the wet ingredients. Stir until a soft dough forms. Do not overmix.
- Transfer the dough to a piping bag fitted with a large star tip (like a Wilton 1M or similar).
- Pipe shapes such as rings, swirls, or straight lines onto the prepared baking sheet, leaving about one inch between cookies.
- Bake for 10 to 12 minutes, watching closely until the edges are just lightly golden.
- Cool the cookies completely on the baking sheet before moving them.
- Decorate as desired: dust with powdered sugar, dip the ends in melted chocolate, or sprinkle with chopped pistachios.
Notes
- If your dough feels too stiff to pipe, let it rest at room temperature for a few minutes to soften slightly.
- For a true bakery touch, sandwich two cooled cookies together with a thin layer of raspberry jam or melted chocolate.
- These cookies are excellent for holiday trays and require no chilling time, unlike some other cookie doughs. This saves time compared to complex meal planning.
Nutrition
- Serving Size: 1 cookie
- Calories: 90
- Sugar: 4g
- Sodium: 25mg
- Fat: 6g
- Saturated Fat: 3.5g
- Unsaturated Fat: 2.5g
- Trans Fat: 0g
- Carbohydrates: 8g
- Fiber: 0.2g
- Protein: 1g
- Cholesterol: 25mg
