 Skip to content

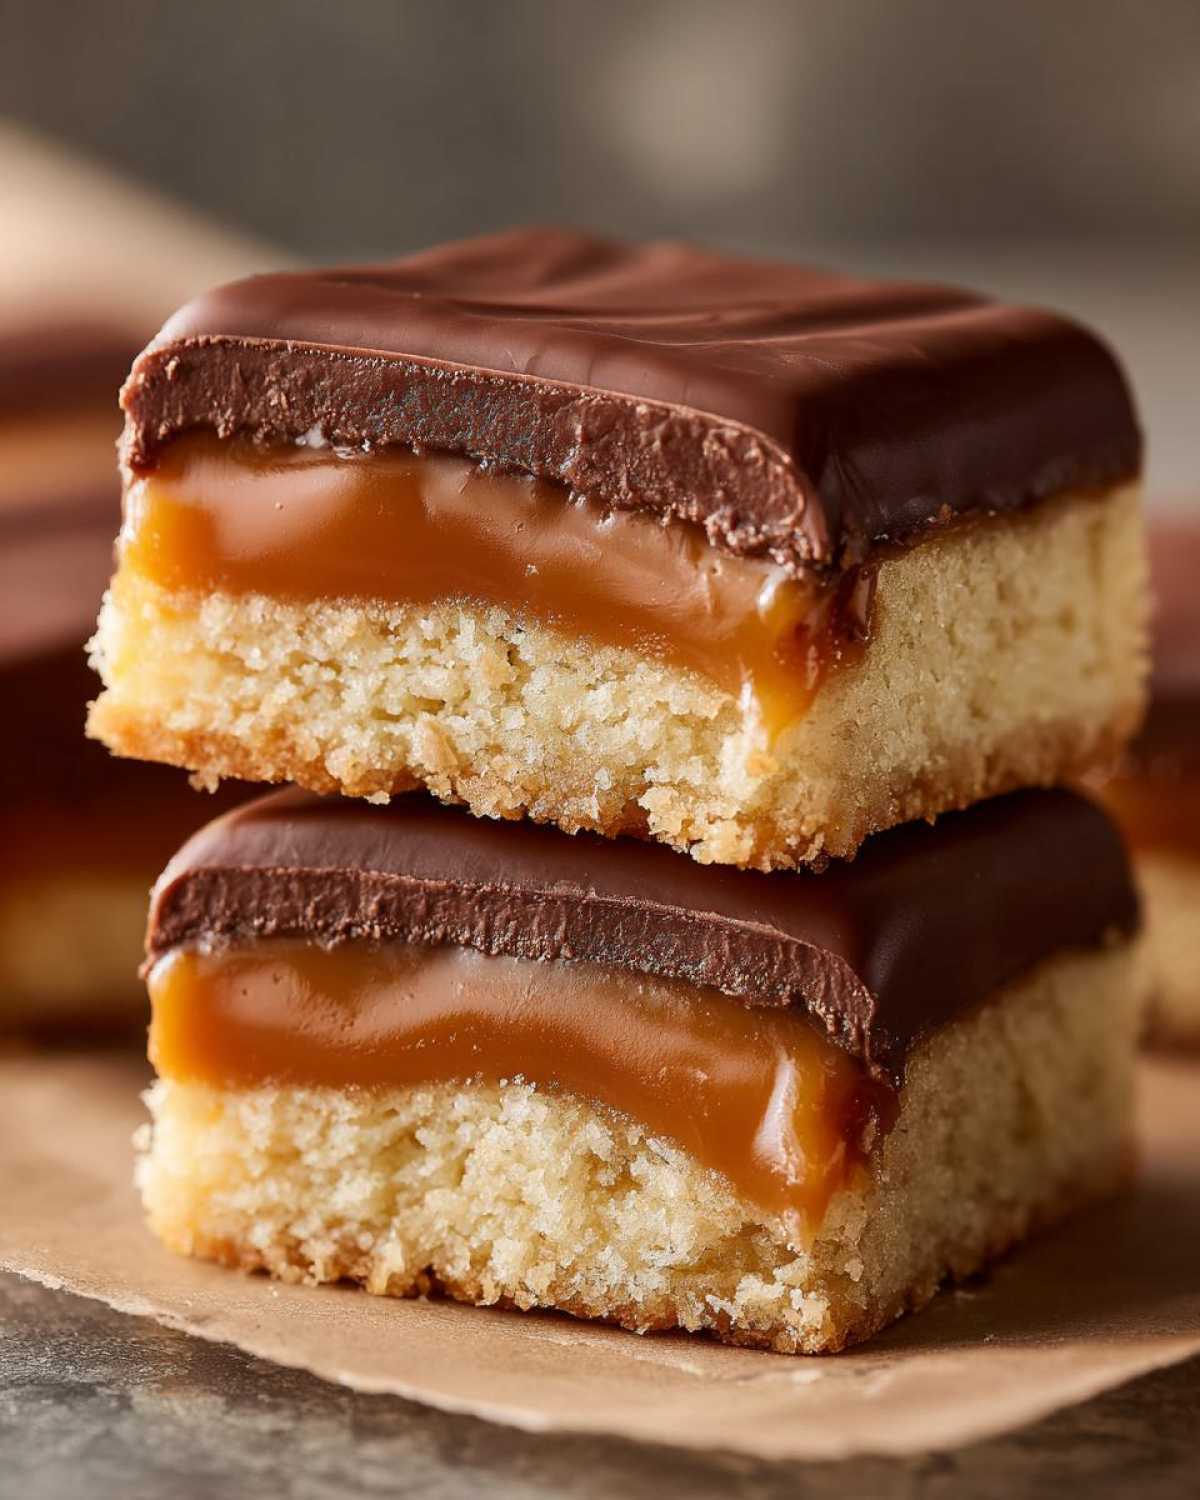
There’s just something about those perfect, snappy candy bars we loved sneaking from the checkout line, isn’t there? That craving for chocolate, caramel, and that unmistakable buttery crunch hits hard sometimes! Well, folks, forget the wrapper because today we’re making something infinitely better. I’m sharing my absolutely unbeatable recipe for homemade twix bars. Trust me, when you achieve that perfect trio of layers—crisp shortbread, gooey caramel, and that smooth chocolate blanket—you’ll feel that pure cooking joy wash right over you. It’s simple enough for a Tuesday night, but decadent enough for any celebration!
- Why You Will Love These Homemade twix Bars
- Gathering Ingredients for Your twix Recipe
- Step-by-Step Instructions to Make Perfect twix Bars
- Tips for Success with Your Homemade Candy Bar Recipes
- Variations on the Classic twix Style
- Storage & Reheating Instructions for twix
- Frequently Asked Questions About Homemade twix Bars
- Estimated Nutritional Data for twix
- Share Your Pure Cooking Joy
Why You Will Love These Homemade twix Bars
I know what you’re thinking: are these *really* as good as the real thing? Yes! They are better, honestly. These aren’t just any homemade candy bar recipes; they are the ultimate indulgence.
- They nail the texture. We get that crisp, satisfying snap from the shortbread base that holds everything together wonderfully.
- The caramel layer is outrageously chewy—none of that hard, sugary stuff here!
- It’s the best kind of caramel shortbread bars experience you can get without a factory.
Perfectly Layered for Authentic twix Flavor
The magic truly comes from respecting the structure. We have three distinct layers here, and each one is essential to hitting that nostalgic flavor profile. You get the slightly salty, deeply buttery base, followed by that slow-cooked, thick, gooey caramel center, and everything gets wrapped up in a blanket of smooth milk chocolate. That balance is everything, my friends.
Easy Dessert Bars Ready for Sharing
Don’t let all those layers scare you; this recipe is deceptively easy. It fits right into my philosophy here at Pure Cooking Joy—spectacular flavor without the stress. These are ideal for cutting up into perfect little squares for your next party, or wrapping individually for homemade gifts. They look impressive, but you’ll be shocked how quickly you whipped these copycat candy recipes up!
Gathering Ingredients for Your twix Recipe
Okay, now for the fun part: gathering our tools! To get that authentic, soul-satisfying flavor, we need quality ingredients for each one of our three layers. I’ve broken down exactly what you need below, grouping them so you can organize your baking station like a pro. Remember, precision matters here, especially with that caramel!
Don’t forget, for those looking for quick assembly ideas later on, check out my guide to easy layered desserts—it helps keep things organized when you have multiple components coming together!
For the Buttery Shortbread Base
This is the foundation, so we want it rich and tender, not hard like a cracker. A proper amount of butter here is non-negotiable for that delicious buttery shortbread cookies texture.
- 1 cup (2 sticks) unsalted butter, softened (Make sure this is really softened, not melted!)
- 1 cup granulated sugar
- 2 1/2 cups all-purpose flour
- 1/2 teaspoon salt
Creating the Gooey Caramel Layer Recipes
This caramel needs to be chewy and coat everything beautifully. That little bit of molasses in the brown sugar adds so much depth, so please make sure that sugar is packed correctly into your measuring cup!
- 1 (14 ounce) can sweetened condensed milk (Use the whole can—we aren’t holding back on this!)
- 1 cup packed light brown sugar
- 1/2 cup (1 stick) unsalted butter
- 1 teaspoon vanilla extract
For the Rich Chocolate Coating Desserts
For the final chocolate coating, we need help to make sure it sets up nicely and doesn’t seize or look dull. That little bit of fat addition is my secret weapon for a professional-looking finish on these rich chocolate coating desserts.
- 12 ounces milk chocolate chips (Your favorite brand works best here!)
- 2 tablespoons vegetable shortening or coconut oil (This keeps the dipping chocolate smooth and shiny.)
Step-by-Step Instructions to Make Perfect twix Bars
Now that we have our ingredients lined up, let’s get baking! Making these layers might sound like a lot of work, but trust me, they happen one right after the other, so keep your eye on the oven and follow right along. We’re aiming for that amazing texture, and it all comes down to timing.
Remember, these are the kinds of easy dessert bars that really pay off for the effort you put in. You’ll be so proud when you see them setting up!
Baking the Buttery Shortbread Cookies Base
First things first, let’s get that oven hot! You’ll preheat to 350°F (175°C). Before we mix anything, line that 8×8 inch pan with parchment paper, making sure to leave a nice overhang on two sides—that overhang is your future lifeline for getting these bars out safely.
In a large bowl, you’ll cream together that softened butter and the granulated sugar until it looks light and fluffy. Then, gently mix in the flour and salt until it just comes together into one soft dough. Don’t overwork it! Press that dough evenly into the bottom of your prepared pan. Bake it for about 18 to just 20 minutes. You want to see those edges just starting to turn that lovely light gold color. Take it out and let it cool just a tiny bit while we rush to the caramel step.
Achieving the Chewy Caramel Snacks Layer
This is where the real magic happens for that amazing chewiness! Grab a medium saucepan and combine your condensed milk, brown sugar, and butter. You need to cook this over medium heat, but you must stir it constantly—seriously, don’t walk away! You’re looking for a boil, and once it hits that, reduce the heat to low and keep stirring for about five minutes until it feels like it’s thickened up nicely. Remove it from the heat and stir in that vanilla extract.
Pour that gorgeous, smooth caramel right over your warm shortbread base. Pop the whole thing back into the oven for another 8 to 10 minutes until you see it bubbling happily. The crucial part comes next: cooling! Let these bars cool completely at room temperature, and then you absolutely must chill them in the refrigerator for at least two hours. This makes cutting them into clean strips so much easier!

Coating Your twix in Rich Chocolate Coating Desserts
Time for the chocolate finish! Melt your milk chocolate chips and shortening together. I recommend doing this in the microwave using short, quick blasts—30 seconds at a time—stirring really well between each blast. This prevents your chocolate from scorching, which would ruin the smooth look we are going for. You want it totally silky.
Once the caramel layer is firm from chilling, use those parchment overhangs to lift the whole block out and cut it into nice, even bars. Dip each piece into that melted chocolate, letting any excess drip off, and lay them on fresh parchment paper. Pop them back in the fridge for maybe 30 minutes until that chocolate shell is completely firm. Then, stand back and admire your amazing chocolate caramel treats!

Tips for Success with Your Homemade Candy Bar Recipes
I’ve made these so many times now that I’ve picked up a few little tricks that really ensure these layer bar recipes turn out absolutely perfect every single time. My goal is always to make that process smoother for you so your results are stunning!
Achieving Clean Cuts on Your twix
This is the secret weapon tip: you MUST chill the entire block until that caramel is rock solid before you even think about slicing. If you try to cut warm caramel, it just smears everywhere, and you’ll end up with messy edges instead of those clean, stunning bars we want. Once it’s perfectly chilled, if you are still struggling with sticky cuts, try dipping a large, sharp knife into hot water, quickly wiping it dry, and then making your cut. Repeat that between slices!
Adjusting the Caramel Texture
The notes mention cooking longer for a chewier center, and that’s totally true! If you are packing these for a drive or just absolutely love a firm caramel that has a real *snap* when you bite it, cook that caramel mixture a bit longer, aiming for that 240°F mark on the thermometer. If, like me, you prefer it super gooey right out of the fridge, stick to that five-minute boil time mentioned in the main steps. You control the chewiness!
Variations on the Classic twix Style
While I absolutely rave about the classic milk chocolate version—it’s just pure nostalgia, right?—I also love mixing things up a bit! Making things from scratch means you get to be the boss of the candy bar, and sometimes that means swapping out the coating or shrinking the size. These ideas are fantastic if you’re taking these to a party or exchanging cookies with friends.
Dark Chocolate or White Chocolate twix Treats
If you find milk chocolate a little too sweet for your sophisticated palate, this is such an easy swap. When you get ready to melt your coating (that’s step ten in the instructions), instead of using just the milk chocolate chips, grab some high-quality dark chocolate chips.
Seriously, the slight bitterness of a good dark chocolate contrasts beautifully with that intense sweetness of the caramel layer we worked so hard to make. It just elevates the entire experience! If you’re feeling really whimsical, try using white chocolate chips instead. You’ll want to be extra careful melting white chocolate since it can seize up more easily, so keep those heating intervals short and slow!
Making Bite Sized Desserts
So many people have asked me if these can be turned into grab-and-go snacks, and yes, they absolutely can! If you want to create perfect little bite sized desserts, you have two great options.
Option one is simple: once those bars are completely chilled and set, just use a sharp knife to cut them into much smaller pieces—think maybe 1-inch squares. They look less like bars and more like little opulent nuggets!
Option two is my cute trick: line a mini muffin tin with mini paper liners. Coat small little strips of the chilled bar (or just drizzle the chocolate layer over the dough before baking the caramel) and place them gently into the liners. They firm up into perfect little discs. They disappear instantly, making them wonderful for the holidays!
Storage & Reheating Instructions for twix
Because we used really fresh, high-quality ingredients to make these spectacular homemade candy bar recipes, they don’t have the stabilizers that the store-bought versions use. That means they taste incredible, but we do need to treat them right for storage!
The absolute best way to keep these layered treats fresh is in the refrigerator. Pop them into an airtight container. If you layer them, put a small square of parchment paper between the layers. This prevents the chocolate from sticking to the caramel of the layer above it, which can get messy when you try to pull them apart later.
When stored this way, they stay perfectly good for about a week, maybe even 10 days. If they start to get too hard straight from the fridge, just let them sit on the counter for about 15 minutes before serving. That slight warming softens the caramel just enough so you get that perfect chewy texture again. Honestly, they rarely last long enough in my house to worry about reheating, but chilling is the key to keeping them pristine!
Frequently Asked Questions About Homemade twix Bars
I always get so many great questions when readers try making these decadent homemade candy bar recipes for the first time! It’s natural to wonder about tweaks and substitutions when moving away from the packaged stuff. Here are the top three things people often ask me about getting these bars just right.
Can I use pre-made shortbread cookies for these twix bars?
Oh, I totally get the temptation for those quick dessert hacks, especially when you’re short on time! You *could* use store-bought shortbread cookies as a base, but honestly, you are sacrificing so much of what makes these bars special. The homemade shortbread base is packed with butter and has a specific crumb that bakes perfectly alongside the caramel. Pre-made cookies often end up too hard or too dry after the baking process, and they just won’t give you that authentic, melt-in-your-mouth texture. Stick with the recipe here—the shortbread takes less than 20 minutes to bake!
What is the best way to get a super smooth rich chocolate coating desserts finish?
This is all about preventing dull, gunky chocolate. The easiest way to ensure you get that super smooth, professional-looking shell on your rich chocolate coating desserts is by mixing in a little bit of fat that stays liquid at room temperature—that’s where the vegetable shortening or coconut oil comes in. It lowers the viscosity, making the chocolate easier to dip into without tearing up your caramel layer. Just make sure the chocolate is completely melted and smooth before dipping; never rush the microwave intervals, or you risk scorching it, which makes it gritty!
Are these caramel shortbread bars suitable for holiday cookie exchange recipes?
Absolutely, they are perfect! These caramel shortbread bars are always a huge hit at exchanges for two reasons. First, they deliver major decadent flavor for just one little square. Second, they travel incredibly well, provided you keep them chilled! Since they are cut and coated, they hold their shape beautifully in a tin. Just layer them carefully with parchment between the rows, and they look stunning coming out of any box. They certainly stand out among the regular cookies!
Estimated Nutritional Data for twix
When we’re baking something this decadent, it’s smart to have a general idea of what’s in that perfect bite. Remember, I’m Alex, and while I love feeding people joy, I’m certainly not a registered dietitian! Because we are starting from scratch with real butter and dark brown sugar, these homemade twix bars are an indulgent treat—and they should be enjoyed as such!
The nutritional breakdown below is based directly on the measurements in the recipe, but please know that your exact results will vary based on the brands of chocolate chips or type of shortening you choose. Think of this as a helpful ballpark estimate for these amazing homemade candy bar recipes, not a strict label!
- Serving Size: 1 bar (These are rich, so one bar goes a long way!)
- Calories: 350
- Sugar: 35g
- Fat: 22g (Includes 14g Saturated Fat—that’s the butter talking!)
- Carbohydrates: 38g
- Protein: 4g
- Sodium: 120mg
This is absolutely a dessert meant for sharing and enjoying moments, folks! Don’t sweat the numbers too much; just focus on that glorious combination of shortbread, caramel, and chocolate when you take a bite!
Share Your Pure Cooking Joy
That’s it! You’ve made it through the shortbread, the gooey caramel, and the chocolate dipping marathon! Now, this is where our journey together becomes real. I truly believe in the community we’re building here at Pure Cooking Joy, and I would absolutely love to hear about your experience making these incredible homemade twix bars.
Did you nail that perfect chewiness in the caramel? Did your family devour them instantly? Don’t be shy! Leave a comment below and let me know how they turned out or if you tried any fun variations we talked about. Telling me what worked (or maybe what unexpected thing happened in your kitchen!) helps me keep bringing you the best, most approachable recipes.
If you snapped a picture of your gorgeous, layered creation, please share it! Tag me on social media so I can see your stunning work. Seriously, seeing your creations is what keeps my own passion fired up. You can find all my latest kitchen adventures over on Facebook here. Happy baking, my friends. Go enjoy that well-deserved, chocolatey reward!
PrintHomemade Caramel Shortbread Bars (Twix-Style)

You can make decadent, layered candy bars at home. These bars feature a buttery shortbread base, a chewy caramel layer, and a smooth milk chocolate coating, tasting just like the classic candy.
- Prep Time: 25 min
- Cook Time: 35 min
- Total Time: 100 min
- Yield: 16 bars 1x
- Category: Dessert
- Method: Baking and Chilling
- Cuisine: American
- Diet: Vegetarian
Ingredients
- For the Shortbread Base: 1 cup (2 sticks) unsalted butter, softened
- 1 cup granulated sugar
- 2 1/2 cups all-purpose flour
- 1/2 teaspoon salt
- For the Caramel Layer: 1 (14 ounce) can sweetened condensed milk
- 1 cup packed light brown sugar
- 1/2 cup (1 stick) unsalted butter
- 1 teaspoon vanilla extract
- For the Chocolate Coating: 12 ounces milk chocolate chips
- 2 tablespoons vegetable shortening or coconut oil
Instructions
- Prepare the shortbread base. Preheat your oven to 350°F (175°C). Line an 8×8 inch baking pan with parchment paper, leaving an overhang for easy removal.
- In a large bowl, beat the softened butter and granulated sugar together until light and fluffy.
- Gradually mix in the flour and salt until a soft dough forms. Press the dough evenly into the bottom of the prepared pan.
- Bake the shortbread for 18 to 20 minutes, or until the edges are lightly golden. Let it cool slightly while you prepare the caramel.
- Make the gooey caramel layer. Combine the sweetened condensed milk, brown sugar, and butter in a medium saucepan.
- Cook over medium heat, stirring constantly, until the mixture boils. Reduce the heat to low and continue stirring for 5 minutes until the caramel thickens slightly. Do not let it burn.
- Remove the caramel from the heat and stir in the vanilla extract.
- Pour the hot caramel evenly over the warm shortbread base. Return the pan to the oven and bake for an additional 8 to 10 minutes, until the caramel is bubbly.
- Let the bars cool completely at room temperature, then chill in the refrigerator for at least 2 hours to set the caramel.
- Prepare the chocolate coating. Melt the milk chocolate chips and shortening (or coconut oil) together in a microwave-safe bowl in 30-second intervals, stirring well after each, until completely smooth.
- Remove the chilled shortbread and caramel from the pan using the parchment overhang. Cut the block into even bar shapes.
- Dip each bar into the melted chocolate, ensuring it is fully coated. Place the coated bars back onto a parchment-lined baking sheet.
- Refrigerate the bars for about 30 minutes, or until the chocolate coating is firm before serving.
Notes
- For a cleaner cut, chill the bars thoroughly before slicing them into individual pieces.
- If you want a thicker, chewier caramel, cook the caramel mixture slightly longer until it reaches 240°F on a candy thermometer.
- You can substitute semi-sweet chocolate chips if you prefer a less sweet coating.
Nutrition
- Serving Size: 1 bar
- Calories: 350
- Sugar: 35
- Sodium: 120
- Fat: 22
- Saturated Fat: 14
- Unsaturated Fat: 8
- Trans Fat: 0.5
- Carbohydrates: 38
- Fiber: 1
- Protein: 4
- Cholesterol: 45
