 Skip to content

Hi, I’m Alex, and I’m so glad you’re here. There’s just nothing that beats that first bite of a truly bright, tangy dessert when the weather starts warming up, right? And when that tartness is perfectly balanced by a buttery, melt-in-your-mouth crust? That, my friends, is pure cooking joy. I’ve spent time perfecting this recipe so you don’t have to stress over it. Forget those boxed mixes; this is the definitive guide for making incredible homemade lemon crumb bars completely from scratch. We’re focusing on simple, reliable baking methods that guarantee a tender shortbread base, a perfectly set filling, and a satisfying crumb topping every single time. Get ready to enjoy the process!
- Why You Will Love These Homemade Lemon Crumb Bars
- Gathering Ingredients for Perfect Homemade Lemon Crumb Bars
- Step-by-Step Instructions for Homemade Lemon Crumb Bars
- Tips for Bakery Style Lemon Bars on a Shortbread Crust
- Ingredient Notes and Variations for Homemade Lemon Crumb Bars
- Serving Suggestions for These Tangy Lemon Squares
- Storage and Reheating Instructions for Buttery Crumb Bars
- Frequently Asked Questions About Homemade Lemon Crumb Bars
- Share Your Homemade Lemon Treats
Why You Will Love These Homemade Lemon Crumb Bars
Look, I’ve eaten enough crumb bars in my life to know what makes one truly special versus one that sits sadly on the counter. This recipe isn’t just another citrus dessert; it’s the one you’ll bookmark immediately. Here are the top reasons why these crumb bars are about to become your new favorite from scratch dessert bars:
- The Texture Trifecta: You get three amazing textures in one bite! We achieve that fantastic contrast between the dense, buttery shortbread base, the smooth, tangy lemon center, and the wonderfully crisp crumb topping.
- Seriously Bright Flavor: This is the best lemon bars recipe because we aren’t shy about lemon! Fresh juice and zest combine for a vibrant, mouth-watering tang that never tastes artificial.
- Reliably Simple: Even though we’re making everything from scratch, the process moves quickly. The crust is pressed, not rolled, and the topping is just mixed by hand. It feels like an impressive bake, but it’s surprisingly straightforward.
- Perfect for Sharing: These homemade lemon treats cut cleanly (once cooled, I promise!) and look gorgeous sitting on a platter. They travel well, making them the perfect lemon dessert for potluck. I have a few more tips over on the blog if you want to see how I set up my baking station!
Gathering Ingredients for Perfect Homemade Lemon Crumb Bars
Okay, let’s talk ingredients! Since we are making these homemade lemon crumb bars completely from scratch, quality really shines through here. Remember, we are building layers of texture and flavor, so make sure your butter is properly cold for the crust and topping. Trust me on that part! Having everything measured out before you start is half the battle won, and it keeps that beautiful shortbread base from getting tough.
For the Shortbread Base and Crumb Topping
These components share dry ingredients, which makes things easier! For that incredible shortbread base dessert, you need that cold butter—it’s non-negotiable for flakiness.
- 1 1/2 cups all-purpose flour
- 1/2 cup granulated sugar
- 1/4 teaspoon salt
- 1/2 cup (1 stick) cold unsalted butter, cut into pieces
- 1 large egg yolk
- 1/4 cup cold water
- 1 cup all-purpose flour (for topping)
- 1/2 cup packed light brown sugar (for topping)
- 1/2 teaspoon salt (for topping)
- 1/2 cup (1 stick) cold unsalted butter, cut into small pieces (for topping)
For the Tangy Lemon Filling
This is where the magic happens! For truly tangy lemon squares, you must use fresh lemons. The bottled stuff just doesn’t cut it when you’re aiming for that bright, pure citrus hit.
- 1 1/2 cups granulated sugar (for filling)
- 1/4 cup all-purpose flour (for filling)
- 1 teaspoon baking powder
- 4 large eggs (for filling)
- 1/2 cup fresh lemon juice
- 1 tablespoon lemon zest
Step-by-Step Instructions for Homemade Lemon Crumb Bars
Alright, take a deep breath! This is where we pull everything together. Cooking is all about rhythm, and these homemade lemon crumb bars follow a beautiful, logical sequence. We build the base, pour in that bright filling immediately, and top it off. If you follow these steps exactly—especially the timing between the base and the filling—you’ll avoid sinking or weeping issues. It’s easier than it sounds, I promise. For a full guide on making easy crumb bar recipe bases, you can check out my general guide here: easy crumb bar recipe.
Preparing and Pre-Baking the Shortbread Base
First things first: let’s get that oven hot! Preheat yours to 350 degrees F. You’ll want to line a 9×13 inch baking pan with parchment paper, making sure you leave a good overhang on the long sides—this acts as your built-in lifter later! Whisk your base dry ingredients together. Now, use a pastry blender or your fingertips to cut in that cold butter until it looks like coarse crumbs. Mix in the egg yolk and water until the dough *just* starts to hold its shape. Press this dough firmly and evenly into the bottom of your prepared pan. Pop that crust into the oven and bake it for just 15 minutes until it looks slightly set and just barely golden around the edges.
Mixing the Perfect Lemon Filling
While that base is getting its head start, we whip up the core of the flavor. In a separate bowl, whisk together the filling’s dry stuff first—that’s the sugar, flour, and baking powder. Mixing these prevents lumps! Then, add your 4 large eggs, the fresh lemon juice, and that wonderfully fragrant lemon zest. Whisk everything together until it is absolutely smooth. You want this perfect lemon filling to be completely homogenous before it hits the heat. It should look glossy and pale yellow.

Assembling and Baking the Homemade Lemon Crumb Bars
Here is the critical moment! As soon as you pull that hot crust out of the oven—do not wait!—pour the lemon filling mixture evenly over the hot surface. This immediate transfer helps seal the base. Next, quickly prepare the topping by combining the topping dry ingredients and cutting in the remaining cold butter until you have tasty crumbs. Sprinkle this topping evenly over the liquid lemon filling layer. Pop the whole thing back into the oven for 35 to 40 minutes. Look for a filling that is set in the middle and a topping that is gloriously golden brown. Don’t overbake it, or you risk weeping! Let them cool totally before you even think about cutting.

Tips for Bakery Style Lemon Bars on a Shortbread Crust
If you want these results to scream bakery style lemon bars and not “sad, slightly soggy kitchen experiment,” you need to pay attention to a couple of timing tricks. Honestly, I learned these the hard way, usually ending up with a runny mess that was still delicious but impossible to serve nicely at a party! These aren’t complicated rules; they just require you to move with purpose when assembling.
The biggest secret, which I mentioned above but can’t stress enough, is the heat transfer. When the shortbread base comes out after its 15-minute pre-bake, it’s hot, and that’s exactly what we want. The heat from the crust starts to cook the bottom layer of the filling immediately. Pour that liquid lemon goodness right over the hot crust. This step sets the foundation and prevents that pesky soggy bottom from ever forming. It’s like giving the crust a little steam blast to firm it up before it meets the wet stage.
Another huge factor in achieving that gorgeous, non-weeping filling is avoiding overbaking. We are looking for a filling that is *set*, not firm and rubbery. Bake just until the center doesn’t jiggle wildly when you gently nudge the pan. If you pull them out and the very middle still looks a tiny bit wet, that’s fine, because carry-over cooking will finish the job while they cool. If you bake them until they look totally solid in the oven, they’ll likely weep golden lemon puddles overnight. Don’t worry if the filling seems a bit delicate when hot; the cool-down process is crucial for structure. You can read about general crust perfection and avoiding tender crust pitfalls in my guide on the best pie crust recipe tips!
Finally, resist the urge to cut them warm! I know the smell is intoxicating, but you’ll end up with sticky knives and broken squares. Let these cool completely—and I mean *completely*—on the counter before you even think about lifting them out with the parchment paper. Patience is key to getting those clean, impressive slices for serving.

Ingredient Notes and Variations for Homemade Lemon Crumb Bars
Once you’ve got the basic method down for these homemade lemon crumb bars, you start wondering about tweaking things, right? That’s where the real fun begins! But remember, we want to keep the integrity of that amazing texture. These bars rely on a precise balance of fat, acid, and flour, so changes in the filling need to be approached carefully. But for the crust and the topping? We can play around a bit!
If you are looking for that extra punch of citrus flavor—and trust me, sometimes you just need *more* zing—don’t hesitate to amp up the zest. We call for one tablespoon of lemon zest in the recipe, but if you have bright, beautiful lemons screaming at you from the fruit bowl, go ahead and use the zest of two lemons instead. That extra oil from the skin packs a huge aromatic wallop without changing the wet-to-dry ratios of the actual filling, so you won’t mess up the setting process. That’s my top tip for making these bright lemon dessert ideas truly unforgettable.
Now, let’s talk substitutions, because I get asked a lot about dietary needs. When it comes to making these buttery crumb bars gluten-free, you really only need to focus on the flour components. The filling is mostly eggs and juice, so that is naturally GF! For the shortbread base and the crumb topping, you can absolutely swap out the all-purpose flour for a good quality 1:1 gluten-free baking blend. Just make sure the blend you choose already contains Xanthan gum so you don’t have to add extra stabilizers. This keeps the texture remarkably close to what you get with regular flour!
For those of you nervous about the shortbread base getting soggy—which we discussed aiming to prevent earlier—I want to reiterate one of the best tips for any citrus dessert recipes: don’t let fresh air sit between your hot crust and your cool filling. Pour that lemon mixture over the crust the very second the crust comes out of the oven. It’s a fast transfer, but that momentary heat shock helps seal the dough so that the liquid doesn’t soak down into the buttery layers over time. It’s a small action with huge payoffs for keeping your homemade lemon treats perfectly layered!
Serving Suggestions for These Tangy Lemon Squares
You’ve put in the work for these beautiful tangy lemon squares, and now they deserve a proper stage! Honestly, these bars are so flavorful and visually appealing on their own that they hardly need anything extra. They are fantastic straight out of the pan once they’ve fully cooled and set up. But since you made them from scratch, why not dial up the presentation a notch or two? This is where you can really show off a little bit!
My absolute favorite, most classic way to finish these up—especially if I’m taking them to a gathering—is a very light dusting of powdered sugar. I use a fine-mesh sieve held high above the cooled bars. You only need a whisper of white snow across that golden crumb top. It provides a lovely visual contrast and cuts the slightest bit of that pure tartness right before you bite in. Keep that sieve handy; it’s a lifesaver for making any simple bake look professional.

If you’re serving these homemade lemon crumb bars as a plated dessert after dinner, think about what pairs well with intense citrus. A small dollop of freshly whipped cream on the side is divine, but if you want to elevate it further, try spiking that cream! Just whip heavy cream until soft peaks form, then gently fold in just a splash of vanilla extract and maybe half a teaspoon of icing sugar. The richness of the cream provides the perfect counterpoint to the brightness of the lemon. If you’re looking for more ways to impress guests without spending hours, check out my thoughts on easy entertaining!
Alternatively, for a real gourmet vibe, serve them next to a small scoop of vanilla bean ice cream or maybe even a tart raspberry sorbet if you want to lean into the bright fruit profiles. The combination of the dense, buttery base with cold, creamy vanilla? Wow. That’s a winner every single time, and it suddenly turns your simple bar into an elegant, satisfying dessert.
Storage and Reheating Instructions for Buttery Crumb Bars
The hardest part about these homemade lemon crumb bars is waiting for them to cool, but trust me, that patience pays off when it comes time to slice them neatly. You cannot rush the cooling process if you want clean, beautiful squares. If you dive in too early, you’ll end up with a sweet, gooey mess on your hands, and while that’s technically delicious, it doesn’t look great on a platter!
Make sure that pan cools completely on a wire rack—I usually give these boys at least three or four hours at room temperature before I even attempt to lift them out. Once they’ve completely set, use those parchment paper slings you left over the sides to gently lift the whole sheet out onto a cutting board. Now you can slice them into your desired sizes. I usually aim for 24 smaller squares; they are rich enough that you don’t need huge pieces!
Speaking of leftovers—and I use that term loosely because these buttery crumb bars disappear fast—they store beautifully. Because of that high sugar content in the filling, they actually keep quite well. The best place for them is an airtight container in the refrigerator. They stay moist and firm in the fridge for about four to five days. Keep a sheet of parchment paper between layers if you stack them, just to make sure that lovely crumb topping doesn’t get stuck to the bottom of the bar above it if they settle.
Do I ever reheat them? Honestly, rarely. They are fantastic served cool or at room temperature. But if you absolutely insist on warming one up, I would zap a single square in the microwave for just 5 to 10 seconds. Too much heat and you risk that filling weeping again, and we worked too hard on avoiding that! Keep them cold, keep them covered, and enjoy that concentrated buttery flavor whenever a craving hits.
Frequently Asked Questions About Homemade Lemon Crumb Bars
It’s totally normal to have a few burning questions when you embark on making a wonderful dessert completely from scratch, like these homemade lemon crumb bars! I’ve tried to cover all the bases in the recipe above, but here are a few more things readers often ask me about making the best lemon bars recipe. Don’t let any small detail stop you from trying these amazing from scratch dessert bars!
How long must the lemon bars cool before cutting?
This is probably the question I get the most! You absolutely must let the bars cool completely before you cut them. I tell everyone to aim for at least four hours at room temperature, or even pop them into the fridge for an hour once they’ve reached room temp to firm everything up perfectly. If you try to slice them while they are even slightly warm, the filling won’t be fully set, and the whole bar will just squish out when you try to lift it. Patience here means you get those clean, gorgeous squares you see in bakeries!
Can I use bottled lemon juice instead of fresh for these citrus dessert recipes?
You *can* technically swap in bottled lemon juice, but I really, really wouldn’t recommend it if you are aiming for these show-stopping citrus dessert recipes. Bottled juice is pasteurized, and that high heat process dulls the flavor dramatically. When you use fresh lemon juice and zest, you get that bright, sharp, vibrant tang that cuts through the sweetness of the sugar and the butter. If you use bottled, you’ll end up with a very sweet bar that tastes… well, a little flat. Save the bottled stuff for cleaning the sink, and use fresh lemons for baking—it’s worth the extra minute of squeezing!
What is the secret to a non-soggy shortbread base?
A soggy base is the absolute enemy of a perfect crumb bar, but we have a two-part defense system built right in! Part one is ensuring that base gets that initial 15-minute pre-bake. This dries out the dough just enough to give it some backbone. Part two is the most crucial: you must pour the raw lemon filling over the crust *while it is still hot* from that initial bake. That immediate heat transfer essentially flash-cooks the bottom layer, creating a seal that prevents the liquid filling from soaking deep into the buttery shortbread. Do that, and you’ll have a sturdy, delicious foundation every time!
Share Your Homemade Lemon Treats
I truly hope these homemade lemon crumb bars bring you as much joy in making them as they do for me every time I pull them out of the oven. Baking should always feel rewarding, and seeing your success makes my day!
Since these are the kind of tangy lemon squares that disappear the second you set them out, I’d love to know how they turned out for you! Please take a moment to leave a rating underneath this recipe—it helps other home cooks feel confident trying them out. I am always looking for ways to make these simple recipes even better, and your feedback is what helps me do that.
And seriously, I want to see your beautiful, golden-topped bars! Snap a picture of your finished from scratch dessert bars, whether you’ve dusted them with powdered sugar or served them with a perfect scoop of ice cream. Tag me on social media! It really means the world to me to see my recipes shining on your tables. You can share your creations over on our Facebook page here: Follow Pure Cooking Joy on Facebook.
Thank you so much for cooking with me today. Go enjoy that bright, buttery slice!
PrintBest Homemade Lemon Crumb Bars Recipe
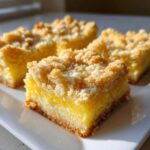
Make bakery style lemon bars from scratch with a buttery shortbread base, a tangy lemon filling, and a perfect crumb topping. This recipe delivers bright lemon dessert ideas that are simple to prepare.
- Prep Time: 20 min
- Cook Time: 55 min
- Total Time: 75 min
- Yield: 24 servings 1x
- Category: Dessert
- Method: Baking
- Cuisine: American
- Diet: Vegetarian
Ingredients
- 1 1/2 cups all-purpose flour
- 1/2 cup granulated sugar
- 1/4 teaspoon salt
- 1/2 cup (1 stick) cold unsalted butter, cut into pieces
- 1 large egg yolk
- 1/4 cup cold water
- 1 1/2 cups granulated sugar (for filling)
- 1/4 cup all-purpose flour (for filling)
- 1 teaspoon baking powder
- 4 large eggs (for filling)
- 1/2 cup fresh lemon juice
- 1 tablespoon lemon zest
- 1 cup all-purpose flour (for topping)
- 1/2 cup packed light brown sugar (for topping)
- 1/2 teaspoon salt (for topping)
- 1/2 cup (1 stick) cold unsalted butter, cut into small pieces (for topping)
Instructions
- Preheat your oven to 350 degrees F. Line a 9×13 inch baking pan with parchment paper, leaving an overhang on the long sides for easy removal.
- Prepare the Shortbread Base: In a medium bowl, whisk together 1 1/2 cups flour, 1/2 cup granulated sugar, and 1/4 teaspoon salt. Cut in the 1/2 cup cold butter using a pastry blender or your fingers until the mixture resembles coarse crumbs.
- Mix in the egg yolk and cold water until the dough just comes together. Press the dough evenly into the bottom of the prepared pan. Bake the crust for 15 minutes until lightly golden.
- Prepare the Lemon Filling: While the crust bakes, whisk together 1 1/2 cups sugar, 1/4 cup flour, and baking powder in a separate bowl. Add the 4 eggs, lemon juice, and lemon zest. Whisk until completely smooth. This creates your perfect lemon filling.
- Pour the lemon filling mixture evenly over the hot, partially baked crust.
- Prepare the Crumb Topping: In a small bowl, combine 1 cup flour, brown sugar, and 1/2 teaspoon salt. Cut in the remaining 1/2 cup cold butter until crumbly.
- Sprinkle the crumb topping evenly over the lemon filling.
- Bake for 35 to 40 minutes. The filling should be set, and the topping should be golden brown. Avoid overbaking, as this can cause weeping.
- Cool the bars completely on a wire rack before cutting. Cooling fully helps the filling set properly.
- Once cool, lift the bars out of the pan using the parchment overhang and cut into squares.
Notes
- For a stronger lemon flavor, use the zest of two lemons instead of one.
- To prevent a soggy bottom, pour the filling over the crust immediately after the crust finishes its initial bake.
- If you want a gluten free option, substitute the all-purpose flour in the crust and topping with a 1:1 gluten-free baking blend.
Nutrition
- Serving Size: 1 bar
- Calories: 210
- Sugar: 18
- Sodium: 95
- Fat: 11
- Saturated Fat: 7
- Unsaturated Fat: 4
- Trans Fat: 0
- Carbohydrates: 27
- Fiber: 1
- Protein: 3
- Cholesterol: 55
