 Skip to content

Hi, I’m Alex, and I’m so glad you’re here with me today! If you think making incredible, soul-satisfying sweets means hours of fiddly, stressful work, I’m here to prove you wrong. There is nothing quite as joyful as pulling a batch of perfect homemade caramel from your own stove. Forget those waxy, store-bought squares; we’re making soft, chewy, buttery homemade salted caramel candy that tastes like heaven.
For me, finding that peace in the kitchen, the kind I used to only find on a weekend getaway, came when I realized simple recipes can yield amazing results. This recipe is my absolute favorite because it’s genuinely beginner-friendly. Trust me, if you can follow a temperature, you can master this treat in under an hour of cooking time. They are seriously the best for gifting or just tucking into the fridge for a midday treat!
This recipe is so good, I even used a batch of the sauce version over my apple pie cheesecake last fall. It’s that reliable!
- Why This Easy Homemade Caramel Recipe Works for Everyone
- Ingredients for Rich Buttery Homemade Salted Caramel Candy
- Step-by-Step Instructions: Making Homemade Caramel From Scratch
- Tips for Success When Making Homemade Caramel Candy
- How to Store and Gift Your Homemade Caramel
- Serving Suggestions for Your Homemade Caramel Topping for Desserts
- Frequently Asked Questions About Homemade Caramel
- Estimated Nutritional Data for Homemade Caramel Candy
- Share Your Homemade Caramel Creations
Why This Easy Homemade Caramel Recipe Works for Everyone
The beauty of this recipe is that it turns potentially tricky candy-making into something anyone can handle. I call this my no fail soft caramel recipe because we rely on precision, not just hope! It’s designed specifically for beginner friendly caramel making, but the results taste gourmet, which is why I love it so much.
- It uses simple pantry staples—nothing exotic needed here.
- The method is standardized, meaning you get the same chewy texture week after week.
- It sets up reliably at room temperature, perfect for wrapping as delicious homemade caramel gifts.
This is one of those recipes I’m proud to share because I know you’ll have success, just like when I make my cottage cheese muffins!
Achieving Soft and Chewy Homemade Caramel Texture
If you take one thing away from candy making, let it be this: temperature is everything. This is where the magic happens, and it’s how we build flavor and get that perfect bite.
For a slightly softer caramel that holds its shape, we aim for the soft-ball stage, around 245 degrees Fahrenheit. But for that classic, slightly firmer, wonderfully chewy center—the kind that needs a little bit of pulling—we cook just a little longer, hitting 240 degrees Fahrenheit. That small 5-degree difference entirely changes the final texture of your homemade caramel. That’s the secret science behind chewy perfection!

Ingredients for Rich Buttery Homemade Salted Caramel Candy
Okay, let’s gather our supplies! Making homemade caramel relies on having your ingredients ready to go because once we start cooking sugar, things move fast. We need quality here so we can achieve that rich, buttery flavor everyone raves about. Don’t substitute too much on your first go—let’s make this rich buttery caramel candy perfectly the first time!
- 1 cup granulated sugar
- 1 cup light corn syrup (this keeps things smooth!)
- 1 cup heavy cream
- 1 cup unsalted butter
- 1 teaspoon vanilla extract
- 1 teaspoon coarse sea salt, plus extra for topping
Ingredient Notes and Substitutions for Homemade Caramel
I know candy making can seem intimidating, but trust me, using a tool that tells you the exact moment something is done removes 90% of the guesswork. That’s why you absolutely must use a candy thermometer for this authentic homemade caramel recipe. Without it, you’re just guessing, and soft caramel is very sensitive to temperature!
The butter quality makes such a difference. Since butter is a main flavor component, please use high-quality unsalted butter. If you use salted butter, you’ll need to cut way back on the added salt so these don’t taste like a salt lick!
Also, please don’t skip the corn syrup. It’s not there just to be cheap filler; it stabilizes the sugar crystals so they don’t seize up on you and turn into an unusable brick. It’s crucial for the smooth texture we’re aiming for.
Step-by-Step Instructions: Making Homemade Caramel From Scratch
Alright, deep breath! This is the fun part where we turn simple sugar into magic. While this recipe uses a candy thermometer, remember that following the visual cues and the temperature guides us to that homemade caramel perfection. Safety first—we are dealing with very hot sugar in this phase, so please handle the saucepan carefully!
- First thing: get an 8×8 inch pan lined with parchment paper, and give that paper a little grease. Trust me, you don’t want to skip this prep step!
- In your heavy saucepan, stir the sugar and corn syrup over medium heat until the sugar disappears completely. Once it starts boiling, step away from stirring! We need to cook this until the thermometer hits 245 degrees Fahrenheit—that’s the soft-ball stage. This usually takes about 10 to 15 minutes, so watch it closely.
- While that’s going, gently warm your butter and heavy cream together in another small pan until the butter melts. We don’t want this boiling, just warm!
- When the sugar mixture hits temperature, pull it off the heat and *slowly* pour in that warm cream and butter. Be warned: this will bubble up like crazy, so pour slowly and stir gently just until everything comes together.
- Back onto medium-low heat we go. Now we stir constantly with a wooden spoon until we hit 240 degrees Fahrenheit. This higher temperature is what locks in that classic chewy texture we love so much.
Once we hit 240°F, take it off the heat immediately. Quick stir in the vanilla and the teaspoon of sea salt. Pour it into that prepared pan, sprinkle the top with a little extra coarse sea salt, and then we just have to wait!

You can check out my recipe for creamy bread pudding if you need an immediate dessert project while waiting, but these need time to set! Don’t peek too much!
The Crucial Temperature Check for Perfect Homemade Caramel
This is the absolute make-or-break point, but knowing the goals makes it easy. If you want a softer caramel that’s a tiny bit gooey when you bite into it, you stop heating when the thermometer reads 245°F (the soft-ball stage). If you want that classic, firmer, satisfyingly chewy bite—the kind that really holds its shape—you push it just a little further to 240°F (firm-ball stage).
That difference of five degrees is what separates a soft square from a slightly tougher one. Stick with 240°F for this recipe’s intention! If you ever need to connect or show me your progress, feel free to send a message over on my Facebook page.
Cooling and Cutting Your Soft and Gooey Homemade Caramel
Patience after the cooking is just as important as precision during it! Do not try to rush the cooling. You need to let the caramel cool completely at room temperature—that means at least three full hours, maybe longer depending on how humid it is. If you try to cut it early, it will just melt into a sticky puddle!
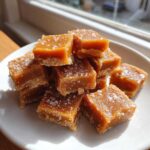
Once it’s totally firm, use the parchment paper edges to lift the whole slab out. Then, the fun part: cutting it into those perfect little squares. To make these look extra professional for delicious homemade caramel gifts, I highly recommend wrapping each square individually in wax paper or little cellophane bags. They look gorgeous stacked in a jar!

Tips for Success When Making Homemade Caramel Candy
I want you to feel totally confident making this authentic homemade caramel recipe. Even though it’s easy, there’s one moment that terrified me for years: the initial sugar heating.
I remember my first attempt where the sugar looked fine, gorgeous, even! But then I added the cream and it seized up instantly. It solidified into one big, gritty rock right in the middle of the pan. I almost gave up right there! The fix, I learned, was twofold: make sure the cream/butter mixture is *warm* when you add it, and *never* stir the sugar/corn syrup mixture once it starts to boil until you hit that first temperature reading.
If you keep your eye on that thermometer, you won’t have messy failures. You’ll just have pure, buttery success. If you ever need a great frosting recipe to go with your candy for another dessert, check out my vanilla buttercream!
How to Store and Gift Your Homemade Caramel
Now that you’ve made these gorgeous, chewy squares of homemade caramel, we need to talk about keeping them perfect and how to make them look like the gourmet treats they are!
Storage is simple, thankfully. Since these have a good amount of sugar and butter, they are pretty shelf-stable, but we want to avoid stickiness. The main enemy here is heat and humidity. Keep your finished, cut caramels in a truly airtight container at cool room temperature. If your kitchen runs hot, the fridge is fine, but you need to wrap them extremely well first.
For gifting, this is where we lean into those gourmet homemade caramel ideas! If you skip wrapping them individually, they turn into one giant, sticky blob very quickly. I always use small squares of wax paper or clear cellophane bags—you can find those rolls online easily. Twist the ends tight, and they stay delightfully separated and look absolutely professional, ready to be tucked into little cellophane bags tied with twine.
Wrap them up tight, and they should stay perfect—chewy and delicious—for about two weeks at room temperature. If you’re sending them through the mail or using them in a care package, I suggest placing a few small pieces of parchment paper between the layers in the box just for extra insurance. I used this same careful packaging advice when I sent out samples of my homemade shrimp cocktail sauce last summer!
Serving Suggestions for Your Homemade Caramel Topping for Desserts
While we spent all that time focusing on making the perfect soft and chewy candy squares, I want you to know that this base recipe is incredibly versatile. If you decide that perfectly wrapping 64 squares sounds like too much work—and hey, I get it—you can easily turn this into the most amazing homemade caramel topping for desserts!
Remember how I mentioned adjusting the temperature? If you stop cooking right at 235°F, you’ll have a much softer pool of caramel that’s perfect for drizzling over just about anything. It’s a quick change with a huge payoff in versatility!
Imagine this: Drizzle a little bit of that warm, liquid gold over a scoop of vanilla bean ice cream. It’s decadent, right? Or, you can use this caramel as a filling layer in cakes or bars. Have you ever tried my bread pudding with bourbon sauce? A thick layer of this salted caramel poured right over the top before serving really takes it to the next level!
It’s also fantastic mixed into coffee drinks or swirled into brownie batter before baking. Once you see how easy it is to make this rich, buttery stuff from scratch, you won’t want to go back to the jarred versions, especially when you control the salt level!
Frequently Asked Questions About Homemade Caramel
I know when you’re trying something new, especially candy making, you end up with a few burning questions! People often ask me about consistency adjustments or if they can ditch the equipment. I totally get it! Here are the most common things I hear after people try making this simple salted caramel from scratch.
Can I make this homemade caramel recipe without a candy thermometer?
That’s the million-dollar question, isn’t it? Technically, yes, you can, using the traditional ‘cold water test.’ You drop a tiny bit of the mixture into a glass of ice water, and based on how it feels—whether it dissolves, wrinkles, or forms a hard ball—you tell if it’s ready. However, I really, really don’t recommend it for your first batch!
This recipe relies on hitting precise temperatures to guarantee that perfect soft and chewy texture we talked about. Using a good quality thermometer is my biggest piece of advice for building confidence. It takes the guesswork out of things and ensures you nail that authentic homemade caramel recipe every single time.
How do I turn this chewy homemade caramel into a liquid sauce?
Oh, I love that you’re already thinking about using this base for other things! Making a sauce is super easy with just one tweak. For the chewy candy, we cook the final mixture until it hits 240°F. To get a pourable, wonderful homemade caramel topping for desserts, you just need to pull the heat right off when it reaches 235°F instead.
That slightly lower temperature keeps the sugar structure softer and more liquid. If you find it’s still a little too thick after pouring it into a jar (it firms up as it cools even when meant for sauce), you can whisk in a tiny splash—maybe a teaspoon—of warm heavy cream off the heat until you reach your desired pouring consistency. It’s that easy to switch flavors!
If you have any other cooking questions at all, please don’t hesitate to reach out through my contact page!
Estimated Nutritional Data for Homemade Caramel Candy
When you’re making something truly delicious like this, I know some of you are curious about the numbers. I want to be super clear: since we are making this homemade caramel entirely from scratch, these are just estimates based on the ingredients listed. They are not official lab results, but they give you a good idea!
This data is based on yielding about 64 squares, so remember, a serving size is just one square of our chewy caramel recipe. I always look at fats and sugars when I calculate things, but honestly, for a special treat like this, I focus more on the joy it brings!
Here’s what the nutrition breakdown looks like for one square of this soft and gooey homemade caramel:
- Serving Size: 1 square
- Calories: 110
- Fat: 4g (of which 2.5g is Saturated Fat)
- Carbohydrates: 19g (Sugar: 18g)
- Protein: 0.5g
- Sodium: 45mg
You can find more transparency about how I run this site and why ingredient quality matters over on my disclosure policy page. Enjoy every single bite of this fantastic treat you’ve made!
Share Your Homemade Caramel Creations
Now that you’ve successfully made this fantastic, simple salted caramel from scratch, I absolutely want to hear about it! Seriously, nothing makes me happier than knowing I’ve helped someone conquer candy making and bring a little sweetness into their life.
Did you wrap them up for a neighbor? Did the kids fight over the scraps while you were cutting? Let me know! Please take a moment to rate the recipe right below where you found the instructions. Your feedback helps other home cooks feel confident tackling this recipe.
And if you took a beautiful photo—maybe showing off the flaky sea salt on top or a tray full of perfectly wrapped squares—please share it! You can tag me on Instagram or wherever you share your kitchen victories. Seeing your results is the best part of running the Pure Cooking Joy blog.
Thanks so much for cooking with me today. I hope these caramels bring you, and whoever you share them with, a whole lot of pure joy!
PrintEasy Soft and Chewy Homemade Salted Caramel Candy
You can make soft, chewy, buttery homemade salted caramel candy with this simple recipe. These treats are perfect for gifting or enjoying yourself.
- Prep Time: 15 min
- Cook Time: 25 min
- Total Time: 4 hours 40 min
- Yield: About 64 pieces 1x
- Category: Candy
- Method: Stovetop Cooking
- Cuisine: American
- Diet: Vegetarian
Ingredients
- 1 cup granulated sugar
- 1 cup light corn syrup
- 1 cup heavy cream
- 1 cup unsalted butter
- 1 teaspoon vanilla extract
- 1 teaspoon coarse sea salt, plus extra for topping
Instructions
- Line an 8×8 inch baking pan with parchment paper and lightly grease the paper. Set aside.
- Combine the granulated sugar and corn syrup in a heavy-bottomed saucepan over medium heat. Stir until the sugar dissolves.
- Stop stirring once the mixture boils. Cook until the mixture reaches 245 degrees Fahrenheit on a candy thermometer, which is the soft-ball stage. This takes about 10 to 15 minutes.
- In a separate small saucepan, heat the heavy cream and butter together over low heat until the butter melts. Do not boil.
- Remove the sugar mixture from the heat. Carefully and slowly pour the warm cream and butter mixture into the sugar mixture. Stir gently until combined. The mixture will bubble vigorously.
- Return the saucepan to medium-low heat. Cook, stirring constantly with a wooden spoon, until the mixture reaches 240 degrees Fahrenheit. This is the firm-ball stage for chewy caramel.
- Remove from heat. Stir in the vanilla extract and 1 teaspoon of sea salt.
- Pour the caramel mixture into the prepared baking pan. Sprinkle the top evenly with extra coarse sea salt.
- Let the caramel cool completely at room temperature for at least 3 hours, or until firm.
- Once firm, lift the caramel out of the pan using the parchment paper. Cut into 1-inch squares. Wrap each piece individually in wax paper or cellophane for gifting.
Notes
- Use a candy thermometer for accurate results; temperature determines the final texture of your homemade caramel.
- If you prefer a softer, more sauce-like consistency, stop cooking the mixture when it reaches 235 degrees Fahrenheit.
- For the best flavor, use high-quality unsalted butter in your recipe.
Nutrition
- Serving Size: 1 square
- Calories: 110
- Sugar: 18g
- Sodium: 45mg
- Fat: 4g
- Saturated Fat: 2.5g
- Unsaturated Fat: 1.5g
- Trans Fat: 0g
- Carbohydrates: 19g
- Fiber: 0g
- Protein: 0.5g
- Cholesterol: 15mg
