 Skip to content

If you’ve been on the internet lately, you’ve probably seen those gorgeous, pull-apart sides that look impossibly delicious. Well, I’m here to tell you—you can absolutely nail that look without spending hours stressing over dough! I used to think that anything this satisfying had to be complicated; that’s the corporate burnout talking, I guess. But learning to make food that comforts me *and* my family changed everything. That sense of pure joy comes from keeping things simple. Seriously, this **hawaiian roll garlic bread** recipe is probably the easiest, most flavorful thing I’ve cracked in years. It takes the sweetness of those famous rolls and makes them savory and unbelievably cheesy. Forget complex recipes—we’re making comfort food magic in under 25 minutes. You are going to love how this tastes amazing while feeling like cheating!
- Why This Cheesy Hawaiian Roll Garlic Bread Recipe Works (E-E-A-T)
- Essential Ingredients for Perfect hawaiian roll garlic bread
- Step-by-Step Instructions for Cheesy hawaiian roll garlic bread
- Tips for the Best hawaiian roll garlic bread Every Time
- Serving Suggestions for Your hawaiian roll garlic bread
- Storing and Reheating Your hawaiian roll garlic bread
- Frequently Asked Questions About hawaiian roll garlic bread
- Estimated Nutritional Data for Cheesy hawaiian roll garlic bread
- Share Your Joy: Rate This hawaiian roll garlic bread
Why This Cheesy Hawaiian Roll Garlic Bread Recipe Works (E-E-A-T)
When I look for a new staple recipe, I need it to deliver huge flavor without a huge time commitment. That’s exactly what this buttery, cheesy pull-apart bread does! It’s totally aligned with my mission here at Pure Cooking Joy: amazing food that brings people together without keeping you stuck doing dishes.
Here’s why I trust this recipe completely for everything from weeknights to impromptu gatherings:
Speed and Simplicity: The 15-Minute Side Dish Promise
Seriously, the total time is under 25 minutes, and the hands-on prep is maybe five! That makes it the ultimate easy entertaining saver. This is my go-to for a last-minute Quick Dinner Side Dish when I realize I forgot to plan ahead. No fuss, no long rises—just delicious bread!
The Perfect Flavor Balance in Your hawaiian roll garlic bread
This is where the magic happens. You get the strong, savory kick from the garlic and Parmesan, but it plays so nicely against the slight sweetness of the rolls. It’s that perfect collision of savory and sweet that makes these Sweet and Savory Rolls so addictive. Trust me, people always ask what the secret ingredient is!

Essential Ingredients for Perfect hawaiian roll garlic bread
You only need a handful of things for this recipe, which just proves my point: simple is best! I always keep the rolls and butter on hand because you never know when you need an emergency Comfort Food Side. We want big flavor here, so skipping out on quality on the basics just won’t do.
- 1 package (12 count) King’s Hawaiian Sweet Rolls
- 1/2 cup unsalted butter, melted (Use real butter, please! It makes a huge difference.)
- 4 cloves garlic, minced
- 1/4 cup grated Parmesan cheese
- 1 cup shredded mozzarella cheese
- 1 tablespoon fresh parsley, chopped (totally optional, but pretty!)
Ingredient Notes and Substitutions
Okay, a quick note on the garlic. If you use that jarred minced stuff, I’m probably going to turn up at your house and swap it out! Fresh garlic is mandatory here; it’s completely different in terms of aromatic punch. Also, grab that optional Italian seasoning tip from my notes—a half teaspoon sprinkled in with the butter mixture pulls the garlicky flavor to the next level. It’s an effortless upgrade for your Essential Kitchen Tips & Tricks collection!
Step-by-Step Instructions for Cheesy hawaiian roll garlic bread
Getting these rolls into the oven is so simple, it hardly feels like cooking! Remember what I always say? Confidence comes from clear steps, and this recipe is practically foolproof. We want these to be soft, pull-apart perfection, so pay attention to how we handle the rolls before they hit the heat.
First things first, get that oven ready! Preheat it to 350°F (175°C) right away. I also like to give my 8×8 dish a quick spritz of non-stick spray—you want these babies sliding right out later.
Now, here is the most important part for that classic pull-apart thing: Keep the rolls connected! Don’t separate them yet. Just arrange the entire package snugly in your prepared dish. This is key for achieving that beautiful, connected texture.
Creating the Buttery Garlic Flavor Base
Once your rolls are settled, let’s make the star of the show! Grab a small bowl when your butter is melted perfectly. Whisk in your minced fresh garlic and that grated Parmesan cheese until they are all happy together. Don’t just dump it on; be intentional! Pour this glorious garlic butter mixture evenly on top of the rolls. Make sure you get it drizzled down into the little cracks separating each sweetness. That’s how we get flavor in every single bite.
Baking and Achieving the Gooey Cheese Top
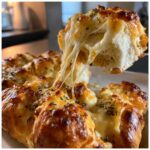
Time for the oven! First, cover the dish loosely with aluminum foil. We do this for about 10 minutes. This steaming time warms everything up nicely and melts the mozzarella underneath the foil so it doesn’t immediately burn. After 10 minutes, pull that foil off—careful of the steam!—and let it bake for another 5 to 7 minutes more. You are looking for the cheese to be totally bubbly and maybe just starting to get those gorgeous light brown spots. That’s how you know you’ve nailed the Gooey Cheese Bread look. Garnish with parsley if you remember, and serve immediately!

Tips for the Best hawaiian roll garlic bread Every Time
Okay, now that you know the steps, I want to share a few pro-level nudges that turn this from just ‘great bread’ into that legendary, I-need-the-recipe bread. Remember, building confidence in the kitchen is all about learning the little secrets that experts use, and this truly helps make it the ultimate Essential Kitchen Tips & Tricks moment.
My biggest early mistake, and I mean a real disaster, was thinking I could just pour the butter right over the cold rolls. Nope! The rolls are so fluffy, the cold butter just sat there—it didn’t seep down into the crevices at all. When it baked, I had dry spots right near the center. So, my top expert tip is to ensure that melted butter is still warm when you pour it over, and really massage or use a pastry brush to ensure it gets everywhere, especially down those seams. That’s how you guarantee that soft, buttery texture throughout the entire loaf.
To maximize that garlic punch when you’re aiming for savory perfection, try letting your minced garlic steep in the melted butter for about five minutes *before* you pour it over the rolls. It hydrates the garlic slightly and really lets those essential oils bloom in the fat. It’s a small thing, but it makes the flavor so much deeper!

When it comes to the cheese melt—which is crucial for a perfect Comfort Food Side—the foil is your best friend. Don’t skip that initial covered bake! That steam is what heats the entire mass of rolls through before you expose the cheese to direct heat. If you go straight to open baking, the cheese browns on top too fast, and the inside is still only lukewarm. We want that satisfying, gooey interior that begs you to rip off a piece!
Follow these small adjustments, especially keeping those sweet rolls connected until they come out of the oven, and you will consistently nail that fluffy, flavor-infused Pull Apart Garlic Bread texture that everyone raves about.

Serving Suggestions for Your hawaiian roll garlic bread
This is the great thing about having such an easy, crowd-pleasing side dish ready to go—it works with literally everything on your dinner table! Because that sweet and savory flavor is so versatile, it moves beyond just being a standard dinner roll replacement.
On a busy Tuesday night when you need a simple Effortless Weeknight Dinner solution, this cheesy bread is the answer. Think about serving it alongside a big bowl of marinara sauce or some creamy tomato soup. It’s perfect for dunking! It’s also obviously the absolute best Quick Side for Pasta dishes. When I make my thirty-minute spaghetti sauce, having these ready means I can get dinner on the table faster than any takeout place.
For entertaining? Forget complicated breads or rolls. These are fantastic alongside chili or any big pot of stew during the colder months. They’re soft enough to hug the side of your bowl but sturdy enough to hold up to hearty sauces because of that little bit of cheesiness we added. Honestly, if there’s ever a party, these beautiful rolls are always the first thing to disappear. It just goes to show that food made simple is often the food people love the most!
Storing and Reheating Your hawaiian roll garlic bread
Okay, let’s talk about leftovers, because these rolls are so good you might actually have some! Full disclosure: like almost all cheesy bread, this **hawaiian roll garlic bread** is one million times better right out of the oven when everything is still melty and fragrant. I mean, that warm, buttery smell is what happiness is made of, right?
But hey, life happens! If you do have extras, don’t just plan to throw them out. They are still wonderful the next day, but you have to treat them right. Do not, under any circumstances, try reheating this in the microwave.
Why? Because microwaving them turns that beautiful, soft roll into a strangely chewy, dense little sponge. And we certainly don’t want that disaster, especially when we’re aiming for simplicity and joy!
The absolute best way to bring these back to life is in the oven. Make sure you wrap them up tightly in aluminum foil first. This traps the steam right around the rolls, which helps bring back that initial softness we worked so hard to achieve. Pop that foil-wrapped package into a 300°F oven for about 8 to 10 minutes. That wraps them up nicely. If you want the cheese layer to get a little bit bubbly again—which is always a good idea—take the foil off for the last two minutes of heating, watching carefully so nothing burns!
If you’re not planning on eating them the next day, make sure they’re completely cooled before sealing them in an airtight container. They usually hold up well at room temperature for about 24 hours. If you plan to wait longer, pop them in the fridge, but always plan that foil reheating step!
Frequently Asked Questions About hawaiian roll garlic bread
I get so many questions about this recipe when people see how quickly it disappears at parties! It’s honestly one of those go-to recipes that makes entertaining fun again, which supports our whole philosophy here at the site. Here are a few things I hear all the time about making the best **Buttery Garlic Rolls**.
Can I use a different type of sweet roll for this hawaiian roll garlic bread?
You totally *can*, but why would you want to? Look, other sweet rolls exist, sure. But the King’s Hawaiian rolls have this specific, delicate texture and sugar balance that really plays well against the sharp garlic and the savory cheese. If you use a drier roll, the topping won’t adhere as well, and you’ll miss that signature soft-yet-sweet base we’re aiming for. Stick with the original for the best results!
Is this Party Appetizer Rolls recipe suitable for meal planning?
The baking part? No, definitely not. Like I said above, you want them fresh for that melty pull-apart goodness. However, you can totally get ahead of the game! The good news is that the garlic butter mixture lasts beautifully in the fridge for about a week, so you can make that ahead of time. This means that when it’s time to serve, you just mix the cheese in and bake. It keeps things fast! While some people rely on full meal planning services for complex weeks, this little hack keeps things simple without needing a subscription.
Plus, honestly, that five-minute prep time means you can whip this up even if you haven’t planned dinner all week. It’s the perfect Comfort Food Side when chaos strikes!
Estimated Nutritional Data for Cheesy hawaiian roll garlic bread
Now, I know some of you might be tracking macros or just curious about what you’re dipping into that pasta sauce, so here are the estimated numbers for this delightful **hawaiian roll garlic bread**. Remember, I’m a cook, not a certified nutritionist!
Because we are using rich butter and that lovely, slightly sweet roll, the numbers are what you’d expect for a decadent side dish. These estimates are based on one single roll, assuming you get a fairly even piece when you pull them apart. I always say that if you’re looking for ultra-precise tracking, relying on commercial Essential Kitchen Tips & Tricks like using exact measurement cups is better than anything I can give you here.
- Serving Size: 1 roll
- Calories: 220
- Fat: 12g
- Saturated Fat: 7g
- Carbohydrates: 24g
- Sugar: 8g
- Protein: 5g
A quick note on transparency: These values are a close approximation based on the ingredients listed. Things like exactly how much butter seeps into the bottom of the pan versus staying coating the top roll will shift those numbers slightly. If you are rigorously following a weight loss programs or dietary regimen, you might want to weigh your portion or perhaps skip the cheese layer occasionally. But hey, for a satisfying side that brings so much joy, I think these numbers are totally worth it!
Share Your Joy: Rate This hawaiian roll garlic bread
That’s it! You’ve made the best, easiest, most comforting batch of **hawaiian roll garlic bread** imaginable. Now, the best part of cooking, like I always say, is sharing that creation with people you care about. My whole philosophy here at Pure Cooking Joy is built around connection and sharing the happiness the food brings.
So, I absolutely want to hear what you thought! Did the sweet and savory combo win everyone over at your dinner table? Was the cheese perfectly gooey? Please, drop a rating below—even if it’s just five stars because you’re nice! Your feedback helps me know which simple recipes are making your cooking life easier and more joyful.
And if you took a picture of your beautiful, pull-apart creation—maybe sitting next to a big bowl of soup or your pasta dinner—please share it with me online! I love seeing your results. You can tag me on Facebook over at Pure Cooking Joy. Seeing your photos truly makes my day and reminds me why I love sharing these simple, soulful recipes with you all!
PrintCheesy Baked Hawaiian Roll Garlic Bread (Quick Comfort Food)
Make this easy, crowd-pleasing Cheesy Hawaiian Roll Garlic Bread. This recipe combines sweet rolls with buttery garlic and gooey cheese for a fast, pull-apart side dish perfect for any meal.
- Prep Time: 5 min
- Cook Time: 17 min
- Total Time: 22 min
- Yield: 12 rolls 1x
- Category: Side Dish
- Method: Baking
- Cuisine: American
- Diet: Vegetarian
Ingredients
- 1 package (12 count) King’s Hawaiian Sweet Rolls
- 1/2 cup unsalted butter, melted
- 4 cloves garlic, minced
- 1/4 cup grated Parmesan cheese
- 1 cup shredded mozzarella cheese
- 1 tablespoon fresh parsley, chopped (optional)
Instructions
- Preheat your oven to 350°F (175°C). Lightly grease an 8×8 inch baking dish.
- Keep the Hawaiian rolls connected in their original packaging or arrange them closely together in the prepared baking dish. Do not separate them.
- In a small bowl, combine the melted butter, minced garlic, and Parmesan cheese. Stir well.
- Pour the garlic butter mixture evenly over the top of the rolls, making sure to drizzle into the crevices between the rolls.
- Sprinkle the shredded mozzarella cheese evenly over the buttered rolls.
- Cover the dish loosely with aluminum foil.
- Bake for 10 minutes covered.
- Remove the foil and bake for an additional 5 to 7 minutes, or until the cheese is melted, bubbly, and lightly golden brown.
- Garnish with fresh parsley, if using. Serve immediately while warm and pull apart the rolls.
Notes
- For extra flavor, add 1/2 teaspoon of dried Italian seasoning to the butter mixture.
- If you are looking for simple ways to manage your weekly meals, consider looking into meal planning options.
- This recipe is fast, making it a great alternative to complex meal delivery companies when you need a quick side.
Nutrition
- Serving Size: 1 roll
- Calories: 220
- Sugar: 8
- Sodium: 350
- Fat: 12
- Saturated Fat: 7
- Unsaturated Fat: 5
- Trans Fat: 0.2
- Carbohydrates: 24
- Fiber: 1
- Protein: 5
- Cholesterol: 25
