 Skip to content

You know that feeling? That slightly deflated stomach when you were dreaming of stacks but ended up with flat, rubbery discs? I’ve totally been there. When I started my journey to find pure joy in the kitchen, getting pancakes right was a huge hurdle! I used to think that wonderfully tall, light breakfast texture was only possible at a diner, but trust me, that’s just not true anymore. Today, I’m sharing my absolute favorite method: The Ultimate Fluffy Old-Fashioned Pancakes: Easy 1-Bowl Recipe with Guaranteed Height. This is the recipe that changed everything for me at Pure Cooking Joy; it turns simple pantry ingredients into the best homemade pancakes you’ve ever tasted from scratch. If you want to learn more about that light, airy breakfast texture, check out my guide on fluffy pancakes here!

- Why This Is The Best Pancake Recipe for Guaranteed Height
- Gathering Ingredients for Fluffy Old-Fashioned Pancakes
- Step-by-Step Instructions for Perfect Pancakes
- Ingredient Notes and Substitutions for Homemade Pancakes
- Mastering Pancake Secrets for Weekend Brunch Ideas
- Serving Suggestions for Classic Breakfast Recipes
- Storage and Reheating Instructions for Leftover Pancakes
- Frequently Asked Questions About Making Fluffy Pancakes
- About Alex and Pure Cooking Joy
Why This Is The Best Pancake Recipe for Guaranteed Height
If you’re tired of ordering takeout because your homemade attempts always turn out flat, you’ve found the solution. This is the best pancake recipe because it marries old-fashioned flavor with modern science to give you those impossible tall pancakes every single time. The real secret here isn’t any weird ingredient; it’s how the leaveners interact.
We use both baking powder AND baking soda, and because we’re using buttermilk (which is acidic), the soda reacts instantly to give us a huge lift right when it hits the griddle. That instant reaction is key to vertical stacking! It’s what sets our old fashioned pancakes apart from the rest.
Here’s a quick tip to boost that lift even further: Make sure your eggs and buttermilk are cool, but your melted butter should be *just* warm. Having slightly different temperatures in your wet ingredients helps create a more stable emulsion when you mix, which locks in the air. If you want to peek at other ways I focus on breakfast texture, check out my guide to easy homemade pancakes or my favorite Greek yogurt version.
Achieving Light and Airy Breakfast Texture
That dreamy, light and airy breakfast texture we all crave comes from the chemical explosion happening in that batter. The baking powder gives a slow, steady rise, while the baking soda gives that immediate, aggressive puff! When we mix this gently, we preserve those little gas bubbles. Those bubbles are the structure that stretches into a fluffy cloud as it cooks. We’re trapping happiness in tiny pockets!
Gathering Ingredients for Fluffy Old-Fashioned Pancakes
Alright, let’s get our ingredients lined up! Since we are making these from scratch pancakes in one bowl, having everything measured out first makes the process incredibly smooth. You need the basics, but it’s how we use the buttermilk and baking powder that makes the difference here.
Here’s what you need for approximately 12 glorious pancakes:
- 2 cups all-purpose flour
- 2 tablespoons granulated sugar
- 4 teaspoons baking powder (don’t skimp on this!)
- 1 teaspoon baking soda
- 1 teaspoon salt
- 2 large eggs
- 1 3/4 cups buttermilk
- 1/2 cup unsalted butter, melted, plus a little extra for greasing the griddle
- 1 teaspoon vanilla extract
For the best flavor, I always recommend using real unsalted butter—it just adds a richness that margarine can never match. Also, make sure your baking powder is fresh! If it’s old, you won’t get that beautiful lift, and we are aiming for height here, friends!
Step-by-Step Instructions for Perfect Pancakes
Now for the satisfying part! Making these fluffy pancakes is really about following a few simple rules, especially when it comes to mixing. Don’t rush this part! We combine our dry ingredients first—flour, sugar, baking powder, soda, salt—all whisked together in one big bowl. That’s the one-bowl magic working right there!
Next, in a separate bowl, just quickly whisk the eggs, buttermilk, vanilla, and that melted butter. Then, pour all the wet stuff right into the dry mixture. This is where you have to stop yourself! Resist the urge to make it look perfectly smooth. We are aiming for lumps! If you overmix, you develop gluten, and gluten means tough, flat discs. I learned this the hard way back when I was stressed about dinner—my first few attempts looked more like frisbees than breakfast!
After you’ve mixed until *just* combined, you must let that batter rest on the counter for 10 full minutes. This resting time is non-negotiable for that rise. It lets the baking powder start working its magic way ahead of time so they puff up beautifully on the heat. If you want to see my chocolate version, check out my chocolate chip batch while you wait!
Mixing Batter: The Key to Thick Pancakes
Seriously, this is the number one thing that separates a nice pancake from a truly thick pancake. When I first started, I used an electric mixer for everything, and they were always dense! Now, I use a big spatula or a whisk and stir only until the flour streaks almost disappear. I count about 15 gentle folds. If you pull your spatula out and see a few white spots of flour hiding, that’s perfect! Those lumps hold air and will turn into beautiful, tall layers of fluffiness. Trust me, the batter should look thick, almost like thin cake batter, not watery at all.
Griddle Prep and Cooking Your Pancakes
Getting the temperature right is just as important as the mixing. You want medium heat—not screaming hot, or the outside burns before the inside cooks. To test the surface, drop a tiny dot of water on the griddle. If it sizzles and evaporates really quickly, you’re good to go! If it just sits there, wait a minute. Once it’s ready, pour a consistent 1/3 cup of batter for each one. You need that volume to get the height you’re looking for. Watch the tops: wait until you see those bubbles pop and the edges look a bit dry around the perimeter. Only then should you go in for the flip!

Ingredient Notes and Substitutions for Homemade Pancakes
We’ve got the blueprint for success locked in with our ingredient list, but let’s talk about wiggle room, because sometimes we run out of buttermilk! If you don’t have it—and honestly, who always keeps buttermilk on hand?—don’t panic. Here is my favorite fix for making homemade breakfast recipes last minute: take your regular whole milk, add one tablespoon of white vinegar or lemon juice, give it a quick stir, and let it sit for about five minutes. It thickens up and gets just acidic enough. That acidic kick is exactly what that baking soda needs to make these pancakes rise!
And if you want to push those fluffy boundaries even further? Try adding an extra five minutes to the batter rest time—that brings us to 15 minutes total. That extra waiting period gives the leavening agents a tiny bit more time to build those air pockets. Also, for perfectly uniform tall pancakes, ditch the spoon and use a 1/4 cup measuring scoop when dropping the batter. Consistency in volume equals consistency in height!
Mastering Pancake Secrets for Weekend Brunch Ideas
Okay, you’ve mixed the batter right, you’ve let it rest—now we need to execute the cook perfectly to guarantee those gorgeous stacks for your weekend brunch ideas. These are the final, expert-level pancake secrets that move you from making an okay breakfast to making a truly memorable meal. This is how I ensure I never have an apology pancake on my plate!
Heat control is everything. Remember I said medium heat? If you start too low, the batter spreads out too fast before it has time to rise, leading to thin pancakes. If you start too high, the outside gets dark brown almost immediately, but the middle is still raw batter. We want a rich, golden brown, not burnt mahogany! Keep that heat steady. If you notice your second batch cooking faster than your first, turn the burner down just a hair between batches.
When it comes to the flip, patience is painful but necessary. Don’t even *think* about grabbing that spatula early! You are waiting for two clear signals: first, you’ll see those surface bubbles—not just any bubbles, but bubbles that pop and leave a little hole behind that doesn’t immediately fill in with batter. Second, look at the edges of the uncooked batter; they should look dry and matte, not shiny and wet. That means the structure underneath is set enough to support the flip without collapsing. Once those two things happen, slide that spatula under and flip confidently! It’s a total game-changer when you stop peeking prematurely. If you want to try another fantastic, flavor-packed breakfast idea, you should look at my Cinnamon Sugar French Toast Muffins—they are totally hug in a handheld form!

Serving Suggestions for Classic Breakfast Recipes
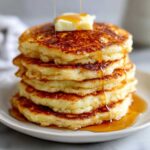
We did all the hard work to get these beautiful, fluffy pancakes, so now we celebrate! The beauty of these old fashioned pancakes is that they are a canvas for simple, delicious toppings. Forget the fancy stuff; sometimes the simplest pairings are the best when you are putting together classic breakfast recipes.
You absolutely need a generous pat of good quality, slightly salted butter melting right into the center—that salty-sweet combination is everything. Then, drench those stacks in real maple syrup. I mean it, skip the fake stuff! A handful of fresh raspberries or blueberries tossed right on top adds a beautiful color and a tiny bit of tartness that cuts through the richness perfectly. If you want another great classic comfort breakfast that’s just as fast, you have to try my easy French toast recipe!
Storage and Reheating Instructions for Leftover Pancakes
I know, right? Sometimes we make too many because they are just that good! But don’t you dare throw leftovers away. Properly stored, these fluffy pancakes are fantastic the next day, and I’ve figured out the best ways to reheat them so they somehow magically regain almost all of their original puffiness.
The key to storing them correctly is cooling them down completely first. Don’t stack them hot because the steam traps moisture and makes them gummy! Once they are totally cool, stack them with small pieces of parchment paper, wax paper, or even paper towels layered between each one. Then, slide that whole stack into an airtight container or a heavy-duty zip-top bag. They will last about three days in the fridge, or you can freeze them for up to two months. Freezing pancakes is my favorite for busy mornings!
When it’s time to eat the leftovers, you have a few great options:
- The Toaster Method: This is my favorite for bringing back a slight crisp edge! Pop a frozen or refrigerated pancake right into your toaster slot. It crisps up the outside while warming the inside perfectly. It only takes a couple of cycles.
- The Oven Method: If you have a big batch, spread them out on a baking sheet and warm them at about 350°F (175°C) for about 5 to 8 minutes. This warms them evenly without them drying out.
- The Microwave (Use Sparingly!): If you’re in a major rush, the microwave works, but you have to be careful. It can turn them rubbery fast. Microwave one or two at a time for about 15 to 20 seconds max, checking frequently. I usually wrap them in a slightly damp paper towel first to trap some humidity and bring back some softness.
Honestly, the toaster method is the winner for texture. It’s fast, and it skips the sad, soggy result you sometimes get from other reheating methods. You get that satisfying structure back!

Frequently Asked Questions About Making Fluffy Pancakes
If you’ve made it this far, you’re clearly serious about ditching flat breakfast failures! Sometimes, even with the best instructions, a few little things trip people up. Here are the questions I get asked most often when people are striving for that fluffy pancake perfection. Don’t worry if you’ve run into these issues before; we’ll fix them right now! For more great ideas on simple meals we love, browse all my homemade breakfast recipes.
Why are my pancakes flat even though I used all the right ingredients?
This almost always comes down to two culprits: either you’ve overmixed the batter, or your leavening agents aren’t cooperating. If you mix away until it’s perfectly smooth, you’ve developed the gluten in the flour, making the structure tight and heavy—no air gets trapped! Also, check your pantry! If the baking powder or baking soda is older than six months, it loses its power, and you won’t get that lift. Remember, we want lumps! Trust me on the lumps for those tall pancakes.
Can I use regular milk instead of buttermilk for this easy homemade pancakes recipe?
You totally can use regular milk, but you have to transform it first! If you just swap in regular milk, you miss out on the amazing reaction with the baking soda needed for that signature old fashioned pancakes rise. As I mentioned earlier, just take your regular milk (whole milk is best here!) and mix in one tablespoon of white vinegar or lemon juice per cup and a half of milk. Let it sit on the counter for about five minutes until it looks slightly curdled. That’s your homemade buttermilk! It’s the key to that beautiful flavor and rise in our homemade breakfast recipes.
How do I get my pancakes perfectly round and consistent in size?
This is all about practice and consistent measuring! If you are using a ladle or spoon, you’ll naturally get slight variations. For consistent, beautiful circles, grab a standard 1/4 cup measuring cup and use that to scoop and pour the batter onto your hot griddle. Pour steadily in the center of where you want the pancake to stop spreading. After a few tries, you’ll notice that even pouring stops the batter from stretching too thin, helping keep the edges nice and neat. It makes stacking them much more satisfying!
Do I really need to let the batter rest?
Yes! Oh gosh, yes. This step is vital to achieving that light and airy breakfast quality. That 10-minute rest isn’t just downtime; it’s when the magic happens chemically. The baking powder gets activated by the liquid and starts producing tiny carbon dioxide bubbles. If you skip that rest, you cook the bubbles out before they have a chance to fully form and stabilize. You want those bubbles to be strong enough to hold their shape when they hit the heat! If you have time, resting for 15 minutes ensures you get truly thick pancakes that practically float on your plate.
About Alex and Pure Cooking Joy
I’m Alex, and my whole philosophy here at Pure Cooking Joy is proving that incredible food doesn’t need to be difficult or stressful. That’s why I’m so happy you found this space! Making these genuinely fluffy pancakes was a huge step on my own journey away from kitchen burnout toward finding real culinary peace.
I hope these recipes bring you that same joy. If you want to read more about where I started or see what else we’re cooking up, feel free to swing by my About page or check out my latest posts on the blog. And hey, come say hello over on Facebook too!
PrintThe Ultimate Fluffy Old-Fashioned Pancakes: Easy 1-Bowl Recipe with Guaranteed Height
I am happy you are here. You want truly fluffy, tall pancakes from scratch, and I will show you how. This easy, one-bowl recipe uses simple techniques to guarantee light, airy, old-fashioned pancakes every time you cook. Say goodbye to flat breakfast disappointments.
- Prep Time: 10 min
- Cook Time: 15 min
- Total Time: 25 min
- Yield: About 12 pancakes 1x
- Category: Breakfast
- Method: Griddling
- Cuisine: American
- Diet: Vegetarian
Ingredients
- 2 cups all-purpose flour
- 2 tablespoons granulated sugar
- 4 teaspoons baking powder
- 1 teaspoon baking soda
- 1 teaspoon salt
- 2 large eggs
- 1 3/4 cups buttermilk
- 1/2 cup unsalted butter, melted, plus more for the griddle
- 1 teaspoon vanilla extract
Instructions
- Combine dry ingredients: In a large bowl, whisk together the flour, sugar, baking powder, baking soda, and salt. This is your first step for guaranteed height.
- Combine wet ingredients: In a separate medium bowl, whisk the eggs, buttermilk, melted butter, and vanilla extract until just combined.
- Mix the batter: Pour the wet ingredients into the dry ingredients. Mix gently with a whisk or spatula until the batter is just combined. Do not overmix; a few lumps are fine. Overmixing develops gluten and makes pancakes tough.
- Rest the batter: Let the batter rest at room temperature for 10 minutes. This resting time allows the baking powder to activate and helps create those light, airy pockets you want for tall pancakes.
- Heat the griddle: Heat a large nonstick griddle or skillet over medium heat. Lightly grease the surface with butter or a neutral oil. The griddle is ready when a drop of water sizzles immediately.
- Cook the pancakes: Pour 1/3 cup of batter onto the hot griddle for each pancake. Cook for 2 to 3 minutes, or until bubbles appear on the surface and the edges look set.
- Flip and finish: Flip the pancakes and cook for another 1 to 2 minutes until golden brown and cooked through.
- Serve immediately: Stack your fluffy, old-fashioned pancakes high and serve warm with maple syrup and butter.
Notes
- For extra thick pancakes, let the batter rest for 15 minutes instead of 10.
- If you do not have buttermilk, mix 1 3/4 cups of whole milk with 1 tablespoon of white vinegar or lemon juice. Let it sit for 5 minutes before using.
- Use a 1/4 cup measure for consistent, tall pancakes.
Nutrition
- Serving Size: 2 pancakes
- Calories: 320
- Sugar: 6
- Sodium: 450
- Fat: 12
- Saturated Fat: 7
- Unsaturated Fat: 5
- Trans Fat: 0
- Carbohydrates: 45
- Fiber: 2
- Protein: 10
- Cholesterol: 95
