 Skip to content

When the game is on, or you just have friends coming over unexpectedly, you absolutely need a foolproof appetizer that screams Tex-Mex celebration. Forget those fussy tapas; we’re going straight for the showstopper. This Ultimate 7 Layer Taco Dip? It’s truly the best layer dip you’ll ever bring to a party. Honestly, after years trapped behind a desk worrying about spreadsheets, finding simple joy in food that brings people together—like this dip—is everything to me now. It’s stunningly colorful, requires zero oven time, and comes together in about 20 minutes flat. If you’re prepping for football Sundays or need some easy entertaining ideas, trust me, this vibrant, no-bake dip is your new secret weapon for Game Day Dips. You can find more easy crowd-pleasers over in my collection of appetizers and snacks!

- Why This Seven Layer Dip Recipe is Your New Favorite Party Dip Recipes (Best Layer Dip)
- Gathering Ingredients for Your Ultimate Layer Dip
- Step-by-Step Instructions for the Best Layer Dip
- Tips for Success When Making a Layer Dip
- Serving Suggestions for Your Layered Bean Dip
- Storage and Reheating Instructions for This Layer Dip
- Frequently Asked Questions About This Tex Mex Dip
- Nutritional Estimates for This Layer Dip
- Share Your Best Layer Dip Creations
Why This Seven Layer Dip Recipe is Your New Favorite Party Dip Recipes (Best Layer Dip)
Honestly, there is nothing more flattering than watching a beautiful layer dip vanish before your eyes. This recipe always disappears first at any gathering I bring it to—it’s embarrassing how fast the chips come out scraping the bottom of the dish! People go crazy for the vibrant colors and the distinct layers. It’s the ultimate addition to your Party Dip Recipes collection because it delivers massive flavor without any fuss.
Quick Assembly for Easy Entertaining
Since this is a completely no-bake situation, you can have this dip ready to go in just 20 minutes of active time. That’s huge when you’re hosting! If you’re already stressed setting out drinks or finding serving spoons, you can still whip up this stunning appetizer quickly. It’s truly an Easy Layer Dip that makes the host look like a genius.
The Perfect Cold Dip Recipe Balance
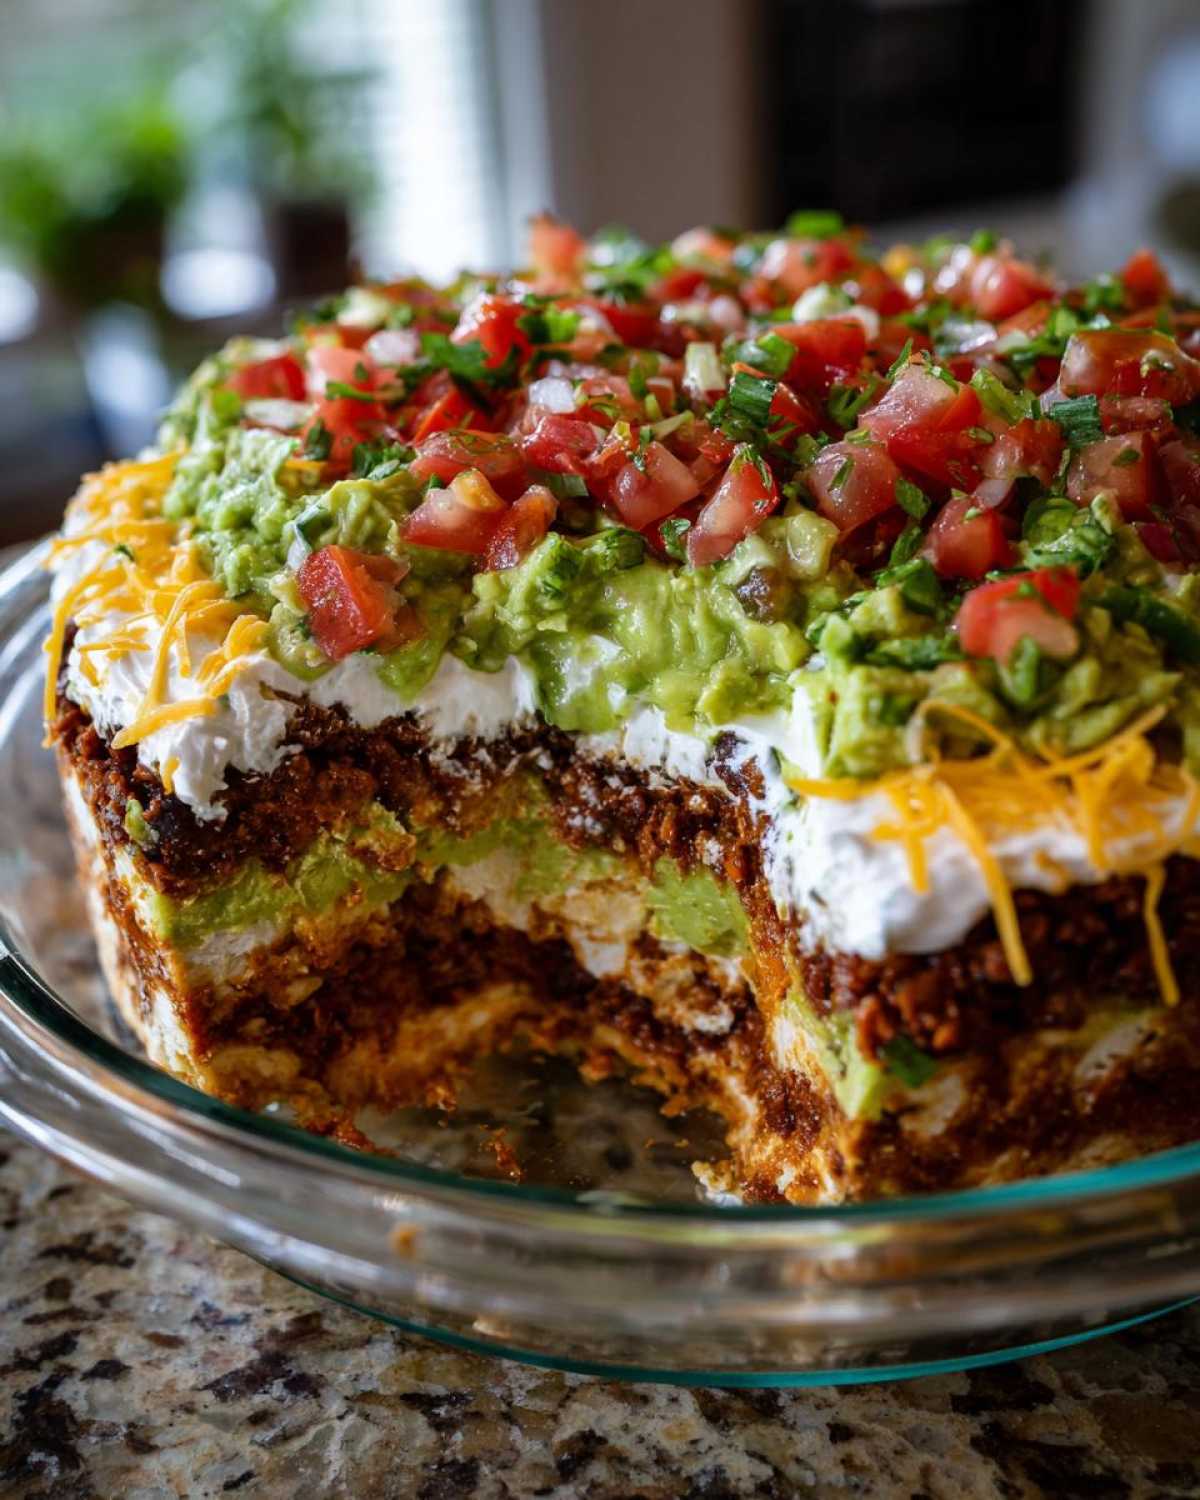
What makes this work so well is the contrast. You get that smooth, creamy dip base from the seasoned cream cheese layer, followed by the cool, zesty punch of the salsa and guacamole. Layering those textures means every scoop hits that perfect, savory Tex-Mex note people crave in a great layer dip.
Gathering Ingredients for Your Ultimate Layer Dip
Okay, now for the fun part—gathering the necessary components for this absolutely essential Classic Layered Appetizer. We are building flavor one creamy stratum at a time. It might sound like a lot of bowls, but trust me, we’re sticking to the essentials to guarantee every scoop is worth the effort. Before you start, I highly recommend whipping up a fresh batch of salsa if you have a few extra minutes; you can find my favorite recipe for restaurant-style salsa right here!

Ingredient Notes and Substitutions for Your Layer Dip
A few little notes here: when you buy the beans, make sure you get the smooth, fully mashed refried beans. Whole beans just won’t give you that nice, spreadable base layer you need for this layer dip. Also, that cream cheese? It simply has to be softened to room temperature, or you’ll end up with frustrating little lumps in the creamy layer—nobody wants to chew on a cold clump of cheese!
We’re using one full packet of store-bought taco seasoning dumped right into the cream cheese and sour cream mix; it’s fast and flavorful, no need to mess with individual spices here! And remember that optional meat layer I mentioned? If you choose to add it, make sure you brown about a pound of ground beef first, drain off every bit of fat, and toss it with half a packet of seasoning before spreading it right on top of the beans.
Step-by-Step Instructions for the Best Layer Dip
Putting this amazing layer dip together is like stacking perfect building blocks of flavor. The secret is patience between steps, especially when spreading, but the assembly itself flies by. You’ll need a shallow 9×13 dish for the best visual impact once you’re done, but I sometimes use a deep pie plate if I’m feeling lazy—it just means the layers end up a little thicker, which isn’t a bad thing! If you want to see another quick Mexican favorite, check out my recipe for easy Mexican Pizza.
Creating the Creamy Seasoned Layer
This is the heart of the creamy texture, so don’t rush it! We are combining the softened cream cheese, the sour cream, and the entire packet of taco seasoning. Grab a whisk or use a hand mixer if you want to be speedy, but make sure you beat this mixture until it is absolutely, completely smooth. We can’t have any little cream cheese islands floating around in our dip!
Layering Technique for a Perfect Taco Dip Layered Presentation
Now we build! Spread the refried beans first across the entire bottom of your dish. Then, gently take that creamy seasoned mix and spread it evenly over the beans—remember, gently! You don’t want to drag the beans up into your white layer. Next comes the guacamole, then the salsa spooned over that. Finally, hit it with your shredded cheese and any chopped olives. The key to that stunning **Taco Dip Layered** look is never stirring or pushing down; just layer, layer, layer!
Crucially, once you’ve finished stacking those seven beautiful layers, cover the whole thing tightly and stick it in the fridge. It needs at least one hour for the layers to chill and really ‘set up’ so they don’t slide all over the place when you serve it. Trust me on the chill time; it makes the difference between a messy snack and a masterpiece.
Tips for Success When Making a Layer Dip
Listen, building this visual feast means we need a few rules to keep those layers looking sharp. The biggest potential disaster is having runny layers that bleed into each other, making everything look like a beige mess instead of a colorful masterpiece! I learned this the hard way: If you put the salsa on while your guacamole is still warm or newly made, the moisture will seep right down. Don’t do that!
My biggest piece of advice is to embrace the Make Ahead Dip strategy. This layer dip is absolutely designed to be prepped the day before. Once those layers are chilled overnight, they firm up beautifully, making it so much easier to serve the next day. You can cover your dish and let it hang out in the fridge for a whole 24 hours before company arrives, which takes so much pressure off the day of the party.
Speaking of making things ahead, you can even prep the guacamole a few hours early, but make sure you really hit it with lime juice and use plastic wrap pressed directly onto the surface to stop the oxidizing. It ensures that vibrant green color stays put until it’s time to dive in. For another great make-ahead recipe that is slightly different but equally wonderful, check out my Avocado Chicken Salad!
Serving Suggestions for Your Layered Bean Dip
This amazing Layered Bean Dip really deserves the perfect vehicle to carry those seven incredible layers straight to your mouth! Sure, you absolutely need a big, sturdy bag of tortilla chips—the thick scoopable ones are definitely the best!

But don’t let the chips hog all the glory! For some great Party Food Ideas variety, I always offer a few other things. Think sturdy crackers; the plain, salted ones work great without overpowering the flavor. I also love throwing some veggie sticks on a platter around the dip—think crisp bell pepper strips or sturdy carrot sticks. It gives people a slightly lighter option for scooping up all that creamy goodness without feeling too heavy before the main meal hits the table. If you’re making other dishes, maybe an easy cornbread recipe, like my cast-iron skillet version, is a great addition!
Storage and Reheating Instructions for This Layer Dip
Because this Ultimate 7 Layer Dip is designed to be served cold and relies heavily on ingredients like fresh sour cream and guacamole, we really need to be mindful of how we store it. This is definitely a fantastic layer dip to assemble the day before your busy party, as chilling it (covered, of course!) lets those flavors really meld together beautifully.
However, I have to be clear: please, don’t even think about reheating this! Stuffing a cold, creamy, Tex-Mex creation into the oven will result in oily, separated disappointment. The texture will be totally ruined. This dip is best the day it’s made or the day after, served chilled, straight from the fridge. It’s meant to be that quick, refreshing hit of flavor!
Frequently Asked Questions About This Tex Mex Dip
I get so many questions every time I post this recipe on social media! It’s proof that everyone loves a great Tex Mex Dip, especially when it’s easy. It’s wonderful that you’re thinking ahead to serve the perfect appetizer for your crowd. If you ever have trouble finding specific ingredients or need quick help while cooking, please don’t hesitate to reach out on my contact page!
Can I make the guacamole layer fresh for this layer dip?
Oh yes, please do! Making the guacamole fresh is always going to give you the best flavor for your Guacamole Dip Recipe component. The only thing you have to watch out for is browning. If you aren’t spooning it onto a layer right away, you need to cover that fresh guacamole completely. I press plastic wrap directly onto the surface to keep the air out, or you can mix in an extra squeeze of fresh lime juice before you layer it. It helps keep those gorgeous green shades bright!
Is this Seven Layer Dip Recipe suitable for vegetarians?
Absolutely, the standard seven-layer version is totally vegetarian! We rely on the beans for substance and flavor, not meat. This makes it a fantastic, crowd-pleasing choice if you are worried about keeping things meat-free for your Cinco de Mayo Appetizers or any other gathering. If you are using the optional ground beef layer, just leave that step out, and you’re good to go. It’s simple!
What is the best dish size for this layer dip?
When it comes to presentation, shape matters! If you want those beautiful, distinct stripes for your Classic Layered Appetizer, I really recommend spreading this recipe out in a 9×13 inch rectangular dish. The layers will be thinner, making it look super impressive when you serve it. If you prefer thicker layers that are easier to scoop, a 9×9 inch square dish works perfectly, though you might run a tiny bit short on the top layer.
Nutritional Estimates for This Layer Dip
I always like to give a general idea of what’s in the dish, though remember these are just estimates based on the standard ingredients and serving size!
- Serving Size: 1/10 of dip
- Calories: 250
- Fat: 18g
- Protein: 8g
- Carbohydrates: 15g
Since this delicious layer dip relies on things like sour cream, cheese, and avocado (if you count the guac!), the numbers can shift slightly based on what products you pick up at the store. But hey, during party season, we focus on the joy, right? These numbers are just for curious cooks like me!
Share Your Best Layer Dip Creations
I truly hope this Ultimate 7 Layer Taco Dip brings as much fun and flavor to your gatherings as it does to mine! Once you’ve made it, please hop over to my main blog and tell me what you thought—rating the recipe helps other new cooks feel confident trying it out.
And listen, if you post photos of your stunning, colorful appetizer spread on social media, please tag me on Facebook at Pure Cooking Joy! Seeing your versions of this fantastic layer dip absolutely makes my day. Happy scooping, friends!
PrintThe Ultimate 7 Layer Taco Dip for Game Day

Make this classic Tex-Mex layer dip for your next party. It is easy to assemble, requires no baking, and features seven distinct, flavorful layers perfect for scooping with tortilla chips.
- Prep Time: 20 min
- Cook Time: 0 min
- Total Time: 1 hour 20 min
- Yield: 10 servings 1x
- Category: Appetizer
- Method: No Bake
- Cuisine: Tex-Mex
- Diet: Vegetarian
Ingredients
- 1 (16 ounce) package refried beans
- 1 cup sour cream
- 1 package (8 ounces) cream cheese, softened
- 1 packet (1 ounce) taco seasoning mix
- 1 cup prepared guacamole
- 1 cup salsa (medium heat recommended)
- 1 cup shredded Mexican blend cheese
- 1/2 cup chopped black olives (optional layer)
- 1/4 cup chopped fresh cilantro (for garnish)
Instructions
- In a medium bowl, mix the sour cream and softened cream cheese until smooth. Stir in the entire packet of taco seasoning mix until fully combined. This creates your seasoned cream cheese layer.
- Spread the refried beans evenly across the bottom of a 9×13 inch serving dish or pie plate.
- Carefully spread the seasoned cream cheese mixture over the bean layer.
- Gently spoon the prepared guacamole over the cream cheese layer, spreading it out evenly.
- Pour the salsa over the guacamole layer. Do not stir the layers.
- Sprinkle the shredded Mexican blend cheese evenly over the salsa.
- If using, sprinkle the chopped black olives over the cheese layer.
- Cover the dish and chill the layer dip in the refrigerator for at least one hour before serving. Chilling allows the layers to set.
- Garnish with fresh cilantro just before serving with tortilla chips.
Notes
- You can make this layer dip up to 24 hours ahead of time. Keep it covered in the refrigerator until you are ready to serve.
- For an optional eighth layer, brown 1 pound of ground beef with half a packet of taco seasoning and drain the fat before spreading it over the refried beans.
- Use your favorite store-bought or homemade guacamole for the best flavor.
Nutrition
- Serving Size: 1/10 of dip
- Calories: 250
- Sugar: 4
- Sodium: 450
- Fat: 18
- Saturated Fat: 8
- Unsaturated Fat: 10
- Trans Fat: 0
- Carbohydrates: 15
- Fiber: 3
- Protein: 8
- Cholesterol: 35
