 Skip to content

Oh, spring! When those beautiful, tart stalks finally show up at the market, I just have to drop everything and bake. If you’re like me, you crave that perfect combination of bright flavor and warm, buttery crust, and trust me, this rhubarb crisp delivers. Forget complicated crusts or tricky toppings—this is the easiest, most classic rhubarb crisp recipe out there, guaranteed to give you that incredible, crunchy oat topping every single time. I spent ages perfecting this, remembering how much simpler cooking felt compared to my old corporate life, and finding that peace in the kitchen is what Pure Cooking Joy is all about. You can learn a little more about my journey right here. This simple baked fruit dessert is pure joy in a dish.
- Why This Classic Rhubarb Crisp Recipe Works Every Time
- Ingredients for Your Easy Rhubarb Crisp
- Step-by-Step Instructions for the Best Rhubarb Crisp
- Tips for a Perfect Homemade Fruit Crisp Every Time
- Variations on the Classic Rhubarb Crisp
- Serving Suggestions for This Simple Baked Fruit Dessert
- Storing and Reheating Your Rhubarb Crisp
- Frequently Asked Questions About Rhubarb Crisp
- Nutritional Estimates for This Comfort Dessert
Why This Classic Rhubarb Crisp Recipe Works Every Time
I’m telling you, this isn’t just another fruit dessert; this is the rhubarb crisp that brings everyone back for seconds. It’s that old-fashioned, comforting treat we all crave, but I’ve made sure the steps are dead simple. You get the best of both worlds: an unbelievably juicy filling and a topping that stays wonderfully crisp. You can trust me on this one; it’s become my go-to comfort food recipe, and I love sharing it with you here on the site.

Achieving the Perfect Crunchy Rhubarb Crisp Topping
The secret to a topping that doesn’t turn into heavy mush? Cold butter! You must use very cold, cubed butter and cut it right into those dry ingredients—the oats, flour, and sugars. When you work it in until it looks like coarse crumbs with some pea-sized chunks remaining, you’ve created those little pockets that bake up golden and crunchy. That’s the magic of a truly excellent oat topping crisp.
Mastering the Tart and Sweet Rhubarb Crisp Filling
Rhubarb wants to be sour, right? That’s why we don’t skimp on the sugar in the filling. The ratio of sugar to the tart rhubarb is crucial here to make sure we get that perfect tart and sweet dessert balance. Too little sugar, and it’s puckeringly sour; too much, and you lose that distinctly bright rhubarb flavor. This specific measurement delivers the jammy center you absolutely need in the best **rhubarb crisp**.
Ingredients for Your Easy Rhubarb Crisp
When it comes to an easy rhubarb crisp, the ingredients are simple, which is perfect for keeping things fast! I’ve listed everything you need below. Remember, this whole recipe works beautifully for those times you want to use frozen rhubarb recipes, too. Just follow the notes later on for that adjustment. Precision here really helps us get that incredible, buttery crumble topping.
For the Tart Rhubarb Filling
- 6 cups fresh rhubarb, cut into 1-inch pieces (or use frozen rhubarb!)
- 1 cup granulated sugar
- 2 tablespoons all-purpose flour (this helps thicken up those lovely juices)
- 1 teaspoon vanilla extract
For the Buttery Oat Topping Crisp
- 1 1/2 cups old-fashioned rolled oats
- 1 cup all-purpose flour
- 3/4 cup packed light brown sugar
- 1/2 teaspoon ground cinnamon
- 1/4 teaspoon salt
- 1/2 cup (1 stick) cold unsalted butter, cut into small pieces
Step-by-Step Instructions for the Best Rhubarb Crisp
Okay, let’s get this **rhubarb crisp** into the oven! Since this recipe is all about being quick and easy, we can get dinner turned into dessert in about an hour total. Always start by making sure your oven is hot—we need 375°F (190°C). I usually grease my 9×9 dish while the oven kicks into gear. We’re going to handle this in two quick parts: the filling first, then that glorious topping you’ve been waiting to make.
Preparing the Rhubarb Crisp Filling
Grab your big mixing bowl! Toss those rhubarb pieces with the granulated sugar, the couple of tablespoons of flour we set aside, and that splash of vanilla extract. Gentleness is key here; we’re just coating everything so the filling gets nice and syrupy while it bakes. Once everything looks evenly coated, pour it all into your prepared baking dish and try to spread it out into one nice, flat layer. Don’t worry if it settles during baking!
Creating the Crunchy Oat Topping
Time for the fun part! In a separate bowl, whisk together your oats, the measuring cups of flour, brown sugar, cinnamon, and salt. Now, remember what I said about the cold butter? Drop those little cold cubes right on top of that dry mix. You have to work fast here, using your fingers or a pastry blender, squishing and rubbing that butter in. Stop as soon as you see coarse crumbs; you want them chunky for that guaranteed crunchy rhubarb crisp topping. Do not overwork it!
Baking and Resting Your Rhubarb Crisp
Sprinkle that buttery oat topping evenly over the rhubarb—don’t pat it down, seriously! Slide it into that hot oven and bake it for about 40 to 50 minutes. Keep an eye on it; if the topping starts getting too dark before the filling bubbles up thickly (that’s how you know it’s done!), just loosely drape some foil over the top. Once it’s bubbly and golden, pull it out. And this is the hardest step: you absolutely must let this simple baked fruit dessert rest for 15 minutes. If you cut it right away, it’ll run everywhere! Check out some easy weeknight dinner ideas while it cools!

Tips for a Perfect Homemade Fruit Crisp Every Time
Even though this is an easy rhubarb crisp, having a couple of tricks up your sleeve makes it foolproof! I share lots of foundational cooking ideas over on my main blog, and crisp-making is no exception. When you’re pulling together a simple baked fruit dessert like this, a few small details can take it from “good” to “absolutely incredible.” Here are the things I always watch out for, especially when I’m baking out of season.
Handling Frozen Rhubarb in Your Rhubarb Crisp
Don’t panic if you can only find frozen rhubarb! The best advice here is simple: never thaw it first. If you start with mushy rhubarb, you’ll end up with soup in your dish. Just dump the frozen rhubarb straight into the mixing bowl with the sugar and flour. Since it starts cold, you’ll notice the baking time cranks up a bit—plan on adding about 5 to 10 extra minutes to the baking time until you see those deep, beautiful bubbles.
Ensuring a Truly Crunchy Rhubarb Crisp
If you’re worried about soggy bottoms, I get it! That buttery crumble topping is the soul of this dessert. You have to make sure that butter is ice cold—I mean, straight from the back of the freezer cold. And promise me you won’t crush that topping into sand! We need those coarse crumbs to get that beautiful, golden, satisfying crunch. If you overmix, the butter melts too soon, and then you’ll end up with a dense layer instead of that spectacular crunchy rhubarb crisp texture we are aiming for.
Variations on the Classic Rhubarb Crisp
This basic rhubarb crisp recipe is fantastic on its own, but once you’ve mastered the classic, it’s fun to play around! I love how versatile rhubarb is, lending itself well to mixing with other orchard favorites for a brand new experience. It’s why this recipe is so great for spring gatherings—you can switch it up slightly each time and everyone thinks you developed a whole new dish!
Making Strawberry Rhubarb Crisp
If you want to soften that beautiful tartness, adding strawberries is the way to go. They bring sweetness and a gorgeous color. For this recipe, just swap out half of your rhubarb quantity for strawberries. So, instead of 6 cups of just rhubarb, you’ll use 3 cups of rhubarb and 3 cups of strawberries. That makes for an incredible strawberry rhubarb crisp!
Adding Spice to Your Rhubarb Crisp
For an extra layer of warmth that really complements that sweet and tart dessert flavor, try adding something extra to your oat topping. I sometimes sneak in maybe a tiny pinch of ground nutmeg alongside the cinnamon when I’m making my buttery crumble topping. Or, if you’re feeling bold, a little dash of ground ginger really wakes up the entire dish. It’s amazing how those little additions make your homemade fruit crisp feel special.
Serving Suggestions for This Simple Baked Fruit Dessert
You just pulled this beauty out of the oven, and while resisting is hard, letting it rest for 15 minutes is non-negotiable! This simple baked fruit dessert is best served warm, not scorching hot. That little bit of cooling time lets the filling set up so it doesn’t run all over the plate.

But seriously, the *only* way to eat a slightly tart rhubarb crisp is with something cold and creamy melting right over the top. A generous scoop of good quality vanilla ice cream is the classic move—that hot-cold contrast is just heaven. If you’re looking for more dessert inspiration for entertaining, maybe check out my favorites on easy cheesecake cupcakes while you wait for this to cool down!
Storing and Reheating Your Rhubarb Crisp
I know you probably plan on eating every last bit of this homemade fruit crisp right now, but let’s be practical about leftovers! If you happen to have any crusty goodness remaining, you can store the uncovered crisp at cool room temperature for about a day. But honestly, to keep that buttery oat topping crisp—the whole goal here—I always recommend covering it tightly and popping it into the fridge. It lasts well for up to four days chilled.

The reheating part is important! Straight from the fridge, the topping needs revival. Don’t use the microwave, it’ll steam it soggy! Instead, reheat individual slices on a baking sheet at 350°F (175°C) for about 8 to 10 minutes. That blast of dry heat wakes up the oats and crisps them right back up. Perfection!
Frequently Asked Questions About Rhubarb Crisp
I get so many great questions whenever I post this recipe! It’s natural to have a few questions when you’re trying out a new version of a classic dessert. I hope these little answers help you feel totally confident before you even turn on the oven. If you’re hosting a gathering soon, you might want to check out my tips for easy entertaining—this crisp is always a huge hit!
Can I make this rhubarb crisp ahead of time?
You absolutely can! If you want to save time right before dinner, assemble the whole thing—filling and topping—and cover it tightly with plastic wrap. Leave it in the fridge for up to a day. When you’re ready to bake, just add about 10 minutes to the baking time since it’s going in cold. Alternatively, you can bake it completely, let it cool, and store it, just remember to reheat it later to crisp up that topping again!
What is the difference between a rhubarb crisp and a rhubarb crumble?
This is such a good question that confuses everybody! Everyone uses the terms interchangeably, but traditionally, the word rhubarb crisp implies that you’re using rolled oats in that buttery topping to give it that extra crunch. A standard rhubarb crumble often skips the oats and is just flour, sugar, and butter, making it a slightly softer topping. For me, the oats are the best part, which is why I stuck with the crisp method!
Why is my rhubarb crisp topping soggy?
Ugh, soggy topping is the worst! There are usually two culprits. First, you didn’t use butter that was cold enough—remember, we need those cold chunks to create steam and crispiness. Second, and this is a big one, you might have pressed that topping down when you sprinkled it on. Never, ever pack it down! Let it be loose and crumbly; if you compact it, those oats can’t toast up properly, and you lose the crunch against that juicy filling.
Nutritional Estimates for This Comfort Dessert
Now, I want to be super clear: I’m Alex the cook, not a registered dietitian! These numbers are just estimates based on the recipe as written, and they don’t account for added cream or ice cream, which let’s be honest, makes everything better. But it’s handy to have a general idea when you’re enjoying this comforting treat. If you are looking for more easy meals that bring joy without the stress, my chicken soup recipe is a total winner.
- Serving Size: 1 serving
- Calories: 380
- Sugar: 35g
- Fat: 18g
You can see all the details, including fats and carbs, here. Don’t forget to follow along for more simple, delicious recipes over on my Facebook page too! Come say hi!
PrintEasy Classic Rhubarb Crisp with Crunchy Oat Topping
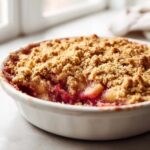
I’m Alex, and I’m glad you are here. This easy rhubarb crisp recipe delivers the perfect balance of tart rhubarb and a buttery, crunchy oat topping. It is a simple, soul-satisfying dessert perfect for sharing.
- Prep Time: 15 min
- Cook Time: 45 min
- Total Time: 60 min
- Yield: 6 servings 1x
- Category: Dessert
- Method: Baking
- Cuisine: American
- Diet: Vegetarian
Ingredients
- 6 cups fresh rhubarb, cut into 1-inch pieces (or use frozen rhubarb)
- 1 cup granulated sugar
- 2 tablespoons all-purpose flour
- 1 teaspoon vanilla extract
- For the Topping:
- 1 1/2 cups old-fashioned rolled oats
- 1 cup all-purpose flour
- 3/4 cup packed light brown sugar
- 1/2 teaspoon ground cinnamon
- 1/4 teaspoon salt
- 1/2 cup (1 stick) cold unsalted butter, cut into small pieces
Instructions
- Preheat your oven to 375°F (190°C). Lightly grease a 9×9 inch baking dish or an equivalent 2-quart dish.
- Prepare the filling: In a large bowl, combine the cut rhubarb, granulated sugar, 2 tablespoons of flour, and vanilla extract. Toss gently until the rhubarb is evenly coated. Pour this mixture into your prepared baking dish and spread it into an even layer.
- Prepare the crunchy oat topping: In a separate medium bowl, mix together the rolled oats, 1 cup of flour, brown sugar, cinnamon, and salt.
- Cut in the cold butter: Add the cold, cubed butter to the dry topping ingredients. Use your fingertips or a pastry blender to cut the butter into the mixture until it resembles coarse crumbs, with some pea-sized pieces remaining. This creates the buttery crumble topping you want.
- Sprinkle the topping evenly over the rhubarb filling in the baking dish. Do not press it down.
- Bake for 40 to 50 minutes, or until the topping is golden brown and the rhubarb filling is bubbly and tender when pierced with a fork. If the topping browns too quickly, loosely cover the dish with foil for the last 10 minutes of baking.
- Remove the rhubarb crisp from the oven and let it cool on a wire rack for at least 15 minutes before serving.
- Serve warm, ideally with a scoop of vanilla ice cream for that classic taste of home.
Notes
- If you use frozen rhubarb, do not thaw it first. You may need to add 5 to 10 minutes to the total baking time.
- For an extra crunchy rhubarb crisp, ensure your butter is very cold when making the topping.
- This dessert is a simple baked fruit dessert that pairs well with coffee or tea.
Nutrition
- Serving Size: 1 serving
- Calories: 380
- Sugar: 35g
- Sodium: 120mg
- Fat: 18g
- Saturated Fat: 11g
- Unsaturated Fat: 7g
- Trans Fat: 0.5g
- Carbohydrates: 55g
- Fiber: 5g
- Protein: 5g
- Cholesterol: 45mg
