 Skip to content

Hi there! I’m Alex, and I genuinely believe that incredible, soul-satisfying food shouldn’t require complicated steps or hours of work. If you’re like I was—feeling totally overwhelmed by the idea of baking a proper loaf of bread—then you are exactly where you need to be today. Forget the kneading, forget waiting hours for yeast to bloom! We are diving into what I consider the ultimate introduction to homemade baking: the unbelievably easy, 3-ingredient, no-yeast beer bread.

This Simple Homemade Bread is so foolproof, it practically bakes itself. It’s warm, it’s comforting, and it’s ready to be slathered with butter before dinner is even on the table. You can read more about my journey from burnout to baking bliss over on the About Page. Let’s get started on this magic loaf!
- Why This Easy Beer Bread Recipe Works So Well (No Yeast Required)
- Gathering Ingredients for Your 3 Ingredient Bread
- How to Make Beer Bread: Simple Homemade Bread Steps
- Finishing Touches: Achieving a Golden Crust on Your Beer Bread
- Tips for Success: Mastering Your Easy Beer Bread
- Variations: Customizing Your Savory Quick Bread
- Serving Suggestions for this Classic Beer Bread
- Storage and Reheating for Your Homemade Beer Bread
- Frequently Asked Questions About Beer Bread
- Estimated Nutritional Information for This Beer Bread
- Share Your Simple Homemade Bread Experience
Why This Easy Beer Bread Recipe Works So Well (No Yeast Required)
If you’ve ever been intimidated by yeast or the sheer physical labor of baking without kneading, this beer bread is about to become your new favorite thing. Seriously, it’s the definition of a quick bread recipe that delivers! The best part? It comes together in about five minutes of active fussing. We skip the rising time, we skip the kneading—which is why this is such a confidence booster for those just starting out with easy baking for beginners. I share more about my easy approach to baking bread right here on the site.
This rapid success is all thanks to the beer itself. We rely completely on the carbonation, which takes over the job of the yeast, giving us a fast, reliable rise. We’re trading fussiness for fizz, and the results are always incredibly satisfying.
The Magic of Carbonation in Beer Bread
Think of the beer—any beer, really—as a natural, fizzy helper. Those little bubbles trapped inside? Those are gas pockets just waiting to expand in the heat of the oven! That expansion is precisely what creates the lift we need for a beautiful rise. This is the secret to getting that gorgeously soft crumb bread texture without ever touching a packet of yeast. It’s chemistry doing the heavy lifting for us!
Gathering Ingredients for Your 3 Ingredient Bread
Okay, let’s talk about setting ourselves up for success before we even touch a bowl. The beauty of this beer bread is its simplicity; we are aiming for the absolute core, requiring just three primary ingredients, plus the essential butter topping to make it truly special. When you’re relying on so few players, you absolutely need to use good quality versions and pay attention to detail. I always keep the dry stuff stocked because this is the ultimate pantry staple bread!
You’ll need three cups of all-purpose flour—make sure it’s scooped lightly and leveled off, not packed down! We also call for one tablespoon of sugar, which isn’t just for sweetness; it helps the crust brown beautifully. Then we add the leavener: one tablespoon of baking powder and one teaspoon of salt to balance everything out. But here’s the non-negotiable part for an amazing loaf: you must use one full 12-ounce bottle of beer, and it has to be room temperature. Cold beer doesn’t mix as smoothly and won’t let the carbonation work its best!
Ingredient Notes and Beer Selection for Perfect Beer Bread
When it comes to choosing your beer, trust me on this: avoid anything too dark or specialty right now. Stouts or heavy porters tend to bring too much bitterness and can result in a darker, denser loaf than we want for this *fluffy* outcome. Stick to light lagers, pilsners, or maybe a standard pale ale. You want the fizz, not overwhelming flavor notes.
Now, don’t forget the grand finale! That melted butter brushed over the top when it comes out of the oven is what turns this from “fine bread” into a genuine buttery bread recipe highlight. Melt about four tablespoons of unsalted butter and keep it ready right next to the oven. It sinks right into that hot crust, creating that perfect, slightly crisp, rich exterior we are looking for. Seriously, don’t skimp here; it makes all the difference in flavor and texture!
How to Make Beer Bread: Simple Homemade Bread Steps
Alright, Alex here, ready to walk you through the actual baking process. This is where the magic happens, but remember our mantra: keep it simple! We are aiming for comfort and ease, so don’t let the unfamiliarity of using beer instead of water scare you off. In fact, because this is such an easy recipe, I put together some notes on turning it into comfort food favorites which you can check out here.
First things first, get your oven preheated to 375 degrees F (190 degrees C). That’s a slightly lower temperature than some breads run, which really helps this loaf bake evenly all the way through. While it heats up, grab a standard 9×5 inch loaf pan. Grease it up really well—a good coating of butter or cooking spray—and then dust it lightly with flour. This bread *will* stick if you skimp on this step, so be thorough!
Next, grab that big bowl where you mixed your dry ingredients—the flour, salt, sugar, and baking powder. Give those a quick whisk one last time, just to make sure everything is evenly distributed before we introduce the liquid.
Mixing the Batter: The Key to Fluffy Beer Bread
Now, pour in that room-temperature beer all at once. Take a sturdy wooden spoon or a spatula and mix barely until the wet and dry ingredients are *just* combined. I cannot stress this enough: do not whip this batter! We want the CO2 from the beer to stay intact. If you mix until it’s completely smooth, you’ll deflate all those bubbles, and you’ll end up with a dense brick instead of our desired fluffy beer bread. It’s totally okay if you see a few streaks of dry flour or a small lump or two; that’s exactly what we are aiming for. Lumps are your friends here!
Baking Time and Testing for Doneness
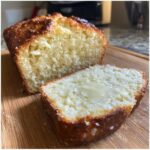
Spoon that slightly lumpy batter right into your prepared loaf pan and get it into that preheated oven. We are looking at a baking window between 45 and 55 minutes. Seriously, keep an eye on it after the 40-minute mark, because every oven is a little different. You know it’s getting close when the top is a rich golden brown. The best way to check for doneness is the classic toothpick test. Stick a thin wooden pick right into the center of the loaf, pull it out, and if it comes out clean, or maybe with just a few moist, tender crumbs attached—but absolutely no wet batter—it’s ready! That’s how we guarantee a fully cooked loaf.

Finishing Touches: Achieving a Golden Crust on Your Beer Bread
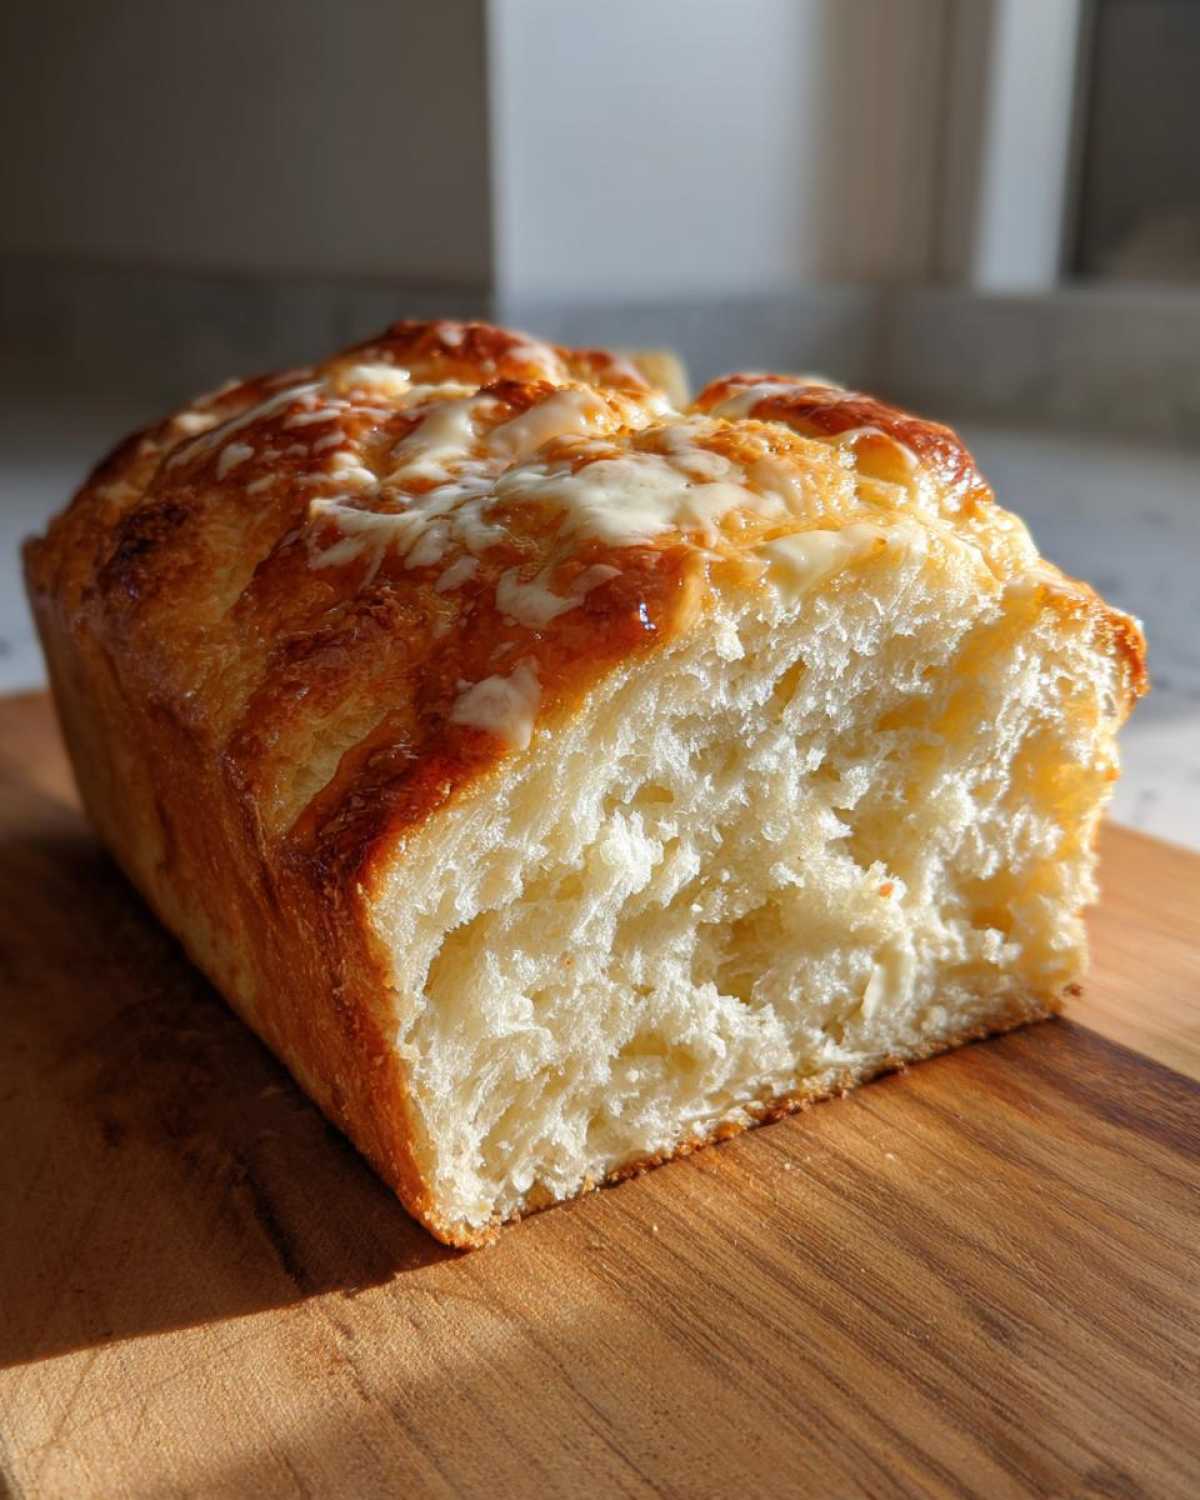
We’re pulling this loaf out of the oven, and it looks beautiful—golden brown and smelling incredible, right? Don’t let it cool yet! This is the critical moment for texture and flavor enhancement. Right off the heat, while that crust is still screaming hot, you need to immediately brush all four tablespoons of that melted butter evenly across the top. This immediate butter bath seals in flavor and creates that irresistible chewiness we love in a great beer bread.
This step is what truly transforms it into a wonderful Beer Bread with Butter. The butter soaks down slightly, guaranteeing a rich flavor right on the surface while making the crust perfectly crisp without being hard. You’ll see it sizzle a tiny bit, and that’s exactly what you want! It’s a quick action that pays off huge in the final eating experience.
Tips for Success: Mastering Your Easy Beer Bread
You’ve mixed it, you’ve baked it, and now you need to resist the urge to attack it immediately! That’s Rule Number One for absolute success with this easy beer bread. Even though this is such an achievable recipe for easy baking for beginners, a couple of small steps right at the end elevate it from good to great.
First, and this is hard, let your loaf cool in the pan for a full ten minutes after it leaves the oven. If you try to turn it out immediately, especially since we added all that lovely melted butter to the top, the structure can be a bit fragile. Give it that ten-minute head start to set up. Then, gently turn it out onto a wire rack. Slicing it while it’s piping hot lets all the internal steam escape too fast, leading to a slightly gummy texture inside. We want that perfectly soft crumb bread, so patience is key for the last five minutes!
Second, don’t be afraid of the mixture looking slightly shaggy or even a little sticky before it goes into the oven. This isn’t batter like you’d use for a cake; it’s thicker. If you are tempted to add more beer because it looks too dry, stop! That’s where most people accidentally ruin the rise. Remember, we are relying on the baking powder and the beer’s carbonation, not liquid volume, so keep that mix fairly stiff.
Finally, if you plan on taking leftovers for lunch the next day, store the loaf tightly wrapped at room temperature—not in the fridge! That cold air is bread’s enemy. If you want to reheat a slice to bring back that just-out-of-the-oven feel, don’t use the microwave. Pop the slice directly into a toaster oven or under the broiler for just a minute or two. This crisps the edges up again beautifully. For more great advice on general baking confidence, you can always browse my latest posts here!
Variations: Customizing Your Savory Quick Bread
This basic beer bread recipe is fantastic just as it is—a perfect, simple loaf to pair with dinner. But since we are aiming for pure happiness in the kitchen, we absolutely have to talk about how easy it is to dress this up! Even though this recipe starts as a truly basic side dish, we can turn it into a more complex, fun, and deeply flavorful savory quick bread with just a few additions. These customizations are simple enough to fold right into the main steps we already covered. You can see some of my other favorite variations, like my Cranberry Walnut Bread, but honestly, savory additions work so well here.
Think about what you’re eating it with. If I’m making this to go alongside a big bowl of chili, I definitely want something cheesy and herbal in the mix. If I’m serving it merely with butter, maybe I just want a little garlic punch. The beauty is that because we aren’t relying on yeast, we keep the structural integrity even when we add extra bits and pieces.
Making Cheesy Beer Bread Variation
This is probably the most popular way to upgrade this loaf! If you want that gooey, sharp flavor, you can easily create the Cheesy Beer Bread Variation. When you get to the part where you are ready to pour the beer into the dry ingredients, or just after you mix the beer in, stop mixing. Right then, gently fold in about one full cup of shredded sharp Cheddar cheese. I specify sharp because mild cheddar just tends to disappear flavor-wise.
The key here, like everything else with this recipe, is gentleness! You don’t want to stir this aggressively, or you risk deflating the batter that the baking powder and beer have already started creating. Use a light hand, aiming to just distribute the chunks evenly throughout the batter before you transfer it to your greased loaf pan. The cheese melts perfectly during the bake, providing those pockets of salty, sharp goodness right through your loaf!
For simple herbed versions, a tablespoon of dried rosemary or even a teaspoon of garlic powder whisked in with the dry ingredients does absolute wonders. It’s the easiest way to turn this side into something worthy of being called a star!
Serving Suggestions for this Classic Beer Bread
One of my favorite things about having this recipe in my back pocket is how versatile this classic beer bread is. It’s proof that you don’t need fussy dinner rolls to have a fantastic bread side. Because of its robust texture and gentle savory flavor, it fits perfectly alongside almost anything hearty you’ve got simmering on the stove. This truly is the ultimate quick dinner side hack!
Of course, the absolute best way to enjoy it, especially when it first comes out of the oven and the surface is slightly crisp? Slicing it thick and slathering it with quality salted butter. Let that butter melt right into the warm interior—it’s pure happiness, and honestly, it needs nothing else.
But if you’re looking to pair it with a meal? This bread begs for thick, rich winter dishes. It’s perfect for soaking up the last drips of a simmering beef stew or thick, meaty chili. Speaking of soup, this loaf is just divine served alongside something like a hearty bean soup or, if you’re looking for inspiration, my recipe for Pasta e Fagioli. Let the bread act like a sponge for all those savory juices!
Because this loaf is sturdy but still tender inside, it also holds up beautifully when sliced and toasted the next day. Use those slices for dipping into leftover pasta sauce or serve them alongside a big salad for lunch. Honestly, once you realize how fast this no yeast bread comes together, you’ll be making it at least once a week!
Storage and Reheating for Your Homemade Beer Bread
Even though this beer bread disappears disturbingly fast in my house, I know sometimes you actually end up with leftovers—or maybe you’re smart and baked two loaves! Storing this simple homemade bread correctly is important because we didn’t use any preservatives. The key is keeping air away from it, but not trapping too much moisture.
Once the loaf is completely cool—and I mean cool all the way through, which takes patience after that beautiful butter topping—wrap it tightly. I prefer using beeswax wraps or just getting it into a sturdy zip-top plastic bag, squeezing out as much air as you can. Stored this way on the counter, at room temperature, this quick bread recipe stays wonderfully tender for about two to three days. Do NOT put it in the refrigerator! Trust me, the fridge will turn even the softest beer bread stale and dry overnight.
If you happen to have more than a couple of days’ worth, slicing the loaf and freezing the slices is your best bet. Wrap the individual slices tightly in plastic wrap first, then place them all into a freezer bag. They freeze perfectly for up to two months!
The best part about freezing slices is how easy reheating is. Forget the microwave; we want that wonderful, slightly crisp crust back! When you pull a slice out, whether from the counter or the freezer, the best method is the toaster oven or a regular oven set to about 350 degrees F. Pop the slice right on the rack or a baking sheet. If it was just countertop stored, give it three to five minutes until it’s warmed through. If you’re reviving a frozen slice, you might need ten minutes, but you’ll be rewarded with a crust that snaps just like it did when it was fresh out of the pan!
Frequently Asked Questions About Beer Bread
It’s totally normal to have a few questions when you’re trying a recipe for the first time, especially when it involves using beer instead of water! I’ve collected the most common things folks ask me about this beer bread so you can feel totally confident before you even turn on the oven. We want this to be the easiest cooking experience possible, demonstrating how simple baking without kneading can truly be.

We all want that perfect, reliable rise, and I want to assure you that this recipe acts just like a super-fast version of a traditional yeast loaf. This is why it’s such a popular choice for busy weeknights—zero fuss, maximum flavor!
Can I use non-alcoholic beer to make beer bread?
That’s a great question! The answer is yes, you absolutely can use non-alcoholic beer! The leavening in this no yeast bread comes primarily from the carbonation, so as long as your non-alcoholic beer is still fizzy, you will get a decent rise. I’ve found that sometimes the non-alcoholic versions aren’t quite as fizzy as the regular stuff, so your loaf might be just slightly less voluminous than one made with regular beer. But flavor-wise? It works perfectly well for a satisfying comfort food bread!
What is the best type of beer for this quick bread recipe?
If you want that perfect pale, golden crust and a light texture, stick to light-bodied beers. Think classic American lagers, pilsners, or perhaps a nice pale ale. These beers provide the necessary fizz without overpowering the subtle savory notes of the flour and baking powder. What you want to avoid are really thick, heavy beers like imperial stouts or overly bitter, heavily hopped IPAs. Those can sometimes impart a slightly bitter taste to the final loaf, which isn’t what we’re aiming for in this classic beer bread.
Can I skip the sugar in this beer bread?
Technically, yes, you could leave out that single tablespoon of sugar, but I strongly advise against it. You’ll find that this recipe is not overly sweet to begin with, even in the base version. That small amount of sugar does two important jobs for us: first, it contributes to that lovely golden-brown color on the crust, helping the bread look perfectly baked. Second, sugar helps balance any slight bitterness that might come from the hops in the beer. It just rounds out the entire flavor profile, making the loaf taste richer and more complex. It’s a small ingredient with a big impact on presentation and taste!
If you are looking for more inspiration on making quick, easy meals that impress guests, check out my tips for easy entertaining!
Estimated Nutritional Information for This Beer Bread
I always try to keep my cooking joyful, not stressful, and that includes knowing what’s in the food we share. Now, because this is a homemade recipe made with simple ingredients, these numbers are just an estimate, okay? Real-world results can vary depending on exactly which beer you use or how much butter sinks in! But for reference, here’s a good breakdown of what you are looking at per slice.
We based these general figures on an 8-slice yield for the loaf after baking and brushing with the butter topping. If you happen to cut bigger slices, well, the numbers will naturally creep up a bit!
- Serving Size: 1 slice
- Calories: 220
- Fat: 4g
- Saturated Fat: 2g
- Carbohydrates: 43g
- Sugar: 3g
- Protein: 5g
- Sodium: 350mg
As you can see, it’s a classic comfort baked good here—a little higher on the carbs, which is expected from flour, but it provides a satisfying amount of energy for a quick dinner side. It’s honest, delicious food, and knowing the basics helps me feel more connected to what I’m serving my family!
Share Your Simple Homemade Bread Experience
Now that you have everything you need to bake this unbelievably easy beer bread, I sincerely hope you give it a try this week! Whether you’re looking for a fast side for dinner tonight or you just need a little dose of baking therapy after a long day, this recipe is ready for you.
When you pull that golden, buttery loaf out of the oven—and trust me, you will be so proud—I want to see it! Don’t keep this deliciousness a secret! The best part of what I do here at Pure Cooking Joy is seeing all of you create these wonderful things in your own kitchens. If you bake this simple homemade bread, please leave a rating right down in the comments below. Did you add cheese? Did you stick to the basics? Your feedback helps other beginners feel confident enough to try it too.
And if you’re sharing your success on social media—maybe you got a picture of that perfect, fluffy crumb slice next to your soup bowl—tag me! Come say hello and show off your creation over on Facebook at Pure Cooking Joy’s Facebook page. I love looking through all your bakes and cheering you on. Happy baking, friends!
PrintEasy 3-Ingredient Beer Bread Recipe (No Yeast, No Kneading)
You can bake this incredibly simple, fluffy beer bread with a crisp crust using just three pantry staples. It requires no yeast and no kneading, making it a fast, foolproof side dish perfect for beginners.
- Prep Time: 5 min
- Cook Time: 50 min
- Total Time: 55 min
- Yield: 8 servings 1x
- Category: Side Dish
- Method: Baking
- Cuisine: American
- Diet: Vegetarian
Ingredients
- 3 cups all-purpose flour
- 1 tablespoon sugar
- 1 tablespoon baking powder
- 1 teaspoon salt
- 1 (12 ounce) bottle of beer, room temperature
- 4 tablespoons unsalted butter, melted (for topping)
Instructions
- Preheat your oven to 375 degrees F (190 degrees C). Grease and flour a standard 9×5 inch loaf pan.
- In a large bowl, whisk together the flour, sugar, baking powder, and salt until they are fully combined.
- Pour the room temperature beer into the dry ingredients. Mix with a spoon just until the ingredients are combined. Do not overmix; a few lumps are fine.
- Pour the batter into your prepared loaf pan.
- Bake for 45 to 55 minutes, or until the top is golden brown and a toothpick inserted into the center comes out clean.
- While the bread is still hot, brush the melted butter evenly over the top crust.
- Let the bread cool in the pan for 10 minutes before carefully turning it out onto a wire rack to cool completely before slicing.
Notes
- Use a light or medium-bodied beer for the best results in this classic beer bread recipe. Darker beers can sometimes result in a denser loaf.
- For a cheesy beer bread variation, fold 1 cup of shredded sharp cheddar cheese into the batter before pouring it into the pan.
- This quick bread recipe pairs wonderfully with chili, stews, or simply served warm with more butter.
Nutrition
- Serving Size: 1 slice
- Calories: 220
- Sugar: 3
- Sodium: 350
- Fat: 4
- Saturated Fat: 2
- Unsaturated Fat: 2
- Trans Fat: 0
- Carbohydrates: 43
- Fiber: 1
- Protein: 5
- Cholesterol: 5
