 Skip to content

Hi, I’m Alex, and I’m so glad you’re here. If you thought making that incredible, bakery-style artisan bread with the shatteringly crisp crust was complicated, you’ve got to ditch that idea right now! For years, the kitchen felt like just another place to stress after work—until I found my peace in baking.
That changed when I finally nailed a perfectly simple loaf. Honestly, that moment felt like pure joy! Now, I want you to experience that feeling immediately. That’s why this recipe is my go-to: it’s a ridiculously easy, no-knead method using your Dutch oven to deliver rustic perfection. We’re making a fantastic Parmesan and Garlic artisan bread loaf that tastes like you spent all day fussing over it, but you really didn’t. Trust me, this flavor combination is addictive. You can find more of my essential baking guides over at my baking page!
- Why This No-Knead Artisan Bread Recipe Works So Well
- Gathering Ingredients for Your Parmesan Garlic Artisan Bread
- Step-by-Step Instructions for Easy Artisan Bread Recipe
- Tips for Achieving the Best Homemade Artisan Bread Results
- Serving Suggestions for Your Chewy Artisan Loaf
- Storage and Reheating Instructions for Leftover Artisan Bread
- Troubleshooting Common Issues When Baking Artisan Bread
- Frequently Asked Questions About No Knead Bread
- Estimated Nutritional Information for This Artisan Bread Loaf
Why This No-Knead Artisan Bread Recipe Works So Well
You might be thinking this result looks too good to come from an easy artisan bread recipe, but I promise, the magic is in the waiting, not the working! We rely on time to do the heavy lifting.
- It’s genuinely a beginner artisan bread dream—you just mix and walk away for about 15 minutes of actual work.
- The resulting loaf is the definition of bakery style bread at home; that gorgeous, open crumb structure is tough to beat.
- We get maximum flavor using minimal effort, which is my favorite kind of cooking philosophy!
The Magic of Long, Slow Fermentation for Artisan Bread Flavor
That long rest—the 12 to 18 hours—is where the real flavor develops. When yeast works slowly over time, it creates these deep, complex, slightly tangy notes you usually only find in bread made by true artisans. It’s what separates this recipe from quick yeast bread recipes. Don’t rush this step; it’s essential for developing that authentic artisan bread taste.
Achieving the Perfect Crusty Homemade Bread with a Dutch Oven
If you want that incredible, shatteringly crisp exterior—the kind that sings when you tap it—you have to use a Dutch oven. It traps all the steam released by the dough during the first part of the bake. That steam keeps the crust soft initially so the dough can expand beautifully. Once you remove the lid, the intense heat caramelizes that already hydrated surface, giving you flawless, crusty homemade bread every single time. It’s basically a tiny steam injection oven!

Gathering Ingredients for Your Parmesan Garlic Artisan Bread
Okay, are you ready for the best part? This specific loaf uses just a handful of pantry staples, plus our flavor boosters. The beauty of this homemade artisan bread is that you don’t need any fancy bread flour or multiple types of yeast. Keep your measurements precise here, because while this is ‘no-knead,’ it’s not ‘no-precision’! If you are using the Dutch oven method, you’ll want to make sure you have everything laid out before you start mixing.
Here is exactly what you need for one perfect loaf:
- 3 cups all-purpose flour
- 1 ½ teaspoons salt
- ¼ teaspoon instant yeast
- 1 ¼ cups cool water
- ½ cup grated Parmesan cheese
- 2 cloves garlic, minced
- 1 tablespoon fresh rosemary, chopped
Ingredient Notes and Substitution Tips for Artisan Bread
A couple of quick notes here to ensure your success on your first try. First, make absolutely sure you are using instant yeast (also sometimes called rapid-rise). Active dry yeast needs to be bloomed in warm water first, and that will throw off the delicate balance of this recipe! We want the yeast to wake up slowly over many hours, not instantly.
Second, the Parmesan cheese needs to be finely grated—we want it to melt into the dough and create little pockets of savory goodness, not sit in hard chunks. If, for some reason, you don’t have Parmesan available, don’t panic! Just swap it out for an extra tablespoon of all-purpose flour. You’ll shift slightly away from the savory flavor, but you’ll still end up with a beautiful, rustic loaf.
Step-by-Step Instructions for Easy Artisan Bread Recipe
This is where the magic happens, but trust me, it’s mostly waiting! Since this is the ultimate easy artisan bread recipe, the active work is minimal. Remember, almost all the flavor development happens while you’re sleeping or running errands. Don’t worry about punching down the dough when you finally take it out; that’s the beauty of this technique! If you want to see my general philosophy on no-knead baking, check out my other go-to no knead guide.
Mixing the Simple Bread Dough and Long Rest
Grab a big bowl—you don’t even need a stand mixer here! Just whisk together your dry stuff first (flour, salt, yeast). Then pour in the cool water, cheese, garlic, and rosemary. Mix it with a wooden spoon until you can’t see any more dry spots. It’s going to look messy, gloopy, and totally unappealing—that’s the wonderful, simple bread dough we want! Cover that bowl TIGHTLY with plastic wrap. Now, put it somewhere warm and just leave it alone for 12 to 18 hours. Seriously, walk away!
Mastering Dutch Oven Bread Baking Preheat and Transfer
About 30 minutes before your long rest is up, it’s time to get serious. Put your Dutch oven, lid and all, into the oven and let it preheat to 450°F (232°C). That pot needs to be screaming hot! When the time comes, line up a piece of parchment paper and gently scrape that bubbly dough right onto it. Listen, that pot is dangerously hot, so use thick oven mitts! Slowly and carefully, use the parchment paper as a sling to lower your dough right into the center of that cast iron heaven. Cover it up quick!
Baking Your Warm Crusty Bread to Perfection
For the first 30 minutes, we bake covered. This traps all that steam, giving us that phenomenal height and helping set up that great interior structure of your artisan bread. After 30 minutes, carefully take the lid off. You’ll see it’s pale but puffy. Now bake it uncovered for another 10 to 15 minutes until it turns that deep, gorgeous brown color. The very last step, and this is crucial: let your warm crusty bread cool completely on a wire rack before you slice into it. Cutting too early releases all the internal steam and you lose that perfect chew!

Tips for Achieving the Best Homemade Artisan Bread Results
Even though this is the easiest bread recipe on the planet, there are always little touches you can add to make your loaf truly spectacular. I’ve learned a few tricks over the years that take this from “great homemade bread” to something you’d genuinely pay good money for at a bakery. If you’re aiming for the best homemade bread possible, pay attention to these details!
First, let’s talk seasoning. My recipe calls for fresh rosemary and Parmesan, but feel free to experiment! Before I put the lid on the Dutch oven for that final bake, I sometimes like to spritz the top of the dough very lightly with water. This little burst of moisture helps break down the outer starches just a tiny bit more. Then, right before putting the lid on, I sprinkle a touch of coarse sea salt on top. That combination gives you an incredible shine and an extra layer of texture on your crust.

Also, don’t be afraid of the dark color! Most beginners pull their loaves out when they are light golden, but that real crusty homemade bread flavor comes from deeper caramelization. Don’t stress if it looks darker than your usual cakes—that deep mahogany brown is exactly what we are aiming for!
If you’re looking for ways to incorporate this bread into your busy schedule, you can actually use this technique for weeknight dinners by mixing the dough early in the morning before heading to work. Easy prep, amazing results later! You can see some of my favorite quick meal ideas designed to pair perfectly with fresh loaves over at my weeknight recipes.
Serving Suggestions for Your Chewy Artisan Loaf
Now that you have this incredible, flavorful loaf, the real question is: what do you smother it with? Because this chewy artisan loaf is infused with Parmesan and garlic, it begs to be paired with bolder flavors. Honestly, slicing off a massive piece while it’s still slightly warm (don’t wait until it’s totally cool, I won’t tell anyone!) and slathering it with salted butter is heaven, but we can do better!
Since we packed savory notes into this recipe, it shines next to anything tomato-based or brothy. Imagine dunking thick slices into a hearty soup—that’s when you really appreciate the open crumb structure we worked so hard to achieve without kneading! If you’re looking for a perfect partner for this cheesy bread, I highly recommend my favorite Italian Sausage Tortellini Soup; that rich broth is perfect for soaking up every last bit of flavor from your loaf. You can find that recipe right here.
For a simple appetizer spread, this bread is fantastic grilled slightly and topped with fresh basil, maybe a drizzle of good quality balsamic glaze, or even just used to sop up the remnants of pesto or marinara sauce from your pasta plate. Forget standard garlic bread; this version elevates everything it touches. It’s a spectacular side for roasted chicken or a simple Italian feast!
Storage and Reheating Instructions for Leftover Artisan Bread
I know, right? It’s nearly impossible to have leftovers of this delicious artisan bread, but if you manage to save some past the first sitting, you need to treat it right. Unlike softer sandwich loaves, these rustic beauties need a little TLC to keep that amazing crust from softening up. Humidity is our enemy here!
When storing, resist the urge to put it in a zip-top plastic bag. That traps moisture and turns your shatteringly crisp exterior into soft leather within hours! Instead, wrap your leftover loaf loosely in a clean kitchen towel and keep it on the counter at room temperature. It should stay good for about two days this way. But honestly, day two usually calls for revival!
Reviving the Crust for That Fresh-From-the-Oven Experience
If your heel has gone a little floppy overnight, don’t toss it! We can bring it right back to life using that amazing Dutch oven technique again, only faster this time. Preheat your oven to 350°F (175°C). You don’t need to put the Dutch oven in this time, though—unless you’re feeling extra dramatic! Just wrap your cooled bread tightly in aluminum foil.
Pop the foil-wrapped loaf right into the oven for about 10 minutes. The foil traps just enough steam to permeate the crumb, softening the inside without letting water ruin the crust. When you unwrap it after those 10 minutes, place it directly on the oven rack for another 3 to 5 minutes. This quick blast of dry heat will re-crisp the exterior beautifully. You’ll have that crackle back in no time, ready for dipping!
Can I Freeze My Homemade Artisan Bread?
Yes, you absolutely can freeze it, and it’s fantastic for busy weeks! The key is freezing it *before* it goes stale or soft. Once the loaf is completely cool from the initial bake, slice it up. This is important because trying to slice a rock-hard frozen loaf is nearly impossible!
Wrap the slices tightly in plastic wrap first, then slip them into a heavy-duty freezer bag or an airtight container. It will keep perfectly for up to three months. When you crave a slice, just pop a frozen piece directly into the toaster or a low oven (around 325°F) until warm and crisp throughout. It’s perfect for enjoying that incredible artisan bread flavor long after baking day!
Troubleshooting Common Issues When Baking Artisan Bread
Even though this is a “no-knead” recipe, sometimes things don’t go exactly to plan, and that’s okay! Baking is chemistry, and chemistry sometimes throws us curveballs. Don’t stress if your first loaf isn’t perfect; figuring out what went wrong is how you become a truly confident home baker. We’re going to tackle the three most common bumps in the road when making this type of rustic loaf.
My Dough Didn’t Bubble Up Much After 18 Hours
If your dough looks pretty much the same as when you mixed it, nine times out of ten, your kitchen was just too cold. Yeast is sleepy when it’s chilly! Remember, we used such a tiny amount of instant yeast precisely because we rely on time and warmth to activate it fully. If your room temperature is below 70°F (21°C), the fermentation slows way down.
What to do now? Don’t panic! Just move the covered bowl to a warmer spot—maybe on top of your refrigerator, or near a pilot light if you have one. Give it another 4 to 6 hours. That long, slow rise is what builds flavor, so even if it takes 22 hours total, you’ll be fine. If it still looks flat, there might be an issue with old yeast, but usually, it’s just the temperature!
Why Is My Loaf Dense or Gummy Inside?
A dense, gummy interior usually points to two things: either you didn’t let it cool long enough before slicing, or you used too much water for the flour you had. Since we are using passive measuring (scooping flour), there can be slight variations in density depending on how packed your flour was in the cup.
If you cut into it while it was hot, that steam rushes out, and the structure collapses, leaving you with a gluey texture. Always, always let it cool completely—at least two hours on the rack. If you *did* wait and it’s still gummy, next time, try reducing the water by just one tablespoon. That slight reduction often firms up the crumb beautifully for the perfect chewy artisan loaf.
My Crust Didn’t Get Dark Enough in the Dutch Oven
This is almost always a time or temperature issue during the uncovered bake. If your crust is pale, it means the Maillard reaction—that beautiful browning process—didn’t get enough intense, dry heat exposure. A pale crust doesn’t have that big, crackly flavor!
Next time, make sure your oven really is preheated to 450°F *with the pot inside* for a full 30 minutes. When you remove the lid for the second bake stage, give it the full 15 minutes, or even 20, until it looks deep mahogany brown. A little darker is always better for that crusty exterior we love on our homemade loaves!

Frequently Asked Questions About No Knead Bread
I get so many great questions from folks baking this for the first time! Since this no-knead method relies a bit on chemistry and a lot on patience, it’s natural to have a few queries. Here are some of the most common things readers ask me about getting that perfect rustic loaf without breaking a sweat.
Can I use Active Dry Yeast instead of Instant Yeast?
That’s a great question, and yes, you absolutely *can*, but you have to treat it differently! Instant yeast dissolves right into the flour mixture. Active dry yeast needs to be awakened first. If you only have active dry, you need to dissolve about 2 ¼ teaspoons of it into ¼ cup of warm (not hot!) water, let it sit until foamy for about 5-10 minutes, and then use that activated liquid in place of the 1 ¼ cups of cool water in the recipe. Just remember, this recipe works best with the slow, cool rise that instant yeast provides, so if you use active dry, you might need to let it rest a little longer than 18 hours to see proper bubbling!
What happens if I skip the Dutch Oven? Can I still bake it?
Oh, I totally get it—not everyone has a giant Dutch oven lying around! While the Dutch oven is the secret tool for that amazing, professional crust, you can improvise. The goal is to trap steam. If you don’t have one, try this: place a shallow, oven-safe metal pan on the bottom rack while you preheat. When you put your loaf (on a baking stone or sturdy sheet pan) into the oven, carefully pour about a cup of boiling water into that lower hot pan. Shut the door quickly to trap the steam. You won’t get quite the same crackle, but you’ll get a much better rise and crust than you would baking it dry!
How long can the dough stay in the refrigerator?
This is my trick for making weekend baking truly easy! Once your dough has rested for the initial 12 hours at room temperature and looks nice and bubbly, you can pop that covered bowl right into the fridge. The cold temperature drastically slows the yeast activity down, but it continues to build flavor incredibly slowly. You can safely let it chill out there for up to about 5 days! When you’re ready to bake, take it out of the fridge, let it sit on the counter for about an hour to warm up slightly, and then proceed with preheating the Dutch oven as usual. It’s perfect for meal planning ahead!
Why is the water supposed to be cool, not warm?
This is crucial for the no knead bread recipe success! We are using cold or cool water—nothing warm—because we want the yeast to activate very slowly. If you use warm water, the yeast goes into overdrive immediately, and you’ll end up with a loaf that rises too fast, tasting somewhat bland and yeasty. By using cool water, we force that long, slow fermentation over 12 to 18 hours, which is how we get that deep, wonderful, complex flavor profile that makes this loaf so satisfying. Patience pays off here!
For more general information about sourcing and ingredient policies on this site, please feel free to review my disclosure policy.
Estimated Nutritional Information for This Artisan Bread Loaf
I always tell people that baking is a joy, but when you add Parmesan and rich garlic flavor to the mix, you know the nutrition facts aren’t going to look like plain white bread! I’ve crunched the numbers based on the recipe above, but please remember, this is just an estimate.
The precise amounts can change based on how much moisture your flour held or the exact brand of cheese you used. This breakdown is for one slice, assuming you cut the final loaf into 12 servings. It gives you a good idea of what you are eating, but I always say, the joy of baking from scratch means you control the good stuff!
- Serving Size: 1 slice
- Calories: 220
- Sugar: 1g
- Sodium: 350mg
- Fat: 2g
- Saturated Fat: 1g
- Carbohydrates: 45g
- Fiber: 2g
- Protein: 7g
- Cholesterol: 5mg
See? Not too shabby for a loaf that tastes like it came straight out of a stone-hearth Italian bakery! It’s savory, satisfying, and perfect with dinner. If you are trying to cut back on sodium, you can easily reduce the added salt in the dough by a quarter teaspoon, though reducing it too much can affect the texture slightly, so proceed with caution!
PrintEasy No-Knead Artisan Bread with Parmesan and Garlic
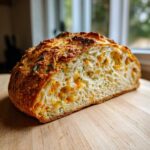
I am happy you are here. This recipe shows you how to make bakery-style artisan bread at home using a simple no-knead method in a Dutch oven. You get a crusty exterior and a soft interior, enhanced with Parmesan and garlic flavor.
- Prep Time: 15 min
- Cook Time: 45 min
- Total Time: 13 hours 45 min
- Yield: 1 loaf 1x
- Category: Baking
- Method: No-Knead Baking
- Cuisine: American
- Diet: Vegetarian
Ingredients
- 3 cups all-purpose flour
- 1 ½ teaspoons salt
- ¼ teaspoon instant yeast
- 1 ¼ cups cool water
- ½ cup grated Parmesan cheese
- 2 cloves garlic, minced
- 1 tablespoon fresh rosemary, chopped
Instructions
- In a large bowl, whisk together the flour, salt, and yeast.
- Add the water, Parmesan cheese, minced garlic, and rosemary to the dry ingredients. Mix with a wooden spoon until just combined into a shaggy dough. Do not overmix.
- Cover the bowl tightly with plastic wrap and let the dough rest at room temperature for 12 to 18 hours. The dough will become bubbly and increase in volume.
- About 30 minutes before baking, place a 5 to 6-quart Dutch oven, with the lid on, into your oven. Preheat the oven to 450°F (232°C).
- Carefully remove the hot Dutch oven from the oven. Gently scrape the dough out of the bowl onto a piece of parchment paper. You do not need to punch it down.
- Using the parchment paper as a sling, carefully lower the dough into the hot Dutch oven. Cover with the lid.
- Bake for 30 minutes with the lid on.
- Remove the lid and continue baking for another 10 to 15 minutes, or until the crust is deep golden brown.
- Carefully remove the bread from the Dutch oven and let it cool completely on a wire rack before slicing.
Notes
- For an extra crispy crust, you can lightly spritz the dough with water before placing the lid on for the second baking stage.
- If you do not have Parmesan cheese, you can substitute it with an extra tablespoon of flour for a more traditional rustic loaf.
- This recipe uses cool water to slow the yeast activity, which is key for the long, slow fermentation needed for true artisan bread flavor.
Nutrition
- Serving Size: 1 slice
- Calories: 220
- Sugar: 1
- Sodium: 350
- Fat: 2
- Saturated Fat: 1
- Unsaturated Fat: 1
- Trans Fat: 0
- Carbohydrates: 45
- Fiber: 2
- Protein: 7
- Cholesterol: 5
