 Skip to content

If you’ve ever felt the stress of complicated dessert making creeping up on you, welcome! I totally get it. Before I found my peace in the kitchen, the idea of making anything that required a candy thermometer felt like failing a final exam. But let me show you something incredible: this 3-Ingredient Chocolate **Fudge** recipe. It is ridiculously easy and delivers that deep, satisfying, creamy texture we all dream about when reaching for a decadent treat. Forget the fuss; this is truly foolproof homemade fudge, the kind that melts in your mouth. Trust me, making this feels like magic, and it’s proof that simple cooking brings the purest joy!
- Why This 3 Ingredient Chocolate Fudge is Your New Go-To Recipe
- Essential Ingredients for Your Easy Fudge Recipe
- How to Prepare Foolproof 3 Ingredient Chocolate Fudge
- Tips for Success When Making This Simple Homemade Candy
- Storage & Reheating Instructions for Perfect Fudge
- Serving Suggestions for Decadent Treats
- Frequently Asked Questions About Making Fudge
- Understanding the Nutritional Profile of Your Fudge
- Share Your Simple Homemade Candy Creations
Why This 3 Ingredient Chocolate Fudge is Your New Go-To Recipe
I know you’re looking for the best **fudge** recipe that delivers on flavor without demanding hours of your time, and this is it! This recipe is a lifesaver when you need a **Quick Dessert** that tastes incredibly rich. It’s all about making decadent treats accessible.
- It requires only three main ingredients—that’s it!
- It’s completely **No Bake**, saving you oven space and hassle.
- It results in that perfect, velvety, **Creamy Fudge** texture consistently.
Unbeatable Speed: Making Quick Fudge
Seriously, the prep time is less than ten minutes! You’re looking at maybe five minutes of actual stirring or microwaving before it heads to the fridge. This is my absolute secret weapon when I decide at 7 PM that I need something sweet for a late-night snack or when a friend pops over unexpectedly. Since there is no baking involved, the hardest part is waiting for it to chill!
Achieving Smooth Fudge Texture Every Time
The absolute worst thing about making homemade candy is that grainy texture that creeps in when the sugar starts to crystallize. I used to worry about that so much! But with this recipe—thanks to the magic of condensed milk—you skip all the careful temperature monitoring. It sets up beautifully every single time, giving you that wonderful **Melt in Your Mouth Dessert** quality without any fuss. It’s truly my easiest path to a perfect, rich treat.

Essential Ingredients for Your Easy Fudge Recipe
When you’re keeping a recipe down to just three ingredients, you have to make sure those ingredients are good quality! Thankfully, you probably already have everything you need tucked away in your pantry right now. There are very few chances for error here, which is why I love calling this a Basic Fudge Recipe. If you can measure three things, you can make this incredible fudge.
Here is exactly what you need for a perfectly rich batch:
- 1 (14 ounce) can sweetened condensed milk
- 1 (12 ounce) package semi-sweet chocolate chips
- 1 teaspoon vanilla extract
That’s your list! You don’t need any butter here, no heavy cream, and zero corn syrup. Just these three items set us up for success. Before we jump to the steps, let’s talk about the real superstar here, the ingredient that makes this quick process possible.
Ingredient Spotlight: The Role of Sweetened Condensed Milk in Creamy Fudge
If you are craving that beautiful, smooth texture associated with Old Fashioned Fudge but want to skip the boiling and cooling process, sweetened condensed milk is your answer. It’s not the same as evaporated milk, so don’t swap them! Sweetened condensed milk has a huge amount of sugar cooked down with the milk solids.
That high sugar level is what prevents those big, gritty sugar crystals from forming when the mixture cools. When we heat it just enough to melt the chocolate, the sugar is already beautifully dissolved and suspended. It acts as our stabilizer and sweetener all in one go, meaning we get that creamy fudge result without ever needing to use a candy thermometer. It takes all the guesswork out of making perfect homemade candy!
How to Prepare Foolproof 3 Ingredient Chocolate Fudge
Okay, the preparation is the easiest part, I promise! Because this is a quick dessert, you want to have everything ready to go near the microwave before you start. I always line my pan first because once the chocolate melts, everything moves pretty fast toward deliciousness.
We are aiming for clarity here, so we can turn these simple ingredients into that satisfying, rich fudge without any drama.
Preparing the Pan and Melting the Fudge Base
First thing: grab an 8×8 inch baking pan. Line it with parchment paper, but make sure you leave an overhang on two sides. That makes removal after chilling a total breeze; you just lift it out like a big chocolate brick! Lightly grease that paper so nothing sticks while it sets. Now, combine your whole can of sweetened condensed milk and all those glorious chocolate chips in a microwave-safe bowl.
We are going to heat this gently. Pop it in the microwave on 50% power for 60 seconds. When it beeps, pull it out and stir until it smooths a bit. **Crucially**, if it’s not fully smooth yet, you only microwave for 30 seconds at a time after that, stirring really well between each burst. If you blast it on high, you risk scorching those precious chocolate chips! Keep going until it’s silk. Once it is smooth, stir in that teaspoon of vanilla extract until it disappears.
Setting and Cutting Your Homemade Fudge
Pour that beautiful, glossy mixture into your prepared pan. Use an offset spatula—or even the back of a spoon if you don’t have one—to spread it gently and evenly across the bottom. It shouldn’t take much work at all. Then, it goes straight into the refrigerator. You need at least two hours for it to get truly firm enough to cut cleanly. I usually make mine the night before!
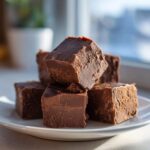
When it’s fully chilled, use those parchment paper handles you left to lift the entire slab onto a cutting board. Give it a quick slice into about 36 small squares. If you look closely at the cross-section, you’ll see that perfect, dense, non-grainy texture. That’s not luck; that’s the power of sweetened condensed milk in action, delivering the easiest homemade fudge.

Tips for Success When Making This Simple Homemade Candy
I always tell people that while the base recipe for this fudge is incredibly straightforward, a tiny bit of personalization makes it your very own Best Fudge Recipe. Since we aren’t dealing with finicky candy thermometers, we have a little room to play around with additions! You want fantastic results when making this Simple Homemade Candy, and I’ve got a few tweaks that always work well.
If you’re looking to bulk up your batch or add some serious chew, remember what I scribbled in my notes: folding in extra goodies after the chocolate is melted but before it sets is the way to go. Don’t even think about stirring large amounts of ingredients in while everything is melting, or you’ll cool the mixture down too much!
Flavor Variations for Your Chocolate Fudge
The base recipe is just begging for texture. If you love crunch, gently fold in about half a cup of coarsely chopped nuts—walnuts or pecans are my favorites here. If you’re making this for a party and want something extra fun, toss in half a cup of those tiny, colorful mini marshmallows right at the end. They won’t melt completely, giving you little pockets of marshmallowy chewiness!
You can also change the chocolate chip flavor! Instead of semi-sweet, try using milk chocolate chips for a sweeter profile, or go dark for something truly decadent. If you want to step away from chocolate entirely, white chocolate chips work wonderfully, though I would suggest doubling the vanilla extract in that case. For a completely different experience, you could even look up specialized recipes like my Rocky Road Fudge variation if you want that marshmallow and nut combo baked right in!
Storage & Reheating Instructions for Perfect Fudge
One of the best things about this fudge is that it’s just as good on day four as it was on day one! Because this recipe is so rich in sugar thanks to the condensed milk—which acts as a preservative—you actually don’t need to rush to eat it all. I’ve tested this extensively, believe me!
For short-term enjoyment, keeping it on the counter is perfect. Store your cut squares in an airtight container at room temperature for up to about one week. It stays soft enough to bite into easily that way. If you are making a huge batch for upcoming holiday gifting or you live somewhere really hot and humid, popping it into the refrigerator is a better idea.
In the fridge, your homemade fudge will last longer, easily two to three weeks. Just know that chilling makes it much firmer, so if you pull it straight from the cold, let it sit on the counter for about 15 to 20 minutes before slicing or serving. That little bit of warmth softens it right back up to that incredible, melt-in-your-mouth consistency we aimed for!
Serving Suggestions for Decadent Treats
This rich, creamy **fudge** is basically a gift wrapped in chocolate, even if you aren’t actually giving it away! Because it’s so easy to transport and holds up beautifully, it’s my number one recommendation for quick **Holiday Fudge Ideas** or when you need last-minute something-sweet for a potluck. Everyone loves something homemade, and this three-ingredient wonder makes you look like a baking genius!
When I make a big batch, I always try to dress it up just a little before boxing it up for friends. It really elevates this simple homemade candy!
For presentation, skip the big square slab and cut it into smaller, more elegant 1-inch pieces. Tiered stands or small decorative boxes work wonders. A fantastic trick for **Fudge for Gifting** is to sprinkle a little sea salt flakes on top right after you pour it into the pan—it looks so professional!

If you’re serving it right away at home, think about what you’re pairing it with. This dark chocolate flavor is perfect next to something warm. I always serve a plate of this **chocolate fudge** alongside a big mug of hot cocoa—maybe you’re trying out my recipe for Hot Chocolate Cookies just to double down on the cozy factor! A simple glass of ice-cold milk is a classic pairing that cuts through the richness beautifully, too.
Honestly, whether you serve it on a fancy platter at Christmas or sneak a square while doing dishes after dinner, this **decadent treat** always hits the spot. Don’t forget to snap a picture and tag me if you share your creations! You can find me over on Facebook where we share all the cooking joy!
Frequently Asked Questions About Making Fudge
I know sometimes the simple recipes still spark the biggest questions! That’s totally okay; it shows you care about making the **best fudge recipe** possible. Baking should never be scary, especially when we are making something as comforting as **homemade fudge**. Here are a few things I get asked most often about this particular **creamy fudge** method.
Can I substitute the chocolate chips in this fudge recipe?
You absolutely can experiment with the chips, but you need to know what you’re swapping into! The semi-sweet chips give us that classic, slightly dark chocolate flavor that balances the sweetness of the condensed milk perfectly. If you swap to milk chocolate, the final product will be much sweeter, so you might want to reduce the amount of condensed milk by a tablespoon or two just to keep that balance right.
White chocolate chips work well too! They make a beautiful, creamy base for additions like sprinkles or dried fruit. Just be aware that white chocolate tends to set a little softer than dark or semi-sweet, so you might need that extra 30 minutes of chilling time to ensure it cuts nicely. Feel free to use butterscotch chips for a totally different flavor profile!
How do I get a perfectly smooth fudge without a candy thermometer?
This is the greatest gift of this 3-ingredient recipe! The trick is ensuring you don’t introduce any graininess, which usually happens when improperly dissolved sugar cools down. Because we are using sweetened condensed milk, the sugar is already stabilized, so we dodge that problem entirely. You achieve that beautiful, smooth texture simply by taking your time while melting the chips.
Remember what I said about microwaving? Keep the power low (50%) and stir thoroughly after every short burst, even if it doesn’t look completely melted yet. You want the heat distributed evenly so all those sugar crystals from the milk dissolve smoothly into the chocolate fat. Once it’s glossy smooth—like warm velvet—you know you’ve nailed the texture required for a perfect, **melt-in-your-mouth dessert**.
If you look at traditional recipes, like those for an **Old Fashioned Fudge**, they require candy thermometers to hit that specific temperature zone. We avoid all that stress! If you are curious about other texture variations, check out my guide on how to make Easy Peanut Butter Fudge, which uses a slightly different method to achieve smoothness!

Understanding the Nutritional Profile of Your Fudge
Now, listen, I believe in enjoying what we make! Food is about joy, connection, and celebrating life, not obsessively counting every single bite. However, I totally understand that sometimes you just want a snapshot of what you’re digging into. Since this is a decadent, **quick dessert** made with condensed milk and chocolate chips, it definitely falls into the ‘treat’ category, which is one hundred percent okay!
I ran the numbers just so you have them, but please keep in mind these are all just estimates for one single square of this glorious fudge. These numbers are based on the standard recipe I provided. If you add extra nuts or marshmallows, the profile changes, so keep that in mind!
Here’s the approximate breakdown per square:
- Serving Size: 1 square
- Calories: 110
- Sugar: 15g
- Fat: 5g
- Protein: 2g
Isn’t that wild? Just three ingredients leading to such a satisfying, rich bite! You can see the sugar content is the highest component, which is exactly what makes this fudge set up so beautifully and keeps it shelf-stable. It’s meant to be an indulgence, a wonderful, **no bake fudge** reward at the end of a long week. Bake it, enjoy it, and don’t stress about the rest!
Share Your Simple Homemade Candy Creations
I truly hope you loved making this **fudge** as much as I love eating it! Honestly, the best part of sharing these recipes is knowing that you’ve created something joyful and delicious in your own kitchen. When you make something this easy and this decadent, you just have to tell people about it, right?
So, I’m begging you—if you try this **Simple Homemade Candy** recipe, please come back and leave a rating! Did it set up perfectly for you? Were you surprised by how creamy it was? Your feedback not only helps me know that my instructions are clear but it also helps other cooks feel confident stepping into the kitchen.
If you shared pictures of your squares—maybe drizzled with something special or arranged nicely for gifting—I would absolutely love to see them! Tag me on your favorite platforms so I can gawk at your amazing results. There’s nothing that brings me more pure cooking joy than seeing readers enjoy these simple, satisfying treats. You’ve officially joined the club of people who know how easy it is to make spectacular, **no bake fudge** from scratch!
If you’re already dreaming up your next project now that you’ve mastered the basics, you can check out all my latest inspiration, weeknight dinners, and other accessible comfort food ideas over on my main blog page. Happy baking, my friends!
PrintFoolproof 3-Ingredient Chocolate Fudge: Quick and Creamy
I am so glad you are here. This recipe proves that incredible, soul-satisfying treats do not have to be complicated. Make this rich, creamy chocolate fudge with just three simple ingredients. It sets up perfectly every time, delivering that melt-in-your-mouth texture you want without needing a candy thermometer.
- Prep Time: 10 min
- Cook Time: 5 min
- Total Time: 2 hours 15 min
- Yield: 36 squares 1x
- Category: Dessert
- Method: No Bake
- Cuisine: American
- Diet: Vegetarian
Ingredients
- 1 (14 ounce) can sweetened condensed milk
- 1 (12 ounce) package semi-sweet chocolate chips
- 1 teaspoon vanilla extract
Instructions
- Line an 8×8 inch baking pan with parchment paper, leaving an overhang on two sides for easy removal later. Lightly grease the paper.
- In a medium, microwave-safe bowl, combine the sweetened condensed milk and chocolate chips.
- Microwave on 50% power for 60 seconds. Stir well. Continue microwaving in 30-second intervals, stirring thoroughly after each interval, until the mixture is completely smooth and melted. This prevents scorching.
- Remove from the microwave and stir in the vanilla extract until fully combined.
- Pour the hot fudge mixture into the prepared baking pan. Spread it evenly using an offset spatula.
- Refrigerate for at least 2 hours, or until the fudge is firm enough to cut.
- Use the parchment paper overhang to lift the fudge from the pan. Place it on a cutting board and cut into 36 small squares.
Notes
- For a richer flavor, substitute semi-sweet chips with dark chocolate chips.
- If you want to add texture, gently fold in 1/2 cup of chopped nuts or mini marshmallows after the mixture is smooth, before pouring into the pan.
- Store the finished fudge in an airtight container at room temperature for up to one week, or refrigerate for longer storage.
Nutrition
- Serving Size: 1 square
- Calories: 110
- Sugar: 15
- Sodium: 25
- Fat: 5
- Saturated Fat: 3
- Unsaturated Fat: 2
- Trans Fat: 0
- Carbohydrates: 16
- Fiber: 0
- Protein: 2
- Cholesterol: 5
