 Skip to content

Hi, I’m Alex, and I’m so glad you’re here! Finding that perfect appetizer that feels impressive but doesn’t demand hours in the kitchen is one of my greatest joys in cooking. If you’ve ever dreamed of that classic, savory shrimp toast but hated the idea of soaking bread in oil, I have wonderful news for you. This shrimp toast recipe is your answer! We’re taking the bold, flavorful filling you love and baking it until it’s perfectly golden and wonderfully crispy. There’s so much satisfaction in taking a traditional favorite and giving it a lighter, baked twist. Trust me, this version locks in that necessary crunch without the mess of deep frying, and it makes entertaining so much easier.
- Why This Baked Shrimp Toast Recipe Delivers Joyful Flavor
- Gathering Ingredients for Savory Seafood Toast
- How to Prepare Crispy Shrimp Toast Instructions
- Tips for Perfect Oven Baked Shrimp Toast
- Serving Suggestions for Your Easy Appetizer Shrimp Toast
- Storage and Reheating Instructions
- Common Questions About Asian Shrimp Toast Recipe Variations
- Nutritional Snapshot for Your Party Shrimp Appetizers
- Share Your Joyful Cooking Creations
Why This Baked Shrimp Toast Recipe Delivers Joyful Flavor
I promise you, making this recipe means you get all the satisfaction of a rich appetizer without the kitchen drama. It fits perfectly into my philosophy: big flavor, small effort. We’re talking about a truly crispy shrimp toast recipe here, but one that lets you focus on your guests instead of hovering over a fryer basket. It’s the ideal way to serve up something special!
- Crispy Shrimp Toast Recipe Without Deep Frying: We achieve that incredible, golden brown crunch simply by using a hot oven and a little brush of oil. It’s lighter, easier, and honestly, just as satisfying.
- Quick Shrimp Snacks Ready in 30 Minutes: From the chopping board to the serving platter in just 30 minutes total time! That means you can whip this up even when people unexpectedly drop by. It’s fantastic for easy entertaining!
Gathering Ingredients for Savory Seafood Toast
Okay, let’s get organized! The flavor in this savory seafood toast comes down to using fresh ingredients, so take a peek at your list before you even turn on the food processor. Since we aren’t deep-frying, the shrimp mixture really has to shine, so get the best raw shrimp you can find—peeled and deveined, please! You need four slices of standard white bread, and yes, you must remove those crusts. Nobody wants a stale edge fighting the creamy shrimp topping, right?
We’re using garlic, fresh ginger, a scallion, soy sauce, sesame oil, and white pepper to build that classic Asian-inspired profile. The egg white is our little binder, and the mayonnaise? That’s what gives the spread its lovely richness and silkiness. Make sure your garlic is finely minced; we want flavor, not big chunks of raw bite!
Ingredient Notes and Substitutions for Shrimp Toast
Since this is a homemade recipe, quality matters a ton! For the shrimp, using fresh, not frozen-and-thawed-twice, shrimp makes a huge difference in the final texture. It keeps that lovely subtle sweetness we want.
Now, about the mayo. I stick to real mayonnaise because that emulsified fat really helps carry the ginger and garlic flavor when baking. But hey, if you’re cutting back on fat or feeling tangy, you could absolutely substitute half the mayonnaise with plain Greek yogurt. Just know that yogurt adds a little water content, so you might need to pulse the mixture just a few seconds longer to absorb any excess liquid. But for the very first try, stick to the full mayo for that authentic, rich spread!
How to Prepare Crispy Shrimp Toast Instructions
Alright, time to make the magic happen! This whole process moves pretty quickly once you start blending, which is why organization is your friend here. We are aiming for that fantastic, savory shrimp spread that makes this appetizer famous, and we absolutely cannot turn it into baby food. Hear me out on the food processor part—this is where people go wrong and end up with something mushy.
First, get all those powerful flavor components—your shrimp, mayo, garlic, ginger, scallion, soy sauce, sesame oil, white pepper, and the egg white—loaded up into your food processor bowl. Before you hit the start button, remember our mantra: Pulse, Don’t Process!
Creating the Perfect Shrimp Mixture
When you pulse, you’re using short bursts of power. We want the shrimp chopped down nice and fine so it sticks beautifully to the bread, but you need to keep some visible texture left in there. If you run that machine continuously, you’ll emulsify everything into a smooth pink paste, which tastes fine, sure, but it loses that meaty, satisfying bite you get in the best versions of shrimp toast. Pulse maybe 8 to 10 short times until you see a coarse, sticky mixture. Stop and scrape the sides down a couple of times if you need to, then give it one final pulse.
Next up, get your bread prepped. Cut each piece into four equal squares or triangles—you should end up with 16 pieces total. This just makes them perfect little finger food size for serving!
Achieving Golden Brown Shrimp Toast in the Oven
Now that we have our spread ready, let’s get baking! You absolutely must preheat your oven to 400°F (200°C). Don’t try to sneak them in before it’s hot, or you’ll end up steaming them instead of crisping them up. Line a baking sheet completely with parchment paper—this is a lifesaver for cleanup, I promise. This topping is sticky, and parchment ensures nothing sticks!
Take a knife or a small offset spatula and spread a generous, even layer of that shrimp mixture onto one side of every piece of bread. Be nice and generous here; we want plenty of shrimp in every bite! After you’ve topped everything, take a little olive oil or some melted butter and lightly brush just the exposed edges of the bread.
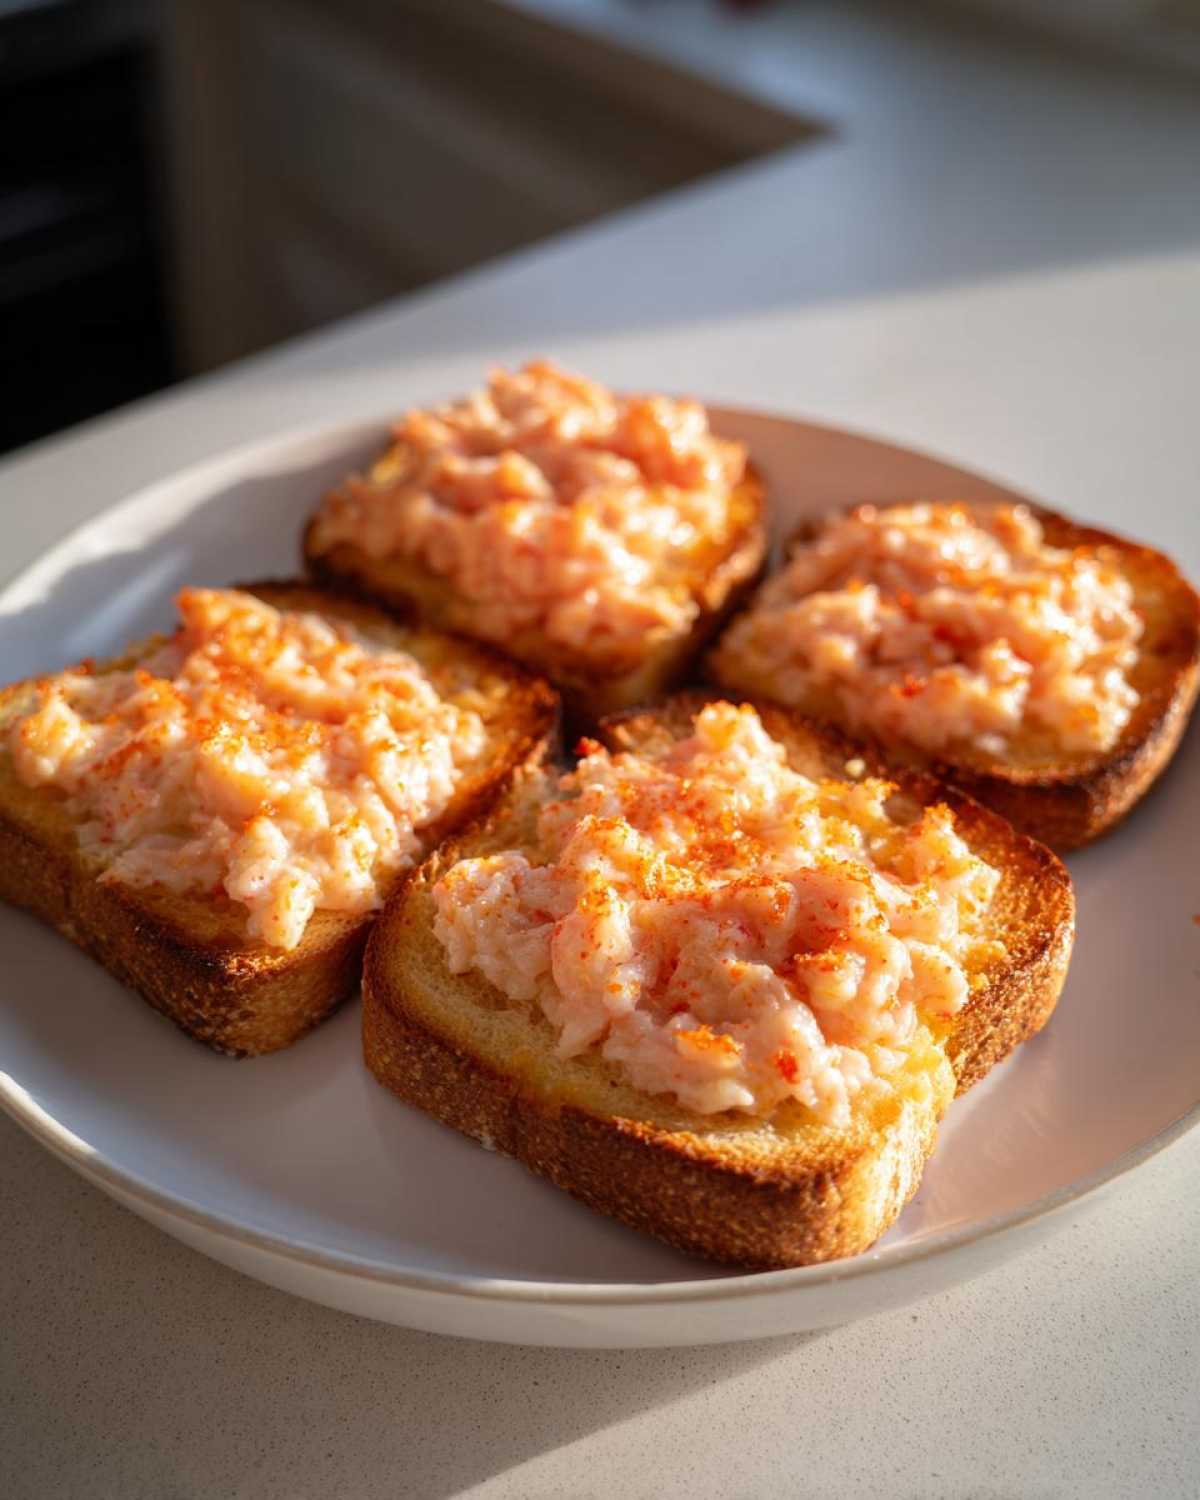
If you’re tossing on some sesame seeds for texture and appearance, sprinkle them now. Then, slide that sheet into the center rack of your preheated oven. Bake these gems for 12 to 15 minutes. You’re looking for that shrimp topping to be fully cooked—it will turn opaque—and the bread edges should look deeply golden brown and wonderfully crispy. Pull them out gently. They are marvelous served right away with something zesty like sweet chili sauce for dipping!

Tips for Perfect Oven Baked Shrimp Toast
We’ve got the directions down, but when you’re aiming for that satisfying crunch in an oven baked shrimp toast, sometimes an extra little nudge helps. Baking is great—it’s quick, less messy, and healthier—but we want that gorgeous, golden finish every single time. Getting the bread dry enough beneath that moist shrimp topping is really the key to success here, especially when you’re prepping these for a party and they might sit out for a bit.
I’ve found that putting a tiny bit of extra love into the preparation pays off huge when it comes time to eat. It shows confidence in what you’re serving, which is what Pure Cooking Joy is all about! If you ever need more inspiration on getting those fantastic crispy textures, you should check out my recipe for air fryer chicken tenders; the crisping principles are surprisingly similar.
The Secret to Extra Crispiness
Remember that note about pre-toasting? I highly, highly recommend it if you have the extra five minutes. This is my personal little trick for ensuring maximum crunch. Before you even spread that delicious shrimp mixture on the bread, just lay those crust-removed pieces directly onto the baking sheet and pop them into the 400°F oven for about three minutes. You aren’t trying to brown them fully, just dry them out slightly.
Bread holds moisture, and when you pile moist shrimp spread on top, the bottom can steam a little. By giving that bread a head start, you’re essentially locking out the steam and creating a firmer base. When you pull them out, spread the shrimp on quickly, sprinkle on your sesame seeds, and then bake for the full 12 to 15 minutes. The result is perfectly cooked shrimp sitting on a base that actually snaps when you bite into it!

If you happen to have an air fryer, you can take this speed boost even further! I use my air fryer for nearly everything that needs crisping now. If you choose that route, set your machine to 375°F (190°C) and check on them after about 8 minutes. They often come out even crispier than the oven because the heat circulates so aggressively around them. It’s just another route to creating delicious, happy food!
Serving Suggestions for Your Easy Appetizer Shrimp Toast
So, your amazing, freshly baked, golden shrimp toast is out of the oven. Perfection, right? But what do you serve alongside it to make that party platter truly unforgettable? That savory shrimp spread is begging for something bright or sweet to cut through its richness. This is what elevates a good snack to a great party shrimp appetizer!
While these bites are absolutely delicious totally plain—piping hot with just the sesame seeds—I always feel like a dipping sauce is the final touch of joy. It’s an opportunity to add color and another layer of texture to the experience. Think about how you want to balance that garlic and ginger base; maybe sweet, maybe creamy, maybe a little zing!
Dipping Sauce Ideas for Shrimp Toast
Don’t stress about making anything complicated! The best sauces are often the simplest ones. For my family gatherings, I usually put out two bowls because everyone has a favorite style. Here are my top picks that pair beautifully with the baked shrimp flavor:
- The Classic: Sweet Chili Sauce. You can’t go wrong here. It’s the perfect mix of sweet and mildly spicy, and it just sings alongside seafood. If you want to try making your own, I have a great recipe for a homemade sauce that beats anything bottled.
- The Zesty Option: Lime Cilantro Aioli. This is where you bring the brightness! Just mix real mayonnaise (back to our friend mayo!) with a squeeze of fresh lime juice, a teaspoon of finely chopped cilantro, and a pinch of salt. It’s cool, creamy, and immediately transports you to a more flavorful vacation spot.
- The Unexpected Twist: Spicy Plum Sauce. If you can find a decent quality plum sauce at the Asian market, thin it out just a drop or two with a little water or rice vinegar. It gives a wonderful fruity depth that pairs surprisingly well with the savory shrimp.
Set these out in little ramekins next to your platter of crispy shrimp toast. It makes the spread look abundant and instantly makes people feel like they are eating something really special!

Storage and Reheating Instructions
Now, I have to be honest with you. Like most things amazing in life, this shrimp toast is truly at its peak about five minutes after it comes out of the oven. The crunch factor is maximized when it’s fresh, and the shrimp spread is perfectly warm. But let’s face it, sometimes we make too much (or we’re just smart enough to plan leftovers for lunch!).
If you do have any pieces left over that you want to save, you need to think about preserving that golden crust. Store them in an airtight container at cool room temperature for up to two days. Do NOT put them in the refrigerator if you can avoid it! The fridge is the enemy of crispness—it makes everything go soft and chewy, and we absolutely can’t have that when we worked so hard to bake them perfectly.
When you want to bring them back to life, the microwave is absolutely off the table. That will instantly turn them soggy and sad. Forget it!
Your best bet for reheating is using dry heat. Pop the leftovers onto a parchment-lined baking sheet and put them back into a preheated 350°F (175°C) oven for about 5 to 7 minutes. If you have a small toaster oven, that works brilliantly too, as it heats up faster and focuses the heat right onto the surface. Just watch them closely! This little blast of dry heat will reactivate the crispiness in the bread base, and you’ll be enjoying nearly-as-good-as-fresh finger food seafood recipes again in no time!
Common Questions About Asian Shrimp Toast Recipe Variations
Okay, now that you know the foolproof method for our go-to Asian shrimp toast recipe, I know some of you pros out there are wondering about ways to spin it, or maybe you’re just missing one key ingredient and wondering if you can still make it work. That’s the fun of cooking, isn’t it? Experimenting! I get a ton of questions about adapting this simple base recipe that I figured we could tackle right here. You might even find a new favorite way to serve this!
Can I make this Vietnamese Shrimp Toast (Bánh Mì Nướng Tôm) style?
Oh, that’s a totally great idea! The core technique of spreading the shrimp paste on bread and baking for a crispy finish translates perfectly to Vietnamese shrimp toast, or Bánh Mì Nướng Tôm. The main difference you’d incorporate is in the seasoning of your shrimp mixture. Traditionally, the Vietnamese flavor profile leans heavily on aromatics, so you’ll want to make sure you are getting some lemongrass into that pulse, and maybe swapping out some of the soy sauce for a dash of fish sauce. Fish sauce adds that deep, savory funkiness that is signature to so many Vietnamese dishes. Since the baking method is gentle, it handles those flavors beautifully, keeping everything tasting incredibly fresh!
Can I add cream cheese to the shrimp mixture?
I know, I know, cream cheese makes everything better, right? People ask me about making a rich, creamy version similar to a shrimp and cream cheese toast, and yes, you certainly can! If you want to incorporate it, I wouldn’t mix too much directly into the main shrimp blend in the food processor, because the extra fat and dairy can sometimes encourage the topping to steam instead of brown, compromising that baked crispiness we worked so hard for.
My suggestion is to spread a very thin layer of softened cream cheese onto the bread *first*. Just a whisper! Then, spread your seasoned shrimp mixture right on top of that cream cheese layer. It gives you that decadent, creamy mouthfeel in every bite without weighing down the topping too much. Just watch your baking time—it might take that extra minute or two to fully cook through because you added that extra layer of richness.
What is the best bread for shrimp toast?
For this specific recipe that focuses on baking the topping on, standard, soft white sandwich bread—crusts removed—is my absolute number one recommendation. Why? Because it absorbs just enough oil brushed on the edges during baking to get genuinely crispy without becoming hard like a cracker. It holds the moisture of the shrimp spread perfectly.
However, if you’re worried about the bread dissolving under the weight of a thicker topping, or if you just want something with a little more heft, feel free to swap it out! A sturdier brioche sliced a little thicker, or even a nice, thick-cut Texas toast, works really well when baking. They give you a stronger foundation for your topping, though they won’t offer quite the same delicate crunch as the classic white bread base.
For more inspiration on other wonderful things you can cook up, you can always browse my main blog for fresh ideas!
Nutritional Snapshot for Your Party Shrimp Appetizers
Since we talked about keeping things lighter by baking instead of deep-frying, I know a lot of you are curious about the numbers. Because we’re prioritizing amazing flavor here at Pure Cooking Joy, I always want to be transparent about what goes into the dishes we love. This section breaks down the estimated nutrition for our party shrimp appetizers, calculated based on the ingredients list above.
Please remember that these figures are highly dependent on the exact size of your shrimp and the specific brand of mayonnaise you use. Think of this as a helpful guide rather than a strict laboratory reading! This is something I always check myself—knowing the general breakdown just adds to the peace of mind when serving food you made with love.
Here is the approximated breakdown per serving size (which is 4 pieces of shrimp toast):
- Serving Size: 4 pieces
- Calories: 220
- Protein: 18g
- Fat: 8g
- Saturated Fat: 1.5g
- Carbohydrates: 20g
- Sugar: 1g
- Sodium: 350mg
See how that fat content stays relatively reasonable compared to deep-fried versions? That’s the power of the oven! We’re getting a great deal of protein from the shrimp, which really makes this snack satisfying enough to hold you over until the main course. If you end up using lighter mayo or cutting back slightly on the brushing oil on the crusts, you can easily push those fat grams down a tiny bit more.
If you make a batch of this delicious shrimp toast, I’d genuinely love to see it! Snap a picture and tag me over on Facebook. It truly makes my day to see you all finding pure joy in these simple, flavorful recipes. You can connect with me over at my Facebook page!
Share Your Joyful Cooking Creations
Well, we made it! You now have a foolproof, delicious, and genuinely easy recipe for fantastic baked shrimp toast. I hope you feel that same sense of quiet accomplishment I felt when I first started creating simpler versions of stressful dishes. Seeing that golden-brown, crispy toast come out of the oven is just the best!
Now, my favorite part comes next: hearing from you! I put my heart into these recipes because I want you to feel confident and happy in your kitchen, whether you’re whipping this up for a big party or just a spontaneous weeknight snack. I truly believe that food tastes better when it’s made with joy, not stress.
So, please, if you made this savory seafood toast, come back here and leave a quick rating—even just a star count helps other home cooks know what you thought! And if you snapped a picture of your perfectly crispy appetizers, I would absolutely love to see the results! Tag me on social media or drop a comment below telling me what dipping sauce you ended up pairing with it. Happy cooking, friends. I can’t wait to see what you create!
PrintEasy Baked Shrimp Toast: Crispy Appetizer Recipe

You can make this crispy, savory shrimp toast in your oven. This easy appetizer recipe uses fresh shrimp and simple ingredients to create a flavorful, golden-brown snack perfect for parties or a quick lunch.
- Prep Time: 15 min
- Cook Time: 15 min
- Total Time: 30 min
- Yield: 16 pieces 1x
- Category: Appetizer
- Method: Baking
- Cuisine: Asian-Inspired
- Diet: Low Fat
Ingredients
- 1 pound raw shrimp, peeled and deveined
- 4 slices white bread, crusts removed
- 2 tablespoons mayonnaise
- 1 tablespoon finely minced garlic
- 1 tablespoon minced fresh ginger
- 1 scallion, finely chopped
- 1 teaspoon soy sauce
- 1/2 teaspoon sesame oil
- 1/4 teaspoon white pepper
- 1 large egg white
- 1 tablespoon olive oil or melted butter for brushing
- Sesame seeds for sprinkling (optional)
Instructions
- Prepare the shrimp mixture: Place the shrimp, mayonnaise, minced garlic, ginger, scallion, soy sauce, sesame oil, white pepper, and egg white into a food processor. Pulse until the mixture is finely ground but still has some texture. Do not over-process into a paste.
- Prepare the bread: Cut each slice of bread into four equal squares or triangles. You should have 16 pieces total.
- Spread the mixture: Spread a generous, even layer of the shrimp mixture onto one side of each bread piece.
- Preheat the oven: Set your oven to 400°F (200°C). Line a baking sheet with parchment paper.
- Bake the toast: Place the bread pieces, shrimp-side up, on the prepared baking sheet. Lightly brush the exposed bread edges with olive oil or melted butter. Sprinkle the shrimp topping lightly with sesame seeds if you are using them.
- Bake for 12 to 15 minutes, or until the shrimp topping is cooked through and the edges of the bread are golden brown and crispy.
- Serve immediately while warm. You can serve this with sweet chili sauce for dipping.
Notes
- For extra crispiness, you can lightly toast the bread slices for 3 minutes before adding the shrimp topping.
- If you prefer a richer flavor, substitute the olive oil brush with melted butter.
- You can use an air fryer set to 375°F (190°C) for 8-10 minutes for a similar crispy result.
Nutrition
- Serving Size: 4 pieces
- Calories: 220
- Sugar: 1
- Sodium: 350
- Fat: 8
- Saturated Fat: 1.5
- Unsaturated Fat: 6.5
- Trans Fat: 0
- Carbohydrates: 20
- Fiber: 1
- Protein: 18
- Cholesterol: 110
