 Skip to content

Hi, I’m Alex, and I’m thrilled you stopped by! If you’re looking for something incredibly easy that still feels like a major treat, you have hit the jackpot today. I truly believe that soul-satisfying food doesn’t need to be complicated, and that’s exactly what this cool whip candy is all about. Forget hauling out the candy thermometers; this is the simplest homemade candy you will ever whip up. Seriously, it tastes just like a classic 3 Musketeers bar—fluffy, rich, and waiting for that chocolate coating. Finding joy in these truly simple recipes is how I started this whole cooking journey, and I can’t wait for you all to try it! You can always learn more about my philosophy over on my About Page, but right now, let’s get making candy!
- Why This 3-Ingredient cool whip candy Is Your New Favorite No Bake Treat
- Gathering Ingredients for Your cool whip candy
- Step-by-Step Instructions to Make This cool whip candy
- Tips for Foolproof cool whip candy Success
- Variations for Your Easy cool whip candy
- Storage and Keeping Your cool whip candy Fresh
- Frequently Asked Questions About cool whip candy
- Estimated Nutritional Overview for cool whip candy
- Share Your Homemade cool whip candy Creations
Why This 3-Ingredient cool whip candy Is Your New Favorite No Bake Treat
Listen, when I say this is easy, I mean it. This recipe gives you all the payoff with almost zero effort, and that’s why I trust it so much for quick desserts. If you are looking for fantastic no bake cool whip treats that require almost no special equipment, this is IT. It’s a genuine 3 ingredient candy recipe at its core, which means cleanup is a breeze and you can have something sweet on the desk in minutes—even before you factor in the freeze time!
Perfectly Fluffy Chocolate Candy Texture
What sets this apart is the mouthfeel. Thanks to the whipped topping, you don’t get hard fudge; you get this incredible, almost weightless center. It’s genuinely the best fluffy chocolate candy you can make at home, making it the perfect 3 musketeers copycat recipe. It’s so light, it practically dissolves!

Quick Homemade Candy for Any Occasion
Because the prep time is only about 15 minutes, this is my go-to for last-minute needs. Suddenly need simple holiday sweets for a cookie tray? Done. Unexpected guests popping over? No sweat. This quick homemade candy proves you don’t need hours to create something special. Pop it in the freezer and forget about it until you need it. If you loved my easy Buckeye fudge, you’ll adore how simple this no-bake version is —check that one out too!
Gathering Ingredients for Your cool whip candy
Okay, Alex here again! I love how few things we need for these cool whip candy delights. Because the recipe is so short, we really need to be precise with what we grab. When the ingredient list is this short, there’s no hiding sub-par components, right? I’m going to walk you through exactly what you need—and trust me, make sure your whipped topping is completely ready to go before you start mixing!
We are going to break the ingredients into two parts: what makes the wonderful fluffy interior, and what finishes it off with that chocolate shell. If you want to see my similar take on a super quick fudge, you can check out my notes on the easy 3-ingredient fudge too!
For the Fluffy cool whip candy Base
For the actual center of the candy, you’ll be reaching for three things. First up, grab 1 cup of powdered sugar, and I highly recommend giving it a quick sift just to make sure we don’t end up with any weird little clumps in our filling. Next, you absolutely need 1 package (8 ounces) of frozen whipped topping, and it must be fully thawed—think soft, not liquid! Finally, grab 1 package (3.4 ounces) of instant chocolate pudding mix. Critically, this needs to be the dry mix only; do not prepare the pudding!
For the Chocolate Coating
Now for the fun part that makes it taste like heaven! For dipping, you will need about 1 cup of melting chocolate wafers. I usually stick to semi-sweet or milk chocolate for that classic taste, but you can absolutely use whatever type your heart desires.
Step-by-Step Instructions to Make This cool whip candy
Alright, let’s get this amazing, fluffy cool whip candy into shape! Since we aren’t baking anything, the real work comes down to mixing and freezing, so pay attention to the timing here. You’ll be amazed how quickly this comes together before we even think about the lovely chocolate coating. If you’ve made my sugar cookie truffles before, you’ll recognize some of the chilling steps here! Find the full recipe framework here.
Preparing the Base Mixture
First off, grab an 8×8 inch baking dish and line it completely with parchment paper—leave some overhang so we can lift the candy block out later, trust me on this one! Now, in a medium bowl, gently combine your thawed whipped topping and the sifted powdered sugar. Mix them until they are *just* combined. Do not whip this mixture up; we want to keep its slight airiness. Next, add in the dry instant chocolate pudding mix. Fold everything together until it’s fully incorporated and the mix looks thick. Wow, that color is perfect already! Don’t overmix once that pudding is in there.
Freezing and Cutting the cool whip candy
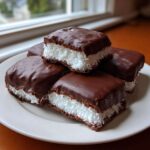
Once everything looks smooth and thick—that beautiful, creamy base—press it right into your prepared dish. Make sure you get it nice and even. Now, this is where patience comes in. This needs to chill out in the freezer for at least two solid hours. If you try to cut it sooner, you’ll just end up with a chocolate mess! Once it’s totally firm, lift the block out using the parchment paper edges and slice it right into small, bite-sized squares. These squares are what we’ll dip.

Coating and Setting the Chocolate Covered cool whip
Time for the big finish! Melt your chocolate wafers. I always feel safest doing this slowly in the microwave, using 30-second bursts and stirring well in between each one until it’s mostly melted, then stirring until the residual heat finishes the job. If you prefer, a double boiler is great too. Now, dip each frozen candy square into the melted chocolate. Let the extra chocolate drip off gently before setting the piece on a new tray lined with parchment. If you want the chocolate to set fast—and who doesn’t?—toss them back into the freezer for maybe 15 minutes. Easy peasy!

Tips for Foolproof cool whip candy Success
I really want you to have the best experience making this cool whip candy. Since this recipe is so incredibly simple, the main challenge comes when we deal with temperature—we are working with frozen stuff and melted stuff, and they don’t always play nice! Follow these tips, and you’ll end up with a batch of perfect, melt in your mouth candy every single time. This is what separates a good batch from a truly foolproof candy recipe! For more simple solutions and kitchen insights, check out my latest blog posts.
Achieving the Right Consistency
Remember when I told you the whipped topping needed to be thawed? This is crucial. It should be soft enough that you can stir it easily, but you absolutely cannot let it get warm or runny. If it starts collapsing before you add the dry pudding mix, you’re already losing the airiness we need for that signature light texture. Keep your Cool Whip bowl sitting out just long enough to take the hard chill off, but work quickly once you start mixing the powdered sugar in!
Perfecting the Chocolate Dip
The biggest disaster when making chocolate covered cool whip is when you dip a cold, frozen square into warm, thick chocolate. The temperature difference makes the chocolate seize up, or worse, if your base pieces aren’t frozen solid, they just crumble under the weight of the coating. Make sure those squares are rock hard! If your melted coating seems scary thick—almost like paste—you can save it! Seriously, stir in just a teaspoon of vegetable oil or a few drops of coconut oil. It won’t affect the flavor, but it thins the chocolate just enough so it drips beautifully off your candy.
I always hang out by the fridge while dipping, ready to pop the tray back in if I notice the squares getting too soft on the countertop. That quick chill-down guarantees a crisp shell!
Variations for Your Easy cool whip candy
While I absolutely adore this classic chocolate version of our easy cool whip candy—it’s what I grew up making—the beauty of this truly simple recipe is how easy it is reinvent! If you’re looking to change things up for the kids or just want a new flavor profile for a party tray, we can swap out just one ingredient and get a completely different result. It still requires almost no effort, which is why this remains a staple for me. It’s one of those kid friendly candy recipes that excites everyone!
Pudding Flavor Swaps
The instant pudding mix is doing a lot of heavy lifting here, not just for binding but for flavor! If you try my recipe notes, you already know you can use whatever flavor pudding excites you most. Ditch the chocolate pudding and go for vanilla if you want a brighter, sweeter center. Or, if you want something warm and rich for the holidays, try butterscotch pudding mix instead! You still use the dry powder, and the sweetness balances out beautifully. Just follow the coating instructions as normal, and you’ve got a brand new candy!
Shaping Your whipped topping dessert
Most people cut this into neat little squares, but who says candy needs to be square? Honestly, depending on how firm your mixture is, sometimes scooping it into balls is even easier than trying to get perfect cuts after it freezes. If you roll the chilled mixture into balls before you dip them, you instantly transform this into something that feels way fancier—almost like easy chocolate truffles! Just be sure to handle them quickly so they don’t soften up too much between rolling and dipping. It’s amazing how much flavor a little swap can add, much like how adding lemon zest kicks up my cheesecake cupcakes!

Storage and Keeping Your cool whip candy Fresh
Making cool whip candy ahead of time is one of the best parts about this recipe! Since we didn’t use any eggs or heavy dairy, storing these treats is a snap, which makes them perfect for easy edible gifts. The recipe notes say you can store them right in an airtight container in the refrigerator, but honestly, I prefer the freezer for these frozen cool whip bites.
If you keep them in the fridge, they stay soft and chewy, which is lovely. But if you want that firmer, almost truffle-like bite, pop them in the freezer! They keep beautifully for weeks, and you can just grab one or two whenever that sweet craving hits. For storing the rest, just make sure the container is totally airtight so they don’t pick up any funny smells. Check out my no-bake protein bars for another great way to store sweets ahead of time right here!
Frequently Asked Questions About cool whip candy
You know how it is—when you find a recipe this easy, all sorts of questions pop up! Seriously, I get asked the same things all the time about this cool whip candy, so I thought I’d tackle a few of the big ones right here. If you have a question I didn’t cover, please don’t hesitate to reach out through my contact page. I’m happy to help!
Can I use real whipped cream instead of Cool Whip in this cool whip candy?
Oh, I highly advise against it, my friend! While I love real heavy cream whipped up into stiff peaks, it just won’t work here. Cool Whip (or any quality stabilized whipped topping) has stabilizers in it, and that’s what gives our cool whip candy structure once it freezes and thaws slightly. Regular whipped cream is often mostly water and air, and it will weep and collapse on you as soon as it hits room temperature or starts to thaw out of the freezer. You need that “whipped topping” structure for this to work as a piece of creamy no bake candy!
How long does this easy cool whip candy last?
That’s the great thing about no bake cool whip treats! If you store them properly, they are long-lasting. If you keep them in an airtight container in the refrigerator, they are fantastic for about a week. However, if you are making them for holiday prep or just want them to hang around longer, the freezer is your best bet. They hold up splendidly in the freezer for up to three months! You can just thaw a few pieces anytime you need a sweet fix.
Is this a true 3 ingredient candy recipe?
This is a fantastic question, and it comes up all the time! Technically, the wonderful fluffy center—the part that tastes like those classic chocolate bars—is made from three ingredients: the Cool Whip, the pudding mix, and the powdered sugar. So, yes, the base is a 3 ingredient candy! But, since we are dipping them in melted chocolate wafers to seal that goodness in, that brings the total count up to four. Still, most people count it because the prep for the base is so minimal, and it’s still the easiest homemade candy out there!
Estimated Nutritional Overview for cool whip candy
Now, because this is cool whip candy, the nutritional facts can swing a little based on the specific chocolate coating you choose, so always take these numbers as a friendly estimate! For serving size based on about 30 small pieces, you’re looking at about 120 calories per piece. That’s not bad for a sweet moment, I think! Per serving, we see roughly 7 grams of fat, 15 grams of carbohydrates (with 14g of that being sugar, naturally!), and about 1 gram of protein.
Remember, this is just a guideline, and you can check out my full disclaimer here if you need the fine print. Enjoying these simple sweets guilt-free means enjoying them in moderation!
Share Your Homemade cool whip candy Creations
I truly hope you enjoyed making this ridiculously easy cool whip candy! When you have something so nostalgic and simple, the best part is seeing how you all customize it—maybe you used peanut butter pudding, or perhaps you found a really fancy dark chocolate to dip them in.
I want to hear all about it! Please take a moment to leave a quick rating and let me know in the comments how your creamy no bake candy turned out. Did it pass the 3 Musketeers taste test in your house? Hearing from you guys truly makes all the work on this site worthwhile. If you’re looking for more inspiration on how I run this kitchen, check out my About Page any time.
If you snap a picture before they all disappear (and trust me, they disappear fast!), tag me over on Facebook. You can connect with me and the rest of the Pure Cooking Joy community right here: Follow Pure Cooking Joy on Facebook. Thanks again for cooking with me today; I hope this sweet treat brings you a moment of pure, simple joy!
Print3-Ingredient No-Bake Cool Whip Candy (3 Musketeers Copycat)
I am so glad you are here. This recipe proves that incredible, soul-satisfying food does not need to be complicated. This is the easiest homemade candy you will ever make. This fluffy chocolate candy tastes just like a 3 Musketeers bar and requires zero baking time.
- Prep Time: 15 min
- Cook Time: 10 min
- Total Time: 2 hours 25 min
- Yield: About 30 pieces 1x
- Category: Dessert
- Method: No Bake/Freezing
- Cuisine: American
- Diet: Vegetarian
Ingredients
- 1 cup powdered sugar
- 1 package (8 ounces) frozen whipped topping, thawed (Cool Whip)
- 1 package (3.4 ounces) instant chocolate pudding mix
- 1 cup melting chocolate wafers (for coating)
Instructions
- Line an 8×8 inch baking dish with parchment paper.
- In a medium bowl, combine the powdered sugar and the thawed whipped topping. Mix them together until they are just combined.
- Add the dry instant chocolate pudding mix to the bowl. Stir or beat on low speed until the mixture is fully incorporated and thick. Do not overmix.
- Press the mixture evenly into the prepared baking dish.
- Place the dish in the freezer for at least 2 hours, or until the candy is firm enough to cut.
- Once firm, remove the candy from the dish and cut it into small, bite-sized squares.
- Melt the chocolate wafers according to package directions. You can use a double boiler or microwave in 30-second intervals, stirring between each interval.
- Dip each candy square into the melted chocolate, allowing excess chocolate to drip off. You can place them on a parchment-lined tray to set.
- If you want a quick set, place the chocolate-dipped candies back into the freezer for about 15 minutes until the chocolate hardens.
- Store your finished cool whip candy in an airtight container in the refrigerator or freezer.
Notes
- For a different flavor, substitute the chocolate pudding mix with vanilla or butterscotch pudding mix.
- You can use white chocolate or milk chocolate for the coating.
- If you want a texture closer to a truffle, roll the frozen mixture into balls instead of cutting squares before dipping.
- This recipe is great for edible gifts because it is a foolproof candy recipe.
Nutrition
- Serving Size: 1 piece
- Calories: 120
- Sugar: 14g
- Sodium: 95mg
- Fat: 7g
- Saturated Fat: 4g
- Unsaturated Fat: 3g
- Trans Fat: 0g
- Carbohydrates: 15g
- Fiber: 0g
- Protein: 1g
- Cholesterol: 5mg
