 Skip to content

Hi there, I’m Alex, and I’m so happy you stopped by my little corner of the kitchen! If you’re anything like me, the smell of perfectly soft vanilla wafers layered with rich, creamy goodness instantly takes you back home. Today, we are making the ultimate comfort food dessert: my **Classic Southern Banana Pudding**. This isn’t one of those fussy, baked-custard jobs; this is the simple, soul-satisfying, no-bake version that you can practically throw together in 20 minutes. Trust me, finding the joy in these simple, classic recipes is what Pure Cooking Joy is all about. I promise this creamy banana dessert will be the best banana pudding you’ve ever made!
- Why This Classic Banana Pudding Recipe Is Your New Go-To Comfort Food Dessert
- Gathering Your Ingredients for the Ultimate Banana Pudding
- Step-by-Step Instructions for Easy No Bake Banana Pudding
- Tips for Success When Making Classic Banana Pudding Recipe
- Variations on Traditional Banana Pudding
- Serving and Storing Your Potluck Friendly Desserts Banana Pudding
- Frequently Asked Questions About Homemade Banana Pudding from Scratch
- Estimated Nutritional Information for This Banana Pudding
- Share Your Perfect Banana Pudding Experience
Why This Classic Banana Pudding Recipe Is Your New Go-To Comfort Food Dessert
Why mess with perfection, right? This recipe is pure magic because it checks every single box. It’s that ultimate comfort food dessert that Mom or Grandma always brought to the potluck. We aren’t using the oven at all, which is a huge win during the summer months, and since it’s a make ahead dessert, you save so much stress right before guests arrive.

- It’s lightning fast to assemble—seriously, it’s an easy no bake banana pudding!
- The texture is spot-on: perfectly creamy and luxurious.
- It’s always a guaranteed crowd-pleaser for gatherings.
- You get those incredible layers that make a great layered banana dessert.
Achieving the Best Southern Banana Pudding Texture
This texture, folks, is what sets a good banana pudding apart from a great one. The goal here is that dreamy, velvety base. We blend instant pudding mixes with milk and sweetened condensed milk, which gives us an almost custard-like filling without any cooking time. The real secret, though, happens in the fridge.
As this sits, those crunchy Nilla Wafers slowly absorb the moisture from the pudding. They transform from crisp cookies into this soft, cake-like layer. That’s the sign you’ve made an authentic, spot-on Classic Banana Pudding Recipe!
Gathering Your Ingredients for the Ultimate Banana Pudding
Okay, seeing as this is our ultimate Easy No Bake Banana Pudding, half the battle is won because the ingredient list is so simple and comforting. You might even have everything on hand right now! Grab your instant vanilla and banana pudding mixes—we’re using both for that perfect tropical flavor blend. You’ll need a full carton of thawed whipped topping; don’t open that until you’re ready to fold it in carefully. Make sure you have plenty of Nilla Wafers because these are non-negotiable for that classic Southern vibe. When you slice those bananas, aim for about a quarter-inch thick so they hold up in the layers. It’s all about simple components working together!
Ingredient Notes and Substitutions for Your Banana Pudding
I always get asked about the milk here. Please, please use whole milk if you can! It makes such a difference in the final consistency, giving you that rich, luscious mouthfeel we’re aiming for in this Creamy Banana Dessert. Skim milk just won’t cut it when you’re trying to achieve true Southern richness!
Next, let’s talk bananas. You want them ripe—you know, the ones that are starting to get those little brown spots on the peel—but still firm enough that they won’t turn to mush when you slice them. If they’re too soft, they just dissolve into the pudding, and we want distinct slices!
Now, about the whipped topping. I use the frozen stuff because it folds in so easily and provides fantastic stability for making this a wonderful make ahead dessert. If you really want to skip it and use fresh heavy cream, go for it! Just whip about 1.5 cups of heavy cream with a tablespoon of powdered sugar until you get stiff peaks, and then gently fold that into the pudding mixture instead. It makes a slightly lighter dessert, but still totally delicious.
Step-by-Step Instructions for Easy No Bake Banana Pudding
Alright, time to get busy! Since we aren’t baking anything, this is all about mixing smart and layering pretty. Grab your very largest mixing bowl. First thing: whisk together both pudding mixes—the banana one and the vanilla one—with the four cups of *cold* milk. You need to whisk this vigorously for a good two minutes until it starts looking thick. Ignore it for five minutes; it needs a little time to set up before we move on. This forms the backbone of our incredible creamy banana dessert!
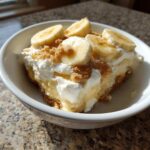
Next, gently fold in the thawed whipped topping, the can of sweetened condensed milk, and that little bit of vanilla extract. I mean *gently* fold. You don’t want to deflate all those air bubbles we just worked to create. We’re making layers now. Start with a thin swipe of that beautiful pudding mixture on the bottom of your 9×13 dish or trifle bowl. Then toss down a layer of Nilla Wafers, followed by your freshly sliced bananas. Top the bananas with another very generous layer of pudding. Repeat this until you run out of ingredients—always try to end with a layer of pudding right on top!
The Critical Chilling Time for Perfect Banana Pudding
This next part is where patience pays off. Cover that beautiful dish tightly. You absolutely must chill this for a minimum of four hours, but honestly, overnight is the golden ticket for a proper Southern Banana Pudding. This rest lets the vanilla wafers completely soften up into that perfect cake-like texture we crave.

Tips for Success When Making Classic Banana Pudding Recipe
You’ve mixed it, you’ve layered it—now let’s talk about making sure this Classic Banana Pudding Recipe survives the trip to the party! The biggest concern people have is the bananas turning brown and slimy. My trick? Once you slice them, toss them *very lightly* with a splash of lemon juice or a tiny bit of pineapple juice before they go into the layers. It slows down that browning process significantly!
Also, remember what I said about chilling? I learned this the hard way one summer. I was in a huge rush for a backyard BBQ, only chilled the pudding for about an hour, and brought it straight out. The wafers stayed crunchy, the layers slid around, and honestly, it just tasted like lukewarm, oddly textured pudding. Not good. Let it sit! The pudding needs time to firm up and marry all those wonderful flavors.

If you are worried about it being too runny even after chilling, it usually means you didn’t whisk the instant mixes quite long enough with the cold milk initially. Go for that thick, almost sticky base before you fold in the whipped topping. Perfect, stable pudding means perfect layers every single time.
Variations on Traditional Banana Pudding
I love that this basic recipe is so adaptable! While I’m firmly in the Nilla Wafer camp for my Classic Banana Pudding Recipe, I know the internet loves a good twist. If you want to try out something a little different next time, you have a couple of great options.
For example, if you see people talking about Paula Deen’s version, they are often referring to using Pepperidge Farm Chessmen cookies instead of wafers. They add a slightly buttery crunch that is fantastic! Just swap those cookies in directly for the Nilla Wafers.
Another super popular idea is boosting that creaminess—I’m talking about adding cream cheese. If you want a little tang, just beat 4 ounces of softened cream cheese into the pudding base right after you mix the milk. It gives you that rich flavor you’d expect from a Banana Pudding with Cream Cheese vibe, and honestly, it makes the whole thing even more decadent. Keep it simple, but feel free to experiment!
Serving and Storing Your Potluck Friendly Desserts Banana Pudding
Presentation is half the fun with this dish! Whether you serve your Potluck Friendly Desserts Banana Pudding in a tall, clear trifle dish to show off those gorgeous layers, or just keep it super casual in a big 9×13 baking pan, it tastes exactly the same. Either way, remember to cover it tight!

When it comes to storage, this layered banana dessert is definitely a fridge-only situation. It’ll keep beautifully for three days—though let’s be honest, it rarely lasts that long in my house. Skip the freezer, though! The whipped topping gets weird, and those poor bananas definitely don’t freeze well.
If you need to transport this, put it in a sealed container and keep it chilled until the very last second. It’s the perfect make-ahead dish for any gathering. Feel free to tag me in any photos you share over on Facebook; I love seeing how you all serve up your creations!
Frequently Asked Questions About Homemade Banana Pudding from Scratch
It’s totally normal to have questions when you’re making a dessert this iconic! We want this Homemade Banana Pudding from Scratch to be perfect, and sometimes the methods can be confusing. I’ve gathered the most common things folks ask me about this recipe. Don’t worry if you run into a snag; most issues are easily fixed just by knowing a quick trick or two!
Can I make this banana pudding recipe ahead of time?
Oh, you absolutely should! This is honestly the best part about having this as my go-to Potluck Friendly Desserts choice. You need time for those Nilla Wafers to soak up all that creamy goodness and become soft. I always make mine the night before serving. Four hours is okay in a pinch, but overnight is truly when this Layered Banana Dessert reaches its peak magic.
What is the secret to creamy banana pudding?
The secret to that unbelievable texture is really a two-part combo we use in this Classic Banana Pudding Recipe. First, we use both the instant vanilla and banana mixes together for depth. But the real game-changer here is folding in that full container of thawed whipped topping at the very end. It makes this such a wonderfully Creamy Banana Dessert without having to cook anything on the stove. Just remember to fold gently!
Why is my pudding runny even after chilling?
Nine times out of ten, the pudding is runny because the instant mixes weren’t given enough time or enough whisking with the cold milk initially. Make sure you whisk hard for those full two minutes until it starts looking stiff, even a little resistant. If you skip that initial vigorous whisking, folding in the whipped topping just deflates it, resulting in a soupy mess. Next time, really commit to that first whisking step!
Can I use homemade custard instead of the instant mixes?
Yes, you definitely can! If you want to lean into making everything truly from scratch, you can skip the instant pudding boxes and make your own vanilla custard base. Just know that when you skip the instant mixes, you lose that stabilizing agent they provide for holding up to the whipped topping. If you use homemade custard, you might want to add an extra ounce or two of cream cheese or even use slightly less milk to ensure your Old Fashioned Banana Pudding sets up nicely!
Estimated Nutritional Information for This Banana Pudding
Listen, I always tell you here at Pure Cooking Joy that we focus on flavor and the joy of cooking over counting every single calorie, but sometimes it’s good to have a rough idea of what you’re serving! Because this is a simple, no-bake comfort food dessert made with ingredients like sweetened condensed milk and whipped topping, it definitely falls into the indulgent category. Remember, every single number below is just an estimate based on the specific ingredients I listed above, so take it with a grain of salt!
Here’s what you are looking at for one serving of this amazing Classic Banana Pudding Recipe:
- Serving Size: 1 serving
- Calories: 350
- Sugar: 45g (Yep, it’s sweet—it’s dessert!)
- Fat: 12g
- Protein: 5g
- Carbohydrates: 58g
If you’re trying to cut down on sugar, remember you can always go lighter on the sweetened condensed milk, but please don’t skip the vanilla wafers entirely; they’re vital to the structure of this Simple Banana Recipe!
Share Your Perfect Banana Pudding Experience
Now that you’ve created this amazing banana pudding, I really want to hear about it! Did you try the tip about the lemon juice or did you go for the cream cheese swirl?
Please drop a comment below and let me know how it turned out, and don’t forget to give this recipe a star rating! Sharing the joy we create in the kitchen is the best part of this whole process. Happy scooping!
PrintClassic Southern No-Bake Banana Pudding
This is the ultimate comfort food dessert: a creamy, layered banana pudding made the easy, no-bake way. It uses simple ingredients to create a nostalgic, soul-satisfying treat perfect for potlucks and family gatherings.
- Prep Time: 20 min
- Cook Time: 0 min
- Total Time: 4 hr 20 min
- Yield: 10 servings 1x
- Category: Dessert
- Method: No Bake
- Cuisine: American
- Diet: Vegetarian
Ingredients
- 1 (5.1 ounce) package instant vanilla pudding mix
- 1 (3.4 ounce) package instant banana pudding mix
- 4 cups cold milk (whole milk works best for creaminess)
- 1 (8 ounce) container frozen whipped topping, thawed (like Cool Whip)
- 1 (14 ounce) can sweetened condensed milk
- 1 teaspoon vanilla extract
- 4 large ripe bananas, sliced about 1/4 inch thick
- 2 (11 ounce) boxes Nilla Wafers (vanilla wafers)
Instructions
- Prepare the instant puddings: In a large bowl, whisk together the instant vanilla pudding mix, instant banana pudding mix, and cold milk for about two minutes until the mixture starts to thicken. Let it stand for five minutes.
- Finish the creamy base: Gently fold the thawed whipped topping, sweetened condensed milk, and vanilla extract into the pudding mixture until everything is just combined and smooth. Do not overmix.
- Begin layering: Select a large trifle dish or a 9×13 inch baking dish. Spread a thin layer of the pudding mixture across the bottom of the dish.
- Add the first layer of cookies and bananas: Arrange a single layer of Nilla Wafers over the pudding, followed by a layer of sliced bananas.
- Continue layering: Top the bananas with another generous layer of the pudding mixture. Repeat the layers—wafers, then bananas, then pudding—until you reach the top of the dish, ending with a final layer of pudding.
- Chill: Cover the dish tightly with plastic wrap. Refrigerate for at least 4 hours, or preferably overnight. Chilling allows the vanilla wafers to soften into a cake-like texture, which is key to a great Southern Banana Pudding.
- Serve: Before serving your potluck friendly dessert, you can top it with a few extra wafers or fresh banana slices if desired.
Notes
- For the best texture, make this make ahead dessert the day before you plan to serve it. The cookies need time to absorb moisture from the pudding.
- If you want a richer flavor, substitute half of the instant pudding with homemade vanilla custard made from scratch.
- Use firm, ripe bananas; overly soft bananas will break down too much during layering.
Nutrition
- Serving Size: 1 serving
- Calories: 350
- Sugar: 45g
- Sodium: 280mg
- Fat: 12g
- Saturated Fat: 6g
- Unsaturated Fat: 6g
- Trans Fat: 0g
- Carbohydrates: 58g
- Fiber: 1g
- Protein: 5g
- Cholesterol: 15mg
