 Skip to content
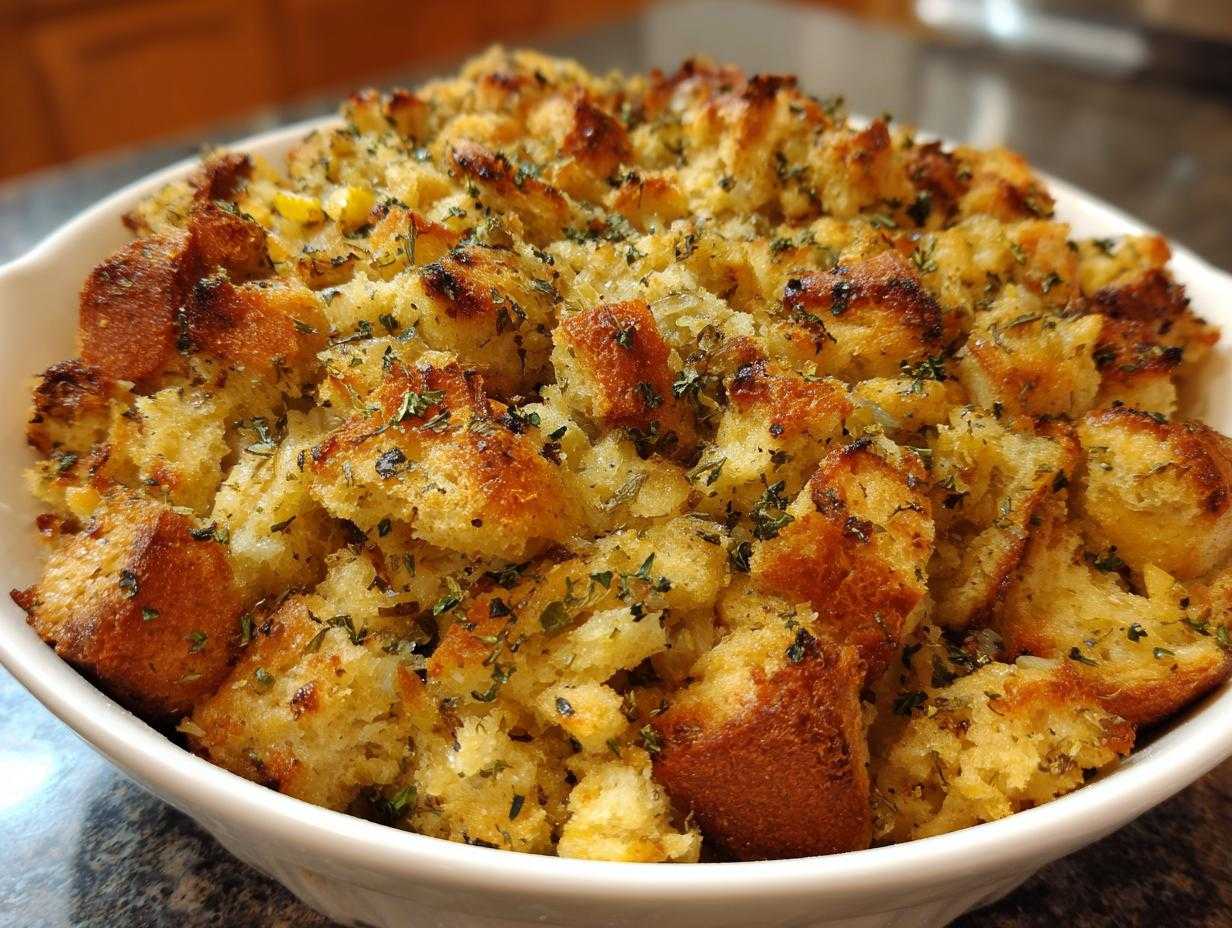

Alright, let’s talk about the holidays for a second. Are you also tired of that one side dish that everyone tolerates, but nobody really *loves*? I know I was! For years, my Thanksgiving table featured stuffing that was either suspiciously spongy or bone-dry around the edges. It felt like stress baking, which is the absolute opposite of what cooking should be. So, I went back to basics, played around with technique, and finally nailed it. Friends, this isn’t just *a* recipe; this is the Best Stuffing Recipe Ever. It’s that soul-satisfying, savory, perfectly textured stuffing that makes the whole meal sing. You deserve incredible comfort food without the fuss, and I’m here to show you how simple it is to achieve pure cooking joy right on your holiday plate.
You can definitely read more about my own kitchen journey and philosophy over on my About Page if you want to get the full story on why I believe food should be simple and joyful!
- Why This Homemade Stuffing Recipe Steals the Show (The Secret to Perfect Stuffing)
- Ingredients Needed for the Best Stuffing Recipe Ever
- How to Prepare Classic Thanksgiving Stuffing
- Baking and Finishing This Holiday Side Dish
- Make Ahead Stuffing and Variation Ideas
- Storage and Reheating Instructions for Leftover Stuffing
- Frequently Asked Questions About Making Stuffing
- Estimated Nutritional Data for This Recipe
- Share Your Experience Making This Stuffing
Why This Homemade Stuffing Recipe Steals the Show (The Secret to Perfect Stuffing)
If you grew up on the stuff in a box, buckle up, because this Homemade Stuffing Recipe is going to change your life! We aren’t looking for spongy bread here; we are aiming for that perfect dichotomy: a deeply moist interior that melts in your mouth alongside a golden, crackly, crispy top. That’s the hallmark of a truly great Classic Thanksgiving Stuffing, right? My method guarantees that balance every single time. It’s the difference between a side dish and *that* side dish everyone asks for the recipe for. You can trust me on this one; this is the secret to Moist and Crispy Stuffing. It’s exactly the kind of soulful dish I love sharing here on Pure Cooking Joy where we focus on big flavors.

Flavor Profile: Sausage Stuffing with Fresh Herbs
The real excitement comes from skipping those sad little packets of dried seasoning. We are using real flavor builders here! Browning savory pork sausage first lets those rich juices mingle with the butter we use to soften the onions and celery. Then we bloom the herbs—fresh sage, thyme, and rosemary—right in that flavorful fat. Wow, the aroma alone makes the kitchen feel like pure magic. That’s how you build deep, comforting savoriness into your Stuffing!
Ingredients Needed for the Best Stuffing Recipe Ever
Okay, let’s pull out our ingredients for what is truly the Best Stuffing Recipe Ever. This isn’t a ‘guess and go’ recipe; the ratios here are what keep this stuffing from turning into mush. Don’t substitute the amounts too wildly, especially with the liquid amounts, because that’s how you end up with heavy, wet bread by Thanksgiving morning.
For starters, you need a full pound of bulk pork sausage if you want that savory punch. The aromatics are simple: one large onion and three celery stalks, chopped up. Then, grab half a cup—that’s one full stick—of unsalted butter, because butter makes everything better, right? For the herbs, go fresh if you can manage it; we’re using a tablespoon each of fresh sage and thyme, and a teaspoon of fresh rosemary. Then, the heart of the dish: you need a whopping 16 cups of dried bread cubes. We balance that with two lightly beaten eggs and about two to two-and-a-half cups of low-sodium chicken broth.
Ingredient Notes and Substitutions for Your Stuffing
A couple of quick notes on these components. First, the bread! This is non-negotiable for great stuffing: you must use cubes that are dried out, or else the final texture will just fall apart. I usually cube up a mix of sourdough and whole wheat bread and leave it on sheet pans overnight. If you’re running late, toss it in a 250-degree oven for twenty minutes until it feels rock hard.
Next, the broth. Since the bread soaks up so much, start with just two cups and only add more if the mixture still looks dry when you toss it. You want every cube coated, but never swimming. Remember those savory sausage juices? If you need a vegetarian stuffing, you can absolutely skip the meat, but make sure you substitute it with about 8 ounces of finely diced mushrooms sautéed in that butter, and swap the chicken broth for a quality vegetable or mushroom broth. That ensures your stuffing still has that deep, earthy base flavor we are looking for.
How to Prepare Classic Thanksgiving Stuffing
Now that we have all our flavor components ready, it’s time to pull this whole stuffing masterpiece together. Don’t worry about timing this perfectly with your turkey cooking; one of the best parts about this recipe is how easy it is to manage alongside everything else—it’s truly an Easy Stuffing Recipe. We’re moving step-by-step here, and I need you to trust the process, especially when we get to the egg and broth part. That’s where the magic happens for the ultimate texture! You can always dig into my latest kitchen adventures for more quick tips!
Sautéing Aromatics and Browning the Sausage Stuffing Base
First things first, we need to get flavor built in the skillet. You’ll want to cook that sausage over medium heat until it’s nicely browned and crumbly. Make sure to drain off most of that glorious fat—we want the flavor, but not an oil slick in our final side dish. Next, right into that same pan goes your stick of butter. Once melted, toss in your chopped onion and celery. Let those cook down slowly until they are soft and sweet, which usually takes about eight minutes. This step is non-negotiable; nobody wants crunchy onion in their holiday stuffing!
Once the veggies are happy, stir back in the cooked sausage. This is when we bloom the herbs! Add your fresh sage, thyme, and rosemary directly into the warm mixture along with the salt and pepper. Stir this fragrant mix around for just two minutes. You will literally smell the herbs waking up. Transfer this entire savory base—sausage, veggies, and melted butter—into the big bowl with your 16 cups of dried bread cubes.
Achieving the Perfect Moist and Crispy Stuffing Texture
This is the moment that separates the good stuffing from the truly spectacular stuffing. In a separate small bowl, lightly whisk together your two eggs with just two cups of the chicken broth. The eggs are the structure, and the broth introduces the moisture. Pour this liquid right over the bread and sausage mixture in the big bowl. Now, take a big spoon (or your clean hands—don’t be shy!) and gently toss everything until the bread is just moistened. I cannot stress this enough: you are aiming for damp, not soggy. If you see any dry spots, add just a splash more broth, up to that extra half cup, but stop immediately if it looks too slurry. Remember, we want that Moist and Crispy Stuffing result!

When you toss it, resist the urge to mash it down. Spoon this beautiful mass gently into your prepared baking dish. Packing it down is the fastest way to create that dreaded dense layer at the bottom, and we worked too hard on those herbs for that! Spread it lightly so the top has room to crisp up beautifully.
Baking and Finishing This Holiday Side Dish
Alright, moment of truth time! We’ve mixed our ingredients perfectly, and now we need to treat this marvelous stuffing just right in the oven. Preheat your oven to 350°F (175°C) because we want a nice, steady heat to bake through. Make sure you’ve lightly greased that 9×13 baking dish we talked about earlier. Nobody wants their perfectly cooked stuffing gluing itself to the pan!
Spoon that glorious mixture evenly into the dish—remember, spread it gently, don’t compress it! Pop it into the preheated oven and let it bake for about 30 minutes. This gives the interior time to steam gently and get wonderfully moist, thanks to all that broth and egg mixture we added.
Now, here’s my chef’s trick for that irresistible texture: once those 30 minutes are up, you have two options. If you want that glorious, golden-brown, shatteringly crisp top layer that makes this truly the Best Stuffing Recipe Ever, switch your oven to the broiler for the last two or three minutes. You have to watch it like a hawk during this part—seriously, don’t walk away! You want golden brown, not charcoal brown.
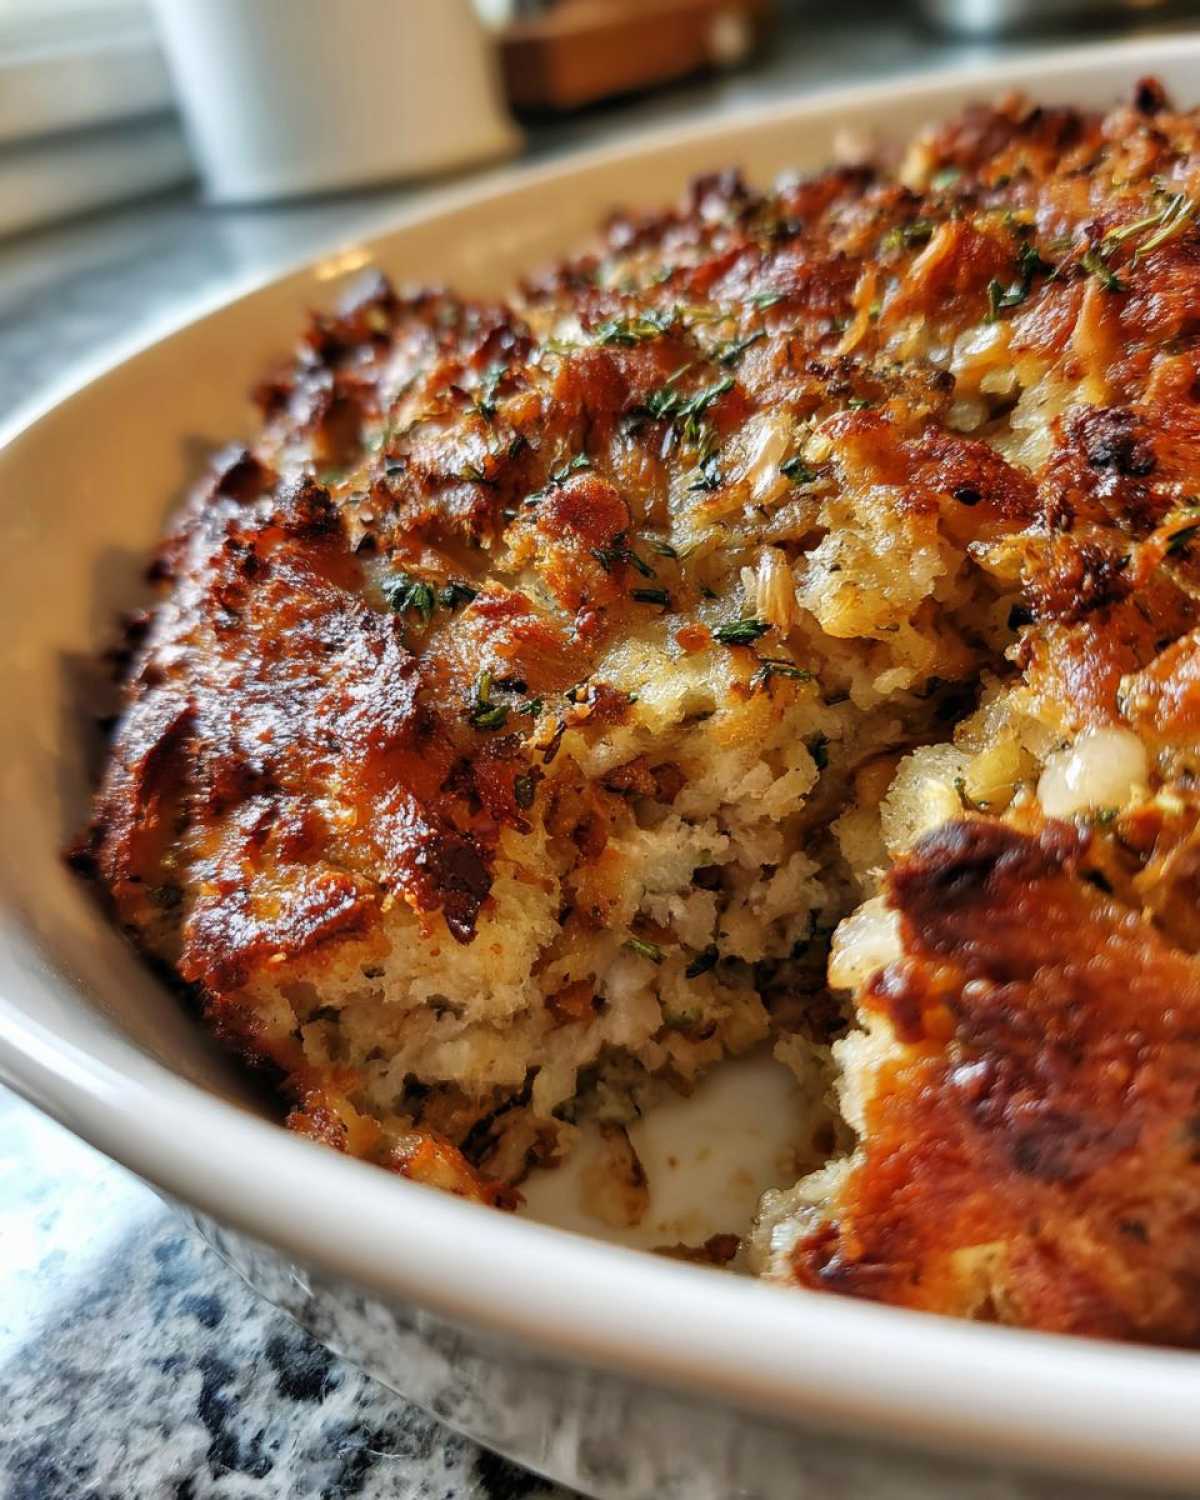
Once it’s out, resist the urge to dig in immediately! This is crucial for any great Holiday Side Dish: let the stuffing rest for about 10 minutes uncovered. This little break allows the textures to settle. The inside will firm up just enough so it stays moist but doesn’t collapse when you scoop it onto your dinner plate. Then? Dig in! You’ve earned it.
Make Ahead Stuffing and Variation Ideas
I know the holiday schedule can feel like Tetris played by a stressed-out toddler, so let’s lighten the load, shall we? This recipe is wonderful because it absolutely doubles as a fantastic Make Ahead Stuffing. You can get all the mixing done ahead of time, which is a massive win on the big day!
To prepare it ahead, just follow the recipe right up until after you gently toss everything with the liquid mixture in Step 6. Once it’s combined but before you put it in the baking dish, just cover the whole bowl tightly and tuck it into the fridge. It keeps beautifully for up to 24 hours. When it comes time to bake, don’t panic! Since the mixture is cold, you’ll need to add about 10 to 15 extra minutes to the baking time we already set. That gives the cold stuffing time to warm up all the way through before it starts crisping.
And for those of you who like things neat and tidy, this recipe is perfect for turning into Stuffing Balls! Instead of tossing it into the 9×13 dish, just use a cookie scoop or your hands to form nice golf-ball-sized rounds. Place these little flavor bombs on a baking sheet lined with parchment paper and bake them for about 20 to 25 minutes. They come out crispy all over, which is phenomenal, and they make serving at a buffet so much easier. Plus, who doesn’t love eating stuffing straight off a little ball?

Creative Variations on Traditional Stuffing
While I absolutely adore the savory depth of the sausage and fresh herb version—it’s my go-to for a reason—sometimes you want to switch things up! If you’re looking for a brighter flavor lift that still perfectly complements roasted poultry, try adding about a cup of dried cranberries and half a cup of finely chopped Granny Smith apples along with your bread cubes. The tartness of the cranberries and the slight tang from the apple mix beautifully with the sage base. It instantly feels festive!
Another idea, especially if you are making this ahead, is to add half a cup of a sharp, good-quality white cheddar cheese right in with the bread cubes. That cheese melts down beautifully into the butter and broth mixture, making the whole pan of stuffing extra decadent. These little additions keep the spirit of the Traditional Stuffing alive while keeping things exciting year after year. You can find a few more easy comfort food ideas here that might spark some more joy in your holiday menu planning!
Storage and Reheating Instructions for Leftover Stuffing
Whew! We love having amazing stuffing left over, but we absolutely cannot let it turn into a sad, dry rectangle in the morning. Leftovers are a gift, but they require a little love to bring them back to their former glory. Since this is such a rich, savory Holiday Side Dish, proper storage is key for safety and texture preservation.
First off, get it cooled down quickly. Don’t cover the dish right away; let it sit on the counter for maybe an hour until it’s not piping hot anymore. Then, you can transfer any leftovers into an airtight container. Because we used so much moisture to get that perfect interior, this stuffing will keep safely in the refrigerator for about three to four days. Four days is my personal hard limit for quality, but honestly, I doubt it lasts that long!
Now, for the reheating—this is where we bring back that crispy top. Forget the microwave for the main batch; it turns everything spongy! If you are reheating the whole pan, pop it back into a 350°F oven covered with foil for about 15 to 20 minutes, just to get the inside warmed up gently. Then, pull that foil off and let it bake uncovered for another 5 to 10 minutes. That short blast uncovered is just enough to restore some of that buttery crispness we worked so hard to create in the first place.
If you’re just reheating a small portion, maybe a mug’s worth, the microwave is okay, but add a tiny drizzle of chicken broth or a pat of butter right over the top before you zap it. That little bit of added moisture will keep the stuffing from tasting like sawdust. Enjoy those second-day leftovers—cold stuffing right out of the fridge is secretly one of the best parts of the holiday!
Frequently Asked Questions About Making Stuffing
I always get a ton of questions once people find this recipe, which tells me you all are serious about making the best stuffing possible! It’s great because it means we can tackle those tricky bits right here so you feel super confident walking into your kitchen. Here are a few things I hear most often about making the perfect batch of stuffing.
Can I use fresh bread instead of dried bread cubes?
That is such a valid question! Look, I know getting dried bread cubes ahead of time can sometimes slip your mind when you’re busy planning all the other magnificent food for your feast. If you absolutely must use fresh bread, you can, but you need to treat it right. Don’t just cube it and toss it in! You need to dry it out first. The easiest way I know to do this is to cube up your bread, throw it on a baking sheet, and pop it into a low oven—think 250°F—for about 20 minutes. You just want it hard and dry to the touch, not toasted brown. If the bread is too soft, it will soak up all the broth and turn into a dense mush, and we definitely don’t want mushy stuffing when we are aiming for that incredible Moist and Crispy Stuffing texture!
What is the actual difference between stuffing and dressing?
This trips up so many people around the holidays! Honestly, in my kitchen, it all comes down to physics. If you bake your bread mixture inside the turkey cavity where it steams in all those drippings, you call it Stuffing. If you bake the exact same mixture in a casserole dish like we are doing here, it becomes Dressing. Since mine is baked in a dish, I use the term dressing sometimes, but everyone knows what I mean when I call it my Classic Thanksgiving Stuffing! Baking it separately, like in this recipe, is my preferred method because it lets the top get way crispier.
Can I bake this Easy Stuffing Recipe in a slow cooker?
That’s a great thought if you’re short on oven space, especially if your turkey is hogging the whole range! You absolutely can use a slow cooker, but you need to change your expectations slightly. The slow cooker is all about steam and heat retention, so you will get an incredibly moist interior—fantastic!—but you really won’t get that beautiful, crispy, golden top this recipe promises. If you go that route, assemble the whole thing, put it in the stoneware, and cook on LOW for about 3 to 4 hours until heated through. Then, if you have a broiler available, you can carefully transfer the top layer briefly to a sheet tray to crisp it up right at the end. It’s a great way to keep large batches warm, but just know you sacrifice some of that exterior crunch!
Can I use this recipe as a Make Ahead Stuffing?
Yes, and you’d be smart to! As I mentioned earlier, making this ahead is a lifesaver. The best way to treat this as a Make Ahead Stuffing is to complete the mixing process completely (that means everything mixed with the broth and eggs) and then cover the dish and chill it. When you are ready to bake on the holiday, just pull it out of the fridge and add about 10 to 15 extra minutes of baking time to make sure it heats all the way through before you uncover it for the final crisping step. It’s such a simple trick for a stress-free cooking experience, and it’s perfect for all your guests!
If you’re looking for other ways to simplify your entertaining, pop over and check out some tips I’ve gathered for managing your kitchen during big events!
Estimated Nutritional Data for This Recipe
Now, I always like to be transparent with you about what we are putting on the plate. We’re making comfort food here, right? So, this savory stuffing isn’t meant to be a diet food, but knowing the breakdown is always helpful for planning your whole big meal! Based on the ingredients list for this Homemade Stuffing Recipe, here is what you can generally expect per serving, assuming this recipe makes about 10 good-sized cups.
- Serving Size: 1 cup
- Calories: 320
- Fat: 18g (with about 7g saturated)
- Carbohydrates: 30g
- Protein: 10g
- Sugar: 2g
Just a quick note, because I want you to be totally informed: these numbers are my best estimate based on standard ingredient brands I use. If you opt for extra-lean sausage, use less butter, or skip the vegetarian substitute mushrooms for higher-fat sausage, those numbers will shift a bit. But this gives you a solid ballpark figure for planning out the rest of your incredible Holiday Side Dish spread. I sure hope you love this recipe as much as my family does!
Share Your Experience Making This Stuffing
Okay, now that you have the very best recipe for savory, herb-packed stuffing, I genuinely can’t wait for you to try it out at your own table! After all that work making sure your texture is perfect—moist inside, crispy on top—I want to hear all about it. Seriously, nothing makes me happier than knowing one of my recipes brought a little bit of calm and joy to your busy kitchen.
If you loved how foolproof this Holiday Side Dish turned out, please hop back up to the top of the post and give this recipe a solid five-star rating! Those ratings help other home cooks, just like you, find recipes that actually work and bring happiness into their kitchens.
I would absolutely love to see your creation in action! Whether you served it alongside a gorgeous turkey or made a pan of vegetarian stuffing, snap a picture and share it on social media. Tag me so I can see your amazing work! You can find me over on Facebook here: Pure Cooking Joy on Facebook.
Also, tell me in the comments below—I’m always looking for connection here. What is your favorite *non-food* memory connected to the holidays? Let’s share some joy outside of the kitchen, too! I’m always ready to read about your favorite traditions. Thanks so much for cooking with me today; come back soon for more simple, soulful food!
If you ever need a reminder about my mission to bring joy back to cooking, you can always revisit my About Page!
PrintThe Best Homemade Stuffing Recipe: Moist Interior, Crispy Top

Stop settling for dry boxed mixes. This Classic Thanksgiving Stuffing recipe, featuring savory sausage and fresh herbs, guarantees a perfectly moist interior and a beautifully crispy exterior. It is the Best Stuffing Recipe Ever for your holiday table.
- Prep Time: 20 min
- Cook Time: 35 min
- Total Time: 55 min
- Yield: 10 servings 1x
- Category: Side Dish
- Method: Baking
- Cuisine: American
- Diet: Vegetarian
Ingredients
- 1 pound bulk pork sausage (or substitute with mushrooms for vegetarian)
- 1 large yellow onion, chopped
- 3 celery stalks, chopped
- 1/2 cup (1 stick) unsalted butter
- 1 tablespoon fresh sage, chopped
- 1 tablespoon fresh thyme leaves
- 1 teaspoon fresh rosemary, chopped
- 1 teaspoon salt
- 1/2 teaspoon black pepper
- 16 cups dried bread cubes (use a mix of white and whole wheat for best texture)
- 2 large eggs, lightly beaten
- 2 to 2 1/2 cups low-sodium chicken broth (or vegetable broth)
Instructions
- Preheat your oven to 350°F (175°C). Lightly grease a 9×13 inch baking dish.
- In a large skillet over medium heat, cook the sausage, breaking it up with a spoon, until browned. Drain off excess fat and set the sausage aside.
- In the same skillet, melt the butter. Add the chopped onion and celery. Cook until softened, about 8 minutes.
- Stir in the cooked sausage, fresh sage, thyme, rosemary, salt, and pepper into the skillet. Cook for 2 minutes until the herbs are fragrant.
- Place the dried bread cubes in a very large bowl. Pour the sausage and vegetable mixture over the bread cubes. Toss gently to combine.
- In a separate small bowl, whisk together the lightly beaten eggs and 2 cups of the chicken broth.
- Pour the egg and broth mixture over the bread mixture. Toss everything gently until the bread is evenly moistened. Add the remaining 1/2 cup of broth if the mixture seems too dry; you want it damp, not soggy. This step is key for a Moist and Crispy Stuffing.
- Transfer the stuffing mixture to the prepared baking dish, spreading it into an even layer. Do not pack it down tightly.
- Bake for 30 minutes. For extra crispiness, switch the oven to broil for the last 2-3 minutes, watching carefully to prevent burning.
- Remove from the oven and let it rest for 10 minutes before serving this Holiday Side Dish.
Notes
- For a Make Ahead Stuffing option, prepare the mixture through Step 6, cover, and refrigerate for up to 24 hours. Add an extra 10-15 minutes to the baking time if baking directly from the refrigerator.
- If you prefer Stuffing Balls, form the mixture into golf-ball-sized rounds and bake on a parchment-lined sheet for 20-25 minutes until golden brown.
- Using stale or dried bread cubes is essential for achieving the right texture. You can dry fresh bread cubes in a low oven (250°F) for about 20 minutes before starting.
Nutrition
- Serving Size: 1 cup
- Calories: 320
- Sugar: 2
- Sodium: 450
- Fat: 18
- Saturated Fat: 7
- Unsaturated Fat: 11
- Trans Fat: 0
- Carbohydrates: 30
- Fiber: 2
- Protein: 10
- Cholesterol: 55
