 Skip to content

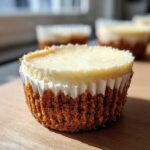
You know those moments when you crave something incredibly decadent, like a slice of rich, velvety New York-style cheesecake, but you just don’t want to deal with cutting slices or worrying about those dreaded cracks on top? I totally get it. That’s why I absolutely adore making these cheesecake cupcakes. They take all the luxurious flavor you expect—that creamy texture, that sturdy graham cracker base—and shrink it down into the most perfect, individual dessert recipes. For me, finding simple ways to create spectacular treats like this is pure cooking joy. These easily become my go-to dessert for sharing with friends because portion control has never tasted so good!

- Why These Are the Best Cheesecake Cupcakes Recipe You Will Make
- Gathering Ingredients for Creamy Cheesecake Cupcakes
- Step-by-Step Instructions for Perfect Cheesecake Cupcakes
- Tips for Success When Making Cheesecake Cupcakes
- Variations: Lemon Cheesecake Cupcakes and More
- Serving Suggestions for Your Individual Cheesecake Desserts
- Storage and Reheating for Homemade Cheesecake Cupcakes
- Frequently Asked Questions About Cheesecake Cupcakes
- Estimated Nutritional Data for These Cheesecake Cupcakes
Why These Are the Best Cheesecake Cupcakes Recipe You Will Make
I can honestly say this is the best batch of cheesecake cupcakes you’ll ever put together. Forget the water baths and the fuss! These bake up beautifully right in the muffin tin, giving you that rich and creamy texture we all dream about without any of the stress. They truly are the definition of an impressive dessert that lets you keep the party going.
- They deliver the unmistakable, dense creaminess of true cheesecake.
- The prep time is laughably short—under 20 minutes, seriously!
- The individual portions mean perfect serving control every time.
- They travel like a dream, making them perfect for potlucks.
When you need a showstopper that sets up fast, this is your moment to shine. You can learn more tips for easy entertaining on my dedicated resource page. Serving these is a breeze!
Quick Prep for Impressive Individual Dessert Recipes
One of the biggest wins here is the speed. We’re talking about just 20 minutes of active prep time before these beauties go into the oven! That means you can decide you want decadent cheesecake after dinner and still have them ready to chill before bedtime. Since they’re already built into their own little crust wrapper, they slide right out, making them fantastic individual dessert recipes. No slicing or messy presentation—just grab and enjoy!
Gathering Ingredients for Creamy Cheesecake Cupcakes
Okay, let’s talk ingredients. The list for these cheesecake cupcakes is surprisingly straightforward—no weird specialty items here! That’s part of why I love them so much; they use pantry staples to achieve that incredible richness. When you look at the list, notice we have two separate sugar amounts: one for that crisp little crust and one for the smooth filling. Trust me, getting the cream cheese just right is the most important part of this whole process!
Ingredient Notes and Substitutions for Your Cheesecake Cupcakes
If you take away anything from my kitchen philosophy, let it be this: temperature matters! You absolutely must have your cream cheese softened—like, really soft—and your eggs at room temperature before you even think about turning on the mixer. Cold ingredients lead to lumpy batter, and for these ultra-smooth cheesecake cupcakes, we are aiming for silky perfection here!
Also, I insist on using real unsalted butter for the crust because the flavor is just superior. For the filling, the source notes mention sour cream, which brings that perfect hint of tang. If you happen to be out, or if you just want a slightly different profile, plain Greek yogurt works wonderfully as a one-to-one substitute. Just make sure whatever you use is cold when you mix it in, even though the cream cheese needs to be soft!
Step-by-Step Instructions for Perfect Cheesecake Cupcakes
Getting that bakery-style look without all the usual cheesecake drama is totally achievable, and it all comes down to timing and technique. The instructions here are built to give you that smooth, dense interior we love so much. I’ve made hundreds of batches trying to conquer the crack, and seriously, the cooling part is non-negotiable for getting truly beautiful cheesecake cupcakes.
Preparing the Graham Cracker Crust for Your Cheesecake Cupcakes
First things first, let’s get that base ready! Preheat your oven to 325 degrees Fahrenheit and line up those muffin cups with paper liners—you’ll need 12 of them. In a little bowl, mix up your graham cracker crumbs with the crust sugar and that melted butter until it looks like wet sand. Press about a tablespoon of that mixture firmly into the bottom of each paper liner. Pop them into the oven for just 5 minutes to set up that crust. Then, pull them out and let them cool down while you whip up the star of the show.
Mixing the Rich and Creamy Cheesecake Filling
Now for the magic filling! In a big bowl, use your electric mixer to beat that softened cream cheese until it is completely smooth and lump-free. Then, mix in the other half-cup of sugar, the sour cream, and the pretty vanilla extract. Mix until everything is just combined. Here’s the big secret for that super smooth texture: add your eggs one at a time, and *only* mix long enough for each egg to disappear into the batter. If you overmix once the eggs are in, you introduce too much air, and that leads straight to cracks later on. Nobody wants that!
Baking and Cooling to Achieve Crack-Free Cheesecake Cupcakes
Spoon or pipe that glorious batter evenly over your slightly cooled crusts—don’t fill them past about three-quarters full. Bake them for about 18 to 22 minutes. You want the edges to look set, but if you nudge the pan, the very center should still have a tiny, nervous jiggle to it. That’s your cue! Immediately turn off the oven, crack the door open just a tiny bit, and let those gorgeous cheesecake cupcakes slowly relax inside the cooling oven for a solid 30 minutes. This gentle transition is revolutionary for avoiding cracks! After that slow warm-down, move them onto a wire rack to finish cooling completely before chilling them overnight. That long chill solidifies everything into creamy perfection. For more tips and tricks on mastering recipes like this, feel free to browse my latest blog posts right here at Pure Cooking Joy.

Tips for Success When Making Cheesecake Cupcakes
Look, I know you want that incredible bakery style cheesecake cupcakes look, right? It’s all about small tricks that make a huge difference. My number one piece of advice, which I’ve hammered home before, is that slow cooling process—don’t skip it! But beyond that, let’s talk about getting that filling neat in the cup.
If you’re tired of slightly lopsided tops, grab yourself a piping bag fitted with a large round tip, or just snip the corner off a strong Ziploc bag. You don’t need precision tips here; just using a bag lets you neatly deposit the filling, ensuring you hit that three-quarters full mark evenly across all twelve cups. Using a spoon means some cups get overfilled before others, and that can mess with baking consistency.
Another minor thing that helps achieve those rich and creamy desserts is chilling the filled, unbaked base for just ten minutes in the freezer before they go into the oven. It helps the crust stay separate slightly longer, giving the filling a head start on setting up evenly. These little nudges make a massive difference when you’re striving for that flawless look. If you want more ideas for wowing guests with effortless treats, check out my guide on easy entertaining recipes!
Variations: Lemon Cheesecake Cupcakes and More
The beauty of this creamy base recipe is how easily it adapts! While this formula is designed for classic, rich cheesecake cupcakes, think of it as your perfect canvas. If you are craving something bright—maybe some zesty lemon cheesecake cupcakes—it’s so simple. Just add the zest of one full lemon right in with your vanilla extract and sour cream. I also love adding a teaspoon of fresh lemon juice for an extra little kick!
For those who want a burst of fruitiness, the strawberry element is just a topping addition. We skip stirring actual strawberries into the batter because that adds too much water, which hurts the texture. Instead, pile on a spoonful of your favorite jam or a simple homemade strawberry topping once they are completely chilled. It’s the perfect pairing!
Serving Suggestions for Your Individual Cheesecake Desserts
Once these glorious individual cheesecake desserts have chilled overnight—and trust me, waiting is totally worth it—it’s time to decorate and serve! Presentation just elevates a good dessert to something memorable, doesn’t it? Because these are already perfectly portioned, serving is an absolute dream for any gathering. Guests can just grab one right off the platter!

If you went heavy on the classic vanilla filling, a simple topping makes a huge impact. Gooey strawberry preserves warmed slightly is divine on top. If you tried the lemon variation, a drizzle of homemade lemon curd looks professional and tastes incredible. For a super easy, elegant look, just melt a teaspoon of cocoa powder with a drop of oil and flick it across the tops with a fork for a chocolate drizzle effect.
I always photograph my creations before they disappear! If you make a batch, I would absolutely love to see what toppings you chose. Tag me in your pictures over on Facebook; seeing your delicious results feels like a party in itself! You can find me and share your baking triumphs here: Pure Cooking Joy on Facebook.
Storage and Reheating for Homemade Cheesecake Cupcakes
Alright, once you’ve successfully baked and cooled these beauties, the final hurdle is keeping them perfect until you serve them. Storing these delicious cheesecake cupcakes correctly is crucial because, well, they are made with actual cream cheese and eggs! They need to be kept cold to maintain that incredible texture we worked so hard to achieve.
You absolutely must chill these for at least four hours. I know, I know, waiting is the worst part, but that minimum chill time is essential for the filling to fully firm up. Honestly, though, they are ten times better if you can let them sit overnight in the fridge. The flavors marry up perfectly, and the texture becomes that wonderfully dense, rich slice you’d expect from a high-end bakery.
When stored properly in an airtight container—paper liners and all—these cheesecake cupcakes will last happily for about five to seven days in the refrigerator. Just keep them away from anything smelly, because cream cheese tends to soak up surrounding odors. And please, forget about reheating these! Cheesecake is meant to be served cold or slightly cool. Popping them in the microwave would be a surefire way to end up with melted goo, and we don’t want that disaster after all this hard work, do we?
Frequently Asked Questions About Cheesecake Cupcakes
I totally get that when you’re baking, questions pop up, especially with desserts that can sometimes feel fussy, like cheesecake. I’ve tried to make this cheesecake cupcakes recipe as straightforward as possible so you don’t have to worry. Here are some common things people ask me as they get ready to bake this amazing treat!
Can I make no bake cheesecake cupcakes instead?
That’s a great question! The recipe we made today is a classic baked version, which gives you that sturdy, ultra-smooth texture similar to a rich New York slice—they are officially baked cheesecake bites! If you strongly prefer a lighter, mousse-like texture that sets up only in the fridge, you’ll want to search specifically for a dedicated no bake cheesecake cupcakes guide. No-bake versions skip the oven entirely but require a longer set time, usually with gelatin or more stability agents mixed in.
How do I get fluffy cheesecake cupcakes like Japanese cotton style?
That ethereal, cloud-like texture found in Japanese cotton cheesecake cupcakes is totally different from what we achieve here. Our recipe is designed to deliver those incredible rich and creamy desserts—dense, smooth, and satisfyingly heavy, if that makes sense! If you are aiming for that ultra-light, jiggly, melt-in-your-mouth experience, you need a recipe that relies on whipped egg whites folded in gently. While delicious in their own right, they are a completely different technique than the classic version we are making today.
What makes these better than standard mini cheesecakes?
Honestly, the main advantage of these cheesecake cupcakes over traditional mini cheesecakes baked in a water bath is the sheer ease of serving! Traditional mini cheesecakes often come right out of the pan—sometimes refusing to budge perfectly—and you usually need a hot knife to slice them cleanly or a little serving fork. Because we use simple paper liners, these are perfectly contained, no-fuss individual dessert recipes that people can easily pick up and enjoy without plates or fuss while mingling. They minimize mess, which is always a win in my book for easy entertaining!

Estimated Nutritional Data for These Cheesecake Cupcakes
I always like to give you a ballpark idea of what’s in these treats, but please, take these numbers with a grain of salt! When you’re making something this homemade and delicious, small changes in your butter brand or the exact amount of sugar you press into the crust can shift things slightly. This data is based on using the ingredients listed in the recipe above. Remember, this is just guidance; they are meant for enjoyment, not for counting every single calorie!
Serving Size: 1 cupcake
- Calories: 280
- Fat: 19g
- Saturated Fat: 11g
- Trans Fat: 0.5g
- Cholesterol: 65mg
- Sodium: 190mg
- Carbohydrates: 22g
- Sugar: 18g
- Fiber: 1g
- Protein: 5g
Because we use full-fat cream cheese and a proper sugar base for that classic texture, these cheesecake cupcakes are definitely a rich and creamy dessert experience! Enjoy every bite, knowing you made them yourself!
PrintEasy Creamy Cheesecake Cupcakes with Graham Cracker Crust
You can make rich, creamy cheesecake in a perfect individual serving size. These easy cheesecake cupcakes use simple ingredients and a classic graham cracker crust for a dessert you will be proud to share at any party.
- Prep Time: 20 min
- Cook Time: 22 min
- Total Time: 4 hours 42 min
- Yield: 12 servings 1x
- Category: Dessert
- Method: Baking
- Cuisine: American
- Diet: Vegetarian
Ingredients
- 1 1/2 cups graham cracker crumbs
- 1/4 cup granulated sugar (for crust)
- 6 tablespoons unsalted butter, melted
- 16 ounces cream cheese, softened
- 1/2 cup granulated sugar (for filling)
- 1/4 cup sour cream
- 1 teaspoon vanilla extract
- 2 large eggs
- Optional: Strawberry topping or lemon zest for garnish
Instructions
- Preheat your oven to 325 degrees Fahrenheit. Line a standard 12-cup muffin tin with paper liners.
- Prepare the crust: In a small bowl, mix the graham cracker crumbs, 1/4 cup sugar, and melted butter until combined.
- Press about 1 tablespoon of the crumb mixture firmly into the bottom of each lined muffin cup. Bake the crusts for 5 minutes. Remove from the oven and let them cool slightly.
- Prepare the filling: In a large bowl, beat the softened cream cheese with an electric mixer until smooth. Add the 1/2 cup sugar, sour cream, and vanilla extract. Mix until just combined.
- Beat in the eggs one at a time, mixing only until each egg is incorporated. Do not overmix the batter.
- Spoon or pipe the cheesecake filling evenly over the cooled crusts, filling each cup about three-quarters full.
- Bake for 18 to 22 minutes. The edges should look set, but the centers will still have a slight jiggle.
- Turn off the oven, crack the door open slightly, and let the cheesecake cupcakes cool inside the oven for 30 minutes. This step helps prevent cracking.
- Remove the cupcakes from the oven and let them cool completely on a wire rack.
- Chill the cheesecake cupcakes in the refrigerator for at least 4 hours, or preferably overnight, before serving with your favorite topping.
Notes
- For the creamiest texture, make sure your cream cheese and eggs are at room temperature before starting.
- If you want a slightly tangy flavor, substitute the sour cream with plain Greek yogurt.
- These individual dessert recipes travel well for potlucks or gatherings.
Nutrition
- Serving Size: 1 cupcake
- Calories: 280
- Sugar: 18
- Sodium: 190
- Fat: 19
- Saturated Fat: 11
- Unsaturated Fat: 8
- Trans Fat: 0.5
- Carbohydrates: 22
- Fiber: 1
- Protein: 5
- Cholesterol: 65
