 Skip to content

Honestly, is there any combination more perfect than rich, fudgy chocolate paired with smooth, salty peanut butter? I didn’t think so until I perfected these! Welcome back to Pure Cooking Joy; I’m Alex Hayes, and today we are making what might just be the ultimate indulgent bar cookie: decadent 3-Layer Buckeye Brownies. These bars look impressive—like they took all day—but I promise you, they are straightforward enough for a Tuesday night craving and absolutely show-stopping when you bring them to a party.
That’s my whole mission here, you know? To strip away the intimidation factor from baking and show you that incredible food doesn’t have to be complicated. If you’re looking for that blissful moment of peace I found when I finally understood baking, these layered bars are a perfect place to start. You can read more about my journey in my About Me page. They deliver huge flavor with minimal fuss!
- Why Our Buckeye Brownies Recipe is a Crowd Pleaser Dessert Bar
- Gathering Ingredients for the Best Buckeye Brownies
- Step-by-Step Instructions for Layered Buckeye Brownies
- Expert Tips for Perfect Buckeye Brownies Every Time
- Ingredient Notes and Substitutions for Your Buckeye Brownies Recipe
- Serving Suggestions for this Decadent Chocolate Dessert
- Storage and Reheating Instructions for Buckeye Brownies
- Frequently Asked Questions About Buckeye Brownies Recipe
- Sharing Your Homemade Buckeye Brownies
Why Our Buckeye Brownies Recipe is a Crowd Pleaser Dessert Bar
I know there are a million brownie recipes out there, but I stand by this one when I say it’s the ultimate crowd pleaser. Why? Because it combines the three things people truly want in a dessert bar:
- Amazing texture: We start with a base that is genuinely fudgy brownies heaven—not cakey, ever!
- The perfect flavor balance: That sweet-and-salty pop of peanut butter is everything.
- Ease of presentation: These layered brownie bars look totally gourmet, even though we’re using a shortcut to make them happen fast.
If you need a reliable dessert for your next gathering, bookmark this one. You can find more easy ideas for stress-free entertaining right here on the blog!
Gathering Ingredients for the Best Buckeye Brownies
Okay, let’s talk ingredients! Trust me, the reason this recipe works so well and why it’s such a fantastic shortcut is because we are using quality basics, but we’re not starting from scratch on the bottom layer. That keeps things manageable—perfect for those times you just need a super satisfying Chocolate Peanut Butter Dessert without the hours in the kitchen. You can see my full philosophy on embracing simple components over on my page about simple box brownie mix desserts!
We are building three distinct layers here, so keep your ingredients grouped as you pull them out. It keeps the assembly process so much calmer!
For the Fudgy Brownie Base
This is where we keep it super simple. We rely on a good quality mix to give us that dense, fudgy foundation we need for these Thick Brownie Recipes.
- 1 box (18.3 ounces) fudge brownie mix (plus whatever liquids/eggs the box calls for).
For the Creamy Peanut Butter Layer Dessert
This layer is the star—it’s what makes them true Buckeye Brownies! Make sure your butter is truly softened; this is key for getting a smooth, spreadable Brownie with Peanut Butter Filling.
- 1 cup (2 sticks) unsalted butter, softened
- 1 cup creamy peanut butter (I strongly recommend the standard commercial kind, not the natural kind that separates for this recipe!)
- 4 cups powdered sugar, sifted (sifting is non-negotiable here!)
- 1 teaspoon vanilla extract
- 1/4 teaspoon salt
For the Chocolate Peanut Butter Ganache Topping
This shiny top layer seals everything in beautifully and delivers that final punch of chocolate decadence. This makes the Peanut Butter Chocolate Ganache so easy!
- 1/2 cup semi-sweet chocolate chips
- 2 tablespoons shortening or coconut oil (The oil helps keep the ganache glossy and spreadable, even when chilled.)
Step-by-Step Instructions for Layered Buckeye Brownies
Alright, let’s get down to business! As I always say, preparation is half the battle, and for these Buckeye Brownies, the cooling time is the most important part of the entire process. If you try to layer too soon, you’ll end up with a peanut butter swirl disaster, and nobody wants that mess!
Follow these steps closely, and by the time you are done, you’ll have the most perfect Two Flavor Brownies imaginable. I have some extra tips you might find helpful over on my post about banana brownies, which involves similar layering techniques!
Baking the Fudgy Brownies
This sets the stage for our entire layered beauty. We are following the box instructions here, but I have a little secret if you want them extra dense!
- Prepare the brownie mix for that 9×13 inch pan exactly as the back of the box tells you. Now, here’s a little trick for thicker, Fudgy Brownies: use about three-quarters of the amount of water or other liquid the package suggests. It makes the batter a bit stiffer, but the payoff is huge.
- Bake them until a toothpick inserted near the center comes out with moist crumbs attached—remember, we want fudgy, not cakey!
- This is crucial: Let the brownies cool completely right there in the pan. Seriously, wait until they are totally room temperature before you even think about moving on. This might take an hour or two, depending on your kitchen.

Making the Creamy Peanut Butter Filling Layer
While the base is cooling down, we whip up that heavenly center layer. This needs to be light and fluffy so it spreads like a dream later.
- In a big mixing bowl (your stand mixer or a strong hand mixer works great here), beat the softened butter and the peanut butter together until they are completely smooth. You don’t want any lumps of butter hiding in there.
- Now, add the sifted powdered sugar slowly. Trust me on the sifting; it prevents gritty pockets in your Creamy Peanut Butter Layer Dessert. Once it’s mixed in, just stir in the vanilla and salt. This mixture will be very thick—almost like stiff dough. That confirms you’re on the right track!
Assembling the Buckeye Brownies Layers
Time to put things together! This really starts looking like a glorious Chocolate Peanut Butter Dessert now.
- Once those brownies are stone-cold, take your peanut butter mixture and spread it evenly across the top of the cooled layer. Use an offset spatula if you have one; it makes leveling this thick layer so much easier!

- Next, while the peanut butter layer is sitting pretty, you’ll make the ganache topping. Microwave the chocolate chips and shortening/oil together in 30-second bursts. Stir well after every blast until it’s liquid silk. You need this to be smooth enough to glide right over that thick peanut butter.
Finishing and Chilling Your Chocolate Peanut Butter Dessert
We’re almost done—it just needs some quality chilling time to firm up before we can slice these beauties!
- Gently pour that melted chocolate mixture over the peanut butter layer. Work quickly because it starts setting fast! Spread it out equally so every square of your Buckeye Brownies gets that perfect chocolate shell.

- Place the whole pan into the refrigerator. You must chill these for at least two hours. I’ve learned from experience that if you cut them too soon, the layers squish together when you slice.
- When they are firm, take them out, let them sit on the counter for maybe 10 minutes to soften just slightly—this helps with slicing—then cut them into your desired squares before serving. Enjoy that sweet, sweet reward!
Expert Tips for Perfect Buckeye Brownies Every Time
Listen, the instructions get you 90% of the way there, but those last few details? Those turn a good dessert into something truly legendary. If you want your buckeye brownies to make people stop mid-sentence when they see them, pay attention to these little secrets. They are what separates my kitchen from a mediocre baking attempt, and trust me, I learned these the hard way!
Achieving the Thickest Buckeye Brownies
When I talk about these being a great example of Thick Brownie Recipes, I mean it. If your box mix calls for a certain amount of water or milk, don’t use it all! Seriously, cut it back by about a quarter of the liquid called for. I know it feels wrong, like you’re messing with the perfect science of the box, but it prevents that cakey rise we absolutely do not want in a fudgy base for layered bars.
When you mix it up, the batter will look a little too thick. That’s perfect! It won’t spread as much while baking, which keeps the layer concentrated on the bottom, giving you that dense, chewy bite that pairs perfectly with the soft filling above it.
Ensuring Smooth Spreading of the Peanut Butter Layer
Spreading cold peanut butter filling onto a fragile brownie layer is a recipe for wrinkles and tearing. We want clean lines so they look perfect when we slice them later!
Before you even start mixing the peanut butter layer, pull your butter out early. Like, really early. It needs to be genuinely soft—like a dab of room temperature cream cheese—so it whips up light and airy with the peanut butter. If it’s too stiff, your final mixture will be grainy and hard to spread.
If the peanut butter layer seems too stiff when you go to spread it over the cooled brownies, try microwaving it for just 10 seconds. Not enough to melt it, just enough to take the chill off and make it pliable. This technique smooths out beautifully, giving you a lovely, flat canvas for that shiny chocolate top. You can check out some other great base-layer spreading advice for my shiny-top brownie recipe post!
Ingredient Notes and Substitutions for Your Buckeye Brownies Recipe
Baking is fun because you can tweak things, but with layered bars like these intense Buckeye Brownies, we have to be a little careful. I’ve gotten so many questions about switching out ingredients, which is totally normal when you’re making an Easy Buckeye Recipe like this one. I want them to be perfect for you! I actually have a great recipe for easy peanut butter fudge if you want to skip the brownie layer entirely, but here we are sticking to the bars!
Peanut Butter Choices for the Creamy Layer
This is the number one question I get about the peanut butter layer: Should I use crunchy? Should I use natural?
My firm answer for this specific recipe is: Please stick to standard, creamy peanut butter, like Jif or Skippy. You want that highly processed, slightly sweeter, perfectly emulsified version. Why? Because when you mix it with all that powdered sugar, you need the fats and oils to stay suspended perfectly. Natural peanut butter often separates, and if you use that, your filling might end up oily or grainy, which ruins the texture of the Creamy Peanut Butter Layer Dessert.
If you absolutely must have crunch, you could try stirring in about 1/4 cup of crunchy peanut butter after the main creamy mixture is smooth, but honestly, for the best result guaranteed, go creamy standard. This keeps it tasting exactly like the classic candy it’s named after.
Making ‘Lazy Buckeye Brownies’ with Store-Bought Options
I mentioned using a box mix above, and I want to really lean into that philosophy here. This recipe is designed to be accessible! If you don’t even want to deal with the brownie mix packaging, feel free to use high-quality, store-bought fudgy brownies. This falls perfectly under the umbrella of Simple Box Brownie Mix Desserts, or rather, “No-Bake Remix Desserts.”
The genius here is that the peanut butter layer and the ganache are what make this bar unique. Using already baked, good-quality, fudgy brownie slabs from the grocery store is totally acceptable, especially when you are looking for quick Holiday Brownie Recipes. Just make sure your store-bought product is dense; we don’t want a light, airy cakey base holding up our layers!
Serving Suggestions for this Decadent Chocolate Dessert
These buckeye brownies are so rich and intense on their own, truly the definition of a Decadent Chocolate Dessert. Sometimes, you serve them naked, straight from the pan, and that’s heavenly! But if you’re bringing these out for a party or as part of a holiday spread, a little extra flair goes a long way.
Since they hit that perfect note as a Sweet and Salty Treat, they pair wonderfully with slightly acidic or tart beverages to cut through the richness. They also look festive when presented nicely, making them ideal for Holiday Brownie Recipes.
Perfect Pairings with Coffee or Tea
If you’re serving these in the afternoon or after dinner, a strong cup of coffee is my absolute favorite partner. The bitterness of dark roast coffee really sets off the sweetness of the peanut butter layer. For tea drinkers, skip the sugary stuff and go for a robust black tea, maybe an Earl Grey. I love having a warm drink like my spiced cider mule (served warm in the winter!) alongside one of these bars.
Garnishes for Presentation
Because the chocolate ganache sets up so nicely, you don’t need much! But if you want that extra touch of wow factor:
- A sprinkle of flaky sea salt: Just a tiny pinch right on top of the chocolate before it fully sets enhances the sweet and salty element perfectly.
- Mini Peanut Butter Cups: If you want to double down on the theme, just chop up a few mini cups and sprinkle them over the warm ganache layer before chilling. It looks really fun!
- A light dusting of cocoa powder: If you want to minimize the extra sweetness, dust the chilled bars lightly with unsweetened cocoa powder just before cutting.
No matter how you serve them, these layered bars disappear fast. Get ready for compliments!
Storage and Reheating Instructions for Buckeye Brownies
Look, these buckeye brownies are so good that you might have leftovers, even if you brought them to a party! But since we have three distinct layers here—a fudgy base, a rich peanut butter center, and a firm chocolate top—storage is important. We want everything to stay structurally sound, especially that beautiful, creamy peanut butter layer. Keeping them safe and fresh really builds trust in the recipe, I promise!
My number one rule for these layered bars? They must be refrigerated. They just won’t hold their shape if they sit out too long, especially if your kitchen is warm. Think of them like a giant, glorious peanut butter cup bar that needs a nice, cool snooze.
Keeping Them Cool and Fresh
The best way to store them is right in the 9×13 pan if you haven’t cut them yet. You just need to cover that entire pan tightly with plastic wrap or an airtight lid. If you’ve already cut them into squares (which I recommend for easy serving!), transfer the squares to an airtight container.
It’s really important to separate the layers if you are stacking them in the container. I learned this the hard way when I tried to save some extra and ended up with chocolate smeared everywhere! Place a sheet of parchment paper between layers of cut Peanut Butter Brownies. This prevents the chocolate top from sticking to the peanut butter layer of the bars stacked above them.

Keep them in the fridge. They hold up beautifully for about 4 to 5 days stored this way. That’s just in time for you to sneak one every day, which is what I usually end up doing!
Room Temperature vs. Refrigeration
You might hear that some brownies are fine on the counter, but because of that thick, buttery peanut butter layer, I strongly advise against it for these Homemade Buckeye Candy Brownies. At room temperature, the peanut butter filling will start to soften too much, making them gooey and messy when you try to pick them up. Plus, the chocolate ganache can look dull or even melt a bit if it gets warm.
The only time they should be out is when you are actively serving them. Plan to pull the container out about 15 to 20 minutes before you want to eat them. This softens the whole bar just enough so it’s not rock-hard from the fridge, but keeps it firm enough to hold together perfectly when you bite in. It brings out the best flavor in the chocolate, too. For storing candy recipes like my easy toffee recipe, refrigeration is key for similar reasons!
Do I Need to Reheat Buckeye Brownies?
Nope! You don’t want to reheat these at all. Microwaving them can sometimes make the brownie base dry out quickly, and it definitely ruins the structure of the ganache topping and the peanut butter layer. They are designed to be enjoyed cold or slightly chilled. Slice them while cold, serve them chilled, and enjoy that perfect snap from the chocolate shell!
Frequently Asked Questions About Buckeye Brownies Recipe
I always get so many questions when people try this recipe for the first time. It’s always about texture or ingredient swaps! That’s what this section is for—to nail down those last few details so your first batch of buckeye brownies is absolutely perfect. Feel free to check out my main blog index if you have other general baking questions, but here are the specifics for this chocolate peanut butter dream!
Can I make these Buckeye Brownies without baking the base?
That’s a great question, especially if you’re hunting for a true no-bake treat! While this recipe is fantastic because it uses a quick-baking base that gets extra fudgy, it’s not technically a no-bake bar as written. If you truly want a no-bake option, you’d need to substitute the brownie layer with a crushed cookie crust mixed with melted butter, similar to a cheesecake base. However, for the authentic flavor and texture of these Peanut Butter Brownies, baking that dense fudge layer first really anchors the whole dessert.
How do I get the cleanest cuts when slicing Peanut Butter Brownies?
This is probably the most important tip for presentation! A layered bar that oozes everywhere never looks as good, no matter how delicious it tastes. The secret to clean slices when cutting your Peanut Butter Brownies is simple: CHILL, CHILL, CHILL!
After you pour the final chocolate ganache layer, you must let the bars firm up in the refrigerator for at least two hours—I often leave mine for three just to be safe. Then, before cutting, take the pan out and let it sit on the counter for just 10 minutes. This takes the severe chill off the chocolate so it doesn’t crack when you press down. Use a very sharp, large knife, and wipe the blade clean between every single slice. It sounds tedious, but it works like magic!
What is the best way to store homemade Buckeye Candy Brownies?
Since these bars are so rich and loaded with butter and chocolate, they absolutely need to stay cool to maintain that perfect layer integrity. Store your finished Homemade Buckeye Candy Brownies in a single layer in an airtight container in the refrigerator. If you absolutely must stack them, use parchment or wax paper between the layers to keep the chocolate topping from smearing onto the peanut butter layer beneath it.
They stay wonderfully fresh for nearly a week stored this way. If you pull them out 15 minutes before serving, they’ll be perfectly soft and flavorful, ready to be the best part of any gathering!
Sharing Your Homemade Buckeye Brownies
And there you have it! These buckeye brownies are such a labor of love, but in the best way possible. That combination of textures—the fudgy base, the creamy center, and that snappy chocolate top—is just incredible, and I’m so excited for you to try them.
I really hope these bring that pure joy into your kitchen that they bring to mine. There is nothing better than seeing something you made from simple items turn into such a show-stopping treat for the people you love. If you make a batch, please let me know how they turned out for you! I thrive on hearing your successes and troubleshooting your slight hiccups.
Drop a comment down below and tell me what you thought! Did you stick to the box mix, or did you use a homemade brownie base? And if you snapped a picture, definitely share it with me over on Facebook, I always love seeing what you bake up!
Happy Baking, everyone! You can always reach out through my contact page if you have follow-up questions, or connect with me directly on Facebook!
PrintDecadent 3-Layer Buckeye Brownies (Fudgy Chocolate Base, Creamy Peanut Butter Filling & Ganache)
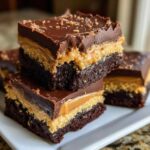
You will make the best Buckeye Brownies with this simple recipe. These layered brownie bars combine a fudgy chocolate base, a creamy peanut butter layer, and a smooth chocolate ganache topping. This Chocolate Peanut Butter Dessert is a crowd pleaser perfect for parties or satisfying any sweet craving.
- Prep Time: 20 min
- Cook Time: 35 min
- Total Time: 55 min
- Yield: 24 servings 1x
- Category: Dessert
- Method: Baking
- Cuisine: American
- Diet: Vegetarian
Ingredients
- 1 box (18.3 ounces) fudge brownie mix (plus ingredients listed on box for brownies)
- 1 cup (2 sticks) unsalted butter, softened
- 1 cup creamy peanut butter
- 4 cups powdered sugar, sifted
- 1 teaspoon vanilla extract
- 1/4 teaspoon salt
- 1/2 cup semi-sweet chocolate chips
- 2 tablespoons shortening or coconut oil
Instructions
- Prepare the brownie mix according to package directions for a 9×13 inch pan. Bake the brownies until a toothpick inserted near the center comes out with moist crumbs attached, not wet batter. Let the brownies cool completely in the pan.
- While the brownies cool, prepare the peanut butter layer. In a large bowl, beat the softened butter and peanut butter together until smooth.
- Gradually add the sifted powdered sugar, mixing until combined. Stir in the vanilla extract and salt. The mixture will be thick.
- Once the brownies are completely cool, spread the peanut butter mixture evenly over the top of the cooled brownie layer.
- Prepare the chocolate ganache topping. In a microwave-safe bowl, combine the chocolate chips and shortening (or coconut oil). Microwave in 30-second intervals, stirring well after each, until the chocolate is completely melted and smooth.
- Pour the melted chocolate mixture over the peanut butter layer. Spread quickly and evenly to cover the entire surface.
- Chill the Buckeye Brownies in the refrigerator for at least 2 hours, or until the chocolate topping is firm.
- Cut the chilled brownies into squares before serving.
Notes
- For a thicker, fudgier brownie, consider using only three-quarters of the water or milk called for on the box mix instructions.
- If you want to make these Lazy Buckeye Brownies, you can use a store-bought fudgy brownie instead of baking from scratch.
- Allow the chocolate topping to set at room temperature for about 15 minutes before slicing for cleaner cuts.
Nutrition
- Serving Size: 1 bar
- Calories: 350
- Sugar: 35g
- Sodium: 150mg
- Fat: 20g
- Saturated Fat: 9g
- Unsaturated Fat: 11g
- Trans Fat: 0g
- Carbohydrates: 42g
- Fiber: 2g
- Protein: 4g
- Cholesterol: 25mg
