 Skip to content

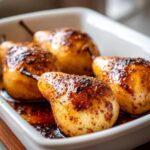
When the air turns crisp and you crave something deeply comforting, but you don’t want to spend hours in the kitchen, this is the recipe calling your name. Seriously, transforming fruit into dessert shouldn’t feel like a marathon! That’s why I’m thrilled to share my go-to for baked pears. This recipe delivers elegance and incredible flavor—all that warm honey and spice—with almost zero fuss. Back when I was recovering from my corporate burnout, finding simple, joyful tasks like this was my therapy. These pears taste like a special occasion but only take minutes of active time. Trust me, this is pure cooking joy right here.
- Why You Will Love This Easy Baked Pears Recipe
- Ingredients for Classic Cinnamon Honey Baked Pears
- Step-by-Step Instructions for Perfect Baked Pears
- Expert Tips for Making the Best Baked Pears
- Ingredient Notes and Substitutions for Baked Pears
- Serving Suggestions for Warm Pear Dessert
- Storage and Reheating Instructions for Leftover Baked Pears
- Frequently Asked Questions About Baked Pears
- Share Your Baked Pears Creations
Why You Will Love This Easy Baked Pears Recipe
I could talk about how good these smell baking all day, but honestly, the best part is how simple they are. If you need a last-minute showstopper or just a healthy treat, this recipe is your shortcut to deliciousness.

- Super Quick Prep: Seriously, 10 minutes tops before they go into the oven. This is as easy baked pears as it gets!
- Elegant Presentation: They look fancy on a platter with that glossy glaze, perfect for holiday tables or impressing guests without any stress.
- Naturally Sweet & Healthy: They satisfy that sweet tooth, but you’re eating wholesome fruit! This makes it a fantastic healthy pear dessert option.
- Warm & Comforting: Nothing beats the aroma of cinnamon and honey filling your kitchen. It’s the definition of a comforting fruit dessert.
- Flavorful Glaze: The simple honey and cinnamon mixture caramelizes perfectly, creating a sauce that you’ll want to drizzle over everything.
- Versatile Serving: Perfect on its own, or paired with yogurt or ice cream—whatever you’re in the mood for!
Ingredients for Classic Cinnamon Honey Baked Pears
When I say this recipe uses simple pantry staples, I mean it! You probably have most of this already hanging around. For the best results, make sure you grab slightly firm pears—Bosc or Anjou are my absolute favorites because they hold their boat shape while baking without turning to mush. We aren’t doing anything fancy here, just pure flavor!
- 4 firm, ripe pears (Bosc or Anjou work best for structure!)
- 4 tablespoons honey (or maple syrup if you prefer!)
- 2 teaspoons ground cinnamon
- 1 teaspoon vanilla extract
- 2 tablespoons water (this is essential for steam!)
- Optional: 1/4 cup chopped walnuts for that great crunch on top.
Step-by-Step Instructions for Perfect Baked Pears
Alright, time to get these beauties into the oven! This Baked Pears Recipe is all about setting up the right environment so they come out tender, sweet, and juicy. Don’t worry if your coring isn’t perfect; we just need to remove that tough center. I always feel like I’m making little edible bowls!
Preparation and Glaze Mixing
First things first, let’s get that oven warmed up. You need it roaring hot at 375°F (190°C). Lightly grease a small baking dish—just enough so they don’t stick when they get bubbly. While that heats, wash those pears. Slice each one right down the middle, top to bottom. Now, scoop out the core and the seeds carefully. I use a small spoon for this part.
In a tiny bowl, whisk together your glaze. It’s just honey, cinnamon, and vanilla extract. Mix it until it looks like a thick, fragrant paste. You’re already halfway done, truly!
Baking the Pears and Finishing Touches
Place your halved pears cut-side UP in your prepared dish. Drizzle that amazing honey mixture evenly over the flat, cut surface of each pear. Now for the secret moisture trick: pour about two tablespoons of water into the bottom of the baking dish. This creates steam so your baked pears turn out soft, not dry.

Bake them for about 30 to 40 minutes. You’ll know they are ready when you can easily pierce the thickest part with a fork—it should feel tender, not hard.
If you grabbed those walnuts, sprinkle them on top during the last five minutes. When they come out, just lift them carefully and spoon any of that extra syrupy glaze from the bottom of the pan right over the top before serving warm. If you need more inspiration on simple baking techniques like this, check out my latest thoughts on baking basics!
Expert Tips for Making the Best Baked Pears
I’ve made this recipe so many times I almost don’t need the card anymore, but there are a few little things I’ve learned that make these Easy Baked Pears truly foolproof. First, choosing the right pear is huge. If you use pears that are too ripe—the kind that bruises if you look at it sideways—they’ll just collapse into mush in the oven. You want them firm enough to stand up straight but yielding slightly when you squeeze gently. Bosc is my favorite because it keeps its shape like a champion!
Also, pay attention to your oven time. Big, chunky pears might need closer to 45 minutes, while smaller ones might be perfect at 30. The fork test is your best friend here; don’t trust the clock entirely!
And about sticking? Even though we use water, sometimes that thick honey glaze wants to grab the glass dish. Taking the time to grease your baking dish well, or even lining the bottom with a small piece of parchment if you’re using a larger casserole dish, saves you a huge headache when spooning out that final serving.
Ingredient Notes and Substitutions for Baked Pears
Look, I know sometimes you open the pantry and the exact ingredient stares back saying, “Nope, not here today!” That’s okay, because this recipe is flexible, especially since we are aiming for that simple, sweet flavor profile of my favorite Honey Baked Pears.
If you don’t have honey, feel free to use maple syrup instead. It gives a slightly different, richer note, but it works beautifully with the cinnamon. The key is having a liquid thickener to coat the fruit. Also, don’t skip that little bit of water you pour into the bottom of the dish! That isn’t flavoring; that’s pure insurance to create steam, keeping the pears unbelievably tender as they roast.

Now, if you want to flip the script completely, the optional savory note is worth trying sometime. Taking a tiny piece of goat cheese and tucking it right into the hole where the core was before baking creates this amazing sweet-and-tangy experience. It’s a fantastic idea for an appetizer!
Serving Suggestions for Warm Pear Dessert
Part of the joy of creating a Warm Pear Dessert is how versatile they are! If you’ve just finished baking these beauties and they are piping hot, you absolutely *must* have something cold to balance that heat. My standard go-to is a big scoop of good quality vanilla ice cream—the way the cold cream melts into that warm honey syrup? Perfection. For something slightly lighter, a dollop of thick Greek yogurt changes the whole profile.

If I’m making these for a grown-up evening, I sometimes serve them alongside a strong, warm cup of coffee or maybe even a slice of one of my fudgy hot chocolate cookies if someone needs a real indulgence. They are truly delicious any way you choose to serve them!
Storage and Reheating Instructions for Leftover Baked Pears
I rarely have leftovers, I’ll be honest, because who can stop eating these? But if you do manage to save some of these amazing baked pears, storing them is simple. Pop them into an airtight container—glaze and all—and they should keep beautifully in the fridge for about three to four days. That’s great for a quick snack later in the week!
When you want to enjoy them again, skip the microwave if you can. Microwaving works fast, but it can make the pears a little too soft. I prefer reheating them gently in a low oven, maybe 300°F (150°C), for about ten minutes. This warms them through and keeps that tender baked texture intact. They just taste fresher that way!
Frequently Asked Questions About Baked Pears
I totally get it; sometimes you have questions that aren’t strictly about the method, but about adapting life to the recipe! I’ve gathered a few things readers often ask me about making these Cinnamon Baked Pears perfect for their own situations. These are wonderful as part of your repertoire of simple dessert ideas because they are so flexible.
What is the best type of pear for baking?
If you want pears that hold their shape looking beautiful and don’t turn into sad puddles, you need a firm variety. My top picks are always Bosc or Anjou. They have that perfect balance—they soften up beautifully when baked but still maintain structure. Avoid pears that are super soft or you risk losing the lovely “boat” shape we are aiming for!
Can I make these baked pears ahead of time for a party?
Yes, you absolutely can! I often bake them a few hours ahead of time. Once they are fully cooled, just cover the baking dish tightly and keep them in the fridge. When it’s time to serve, pop them back into a 325°F oven for about 10 to 15 minutes until they are warmed through again. It keeps things calm right before guests arrive!
Share Your Baked Pears Creations
That’s it! You’ve made something truly wonderful. I really hope you enjoyed making these baked pears as much as I do. If you tried this recipe, please stop by the comments below and give it a rating—I love seeing those five stars!
When you make these, snap a picture and share it! Tag me on Facebook when you post your warm, glossy creations; I always look for them. You can tag me over at my page. Happy baking, friends!
PrintClassic Cinnamon Honey Baked Pears
I am happy you are here. This recipe shows you how to make tender, aromatic baked pears with a simple cinnamon honey glaze. It is a comforting fruit dessert that feels elegant but requires minimal effort, perfect for a cozy night or holiday gathering.
- Prep Time: 10 min
- Cook Time: 35 min
- Total Time: 45 min
- Yield: 4 servings 1x
- Category: Dessert
- Method: Baking
- Cuisine: American
- Diet: Vegetarian
Ingredients
- 4 firm, ripe pears (Bosc or Anjou work well)
- 4 tablespoons honey
- 2 teaspoons ground cinnamon
- 1 teaspoon vanilla extract
- 2 tablespoons water
- Optional: 1/4 cup chopped walnuts for topping
Instructions
- Preheat your oven to 375°F (190°C). Lightly grease a small baking dish that fits the pears snugly.
- Wash the pears. Cut each pear in half lengthwise from top to bottom. Use a melon baller or small spoon to carefully scoop out the core and seeds from the center of each half.
- In a small bowl, mix together the honey, cinnamon, and vanilla extract until combined.
- Place the pear halves cut-side up in the prepared baking dish. Drizzle the honey mixture evenly over the cut surface of each pear half.
- Pour the 2 tablespoons of water into the bottom of the baking dish. This creates steam to keep the pears moist.
- Bake for 30 to 40 minutes, or until the pears are tender when pierced with a fork. Baking time depends on the ripeness of your pears.
- If using walnuts, sprinkle them over the pears during the last 5 minutes of baking.
- Carefully remove the dish from the oven. Spoon any remaining glaze from the bottom of the dish over the pears before serving warm.
Notes
- You can substitute maple syrup for honey for a different flavor profile.
- Serve these warm baked pears with a scoop of vanilla ice cream or a dollop of Greek yogurt for a richer dessert experience.
- If you want a savory twist, try adding a small piece of goat cheese into the core cavity before baking.
Nutrition
- Serving Size: 1 pear half
- Calories: 220
- Sugar: 35g
- Sodium: 5mg
- Fat: 2g
- Saturated Fat: 0g
- Unsaturated Fat: 2g
- Trans Fat: 0g
- Carbohydrates: 55g
- Fiber: 7g
- Protein: 1g
- Cholesterol: 0mg
