 Skip to content
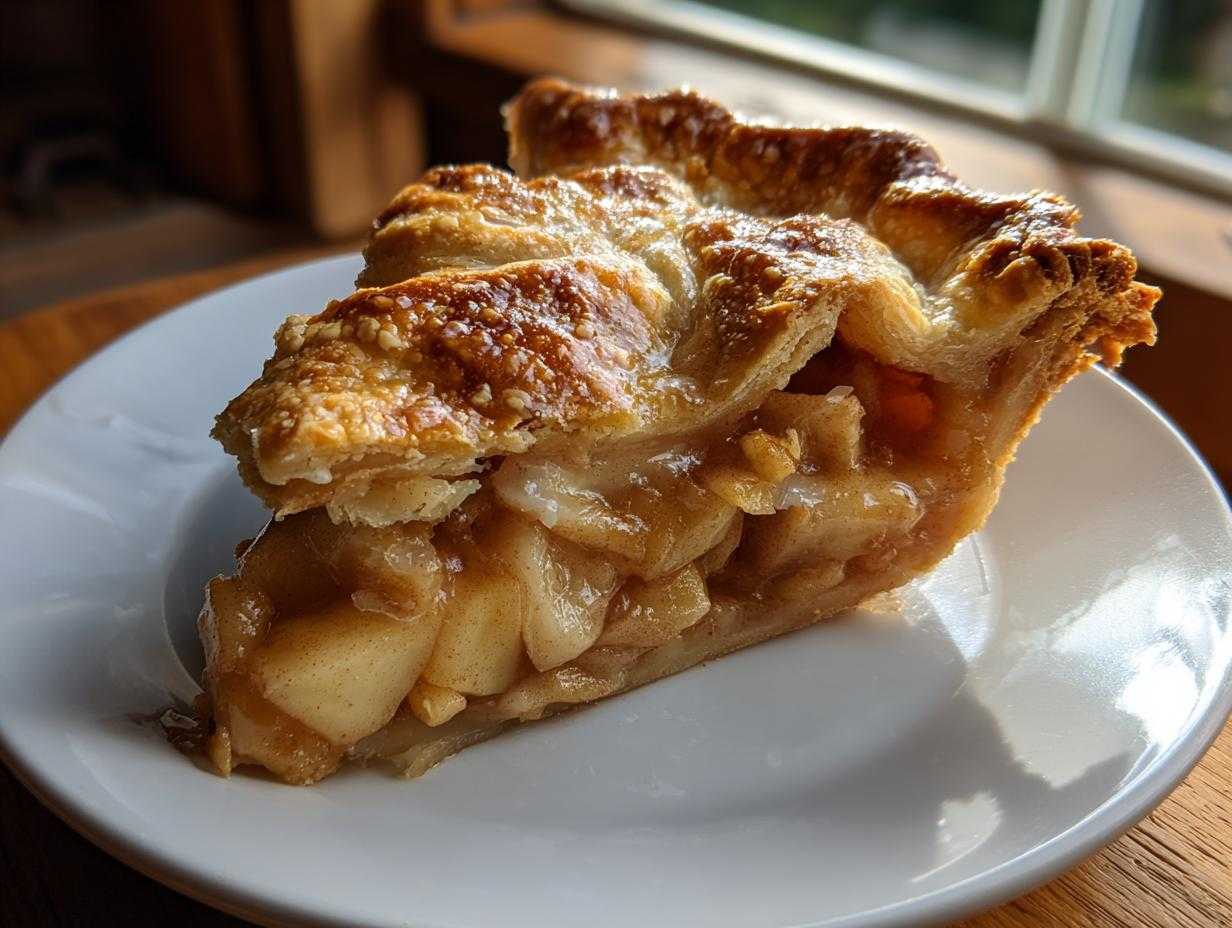

Oh, there’s just nothing quite like the smell of a warm, homemade apple pie filling your kitchen, is there? It’s that perfect blend of sweet apples and cozy spices that just feels like a hug. For me, this classic double crust apple pie is more than just a dessert; it’s a gateway to pure cooking joy. You know, I used to think cooking was this big, scary thing. My corporate job had me completely burnt out, and the last thing I wanted was to spend any more time in the kitchen. But then I learned to bake bread, and holding that perfect loaf, I discovered this amazing sense of peace. It’s that same feeling I get when I pull this apple pie out of the oven. It’s a reminder that delicious food doesn’t have to be complicated. This recipe is specially designed to be super approachable, even if you’re new to baking pies. Trust me, you’ll feel so accomplished, and the taste? Absolutely soul-satisfying!
- Why You'll Love This Classic Apple Pie
- Ingredients for Your Perfect Apple Pie
- How to Prepare Your Classic Apple Pie
- Tips for a Truly Perfect Apple Pie
- Serving and Storing Your Delicious Apple Pie
- Frequently Asked Questions About Apple Pie
- Understanding the Nutritional Value of Apple Pie
- Share Your Pure Cooking Joy!
Why You’ll Love This Classic Apple Pie
This isn’t just any apple pie, it’s *your* apple pie, made with love and simplicity:
- It’s super easy to make! Seriously, Alex designed this recipe so you don’t have to be a pastry chef to get amazing results. You’ll feel totally confident.
- Talk about flavor! We’ve got the perfect balance of sweet, cinnamon-spiced apples hugged by a golden, flaky crust. It’s pure comfort in every single bite.
- The joy of making it yourself! There’s a special kind of happiness that comes from creating something delicious from scratch. This pie brings that feeling right into your kitchen. It’s all about that big flavor and being made for sharing!

Ingredients for Your Perfect Apple Pie
Okay, gathering your ingredients is the first exciting step! You’ll want to have everything ready to go so the magic can happen smoothly. For this classic apple pie, we’re keeping it straightforward with ingredients that make a real difference in taste and texture. It’s all about quality and the right measurements, so let’s get them all out!
For the Double Crust
For that perfectly flaky crust that we all dream of, you’ll need:
- 2 ½ cups all-purpose flour (the foundation of our crust!)
- 1 teaspoon salt (just a touch to bring out the flavor)
- 1 cup (that’s 2 sticks!) of really cold unsalted butter, cut into little cubes. Don’t skip the “cold” part!
- ½ cup ice water (yes, ice water is key for flakiness!)
For the Delicious Apple Filling
Now, for the star of the show – those gorgeous apples! We’re going to make this filling absolutely irresistible:
- About 6 medium apples (around 3 pounds total) – I love using Honeycrisp or Gala apples because they’re sweet with just the right tartness, and they hold their shape so well. Make sure they’re peeled, cored, and sliced nice and evenly.
- ¾ cup granulated sugar (for that lovely sweetness)
- 2 tablespoons all-purpose flour (this helps thicken up all those yummy apple juices!)
- 1 teaspoon ground cinnamon (my favorite cozy spice!)
- ¼ teaspoon ground nutmeg (just a whisper of warmth)
- 1 tablespoon lemon juice (this brightens everything up and stops the apples from browning too fast!)
- 1 large egg, all beaten up (this is for our shiny egg wash on top!)
- 1 tablespoon granulated sugar (for sprinkling on top for that perfectly crisp finish!)

How to Prepare Your Classic Apple Pie
Alright, let’s get down to business and make this apple pie happen! It’s all about working smart and keeping things cool. Don’t worry, I’m right here with you every step of the way. We’ll start with that amazing crust, whip up the filling, put it all together, and bake it until it’s just perfect. It’s really not as intimidating as it sounds, and the reward? Totally worth it!
Making the Perfect Pie Crust
You know, the secret to a really flaky pie crust is making sure everything stays super cold. Seriously, cold butter, cold water – it’s magic! Grab a big bowl and toss in your flour and salt. Then, add those cold, cubed butter pieces. Now, use a pastry blender or even just your fingertips to cut the butter into the flour until it looks like coarse crumbs with some little pea-sized buttery bits still in there. Those bits are what make it flaky! Next, add your ice water, just a tablespoon at a time, mixing gently until the dough *just* starts to come together. Don’t overmix! Divide that dough into two equal parts, flatten each into a disk, wrap ‘em up tight, and let them chill in the fridge for at least an hour. This resting time is crucial, so don’t skip it!
Preparing the Flavorful Apple Filling
While our dough is chilling, let’s get this yummy filling ready. Grab another nice big bowl and toss your peeled, cored, and sliced apples in there. Add your sugar, the two tablespoons of flour (this helps thicken everything up so you don’t have a soupy pie!), cinnamon, nutmeg, and that splash of lemon juice. Give it all a good, gentle toss to make sure every apple slice is coated in that delicious spice mix. The lemon juice is brilliant; it adds a tiny bit of brightness and keeps the apples from turning brown while we’re pie-ing.
Assembling Your Double Crust Apple Pie
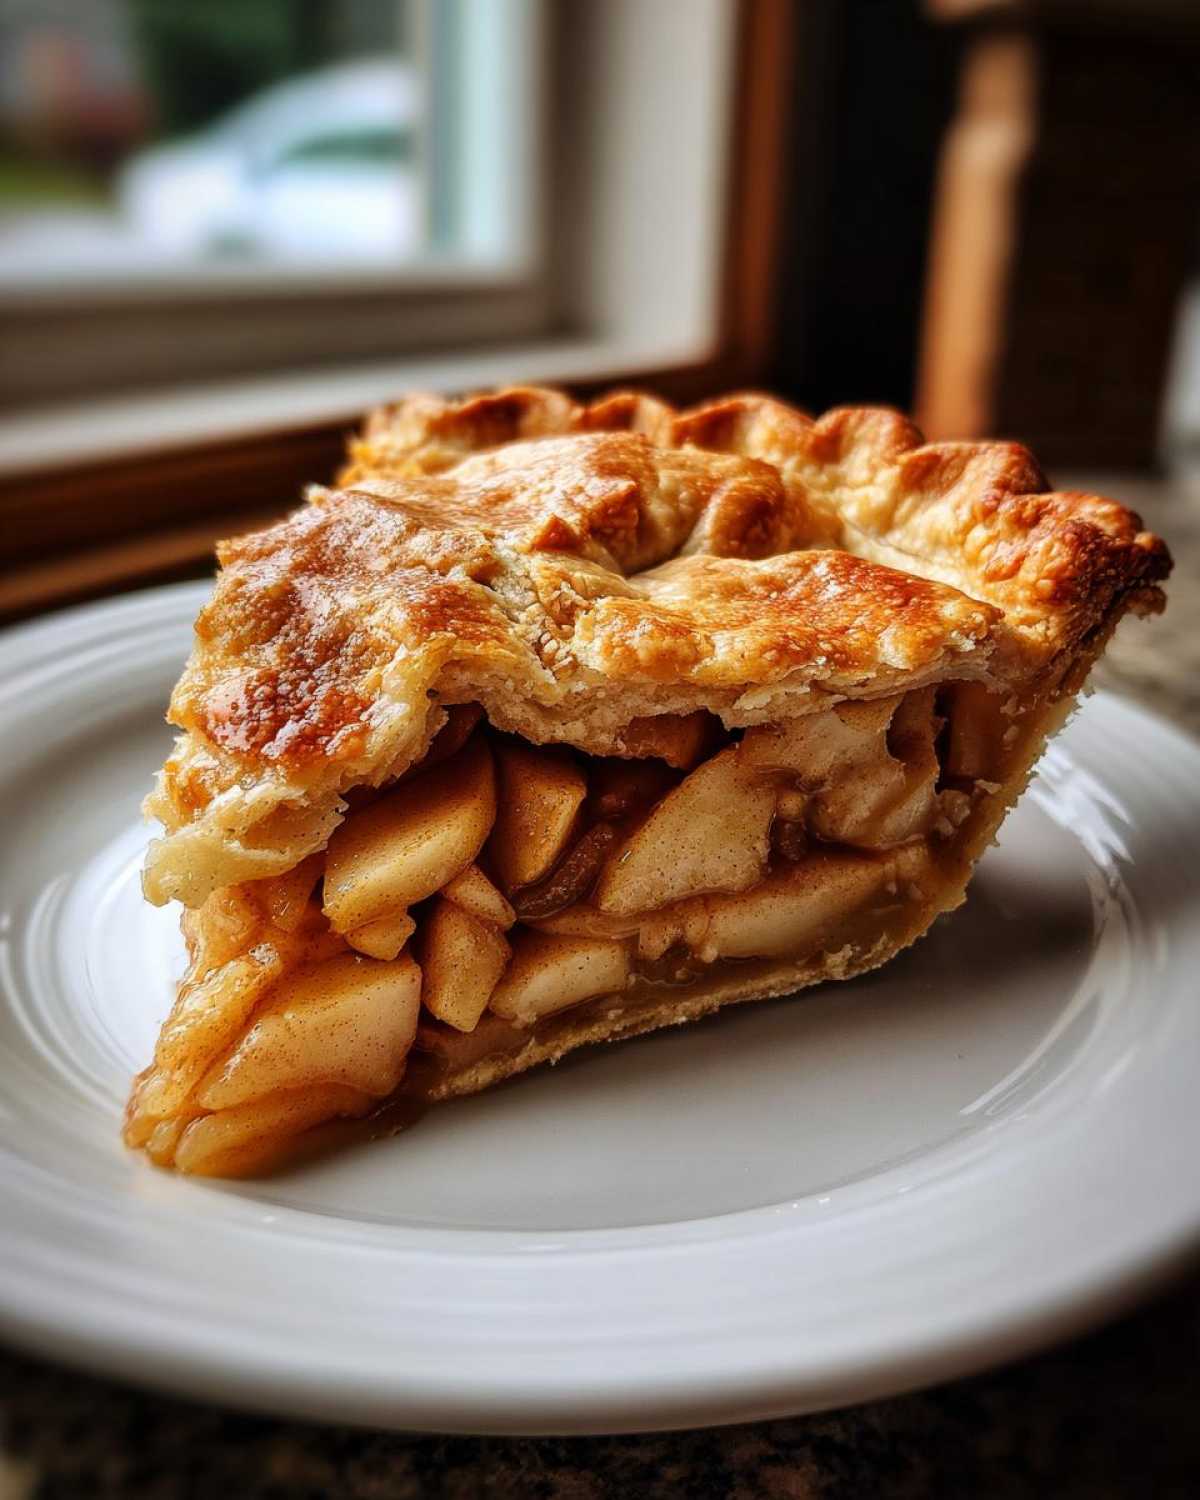
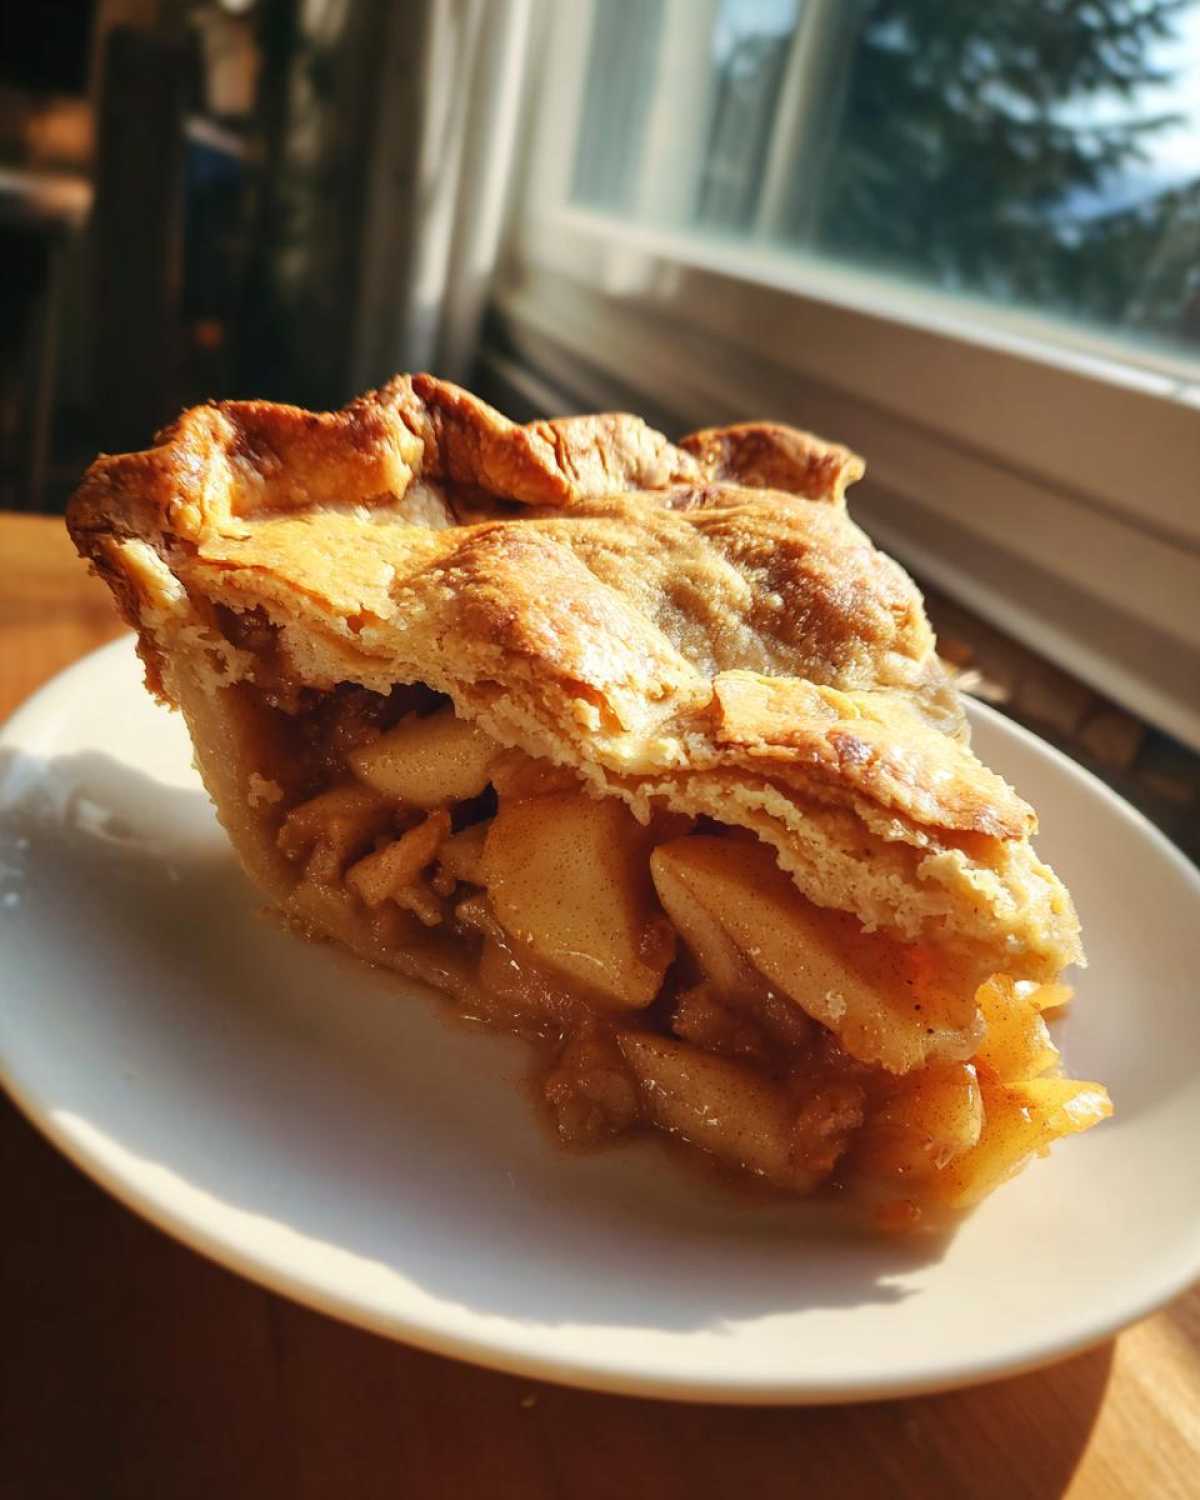
Okay, our dough is nice and chilled, and our filling is ready to go. Time to bring it all together! Lightly flour your counter and roll out one of those dough disks into a circle about 12 inches across. Gently drape this dough into your 9-inch pie plate. You can trim the edges and then crimp them however you like – makes it look so professional! Now, pour that glorious apple filling right into the crust. For the top, roll out the second disk. You can either lay it over the apples as a solid top crust (remember to cut a few vents for steam to escape!) or get fancy with a lattice top by cutting it into strips and weaving them. Once your top is on, trim and crimp those edges again so it’s all sealed up nicely. Finally, brush the top with that beaten egg wash and give it a little sprinkle of sugar. It makes it so shiny and pretty when it bakes!
Baking Your Apple Pie to Golden Perfection
Now for the best part – baking! Preheat your oven to 425°F (that’s 220°C). Carefully place your beautiful pie into the hot oven and bake it for about 15 minutes. This initial blast of heat helps set the bottom crust. After those 15 minutes, turn the oven down to 375°F (190°C) and let it bake for another 35 to 45 minutes. You’ll know it’s done when the crust is this gorgeous golden brown and you can see the filling bubbling happily through the vents or lattice. If the crust starts looking a little too dark before the filling is bubbly, just loosely tent a piece of aluminum foil over it. This little trick saves the crust from burning. Once it’s done, take it out and let it cool on a wire rack for at least 2 to 3 hours. I know, waiting is hard, but this lets the filling set up properly so you get those perfect slices!
Tips for a Truly Perfect Apple Pie
You know, making an apple pie isn’t rocket science, but a few little tricks can really elevate it from good to absolutely amazing. We want that pure cooking joy, right? So, let’s talk about a few things that make a big difference. First off, apple choice! Using a mix of apples, like a firm, tart one and a sweet, softer one, gives your pie a more complex flavor. Think Honeycrisp for sweetness and Granny Smith for that little tang. And for the dreaded soggy bottom? My secret is to blind bake the bottom crust for about 10-15 minutes before adding the filling, or even skip the bottom crust and do a streusel apple pie – though a double crust is so classic! If you’re going for a lattice top, don’t stress about perfection; the charming imperfections are part of its homemade beauty. And remember that cooling time I mentioned? It’s super important for the filling to set properly, giving you those clean, beautiful slices.
Serving and Storing Your Delicious Apple Pie
Okay, your amazing apple pie is out of the oven, golden brown and smelling incredible! The hardest part now is waiting. Seriously, let that pie cool on a wire rack for at least 2 or 3 hours. I know it’s torture, but this is crucial! It gives the glorious apple filling time to thicken up and set, so when you slice into it, you get those beautiful, clean wedges and not a soupy mess. Serve it warm or at room temperature – both are fantastic! If you happen to have any leftovers (which is rare, I know!), just wrap the pie loosely in plastic wrap or pop it into an airtight container. It’ll keep just fine in the refrigerator for about 3-4 days. When you’re ready to enjoy it again, a quick warm-up in a low oven (around 300°F or 150°C) for about 10-15 minutes will bring back some of that fresh-out-of-the-oven magic!
Frequently Asked Questions About Apple Pie
Got questions about making this classic apple pie? I’ve got answers! It’s totally normal to have a few as you get baking, and honestly, a little knowledge goes a long way to achieving pure cooking joy.
What makes this apple pie crust so flaky?
The secret is keeping everything super cold! Cold butter, cold water, and not overworking the dough are key. When the cold butter hits the hot oven, it steams, creating those lovely layers that make the crust wonderfully flaky. It’s all about that delicate touch for a perfect pie crust!
Can I use pre-sliced apples for this easy apple pie recipe?
While convenient, pre-sliced apples often dry out quickly and don’t have the same texture once baked. It’s really best to peel, core, and slice your apples just before you mix them into the filling. This ensures maximum moisture and the best flavor for your delicious apple pie!
My apple pie filling is too runny. What did I do wrong?
A common issue! Make sure you’re using the right amount of flour in the filling to thicken those yummy apple juices. Also, don’t skip the cooling time – letting the pie rest for at least 2-3 hours is crucial for the filling to set properly. Patience is key for the perfect pie!
How hot should my oven really be for apple pie?
We start with a hotter oven, 425°F (220°C), for the first 15 minutes. This blast of heat helps set the bottom crust quickly. Then, we lower it to 375°F (190°C) for the rest of the baking time. This two-temperature approach is a game-changer for getting that perfect bake!
Understanding the Nutritional Value of Apple Pie
Just a little heads-up: all the nutritional info I’m sharing here is an estimate, okay? It can totally change depending on the exact brands you use and specific ingredients in your kitchen. But generally, a slice of this classic apple pie has about 350 calories, 18g of fat (that’s 11g saturated, which is from all that buttery goodness!), around 45g of carbs with 3g of fiber, and about 4g of protein. It’s a delicious treat made with simple ingredients, so enjoy every bite knowing you made it yourself!
Share Your Pure Cooking Joy!
I truly hope you give this classic apple pie recipe a try! Making this pie is all about finding that pure cooking joy, and I’d absolutely love to see your creations. If you make it, please snap a picture and share it with me in the comments below, or tag me on social media. Rate it too if you can – it really helps other home cooks discover this delightful recipe. Let’s fill the world with more delicious, homemade pies!
PrintClassic Double Crust Apple Pie

A timeless double crust apple pie recipe, perfect for any occasion. Learn to make a flaky crust and a sweet, spiced apple filling.
- Prep Time: 45 min
- Cook Time: 60 min
- Total Time: 105 min
- Yield: 8 servings 1x
- Category: Dessert
- Method: Baking
- Cuisine: American
- Diet: Vegetarian
Ingredients
- 2 ½ cups all-purpose flour
- 1 teaspoon salt
- 1 cup (2 sticks) cold unsalted butter, cut into cubes
- ½ cup ice water
- 6 medium apples (about 3 pounds), such as Honeycrisp or Gala, peeled, cored, and sliced
- ¾ cup granulated sugar
- 2 tablespoons all-purpose flour
- 1 teaspoon ground cinnamon
- ¼ teaspoon ground nutmeg
- 1 tablespoon lemon juice
- 1 large egg, beaten (for egg wash)
- 1 tablespoon granulated sugar (for sprinkling)
Instructions
- In a large bowl, whisk together 2 ½ cups flour and 1 teaspoon salt. Cut in the cold butter using a pastry blender or your fingertips until the mixture resembles coarse crumbs with some pea-sized pieces of butter.
- Gradually add the ice water, 1 tablespoon at a time, mixing until the dough just comes together. Divide the dough in half, flatten each half into a disk, wrap in plastic wrap, and refrigerate for at least 1 hour.
- In a separate bowl, combine the sliced apples, ¾ cup sugar, 2 tablespoons flour, cinnamon, nutmeg, and lemon juice. Toss to coat the apples evenly.
- Preheat your oven to 425°F (220°C).
- On a lightly floured surface, roll out one disk of dough into a 12-inch circle. Carefully transfer the dough to a 9-inch pie plate. Trim and crimp the edges as desired.
- Pour the apple filling into the pie crust.
- Roll out the second disk of dough. You can either place it over the filling as a solid top crust (cutting vents) or cut it into strips for a lattice top.
- If using a solid top crust, place it over the filling, trim the edges, and crimp them to the bottom crust. Cut several slits in the top crust to allow steam to escape. For a lattice top, arrange the strips over the filling, weaving them as you go, and then trim and crimp the edges.
- Brush the top crust with the beaten egg wash and sprinkle with 1 tablespoon of sugar.
- Bake for 15 minutes at 425°F (220°C). Then, reduce the oven temperature to 375°F (190°C) and continue baking for another 35-45 minutes, or until the crust is golden brown and the filling is bubbly. If the crust starts to brown too quickly, you can loosely tent it with aluminum foil.
- Let the pie cool on a wire rack for at least 2-3 hours before slicing and serving. This allows the filling to set properly.
Notes
- For a flaky crust, ensure your butter and water are very cold.
- Using a mix of apple varieties can add complexity to the flavor.
- Allowing the pie to cool completely is crucial for the filling to set.
Nutrition
- Serving Size: 1 slice
- Calories: 350
- Sugar: 30g
- Sodium: 200mg
- Fat: 18g
- Saturated Fat: 11g
- Unsaturated Fat: 7g
- Trans Fat: 0g
- Carbohydrates: 45g
- Fiber: 3g
- Protein: 4g
- Cholesterol: 45mg
