 Skip to content

Hi, I’m Alex, and I’m so glad you’re here! If you’re anything like me, fall means you want all the cozy flavors—cinnamon, apples, and all things comforting—but you sometimes don’t have the energy for a full, fussy pie. That’s exactly why I developed these apple cheesecake bars. They deliver everything magnificent about classic apple pie and rich, creamy cheesecake, all bundled up in one easy, handheld square. Trust me, baking used to stress me out until I realized simplicity is where the pure joy is found. You can read more about how I found my way back to the kitchen over at my About Page. These layers prove that you absolutely don’t need complexity to achieve incredible, soul-satisfying flavor.
- Why You Will Love These Caramel Apple Cheesecake Bars
- Gathering Ingredients for Perfect Apple Cheesecake Bars
- Step-by-Step Instructions for Easy Apple Cheesecake Bars
- Tips for Perfect Apple Crumble Cheesecake Bars
- Variations for Your Layered Apple Cream Cheese Bars
- Storing and Reheating Your Homemade Apple Dessert Slices
- Frequently Asked Questions About Apple Cheesecake Bars Recipe
- Pairing Suggestions for Your Best Apple Bars Recipe
- Nutritional Estimates for Apple Cheesecake Bars
Why You Will Love These Caramel Apple Cheesecake Bars
I’ve made a lot of desserts where you have to choose between getting that perfect pie texture or that rich cheesecake filling. Not here! These bars give you all the best parts without any of the fuss. Honestly, they are my go-to when company is coming over last minute.
- They nail that perfect marriage of tart apples and sweet, creamy filling—it’s like a miniature Apple Pie meets a classic New York Cheesecake in one bite.
- We use the same mixture for the base and the crumble topping, which saves you time and dishes. Who doesn’t love an apple cheesecake bars recipe that cuts down on cleanup?
- They are sturdy! Because they bake up firm, they travel beautifully. They are perfect for potlucks, bake sales, or dropping off to a neighbor.
- The buttery crust gives you that fantastic, satisfying crumble contrast against the smooth center.
- They look way more impressive than they actually are to make. You get maximum ‘wow’ factor for minimal effort.
- They fit right into that cozy Autumn Baking Recipes theme without requiring you to roll out pie dough!

Gathering Ingredients for Perfect Apple Cheesecake Bars
Okay, before we even think about preheating the oven, we need to get our ingredients lined up. Think of this like setting the stage for a perfect fall show! I always pull everything out and measure it before I start mixing. It keeps me calm, stops me from accidentally dumping in too much cinnamon, and ensures we get those beautiful, distinct layers in our apple cheesecake bars. If you need inspiration for other fall bakes, check out my recent apple bread recipe!
For the Buttery Crust and Streusel Topping
The genius here is that we make one simple crumb mixture, use most of it for the bottom crust, and save the rest for sprinkling on top. It gives us that satisfying crunch that ties the whole bar together. You absolutely must use cold butter here—it’s what creates those lovely crumbly pockets!
- 1 1/2 cups all-purpose flour
- 1/2 cup packed light brown sugar
- 1/4 teaspoon salt
- 1/2 cup (1 stick) cold unsalted butter, cut into cubes
For the Spiced Apple Filling
This is our pie element! Don’t skimp on the spice—it’s what wakes up the sweetness of the apples. My top expert tip: If you have Granny Smith apples, grab those! Their tartness cuts through the richness of the cream cheese perfectly.
- 3 medium apples (Granny Smith are perfect!), peeled, cored, and sliced thin
- 1/4 cup granulated sugar
- 1 teaspoon ground cinnamon
- 1 tablespoon lemon juice

For the Creamy Cheesecake Layer
This layer needs love and patience. The absolute rule here, folks, is that the cream cheese must be truly softened. If it’s still cold, you’ll end up with tiny cream cheese lumps, and we are aiming for silkiness here!
- 8 ounces cream cheese, softened (room temperature is key!)
- 1/2 cup granulated sugar
- 1 large egg
- 1 teaspoon vanilla extract
And finally, if you want to dress these up for a special occasion, grab that caramel sauce for drizzling right before serving. That little bit of extra sweetness makes these incredible!
Step-by-Step Instructions for Easy Apple Cheesecake Bars
Alright, masterpiece time! This recipe really flies once you have your ingredients ready. You’re looking at about 20 minutes of prep and 45 minutes in the oven. We’re building this glorious dessert in layers, and the order is everything for these perfect apple cheesecake bars. Just trust the process—I promise, it’s much simpler than assembling a whole pie!
Preparation and Pre-Baking the Crust
First things first, let’s get that oven happy. Preheat it to 350°F (175°C). Now, grab that 9×9 inch pan. You want to line it with parchment paper, but here’s the trick: leave an overhang on two of the opposite sides. These ‘flaps’ act as little handles later, which saves you a massive headache when it’s time to pull them out!
Next, we take about three-quarters of that crust mix we made earlier and press it down firmly into the bottom of the prepared pan. Get it nice and even! Pop that pan in the oven for just 10 minutes. We aren’t fully cooking it; we just want it set *before* we add the wet layers on top.
Assembling the Layers of Your Apple Streusel Cheesecake Bars
While that crust is getting a head start, make sure your apple filling is tossed really well—we want every slice coated in cinnamon and sugar. Then, take your softened cream cheese mix and gently spread it right over that warm, pre-baked crust. Don’t work it too much; just get it smooth.
Here comes the fun part: layering! Arrange those spiced apple slices neatly over the cheesecake filling. Once the apples are tucked in, take that reserved crumb mixture—the stuff you didn’t use for the base—and sprinkle it evenly all across the top. This forms our beautiful streusel. This layering sequence—Crust -> Cheesecake -> Apples -> Reserved Crumble—is what creates those gorgeous ribbons of texture in your apple streusel cheesecake bars.

Baking and Cooling for the Best Texture
Time to bake! Put the assembled bars into the oven for about 35 to 40 minutes. You know they’re done when the edges look just slightly golden brown and the center has mostly firmed up. It might still wiggle just a tiny bit, but that’s okay, those final moments happen during cooling.
This next part is non-negotiable if you want gorgeous squares. You *must* let them cool completely in the pan on a wire rack. Seriously, walk away! If you try to slice them warm, the creamy filling will squish everywhere. Chilling them fully, maybe for a couple of hours, ensures those incredibly clean cuts so you can show off those perfect layers you built. You can see how I handle setting up lemon bars for clean cutting over at my lemon bars recipe—it’s the same concept!
Tips for Perfect Apple Crumble Cheesecake Bars
Even though this recipe is pretty foolproof, I have a couple of little secrets I picked up over the years that guarantee amazing results every single time. Remember, baking is chemistry, but it’s also intuition! If you follow these quick tips, especially regarding your mixing and cooling, you’ll have the prettiest Apple Crumble Cheesecake Bars on the block. Before you start baking, maybe check out my thoughts on using brown sugar in my maple brown sugar cookies for extra flavor inspiration!
Preventing Overmixing the Cheesecake Filling
This is where most people accidentally sabotage their creamy layer! When you mix cream cheese and sugar, you are trying to incorporate just enough air to make it smooth, but no more. If you use the electric mixer on high speed for too long, you whip too much air in there. What happens when it bakes? It rises too fast and then falls, leaving you with those dreaded cracks on the top of your apple cheesecake bars.
My rule is to mix the cream cheese and sugar until they look uniform, and then mix the egg in just until the yellow disappears. Stop! Don’t let the beaters run anymore than necessary. We want creamy, not fluffy and cracked.
Achieving Clean Slices
I mentioned this before, but I’m bringing it up again because it’s SO important when you are dealing with layers. You can bake these bars perfectly, but if you try to cut them while they are even slightly warm, you’ll end up with a beautiful, sticky mess, not distinct squares.
The trick is patience—you have to let them cool on the counter completely first, and then slide that whole pan into the refrigerator for at least two hours. Four hours is even better! Chilling solidifies that cream cheese filling and firms up the buttery crust. When you use that parchment overhang to lift them out onto a cutting board, they will slice like a dream. A sharp, non-serrated knife works best; wipe the blade clean between cuts if you want those edges looking bakery-perfect.
Variations for Your Layered Apple Cream Cheese Bars
Now that you’ve mastered the base recipe for these fantastic treats, let’s talk about how we can switch things up! Part of the pure joy of cooking is making a recipe totally your own, right? These Layered Apple Cream Cheese Bars are so adaptable. You don’t have to follow my exact notes every single time; sometimes you just need a little tweak to make it perfect for the mood.
If you’re looking for a real showstopper, adding caramel is the way to go. We call for drizzling it on top, but for true indulgence, try mixing in a quarter cup of good quality, thick caramel sauce right into that cream cheese layer before you spread it over the crust. It melts slightly while baking, creating a beautiful, gooey ribbon beneath those apples. It’s basically cheating how good it tastes!

Spice changes everything, too. If you’re feeling extra autumnal, try swapping that teaspoon of cinnamon for a teaspoon of apple pie spice blend, which usually includes cloves and allspice. Use a light hand, though; you want the apple and cheesecake to shine, not a spice bomb!
And for those who like a little crunch inside, you can certainly mix chopped pecans or walnuts directly into your reserved streusel topping. Just make sure they are roughly chopped so they don’t sink right out the bottom layer. Feel free to check out how I tackle incorporating warm spices into my pumpkin poke cake for more general spice guidance!
Storing and Reheating Your Homemade Apple Dessert Slices
You’ve made these gorgeous homemade apple dessert slices, and now the big question: how do we keep them tasting absolutely perfect after the party is over? I’ve found that because these bars have three distinct textures—the crumbly top, the creamy center, and the tender apples—they definitely need a little refrigeration love to keep everything stable.
The absolute best way to store them is tightly wrapped. Once they are completely cool—remember that crucial cooling step from earlier!—slide them into an airtight container. You can layer them if you need to, but put a tiny piece of parchment paper or wax paper between the layers. This stops the creamy filling of one bar from sticking annoyingly to the streusel of the bar above it. Keep them in the fridge, and they should stay wonderfully fresh for about four to five days. They honestly taste even better on day two, once all those cinnamon-apple juices have had time to really permeate the crust!
If you happen to have leftovers after a full week, you can freeze them! Wrap individual slices tightly in plastic wrap first, and then pop those wrapped slices into a freezer-safe bag. They should last great in the freezer for up to about two months. When you’re ready for a treat, just pull one out and let it thaw slowly in the fridge overnight. They thaw beautifully! For more tips on storing baked goods like quick breads, you can check out my thoughts on date nut bread; the principles of keeping moisture locked in are very similar.
Now, what about warming them up? Since you are reheating something with a cheesecake layer, you have to be careful. I never put these directly in the microwave because it gets the cheesecake layer weirdly soft or rubbery. If you want to warm them up slightly—say, serving them with vanilla ice cream—just let a square sit on the counter for about 20 minutes before you plan to eat it. That just takes the chill off the crust, making it even more buttery, while keeping the filling nice and firm. Nobody wants a melted cheesecake center!
Frequently Asked Questions About Apple Cheesecake Bars Recipe
I get so many great questions about these bars, especially as we head into the holiday baking season. It’s natural when you are mixing three wonderful desserts into one! Here are some of the things I hear most often about making these the best apple cheesecake bars recipe.
Can I make these Easy Apple Cheesecake Bars ahead of time?
Oh, absolutely! I highly recommend it, especially if you are busy hosting. These bars are actually better the next day. You can bake them completely, let them cool, and even chill them overnight. The only thing I advise holding off on is the final drizzle of caramel sauce if you are using it. Do the caramel right before you set them out to serve; that keeps the drizzle nice and glossy. These are fantastic Easy Apple Cheesecake Bars for making ahead!
What are the best apples for these Fall Dessert Bars?
Hands down, you want tart and hard apples that won’t turn to total mush in the oven. Granny Smith apples are my number one choice every single time. Their tartness is the perfect counterpoint to the sweetness of the cheesecake filling and the streusel. If you use something super sweet like a McIntosh, the bars can get overly sweet and the apple texture breaks down too much. Stick to firm, tart apples for the best structure in these Fall Dessert Bars.
Can I skip the streusel topping on the apple cheesecake bars?
You can, but honestly, why would you want to? That streusel topping is what gives you that textural contrast we talked about! It’s the crunchy, buttery element that separates the creamy center from the spiced apples. If you skip it, you’ll have a delicious apple cream cheese bar, but you lose that fantastic “crumble” element.
If you absolutely must skip the streusel part, you can still use the dough mixture as just a solid bottom crust (but you’d need to adjust the resting amount you save for the top). Or, try a simple dusting of powdered sugar instead for a cleaner look. If you’re looking for more inspiration for easy entertaining, take a peek at some of my go-to recipes for easy entertaining ideas!
Pairing Suggestions for Your Best Apple Bars Recipe
We’ve created the ultimate handheld dessert, but how we serve them really finishes the experience, doesn’t it? These aren’t just good for grabbing on the go; they are wonderful plated treats, especially when paired with the right sidekick. If you are looking for the absolute Best Apple Bars Recipe presentation, here are a few simple things I love to do at the end of a great meal.
If you are serving these warm—and honestly, slightly warm beats fridge-cold for the crust every time—you absolutely need a scoop of something cold sitting right next to it. My first choice is always a high-quality vanilla ice cream. The contrast between the warm, spiced apple and the cold, melting vanilla is just heavenly. If you happen to be making my homemade strawberry ice cream, the slight tartness pairs surprisingly well, too, trust me on that one!
For a lighter touch, especially after a big holiday meal like Thanksgiving, a dollop of freshly whipped cream does the trick. Forget the aerosols! Whip heavy cream with just a tiny touch of powdered sugar and maybe half a teaspoon of vanilla extract until soft peaks form. It’s so much fresher and lighter, and it cuts through the richness of the cheesecake filling perfectly.
And let’s not forget the drinks pairing! These bars deserve a slow moment. They are fantastic after dinner with a hot cup of black coffee—the bitterness of the coffee really lets those sweet caramel and apple notes pop. If you’re serving these in the afternoon, a strong black tea works wonderfully as well. When company comes over, I often share my simple entertaining philosophy, and these bars fit right in because everyone loves them. If you want to check out some other easy crowd-pleasers, stop by my Facebook page for more ideas!
Nutritional Estimates for Apple Cheesecake Bars
Okay, let’s talk numbers for a second. I know that when we’re baking comfort food like these amazing layered bars, we aren’t really focused on macros for every bite, but sometimes it’s helpful to have a ballpark idea, especially when serving them up to guests! Remember, these numbers are just solid estimates based on the ingredients list since every single apple size and the amount of caramel you drizzle will change things slightly.
This whole recipe yields 16 squares, so these figures are calculated per serving. They might be indulgent, but boy, are they worth it!
- Serving Size: 1 bar
- Calories: Approximately 310
- Sugar: Around 25g (That’s the good stuff from the apples and caramel!)
- Fat: Roughly 18g
- Carbohydrates: About 35g
- Protein: Around 4g
- Sodium: About 180mg
Just a friendly reminder—think of these estimates as a guide! If you decide to use a slightly higher-fat cream cheese, or if you’re heavy-handed with that buttery crust, the counts go up. These are delicious, satisfying treats, meant to be enjoyed, so don’t let the numbers stop you from making these wonderful apple cheesecake bars!
PrintEasy Caramel Apple Cheesecake Bars with Streusel Topping
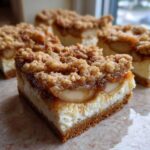
I am so glad you are here! These Caramel Apple Cheesecake Bars combine a buttery crust, creamy cheesecake filling, spiced apples, and a simple streusel topping. This recipe delivers all the flavor of apple pie and cheesecake in one easy, handheld dessert perfect for fall gatherings.
- Prep Time: 20 min
- Cook Time: 45 min
- Total Time: 65 min
- Yield: 16 servings 1x
- Category: Dessert
- Method: Baking
- Cuisine: American
- Diet: Vegetarian
Ingredients
- For the Crust/Crumble: 1 1/2 cups all-purpose flour
- 1/2 cup packed light brown sugar
- 1/4 teaspoon salt
- 1/2 cup (1 stick) cold unsalted butter, cut into cubes
- For the Apple Layer: 3 medium apples (like Granny Smith), peeled, cored, and sliced thin
- 1/4 cup granulated sugar
- 1 teaspoon ground cinnamon
- 1 tablespoon lemon juice
- For the Cheesecake Layer: 8 ounces cream cheese, softened
- 1/2 cup granulated sugar
- 1 large egg
- 1 teaspoon vanilla extract
- For Topping (Optional): 1/4 cup caramel sauce, for drizzling
Instructions
- Preheat your oven to 350°F (175°C). Line a 9×9 inch baking pan with parchment paper, leaving an overhang on two sides for easy removal.
- Prepare the Crust/Crumble: In a medium bowl, whisk together the flour and brown sugar. Cut in the cold butter using a pastry blender or your fingers until the mixture resembles coarse crumbs. Set aside about 3/4 cup of this mixture for the topping.
- Press the remaining crumb mixture firmly into the bottom of the prepared pan to form the crust. Bake the crust for 10 minutes.
- Prepare the Apple Layer: While the crust bakes, toss the sliced apples with the 1/4 cup sugar, cinnamon, and lemon juice in a small bowl.
- Prepare the Cheesecake Layer: In a separate bowl, beat the softened cream cheese and 1/2 cup sugar until smooth. Beat in the egg and vanilla extract until just combined. Do not overmix.
- Assemble the Bars: Spread the cheesecake mixture evenly over the warm, pre-baked crust. Top the cheesecake layer with the spiced apple slices. Sprinkle the reserved 3/4 cup of crumb mixture evenly over the apples.
- Bake for 35 to 40 minutes, or until the edges are lightly golden and the center is mostly set.
- Cool the bars completely in the pan on a wire rack. This step is important for clean slicing.
- Once cool, lift the bars out using the parchment paper overhang. If desired, drizzle with caramel sauce before slicing into squares.
Notes
- Use firm, tart apples like Granny Smith for the best texture and flavor contrast against the sweet cheesecake.
- You can use a shortbread crust recipe if you prefer a more defined buttery base instead of the simple flour/sugar crumble base.
- Chill the bars for at least 2 hours before slicing for the cleanest cuts, especially if you are serving them at a potluck.
Nutrition
- Serving Size: 1 bar
- Calories: 310
- Sugar: 25g
- Sodium: 180mg
- Fat: 18g
- Saturated Fat: 11g
- Unsaturated Fat: 7g
- Trans Fat: 0.5g
- Carbohydrates: 35g
- Fiber: 1g
- Protein: 4g
- Cholesterol: 55mg
