 Skip to content

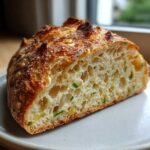
Oh, the smell! There is absolutely nothing in the world that fills a home with more pure, honest comfort than the scent of fresh bread baking. Forget fancy birthday cakes; for me, that aroma—rich, savory, and slightly earthy—signals true peace in the kitchen. If you’ve ever felt intimidated by artisan loaves, stop right now, because I want to share my absolute favorite, no-fuss recipe: this incredible garlic herb dutch oven bread. Trust me when I say this no-knead method transforms humble ingredients into a crusty, flavorful masterpiece. It truly embodies my belief that spectacular food doesn’t need to be complicated. You are going to love how easy it is to pull that golden, herbal loaf out of the oven!
- Why This Garlic Herb Dutch Oven Bread Recipe Works So Well
- Gathering Ingredients for Your **Garlic Herb Dutch Oven Bread**
- Step-by-Step Instructions for Your **Easy Dutch Oven Bread Recipe**
- Baking Your **Garlic Herb Dutch Oven Bread** Perfectly
- Expert Tips for the **Best Dutch Oven Bread**
- Serving Suggestions for Your **Rustic Herb Bread Baking**
- Storage and Reheating Instructions for **Garlic Herb Dutch Oven Bread**
- Frequently Asked Questions About This **Garlic Herb Dutch Oven Bread**
- Estimated Nutritional Data for One Slice
Why This Garlic Herb Dutch Oven Bread Recipe Works So Well
Whenever I share this loaf, people always ask how I get such deep flavor into such a simple **easy Dutch oven bread recipe**. The secret isn’t about complex work; it’s about patience and letting time do the heavy lifting for us. This method is truly superior because it minimizes my effort while maximizing the taste. If you’re looking to bake, you’ll find great foundational knowledge over at my general baking bread guide!
The Magic of No Knead Bread with Herbs
The reason this turns into **crusty no knead bread** is that long, slow rest—we’re talking 12 to 18 hours. That downtime lets the yeast work slowly, developing complex, nutty flavors deep inside the dough. Plus, while it sits, those fresh rosemary, thyme, and garlic bits completely marry their oils with the flour. They infuse every corner of the dough naturally, which is the best way to fully carry that savory flavor.

Achieving the Perfect Crusty Artisan Bread in Oven
This is where the Dutch oven steps in as our unsung hero. Think of it as a miniature steam chamber in your home oven. When we put the lid on, the water evaporating from the dough gets trapped. That steam keeps the early crust soft, allowing the loaf to expand to its full, beautiful volume. Once we lift the lid, the high, dry heat rushes in to form that shatteringly crisp, deeply browned crust we all want!
Gathering Ingredients for Your **Garlic Herb Dutch Oven Bread**
Okay, now that you know *why* this bread is amazing, let’s talk about what we need to make it happen. For this **garlic herb dutch oven bread**, precision matters a bit more than in a regular cake, honestly. Since it’s a no-knead style, the ratios dictate the structure, so stick to what I’ve written here for the best outcome. We want a loaf that feels substantial but springs back beautifully!
Flour, Yeast, and Water Ratios
The foundation is simple: flour, salt, and yeast. We use instant yeast because that’s easiest for the long rest period. The most important part here is the water—make sure it’s cool, not warm or hot! Cool water slows down the yeast activity just enough to ensure that long, slow rise that gives us incredible flavor in our **no fuss homemade loaf**.
Incorporating the Garlic and Herbs
This is where the fun flavor explosion happens! I insist on mincing your garlic as finely as you possibly can; you don’t want giant chunks baking unevenly. Chop up fresh rosemary and thyme leaves—the fresh herbs make such a difference in the final aroma. Using good quality herbs is key to pulling off a delicious **homemade garlic bread recipe** right in your own oven.

Step-by-Step Instructions for Your **Easy Dutch Oven Bread Recipe**
Now for the payoff! As I learned on my journey from burnout to achieving pure cooking joy, the most rewarding things often require the least amount of active effort. This baking process is almost therapeutic. Remember, you can always find my general tips for other simple bread recipes on the site, but follow these steps exactly for this savory loaf.
Mixing the Shaggy Dough
First, get all your dry ingredients—flour, salt, and instant yeast—whisked together in your bowl. Then, toss in that amazing garlic and all that fresh herb goodness. Pour in your cool water and switch to a strong spoon. Mix only until that flour disappears and you have a rough, messy ball of dough. I mean it—stop mixing! If you overwork it now, you’ll develop too much gluten, and we are aiming for that delightfully open, tender crumb.
The Long Fermentation Rest
This is the most important step for flavor development in your **rustic herb bread baking**. Cover that bowl *tightly* with plastic wrap—we don’t want any dry spots forming. Now, stick it somewhere quiet on your counter and forget about it for 12 to 18 hours. Seriously, this long rest is where the flavor deepens and the yeast produces all those beautiful, complex notes that make this bread taste like it came from a fancy bakery.
Shaping and Second Proofing
Once your dough is bubbly and expanded, flour your surface lightly. Gently scrape the dough out—don’t punch it down! We’re going to fold it over itself just two or three times to create a nice, tight skin on the outside. No kneading allowed! Just form a rough ball, set it on parchment paper, cover gently, and let it sit for a quick 30-minute second proof before we bake it off.
Baking Your **Garlic Herb Dutch Oven Bread** Perfectly
Alright, we’ve mixed the dough, we’ve let it rest and get all happy and bubbly, and now it’s time for the performance! This heating stage is non-negotiable if you want that textbook bakery texture. If you’ve ever wanted to master the **crusty artisan bread in oven** look, this is where the Dutch oven shows off. Handling a hot cast iron pot requires care, so please be mindful when moving things around! For more on nailing that crust, check out my guide on crusty artisan bread in oven success.
Preheating the Pot and Oven
You need serious heat built up in that pot! Set your oven to 450 degrees Fahrenheit (232 Celsius). Then, place your empty Dutch oven—lid and all—inside that oven. It needs a solid 20 minutes—at least—to get screaming hot. That intense, retained heat is what gives your dough its initial blast of energy, locking in moisture and allowing that beautiful oven spring to happen.
Covered and Uncovered Baking Times
Once preheated, you’ll carefully use the parchment paper sling to lower your dough gently into the scorching hot pot and cover it immediately. Bake it covered for exactly 30 minutes—that’s the steam phase where it puffs up. Then, carefully take the lid off. We need another 15 to 20 minutes uncovered to let the crust turn that perfect deep golden brown. When it’s done, use oven mitts and tongs to pull that hot pot out and gently transfer your loaf to a wire rack to cool completely.

Expert Tips for the **Best Dutch Oven Bread**
Even though this is a super **no fuss homemade loaf**, there are a few little tricks I picked up over the years that can take it from “really good” to “I’m never buying bread again!” These lessons are what separate a good recipe from a fantastic one, and I absolutely want you to have the **best Dutch oven bread** experience possible. You can always refine your general home loaf techniques by reading more tips over at my guide on the no fuss homemade loaf!
Boosting Garlic Intensity
If you love that deep, roasted garlic flavor but you’re using the no-knead method, here’s my sneaky trick: lightly sauté your minced garlic in just a teaspoon of olive oil for about 60 seconds before you mix it into the dry ingredients. This step softens the bite and unlocks a much deeper, sweeter garlic warmth in the final bake. It takes zero extra time!
Herb Substitution Guidance
I always prefer fresh herbs because their oils are so bright, but life happens! If you only have dried herbs on hand, don’t stress out. Just substitute them in. If my recipe calls for 1 tablespoon of a fresh herb, you should use about 2 teaspoons of the dried version instead. It’s roughly a one-to-three ratio change for dried versus fresh botanicals.
Serving Suggestions for Your **Rustic Herb Bread Baking**
My philosophy here at Pure Cooking Joy is that food is meant to be shared! This incredible **garlic herb dutch oven bread** isn’t just a side dish; it’s the star when it comes out of the oven, hot and fragrant. Since this loaf is packed with savory herbs and garlic, you really don’t need to dress it up much at all. I love cutting thick slices and setting them out when friends come over—it just makes the whole atmosphere feel warmer and more welcoming.
Perfect Pairings
Honestly, the best way to enjoy this is still warm, maybe dipped into some good quality olive oil—you can check out my thoughts on that here! It’s phenomenal served alongside a hearty winter stew or a creamy tomato soup. Also, it makes the world’s best companion to a soft, slightly sharp cheese board. Just let the bread shine!
Storage and Reheating Instructions for **Garlic Herb Dutch Oven Bread**
You went through all that effort, so let’s talk about keeping your beautiful loaf fresh! The single most important thing you have to do is wait until the bread is completely cool before you even think about wrapping it up. If you cover it while it’s even slightly warm, all that trapped steam will turn your amazing crust soggy—and nobody wants that! For the **garlic herb dutch oven bread**, I let mine cool for at least two hours. Store leftovers wrapped tightly in aluminum foil at room temperature for up to four days.
Frequently Asked Questions About This **Garlic Herb Dutch Oven Bread**
I know when you start relying on a long fermentation time like we do here, questions pop up! That’s normal, and honestly, being curious is the first step toward becoming a confident baker. If you’re thinking about taking the plunge into longer ferments, you might find my guide on sourdough starters useful, even though this recipe is quicker! Sourdough starter guide for beginners is a great resource.
Can I use active dry yeast instead of instant yeast in this **Easy Dutch Oven Bread Recipe**?
You absolutely can! Active dry yeast just needs a little wake-up call first, since it isn’t as resilient as the instant type. Take a half cup of your measured cool water, warm it up slightly (it should feel just lukewarm, not hot), stir in the active dry yeast and maybe a pinch of sugar, and let it sit for about five to ten minutes until it gets foamy. Then use that liquid in place of the water called for in the main recipe, and proceed!
What is the best way to prevent the bottom of the bread from burning?
That’s a common concern when you are aiming for that thick, crunchy texture in your **crusty artisan bread in oven** look! If your oven runs hot or your Dutch oven is very dark, try this simple trick: place an empty metal baking sheet on the rack *underneath* the rack holding your Dutch oven. That extra layer of metal will shield the bottom element’s direct heat from scorching the bottom of your beautifully flavored loaf.
How long does the dough need to ferment if my kitchen is very cold?
If your kitchen is chilly—say, below 68 degrees Fahrenheit—that long fermentation will definitely take longer than 18 hours. Cold temperatures slow everything down because the yeast isn’t as active. Don’t panic and don’t go adding more yeast! Just let it sit for an extra few hours, maybe checking it at the 20-hour mark. If you can, moving the bowl to a spot near the oven or on top of the fridge can give it a little needed warmth.

Estimated Nutritional Data for One Slice
Since I am all about transparency here at Pure Cooking Joy, I want to share the estimated nutritional breakdown for this lovely loaf. This information helps you know what you’re sharing and eating, which is just another way of taking care of the people you love. Remember, because we are using natural ingredients and these are estimates, the actual numbers can fluctuate a little bit based on the exact flour or water you use. If you want to see more of my kitchen adventures, come say hello over on my Facebook page!
- Serving Size: 1 slice
- Calories: 205
- Fat: 0.5g
- Saturated Fat: 0.1g
- Carbohydrates: 42g
- Fiber: 1.5g
- Protein: 7g
- Sugar: 0.3g
- Sodium: 380mg
See? Not bad at all for a truly spectacular loaf of **garlic herb dutch oven bread**! It’s mostly carbohydrates meant for energy, with hardly any sugar, which is exactly what I look for in a good, rustic bread recipe.
PrintEasy Garlic Herb Dutch Oven Bread
Bake a crusty, flavorful artisan loaf right in your oven using this simple no-knead Dutch oven bread recipe featuring fresh garlic and herbs.
- Prep Time: 10 min
- Cook Time: 50 min
- Total Time: 13 hours 0 min
- Yield: 1 loaf 1x
- Category: Baking
- Method: Baking
- Cuisine: American
- Diet: Vegetarian
Ingredients
- 3 cups all-purpose flour
- 1 1/2 teaspoons salt
- 1/4 teaspoon instant yeast
- 1 1/4 cups cool water
- 2 cloves garlic, minced finely
- 1 tablespoon fresh rosemary, chopped
- 1 tablespoon fresh thyme leaves
- 1 teaspoon dried oregano
Instructions
- In a large bowl, whisk together the flour, salt, and yeast.
- Add the minced garlic, rosemary, thyme, and oregano to the dry ingredients. Mix briefly to distribute the herbs and garlic.
- Pour in the cool water. Use a wooden spoon or spatula to mix until just combined into a shaggy dough. Do not overmix.
- Cover the bowl tightly with plastic wrap and let it rest at room temperature for 12 to 18 hours. This is the long fermentation period.
- After the long rest, lightly flour a work surface. Gently scrape the dough out of the bowl. Fold the dough over itself a few times to form a rough ball. Do not knead.
- Place the dough ball on a piece of parchment paper. Cover loosely with plastic wrap or a clean kitchen towel and let it rest for a second proof for 30 minutes.
- About 20 minutes before baking, place your 5 to 6-quart Dutch oven (with the lid on) into your oven. Preheat the oven to 450 degrees Fahrenheit (232 degrees Celsius).
- Carefully remove the hot Dutch oven from the oven. Lift the dough by the parchment paper handles and gently lower it into the hot pot.
- Place the lid back on the Dutch oven. Return the pot to the oven.
- Bake covered for 30 minutes.
- Remove the lid. Continue baking for another 15 to 20 minutes, or until the crust is deep golden brown.
- Carefully remove the bread from the Dutch oven and place it on a wire rack to cool completely before slicing.
Notes
- For a stronger garlic flavor, you can lightly sauté the minced garlic in a teaspoon of olive oil for one minute before adding it to the dry ingredients.
- If you do not have fresh herbs, use 2 teaspoons of dried herbs total in place of the fresh amounts listed.
- Cooling the bread fully prevents the interior crumb from becoming gummy when you slice it.
Nutrition
- Serving Size: 1 slice
- Calories: 205
- Sugar: 0.3
- Sodium: 380
- Fat: 0.5
- Saturated Fat: 0.1
- Unsaturated Fat: 0.4
- Trans Fat: 0.0
- Carbohydrates: 42
- Fiber: 1.5
- Protein: 7
- Cholesterol: 0
