 Skip to content

There is nothing quite like the smell of fresh bread wafting through the house, right? It instantly makes everything feel cozy. For me, that smell moved from corporate exhaustion to pure joy the day I perfected my garlic parmesan focaccia bread recipe. I used to think artisan bread was reserved for professionals, but trust me, this loaf proves you wrong!
This isn’t just a simple bread; it’s a sheet pan masterpiece loaded with savory garlic and salty Parmesan flavor. Sometimes the best things in the kitchen, like this easy homemade focaccia, rely on simplicity and great ingredients rather than complex techniques. We are going to make something that tastes rich and magnificent, but the process is surprisingly straightforward, making it one of my favorite garlic bread recipes to share.
- Why This garlic parmesan focaccia bread recipe is Your New Favorite (E-E-A-T)
- Gathering Ingredients for the Perfect garlic parmesan focaccia bread recipe
- Step-by-Step Instructions for Your easy homemade focaccia dough
- Incorporating Garlic and Achieving the Fluffy Focaccia Texture
- Topping Your garlic parmesan focaccia bread recipe Before Baking
- Baking the garlic parmesan focaccia bread recipe for a Crispy Crust Bread
- Tips for Success with this parmesan bread bake
- Frequently Asked Questions about making garlic parmesan focaccia bread recipe
- Storing and Serving Your Homemade Focaccia
Why This garlic parmesan focaccia bread recipe is Your New Favorite (E-E-A-T)
Okay, I know everyone claims their bread is special, but this one truly changes the game for me. This isn’t just another yeasted dough; it’s built for maximum flavor with minimal effort. When you make this garlic parmesan focaccia bread recipe, you’re saying goodbye to stress and hello to seriously delicious results.
Here’s why I stand by this formula:
- It’s practically a no knead bread recipe! We mix it until it’s shaggy, and the long rest does all the hard work for us.
- The flavor bomb is real: Minced garlic mixed right into the dough, topped with salty, nutty Parmesan—it’s everything a good cheesy bread recipes should be.
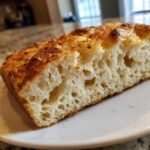
- Texture goals achieved: You get that classic fluffy focaccia texture inside, but thanks to plenty of oil and a hot oven, the bottom gets exactly the crispy crust bread finish we all crave.
If you’re looking to dip your toes into artisan bread at home without the intimidation factor, this is absolutely the place to start. You can check out more of my thoughts on baking confidence over at my bread baking guide!
Gathering Ingredients for the Perfect garlic parmesan focaccia bread recipe
Okay, the real secret to making this savory bread incredible isn’t some ancient, hidden trick; it’s leaning into quality ingredients where it counts. Since this is such a simple garlic parmesan focaccia bread recipe, every component really sings!
First off, let’s talk oil. Don’t skimp! We need that good, fruity extra virgin olive oil—about a quarter cup for the dough, plus more for drizzling later. This oil is non-negotiable for that rich flavor and that lovely, slightly chewy texture. If you want your bread to really pop, use the oil you’d happily dip some crusty bread into!
Here’s the breakdown of what you need:
- For the structure: 3 cups of all-purpose flour and 1 teaspoon of instant dry yeast. Yes, instant works perfectly here, making this an easy homemade focaccia.
- The moisture maker: About 1 and 1/2 cups of warm water. Make sure it’s between 105-115°F so you don’t kill the yeast, okay?
- Flavor Power: Four cloves of garlic—and I mean minced fresh, not the jarred stuff if you can help it—and half a cup of real grated Parmesan cheese. Buy a wedge and grate it yourself; it melts so much better than the pre-grated powder.
- Finally, don’t forget the salt! We need fine sea salt for the dough and flaky sea salt for sprinkling on top for that final crunch. I love pairing this with my garlic butter breadsticks dough for holidays!
Step-by-Step Instructions for Your easy homemade focaccia dough
This part is where we prove that this is truly an easy homemade focaccia. Forget punching down dough or wrestling it into submission; this is relaxing baking. Since this is a no knead bread recipe, our main job is combining things correctly and then stepping back while the yeast gets to work! Remember when I said we need warm water? Get that water temperature right around 105 to 115°F. If it’s too hot, it kills the yeast, and we get flat bread. Too cold, and it takes forever.
We mix the flour, yeast, and salt, then pour in the warm water and that quarter cup of good olive oil. I use a sturdy wooden spoon here. Just mix until everything comes together into what I call a “shaggy monster.” It will be super sticky and messy—that’s exactly right! Don’t even try to knead it; just cover it up tightly.
This needs a long, warm rest, usually 1 to 1.5 hours, until it’s doubled up. If you need to get ahead of the game, you can pop this covered bowl right into the fridge after mixing for up to 24 hours. It develops even more flavor overnight! When you’re ready to bake later, just let it sit on the counter to warm up first. I’ve got even more tips over on my guide for an easy yeast bread recipe!
Mixing and First Rise: Starting the easy homemade focaccia
When mixing, stop as soon as you can’t see any dry flour streaks anymore. Overmixing this batter will make your final bread tough, and we want fluffy, not tough! After you cover the bowl, find the warmest spot in your kitchen. I sometimes turn my oven light on for a little ambient warmth. That first rise is critical for developing that gorgeous, open crumb structure you see in truly great artisan bread at home. Seriously, this initial rest is doing the heavy lifting for us!
Incorporating Garlic and Achieving the Fluffy Focaccia Texture
Now that our dough has had its nice, long nap, it’s time to bring in the star flavors! Just gently stir in that minced garlic we prepped. Don’t go wild; we don’t want to knock all the air out of it after that beautiful first rise required for a fluffy focaccia texture. We want to maintain those bubbles!
Next, grab your 9×13 pan. I use a generous amount of olive oil—don’t be shy!—to slick the bottom. Scrape that sticky mass gently into the pan. Now, here’s the crucial part: stretching it out. Pour a little more oil over the top and start gently pressing it toward the corners. If it snaps back at you, just let it chill out covered for about ten minutes. It relaxes, and then you can press it easily into place. We let it sit for one last, quick proof—about 30 to 45 minutes should do the trick.
While it rests, preheat that oven up to 425°F. You can find my favorite recipe for dipping oil over here if you need some inspiration!
The Dimpling Technique for the best focaccia recipe
This is my favorite sensory part of making focaccia! Once the dough is proofed and relaxed in the pan, dip your fingers generously in oil—this stops sticking and helps the crust form. Then, press straight down through the dough, all the way to the bottom of the pan. These deep holes are essential! They’re what hold all that glorious olive oil and seasoning when we bake it, ensuring you get flavor in every single bite of your best focaccia recipe.

Just press firmly, creating little wells all over the surface. Do this quickly but calmly. It is okay if you see the bottom of the pan through a few of the deepest dimples—that’s how you get that signature airy, chewy interior!
Topping Your garlic parmesan focaccia bread recipe Before Baking
Alright, the oven should be screaming hot right now! We need that 425°F preheated and ready to shock the dough into that perfect, airy rise. This is the grand finale before the bake, and it’s where the “Parmesan” part of our garlic parmesan focaccia bread recipe really comes to life.
Take that remaining olive oil—about 2 tablespoons, if you measured—and drizzle it all over the top. Make sure it pools beautifully in all those dimples we spent time creating. That oil is key to transforming this dough into delicious cheesy bread recipes!

Now for the cheese. Here’s my golden rule for Parmesan: Add it right before it goes into the oven. If you add it too early, it can burn while the bread is still filling out. Sprinkle that grated Italian beauty evenly across the entire surface. Follow that up with a generous pinch of flaky sea salt—you want those crunchy flakes on top! The high heat will crisp up the cheese edges while the interior stays happy and soft. For more inspiration on finishing touches, you can always check out my guide on savory bread topping ideas!
Baking the garlic parmesan focaccia bread recipe for a Crispy Crust Bread
It’s time for the magic to happen! Slide that perfectly oiled and cheesy pan into that 425°F oven. We’re looking for about 20 to 25 minutes of baking time. You want the top to be gorgeously golden brown, and crucially, you want to smell that toasted Parmesan aroma filling your kitchen!

If you really want the ultimate crispy crust bread bottom—and I always do—pop a pizza stone or steel into the oven while it preheats. That intense heat transfer makes a world of difference! When it comes out, you have to lift it right out of the hot pan immediately. If it sits in there, the steam gets trapped, and that beautiful crisp bottom turns soft again. Trust me on this step!
When you’re mastering the best focaccia recipe, finishing strong matters. Check out my breakdown on achieving that perfect crispy crust bread flavor profile!
Tips for Success with this parmesan bread bake
I always tell people that baking this amazing garlic parmesan focaccia bread recipe really comes down to managing expectations about the dough. Forget everything you know about standard bread dough! This is the opposite of stiff and bouncy. It is going to be very wet, almost like a thick batter, and that’s exactly what we want for that fluffy focaccia texture.

Don’t worry about needing fancy bread flour; good old all-purpose flour works like a charm here, keeping this firmly in the easy homemade focaccia category. Just make sure your yeast is fresh! If your dough isn’t rising after the first hour, your yeast might be dead, and you’ll need to start over. That long, slow rise is where all the flavor develops for this parmesan bread bake.
Also, oil everything down! Your hands, your spatula, the pan—oil is your friend when dealing with sticky dough. It prevents frustration and helps guide the dough where you want it to go. For more tips on getting comfortable with artisan bread at home, take a look at my fundamentals guide over here!
Frequently Asked Questions about making garlic parmesan focaccia bread recipe
I always get so many questions whenever I share this garlic parmesan focaccia bread recipe because everyone wants that perfect balance of chewy and crunchy! That’s totally fair; this bread deserves your attention. Here are some of the things I hear most often from folks trying this easy homemade focaccia for the first time.
If you ever have questions about timing your dinners around bread baking, make sure you check out my approachable weeknight meal ideas!
Can I use different herbs on my garlic parmesan focaccia bread recipe?
Oh absolutely! While the garlic and Parmesan are the stars, this is your bread, so feel free to customize. A pinch of dried Italian seasoning mixed in with your toppings works wonders, or fresh rosemary chopped up and tucked into those dimples alongside the garlic is just heavenly. It adds that lovely, fragrant lift to the whole savory bread topping ideas!
What is the best way to reheat leftover cheesy bread recipes?
Leftover focaccia is still good, but it loses that initial beautiful crispness, right? To bring it back to life, skip the microwave entirely! That just makes it rubbery. Instead, place your slice directly on the oven rack or in a toaster oven at about 350°F for just 5 to 7 minutes. It crisps the crust up beautifully again, making it taste almost freshly baked!
Can I substitute the flour?
For this specific formula, I really recommend sticking to all-purpose flour. Because this is a no knead bread recipe, the gluten structure relies on the standard protein content of AP flour to support all that oil and air. Using whole wheat will require way more liquid and totally change the texture we’re aiming for in this Italian bread recipe.
How long does the dough really need to proof the second time?
The second proof is usually shorter because the dough is already warm and active. I watch the dough, not the clock! You are looking for the dough to puff up nicely, nearly filling the pan, which usually takes 30 to 45 minutes. If you press a finger gently into it and the indentation mostly stays put without springing back aggressively, you’re ready to dimple and bake!
Storing and Serving Your Homemade Focaccia
The hardest part of making this garlic parmesan focaccia bread recipe is letting it cool down enough to eat! But once you’ve convinced yourself not to devour the whole loaf right away, you’ll need to know how to keep it fresh. For short-term storage, just let it cool completely on a wire rack first. Once it’s totally cooled, pop it into an airtight container or zip-top bag. It stays great at room temperature for a good two days. Don’t worry about refrigeration unless your kitchen is scorching hot; cold temps can actually dry bread out faster.
If you need to bring it back to life after day one, remember what I said about the oven for reheating! A quick blast at 350°F gets that crust sharp again. Seriously, leftovers make the most amazing crunchy snack.
As for serving, this bread basically begs to be dipped! It’s incredible alongside a big bowl of soup or a hearty salad—you can check out some of my favorite soup and salad pairing ideas here. Or, simply serve slices alongside good quality balsamic vinegar mixed with a splash of extra virgin olive oil. Honestly, though, I’ve eaten this plain straight out of the pan too many times to count. If you want to share your beautiful bake, don’t forget to tag me over on Facebook at Pure Cooking Joy!
PrintEasy Garlic Parmesan Focaccia Bread Recipe
Make this simple, flavorful garlic parmesan focaccia bread at home. This recipe delivers a fluffy interior and a crispy crust, perfect for sharing.
- Prep Time: 20 min
- Cook Time: 25 min
- Total Time: 2 hours 5 minutes
- Yield: 8 servings 1x
- Category: Bread
- Method: Baking
- Cuisine: Italian
- Diet: Vegetarian
Ingredients
- 3 cups all-purpose flour
- 1 teaspoon instant dry yeast
- 1 teaspoon fine sea salt
- 1 1/2 cups warm water (about 105-115°F)
- 1/4 cup extra virgin olive oil, plus more for drizzling
- 4 cloves garlic, minced
- 1/2 cup grated Parmesan cheese
- Flaky sea salt, for topping
Instructions
- In a large bowl, whisk together the flour, yeast, and fine sea salt.
- Add the warm water and 1/4 cup of olive oil to the dry ingredients. Mix with a wooden spoon until a shaggy, sticky dough forms. Do not overmix.
- Cover the bowl tightly with plastic wrap and let the dough rise in a warm place for 1 to 1.5 hours, or until doubled in size. This is a no knead bread recipe.
- Gently stir the minced garlic into the dough.
- Lightly grease a 9×13 inch baking pan with olive oil. Gently scrape the dough into the prepared pan.
- Pour 2 tablespoons of olive oil over the dough. Gently stretch and press the dough to fill the pan corners. If the dough resists, let it rest for 10 minutes before continuing to stretch.
- Cover the pan loosely and let the dough proof for another 30 to 45 minutes.
- Preheat your oven to 425°F (220°C).
- Once proofed, use oiled fingers to create deep dimples all over the surface of the dough.
- Drizzle the remaining olive oil over the top and into the dimples. Sprinkle the grated Parmesan cheese evenly over the surface. Finish with a light sprinkle of flaky sea salt.
- Bake for 20 to 25 minutes, or until the top is golden brown and the bottom is crispy.
- Remove the bread from the pan immediately and let it cool slightly on a wire rack before slicing and serving.
Notes
- Use high-quality extra virgin olive oil for the best flavor in this savory bread topping.
- For an extra crispy crust, place a baking stone or steel in the oven while preheating.
- You can make the dough the day before; after the first rise, place the covered bowl in the refrigerator for up to 24 hours. Bring to room temperature before proceeding with step 4.
Nutrition
- Serving Size: 1 slice
- Calories: 250
- Sugar: 1
- Sodium: 350
- Fat: 11
- Saturated Fat: 4
- Unsaturated Fat: 7
- Trans Fat: 0
- Carbohydrates: 32
- Fiber: 2
- Protein: 7
- Cholesterol: 10
