 Skip to content

Okay, let’s be real for a second. Sometimes you just need something sweet, incredible, and fast, right? When the summer heat is blazing or I have guests showing up unexpectedly, the last thing I want to do is crank up the oven. That’s exactly when I reach for the ingredients required to make what I confidently call the **best no bake peanut butter pie** you will ever taste. Forget anything fussy; this recipe is pure cooking joy distilled into a single, creamy pie. It’s rich, it’s ridiculously simple, and it satisfies that major peanut butter craving every single time. Trust me, this one is going straight into your regular rotation!
If you’re new to my kitchen, welcome! I’m Alex, and I believe soul-satisfying food shouldn’t require a six-hour commitment. This pie proves that idea perfectly. It’s deeply indulgent, yet it takes almost no effort. And since we’re skipping the oven, it’s ideal for those nights when keeping the kitchen cool is the top priority. Ready to see magic happen in about 20 minutes of active time? Let’s grab the mix-ins for this amazing no bake peanut butter pie.
- Why This Creamy No Bake Peanut Butter Pie is Your New Go-To Dessert
- Gathering Ingredients for Your No Bake Peanut Butter Pie
- Step-by-Step Guide to Making a Fluffy No Bake Peanut Butter Pie
- Tips for the Perfect No Bake Peanut Butter Pie Texture
- Serving Suggestions for Your Easy Peanut Butter Pie
- Storage and Make Ahead Tips for Your No Bake Peanut Butter Pie
- Variations: Making a Chocolate Peanut Butter Pie No Bake Version
- Frequently Asked Questions About This No Bake Peanut Butter Pie
- Nutritional Snapshot of Your Indulgent Peanut Butter Dessert
Why This Creamy No Bake Peanut Butter Pie is Your New Go-To Dessert
Why am I so excited about this specific pie? Because it delivers that huge, satisfying punch of an **indulgent peanut butter dessert** without any of the usual baking stress. Seriously, this recipe is foolproof. It’s one of those rare recipes where you mix things, chill things, and everyone thinks you slaved away for hours. That’s what I call pure cooking joy right there!
The texture is the real star, though. We aren’t messing around with watery fillings here. This filling is spectacularly **creamy peanut butter pie** goodness, made light and airy by folding in that whipped topping at the end. It sets up beautifully firm in the fridge, meaning you get clean slices every time—perfect for parties or when you need a reliable **make-ahead dessert**.
Prep Time and Effort for the Best No Bake Peanut Butter Pie
Let’s talk efficiency because I know you’re busy. The active prep time here is just about 20 minutes flat! That’s right—a magnificent, rich pie ready to go into the fridge in under half an hour. The only thing you “cook” is the crust binder with completely melted butter. Since this is a true **quick dessert recipe**, you can whip it up right after dinner and then forget about it until it’s time to enjoy that dreamy, smooth flavor. It’s the perfect centerpiece for any gathering, especially when the goal is maximum deliciousness with minimum effort. If you love my easy gooey Southern pecan pie, you’ll appreciate the similar ‘no-fuss’ vibe here!
Gathering Ingredients for Your No Bake Peanut Butter Pie
Alright, time to talk supplies! When you’re making a **no bake peanut butter pie**, the ingredient list is amazingly short, which is exactly what I love about it. Fewer things to buy means less stress! We are building a beautiful tower of flavor here, starting with that chocolatey base and moving up to the decadent, creamy center. For the best results, especially if you want that perfectly **smooth peanut butter filling**, don’t skimp on the quality of your main ingredient—use a good, creamy peanut butter that you actually enjoy eating with a spoon!
- 1 1/2 cups chocolate sandwich cookie crumbs (you know, about 24 of those delicious cookies already crushed up)
- 6 tablespoons unsalted butter, melted
- 1 (8 ounce) package cream cheese, make sure it’s fully softened to room temperature!
- 1 cup creamy peanut butter
- 1 1/2 cups powdered sugar (sifting this is optional, but I always skip it!)
- 1 teaspoon vanilla extract
- 1 (12 ounce) container frozen whipped topping, thawed (I always use the stuff in the big tub, thawed in the fridge!)
- Optional: 1/2 cup mini peanut butter cups, chopped, for that ultimate topping.
See? Super easy. You probably have half of this already! I find that having everything measured out before I start mixing keeps the momentum going, which helps us keep this whole process under that 20-minute active mark.
Ingredient Notes and Substitution Options
I know sometimes we don’t have exactly what’s on the list, so let’s chat substitutions real quick. The Oreo crust is my current obsession because those chocolate cookies pair so perfectly with the peanut butter, but if you don’t have them, don’t panic! If you swap it out for a classic graham cracker crust pie, that works wonderfully too. If you go that route, you might want to check your butter measurement, as graham cracker crumbs can sometimes drink up a bit more fat. Also, that whipped topping is essential for the fluffiness—it’s what turns this into a light filling instead of a dense brick. I wouldn’t recommend trying to whip heavy cream for this specific recipe, as it changes the stability too much for a successful **no bake peanut butter pie**.
Step-by-Step Guide to Making a Fluffy No Bake Peanut Butter Pie
Now for the fun part—putting it all together! Making the **no bake peanut butter pie** is honestly like building something in fast-forward; it moves quickly but the results are incredibly rewarding. The key here is organization so you can move straight from crust to filling without stopping. Remember, no oven means no waiting for things to bake and cool down! If you want that ultra-smooth center, follow these steps exactly. They are the basis of my family’s no bake fudge recipe too—technique really matters!
Creating the Crunchy Oreo Crust for Your No Bake Peanut Butter Pie
First things first, we handle the base. Grab your 9-inch pie plate. You’re going to mix those chocolate cookie crumbs with the melted butter until everything looks like wet sand. Don’t be shy when pressing it into the plate. Really use the bottom of a measuring cup or the back of a spoon to pack that mixture tightly across the bottom and up the sides. We need a solid foundation for this heavy filling! Once it’s nice and compact, slide that shell into the freezer. It needs at least 15 minutes in there to firm up while you tackle the star of the show—the filling.
Achieving the Smooth Peanut Butter Filling for Your No Bake Peanut Butter Pie
This is where we build the texture! Grab your big mixing bowl. The absolute first thing you must do is beat that softened cream cheese by itself until it is completely smooth—no lumps allowed, or your texture will suffer! Once it looks like soft icing, beat in your creamy peanut butter until it’s blended. Next, slowly add in the powdered sugar and vanilla. Beat it well, but not violently, until it looks lovely and smooth. Now, for the essential step to keep this a **fluffy peanut butter pie**: gently fold in your thawed whipped topping. I mean gently! Use a spatula and cut through the middle, scraping the sides, until it’s just combined. Put the mixer away—overmixing this will deflate all that air we just whipped in.

Assembling and Chilling the No Bake Peanut Butter Pie
Easy peasy! Now take that chilled crust out of the freezer. Spoon all that beautiful, light peanut butter filling right into the crust. Use your spatula to smooth the top so it looks nice before it sets. Then, you have to be patient! Cover the pie loosely with plastic wrap and put it in the refrigerator. I really, really insist on a minimum of 4 hours chilling time. If you try to slice it early, it will just slump, and nobody wants a sloppy **no bake peanut butter pie**. If you can wait overnight, even better; it gets that perfect dense, sliceable texture.

Tips for the Perfect No Bake Peanut Butter Pie Texture
Listen, I know the temptation to rush a **no bake dessert** is strong, especially when you see those lovely ingredients—cream cheese, peanut butter, whipped topping—just begging to be mixed. But if you want that unbelievably smooth, non-gritty filling that melts in your mouth (the secret to a truly **creamy peanut butter pie**), you have to respect the temperature and the mixing steps. This is where we move from “good” pie territory to “I need the recipe immediately” territory.
My biggest non-negotiable tip, which I mentioned during ingredient prep, is the cream cheese temperature. Don’t even think about using cream cheese straight from the fridge! It needs to be fully softened—think squishy, pliable, room temperature soft. Cold cream cheese will fight the peanut butter, and you’ll end up with tiny, annoying cheese lumps suspended in your gorgeous filling. You can’t just beat that out; you have to prevent it from happening in the first place.
Secondly, pay close attention when you’re incorporating that peanut butter and then the powdered sugar. You want to mix them until they are *just* combined and smooth before you even think about adding the fluffy component. That mixing develops the structure nicely. But when the whipped topping comes in, you need to treat it like spun clouds. You’ll hear me say it again: fold it gently! That folding action is what keeps our **fluffy peanut butter pie** sky-high and light. If you use the electric mixer after the whipped topping is added, you’re simply beating the air right back out, and suddenly your pie filling looks less airy and more like dense frosting. We want airy, people!
Finally, while you might be tempted to slice this after two hours in the fridge because you’re so excited, please resist. The chilling time isn’t just for flavor development; it’s critical for structure. If you’re ever looking for advice on making a proper, flaky crust (though not needed for this pie crust recipe), technique is key, and here, technique means chilling! Give it that full four hours, and you’ll have a perfect slice every time.
Serving Suggestions for Your Easy Peanut Butter Pie
Okay, the pie is chilled, it’s firm, and it smells absolutely divine—now what? This is such an incredibly rich and **indulgent peanut butter dessert**, so sometimes a little something extra on top or on the side makes it feel truly special without adding any more work to your plate!
If you asked me how I finish this **easy peanut butter pie** for a weeknight treat, I keep it simple. A little sprinkle of flaky sea salt right before serving is magic because it seriously cuts through that richness and makes the peanut butter flavor pop. Seriously, try it—it’s a game-changer.
But if we’re entertaining or just feeling fancy, we gotta go big, right? Chopped mini peanut butter cups are a no-brainer. If you have them, chop them roughly and just scatter them all over the top right before you bring it out. That little bit of crunch and extra chocolate is just *chef’s kiss* perfect.

Another simple, yet elegant touch is a drizzle of melted chocolate. You don’t need a fancy ganache or anything complicated. Just melt a few semi-sweet chocolate chips—maybe a tablespoon of shortening or coconut oil if you have it to keep it runny—and use a fork to flick thin lines across the surface of the pie. It instantly looks like you bought this from a fancy bakery!
As for what to serve alongside it? Because this pie is so dense and creamy, you want something bright or slightly bitter to balance it out. A little bowl of fresh raspberries or strawberries works wonders; the tartness is the perfect counterpoint. And if you’re making this for an adult gathering, honestly, a strong cup of black coffee or a little sip of something rich, like my chocolate martini recipe, is the perfect accompaniment. It finishes the meal beautifully!
Storage and Make Ahead Tips for Your No Bake Peanut Butter Pie
Okay, this is one of my absolute favorite parts about making this **no bake peanut butter pie**: it is the queen of the **make ahead dessert** category! Seriously, this pie is designed for planning ahead, which takes all the pressure off entertaining. Think about it—you make this gem the day before, stick it in the fridge, and bam, dessert is done! That’s true cooking joy, right there, because it means you get to enjoy your guests instead of worrying about last-minute whipping or baking.
When it comes to keeping it fresh, the refrigerator is your best friend. Because our filling relies on cream cheese and whipped topping—which are quite stable once set—this pie holds up beautifully. You can wrap it loosely with plastic wrap or, even better, try using an airtight pie carrier if you have one. Stored correctly, you can expect your pie to stay perfectly delicious for a good two to three days.
I’ll be honest, I’ve definitely eaten leftovers on day four, and it was still fine, but the texture starts to get a little heavier after day three. The crust starts to soften just a tiny bit as moisture migrates, but honestly, it’s still good! This is why it’s such a reliable make ahead dessert.
What about freezing? Yes, you absolutely can freeze this! Because we didn’t bake it, freezing goes surprisingly well. If you want to freeze the entire pie, make sure it’s completely chilled first. Wrap the whole thing tightly—I usually do one layer of plastic wrap followed by a layer of aluminum foil to protect it from freezer burn. It holds up great for about a month in the freezer.
The key is the thawing process. You need to move it from the deep freeze to the refrigerator *the night before* you plan to serve it. Let it thaw slowly in the cold. Don’t try to rush this by leaving it on the counter for an hour; that will mess up that lovely fluffy texture we worked so hard to achieve by gently folding in the topping! Thaw slow and steady, and when it’s time to serve, top it off with your chopped peanut butter cups and enjoy your stress-free work!
Variations: Making a Chocolate Peanut Butter Pie No Bake Version
You know I love keeping things simple, but sometimes you just crave that perfect peanut butter and chocolate combination, right? It’s a classic pairing for a reason! Even though the base recipe uses an Oreo crust, which gives us a little chocolate kick already, we can easily amplify that cocoa flavor to turn this into a full-on **chocolate peanut butter pie** experience. It’s all about layering those flavors!
If you’re making this for a true Reese’s lover, you absolutely need to try one of these two simple tweaks. They give you that intense chocolate flavor while keeping the beautiful, **creamy peanut butter pie** filling the star of the show. And don’t worry, these are still totally no-bake, keeping with our philosophy here at Pure Cooking Joy!
Speaking of chocolate, if you’ve ever made my classic chocolate whoopie pies, you know I don’t shy away from a good cocoa moment. We can borrow that deep chocolate flavor here!
The Double Chocolate Layer: Adding Cocoa to the Filling
This is my favorite variation for getting that true chocolate peanut butter fix without turning the whole filling brown. We keep the filling predominantly peanut butter flavored, but we add a dark, rich chocolate element right into the mix. The secret here is using unsweetened cocoa powder.
Here’s what you do: When you get to step 3 of mixing the sweetener (after adding the powdered sugar and vanilla), you’ll add 1/4 cup of unsweetened cocoa powder right along with the sugar. Make sure you beat it really well with the electric mixer until it’s fully incorporated and you don’t see any dry streaks. Then, proceed carefully with folding in that whipped topping as usual to keep it light!
The result? The filling takes on a subtle, rich chocolate undertone that marries perfectly with the peanut butter, making it feel significantly more decadent. If you want the chocolate layer to be even more pronounced, you can always skip the peanut butter cups on top and instead make a thin chocolate topping sheet, just like a fudge layer. It’s rich, trust me!
Emphasizing the Chocolate Crust Base
Since our original recipe already calls for chocolate sandwich cookies (Oreos!), this variation is the easiest one because it requires zero extra steps beyond what we already detailed in the instructions! But I want to emphasize this point for anyone thinking of swapping to a graham cracker crust: Don’t!
If you want to lean into the **chocolate peanut butter pie** vibe, stick to the chocolate cookies for the crust. They offer a structural sturdiness that complements the creamy filling perfectly. When you press that buttery, dark filling into the crust, you get a wonderful contrast in color and texture when you slice it—a dark, crunchy outer ring giving way to the pale, fluffy interior. It makes for such a beautiful presentation, especially when you dust the finished pie with a tiny bit of finely sifted cocoa powder instead of relying only on chopped candy toppers.

So, whether you choose to deepen the filling flavor with cocoa or just ensure you use that dark, buttery Oreo base, you’ve successfully transformed this into a powerhouse **chocolate peanut butter pie** without ever firing up the oven. It’s proof that a few small swaps can lead to a completely new dessert experience!
Frequently Asked Questions About This No Bake Peanut Butter Pie
I get so many wonderful messages asking about tweaking this **no bake dessert** recipe, and that just goes to show how much everyone loves a good slice of this pie! Since we are aiming for that perfect texture every time, I thought I’d round up a few of the most common questions I hear—especially around ingredients and setting time. We want every single pie to be the best, most **creamy peanut butter pie** possible, after all!
Can I use natural peanut butter in this no bake dessert?
Oh, that’s a tricky one! While I love natural peanut butter for toast, I strongly recommend sticking to the conventional, creamy stuff for this recipe. Natural peanut butter tends to separate really easily if the oil isn’t completely mixed in, and that liquid oil doesn’t incorporate nicely into the cream cheese mixture. You’ll end up fighting with the filling ingredient list, and it won’t achieve that gorgeous, **creamy peanut butter pie** texture we are after. For this specific **quick dessert recipe**, you need that stabilized, uniform peanut butter to ensure everything sets up perfectly firm.
What is the best crust for a no bake pie?
Honestly, the best crust is the one you love the most! In this recipe, I insisted on the Oreo crust because the dark chocolate is incredible against the sweet filling. But if you’re a classicist, you absolutely can go for a standard graham cracker crust pie setup. Both firmly pack down and freeze beautifully, giving you that necessary sturdy base so your filling doesn’t ooze out when you slice it. As long as you press it firmly into the bottom and up the sides, you’ve got a winner!
How long must the no bake peanut butter pie chill?
This might be the most important question because chilling is what sets this entire **easy peanut butter pie**! You need a *minimum* of 4 hours in the refrigerator. I know, I know, waiting is the hardest part, especially when it smells this good, but it’s non-negotiable for structure. If you rush it, you’ll end up with a lovely, sweet peanut butter soup!
If you can leave it overnight, please do. When that **no bake peanut butter pie** chills longer, the cream cheese binds really tightly with the whipped topping, resulting in an even firmer, almost fudge-like texture that slices like a dream. It makes serving at a party so much easier, and you don’t have to worry about anything collapsing. If you have any leftover thoughts or questions after making this stunning dessert, feel free to send me a message over on Facebook!
Nutritional Snapshot of Your Indulgent Peanut Butter Dessert
Okay, now that we’ve talked about how this amazing **no bake peanut butter pie** satisfies the soul, we should probably talk about what it does for the body, right? Look, this is an **indulgent peanut butter dessert**, so we aren’t going for salad territory here! This slice is rich, creamy, and exactly what you need when you decide to treat yourself.
I pulled together the estimated nutritional breakdown using standard measurements for the ingredients listed above. Remember, this is just a guide. If you use a different brand of peanut butter or add a mountain of peanut butter cups on top, the numbers will shift a bit! But for a single slice of this decadent beauty, here’s what you can generally expect:
- Serving Size: 1 slice
- Calories: 450
- Sugar: 35g
- Sodium: 280mg
- Fat: 30g
- Saturated Fat: 10g
- Unsaturated Fat: 20g
- Trans Fat: 0g
- Carbohydrates: 40g
- Fiber: 2g
- Protein: 10g
- Cholesterol: 35mg
See? Plenty of richness! This is why we make it as a **make-ahead dessert**—so we can enjoy it slowly and savor every bite. When you’re focused on pure joy in the kitchen, sometimes calories are just numbers, especially when the recipe is this easy and satisfying! For more stress-free cooking, you might enjoy my tips on baking bread, which requires a little more effort but offers similar cozy comfort!
PrintThe Best Creamy No Bake Peanut Butter Pie with Oreo Crust
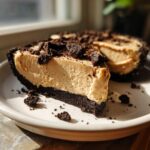
You can make this incredibly creamy no bake peanut butter pie with minimal effort. It features a rich, smooth peanut butter filling set in a crunchy chocolate Oreo crust. This is the ultimate quick dessert for any gathering, and you do not need to turn on your oven.
- Prep Time: 20 min
- Cook Time: 0 min
- Total Time: 4 hr 20 min
- Yield: 8 servings 1x
- Category: Dessert
- Method: No Bake
- Cuisine: American
- Diet: Vegetarian
Ingredients
- 1 1/2 cups chocolate sandwich cookie crumbs (about 24 cookies)
- 6 tablespoons unsalted butter, melted
- 1 (8 ounce) package cream cheese, softened
- 1 cup creamy peanut butter
- 1 1/2 cups powdered sugar
- 1 teaspoon vanilla extract
- 1 (12 ounce) container frozen whipped topping, thawed (like Cool Whip)
- Optional: 1/2 cup mini peanut butter cups, chopped, for topping
Instructions
- Prepare the crust: In a medium bowl, combine the chocolate cookie crumbs and melted butter. Press the mixture firmly and evenly into the bottom and up the sides of a 9-inch pie plate. Place the crust in the freezer while you prepare the filling.
- Make the filling base: In a large bowl, use an electric mixer to beat the softened cream cheese until it is smooth. Add the peanut butter and beat until fully combined and creamy.
- Sweeten the filling: Gradually add the powdered sugar to the peanut butter mixture, beating on low speed until incorporated, then increase the speed to medium and beat until smooth. Mix in the vanilla extract.
- Lighten the texture: Gently fold in half of the thawed whipped topping until just combined. Then, gently fold in the remaining whipped topping until the filling is light and fluffy. Do not overmix.
- Assemble the pie: Spoon the peanut butter filling evenly into the chilled Oreo crust. Smooth the top with a spatula.
- Chill: Cover the pie loosely with plastic wrap and refrigerate for at least 4 hours, or until the filling is firm. Chilling time is important for the best texture.
- Serve: Before serving, you can top the pie with chopped peanut butter cups or a light dusting of cocoa powder. Slice and serve this easy peanut butter pie cold.
Notes
- For the creamiest filling, make sure your cream cheese is fully softened to room temperature before mixing.
- If you prefer a graham cracker crust instead of Oreo, substitute 1 1/2 cups of graham cracker crumbs and reduce the butter slightly if the mixture seems too wet.
- This is a great make-ahead dessert; it holds up well in the refrigerator for up to three days.
Nutrition
- Serving Size: 1 slice
- Calories: 450
- Sugar: 35g
- Sodium: 280mg
- Fat: 30g
- Saturated Fat: 10g
- Unsaturated Fat: 20g
- Trans Fat: 0g
- Carbohydrates: 40g
- Fiber: 2g
- Protein: 10g
- Cholesterol: 35mg
