 Skip to content

Mornings. Whew! They can feel like a frantic race before you’ve even had your first cup of coffee. If you’re like me, Alex Hayes, and you value real, satisfying food but just don’t have thirty minutes to stand over a stovetop every day, I totally get it. That’s why I am so thrilled to share these incredible **banana oatmeal** bars with you today. These aren’t just any baked good; they are the ultimate solution for transforming chaotic mornings into peaceful ones. We’re talking easy, grab-and-go fuel that tastes like you spent ages making it. Forget stressful cooking; this recipe embodies the simple, joyful approach I bring to every dish here on Pure Cooking Joy.
- Why This Banana Oatmeal Recipe is Your New Breakfast Hero
- Gathering Ingredients for Your Banana Oatmeal Bars
- Step-by-Step Instructions for Perfect Banana Oatmeal
- Baking and Setting Your Banana Oatmeal Bars
- Tips for Success with Banana Breakfast Recipes
- Make Ahead Breakfast and Storage for Banana Oatmeal
- Variations on Classic Banana Oatmeal
- Frequently Asked Questions About Banana Oatmeal
- Share Your Pure Cooking Joy
Why This Banana Oatmeal Recipe is Your New Breakfast Hero
Listen, I love creamy oatmeal; who doesn’t? But when the alarm goes off at 6 AM, standing and stirring isn’t always feasible, right? That’s where transforming this fantastic **banana oatmeal** base into solid, sturdy bars becomes a kitchen game-changer. These aren’t just sweet treats; they are genuine, hearty fuel designed for your real life. If you’re tired of grabbing something processed or skipping breakfast entirely, these bars solve that problem instantly. They are firm enough to toss in a bag and taste divine straight from the fridge.
We are tapping into everything you love about **healthy oatmeal recipes** but wrapping it up in a package that moves with you. Think of them as the ultimate convenient breakfast upgrade.

Perfect for Meal Prep Oats and Busy Schedules
This is where the magic happens for your whole week. Forget cooking oats every morning! You bake these once, and suddenly you have 12 days worth of **Make Ahead Breakfast** waiting for you. Think about that relief when you’re rushing out the door. You just grab one of these beauties—a real, sustaining **Grab And Go Breakfast**—and you’re set until lunch. It seriously cuts down on the lunchtime scramble, too!
Simple Ingredient Recipes for Wholesome Snacking
When I started Pure Cooking Joy, I promised myself I’d cut out unnecessary fluff, and these bars keep that standard high. We rely on glorious, ripe bananas for most of the binding and sweetness, meaning we don’t need loads of added sugar. That’s the beauty of **Simple Ingredient Recipes**! These **banana oatmeal** bars are absolutely full of naturally sweet goodness, making them a genuinely **Wholesome Snack** when those 3 PM hunger pangs hit. For more handheld goodness, check out my super easy protein bars recipe too!
Gathering Ingredients for Your Banana Oatmeal Bars
Okay, shopping list time! The beauty of this **banana oatmeal** creation is that you probably have everything needed sitting in your pantry right now. We keep this simple, which is why it works so well for quick weeknight fixes. But before you grab anything, I have one tiny, totally critical plea to make: do not use yellow bananas!
Seriously, you need those bananas to look sad. We are talking brown spots everywhere—almost black is even better. Those super-ripe ones give you the sticky sweetness and the binding power we need so these bars hold together perfectly. Ripe bananas are the secret backbone to these bars, much like how good butter is the backbone of so many classic desserts. If you love recipes that rely on whole, beautiful fruit for sweetness, you’ll adore my apple crumb bars, too!

Specific Ingredient Notes and Substitutions
Let’s talk about the oatmeal. You must use old-fashioned rolled oats here, not the quick-cooking or instant kind. Instant oats dissolve way too much, and we want texture in every bite of our **banana oatmeal** bars! The baking powder is also small but mighty; it gives just enough lift so these aren’t totally flat bricks, but they stay dense and satisfying. Simple swap alert: Maple syrup or honey? Use whichever you have more of—they are interchangeable here. Same goes for the milk; use whatever you keep on hand, whether that’s dairy, almond, or oat!
Step-by-Step Instructions for Perfect Banana Oatmeal
Alright, let’s get baking! I know you’re eager to get this done so you can enjoy your mornings later, and trust me, the process is so quick you’ll finish before your water boils for tea. We are going to move deliberately but quickly here to make sure our **banana oatmeal** bars are soft and chewy, not tough. Follow these steps exactly, especially when it comes to mixing, and you’ll have the best **Baked Oatmeal** batches to last you all week long.
Prepping the Pan and Oven for Baked Oatmeal
First things first: get that oven kicking up to 350°F (that’s 175°C). Grab your 8×8 inch baking pan—that’s the sweet spot for thickness. I always line mine with parchment paper, making sure the edges hang over just a little bit. This turns the bars into a little sling so you can easily lift the entire thing out later without breaking a single corner. No stress, no mess!
Mixing and Folding the Banana Oatmeal Batter
Now we bring those sad, spotty bananas into the bowl and mash them up good and fine. Next, toss in all your wet ingredients and your dry ingredients—oats, sweetener, milk, spices, everything! Mix it all together until you see it just starting to come together. Stop mixing right there! Don’t keep stirring looking for perfectly smooth batter; that’s how you get tough bars. Now, gently fold in whatever tasty things you chose, like chocolate chips or walnuts. This simple mixing keeps your **banana oatmeal** light!

If you want more decadent baked goodness, you have to try my recipe for gooey pecan pie—it’s the exact opposite of this healthy bake in terms of simplicity, but equally rewarding!
Baking and Setting Your Banana Oatmeal Bars
Time for the oven! Pour that beautiful, thick **banana oatmeal** mixture into your prepared pan and, this is important, press it down firmly. Use the back of a spatula or even just your knuckles to flatten the top so it bakes evenly. We want solid, uniform bars, not a crumbly mess!
Slide it into that 350°F oven and let it work its magic for about 20 to 25 minutes. How do you know when these **Healthy Oatmeal Recipes** are done? Don’t just rely on the clock! Look closely at the edges; they should look slightly golden and feel firm to the touch. The center should look set—meaning when you gently tap it, it doesn’t slosh. It should feel like dense, slightly warm cake batter that’s decided to solidify.
Now, for the hardest part, and this is where so many people mess up their beautiful **banana oatmeal** work: LET THEM COOL. Seriously, I know it’s tempting to dive right in, but if you try to slice these while they are hot, they will absolutely crumble on you. Grab that parchment overhang and lift the entire block out onto a wire rack. You need to let them cool completely—at least an hour, maybe even longer if your kitchen is warm. Cooling solidifies that banana binder, creating those perfect, sturdy structures that make these the ideal **Grab And Go Breakfast**!
Tips for Success with Banana Breakfast Recipes
Now that you know the basic steps for these amazing **banana oatmeal** bars, let me share some extra nuggets of wisdom that take them from good to absolutely legendary. Creating the best **Healthy Oatmeal Recipes** isn’t just about following steps; it’s about knowing the little secrets that perfect the final product. A few small tweaks make all the difference between a slightly fragile bar and one that holds together perfectly, even after a week in the fridge.
Remember I stressed those deeply spotted bananas? Let’s circle back to that one more time. If your bananas are yellow or barely spotted, your bars will be too loose; they’ll lack that beautiful, natural, dense structure. You want them almost gooey inside before mashing them. This ensures the final baked product is chewy and moist, not dry or crumbly.
Texture is everything in a good **banana oatmeal** bar. To keep that perfect chewy center, try not to press the mixture into the pan too aggressively—firm, yes, but don’t compact it like you’re packing sand! You want some air pockets in there so they don’t turn into hockey pucks when they cool down. If you love soft textures in your recipes, you seriously must try my soft and chewy oatmeal cookies next time!
The final secret is making sure you get the ratio of oats to liquid just right. Since ripeness varies so much from banana to banana, you might need a tiny splash more milk, or maybe they absorb the sweetener faster. Get the batter to a consistency where it’s thick but still easily spreadable, and you’ve won half the battle!
Make Ahead Breakfast and Storage for Banana Oatmeal
The real reason I became obsessed with these **banana oatmeal** bars is because they make you look like a superhero when a busy week rolls around. This is peak **Meal Prep Oats** territory, folks! If you bake these on Sunday afternoon, you’ve essentially automated breakfast (or at least a fantastic snack) for the next five days. That’s pure freedom right there!
I want you to store them correctly, though, so they taste as good on Friday as they did on Monday. If you plan on eating them within a day or two, leaving them in an airtight container on your counter at room temperature is totally fine. They stay wonderfully soft that way. I often keep mine under a glass cloche because I just love looking at them—it reminds me I’m organized!
If you need them to last longer, head straight to the fridge. I find that wrapping them individually in plastic wrap, then putting them all into one sealed container, keeps them happy for right around a full week. Pop them out about twenty minutes before you want to eat them, or just microwave them for ten seconds if you like them soft and warm again.
But Alex, what if I want them for next month?
Yes! You absolutely can freeze these **banana oatmeal** bars. Once they are completely cool and sliced, wrap each bar individually in plastic wrap or parchment paper, and then toss them into a freezer-safe zip-top bag. They freeze beautifully for up to three months. When you pull one out, just let it thaw on the counter for an hour, and it tastes almost freshly baked. This is why these are my go-to for planned freezer meals or when I’m prepping snacks for later in the month. Check out how I use the same planning mindset for my super easy Italian pinwheels when planning for parties!
Variations on Classic Banana Oatmeal
So, you’ve nailed the original **banana oatmeal** bars, and now you’re ready for round two? That’s the spirit! Just like my favorite classic comfort dishes, these bars are wonderful starting points for endless creativity. We are keeping things wholesome, but we can absolutely play with texture and flavor using simple pantry additions. If you love bananas in your baking, you’ll find tons of inspiration here. I’ve even got some links to my peanut butter protein balls if you’re looking for other no-bake fuel sources!
These **Banana Recipes** are so flexible, it’s hard to go wrong. Think about the standard base we created—it’s slightly sweet, dense, and hearty. We can use that as a canvas for almost anything!
Ideas for Healthy Baking Add-Ins
The beauty of this **banana oatmeal** base is its ability to absorb healthy extras without compromising structure. If you want to boost the nutrition subtly? Toss in a couple of tablespoons of chia seeds or ground flaxseed. They blend right in! For a little texture contrast, I love adding dried cranberries or diced dates. They plump up slightly during baking and give you little bursts of chewy sweetness throughout the bar.

Frequently Asked Questions About Banana Oatmeal
I always get questions when people first try a new **banana oatmeal** staple, and that’s great! It means you’re thinking about how to make this recipe fit perfectly into your life. I’ve collected the most common things people ask me about these bars—especially when they’re trying to squeeze them into a healthy routine or customize them for dietary needs. Don’t be afraid to experiment, but read these tips first!
Can I make this Banana Oatmeal recipe vegan?
Absolutely, yes! This recipe is so forgiving, which is what I love about it. Since we are using maple syrup (or honey, which isn’t vegan), you’ll swap that out for agave nectar or just use a little extra maple syrup—whichever you prefer for your sweetness level. The only other swap is the milk. Just use any non-dairy milk you love! Almond milk, soy milk, or oat milk work perfectly well in these **banana oatmeal** bars. If you want another great vegan treat, check out my rich vegan chocolate chip cookies!
What is the best substitute for rolled oats in this banana oatmeal?
This is important, so lean in! For these bars to structure correctly, you really need those old-fashioned rolled oats. They offer that perfect structural chewiness that makes them excellent **Grab And Go Breakfast** items. If you absolutely cannot use rolled oats, you could try using certified gluten-free rolled oats if you have a sensitivity, but please, please avoid instant or quick oats. They break down too much and we end up scrambling for something else to make for breakfast the next day because the bars turned mushy!
If you are aiming for low-carb or grain-free, you would need a total recipe overhaul, honestly. For this specific **banana oatmeal** bar, sticking to the rolled oats is the key to that satisfying, wholesome texture we are aiming for.
Share Your Pure Cooking Joy
Well, that’s it! We’ve covered everything you need to know to turn those sad, spotty bananas into your new favorite **banana oatmeal** staple. Honestly, seeing someone use my recipes to simplify their week is the best reward for me, Alex. It’s what Pure Cooking Joy is all about—making life a little easier and definitely more delicious!
Now I want to hear from you! Did you stick to the basics, or did you get wild with the mix-ins? I’m always looking for new ideas, so drop a comment below and tell me what crazy combinations you tried. Did you add walnuts? Cinnamon spice blends? Let me know your secrets!
If you made a batch and they look absolutely perfect (and I bet they do!), snap a photo and tag me on social media. Seeing your creations genuinely brightens my day. You can always catch up on my latest kitchen explorations over on the main blog page, or say a quick hello over on Facebook at Pure Cooking Joy. Happy baking, and I hope these bars bring lasting joy (and much less morning stress!) to your kitchen!
PrintHealthy Banana Oatmeal Bars for Easy Meal Prep
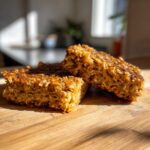
I am so glad you are here. These banana oatmeal bars use simple ingredients to create a satisfying, grab-and-go breakfast or wholesome snack. This recipe is perfect for busy mornings and meal prep routines.
- Prep Time: 10 min
- Cook Time: 25 min
- Total Time: 35 min
- Yield: 12 bars 1x
- Category: Breakfast
- Method: Baking
- Cuisine: American
- Diet: Vegetarian
Ingredients
- 2 large, very ripe bananas, mashed
- 2 cups rolled oats
- 1/4 cup maple syrup or honey
- 1/4 cup milk (dairy or non-dairy)
- 1 teaspoon vanilla extract
- 1 teaspoon baking powder
- 1/2 teaspoon ground cinnamon
- Pinch of salt
- 1/2 cup mix-ins (chocolate chips, chopped nuts, or dried fruit)
Instructions
- Preheat your oven to 350°F (175°C). Line an 8×8 inch baking pan with parchment paper, leaving an overhang for easy removal.
- In a large bowl, mash the ripe bananas until mostly smooth.
- Add the rolled oats, maple syrup (or honey), milk, vanilla extract, baking powder, cinnamon, and salt to the bowl with the mashed bananas. Mix everything together until just combined. Do not overmix.
- Fold in your chosen mix-ins, like chocolate chips or nuts.
- Press the mixture evenly into the prepared baking pan. Pat it down firmly to help the bars hold their shape.
- Bake for 20 to 25 minutes, or until the edges are lightly golden brown and the center is set.
- Remove the pan from the oven and let the bars cool completely in the pan before lifting them out using the parchment paper overhang.
- Once cool, slice the mixture into 12 bars. Store the bars in an airtight container.
Notes
- Using very ripe, spotty bananas provides the best natural sweetness for these bars.
- These bars store well at room temperature for 2 days or in the refrigerator for up to one week.
- For a gluten-free option, make sure you use certified gluten-free rolled oats.
Nutrition
- Serving Size: 1 bar
- Calories: 160
- Sugar: 8g
- Sodium: 50mg
- Fat: 4g
- Saturated Fat: 1g
- Unsaturated Fat: 3g
- Trans Fat: 0g
- Carbohydrates: 29g
- Fiber: 4g
- Protein: 4g
- Cholesterol: 0mg
