 Skip to content

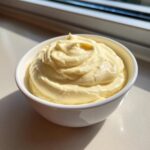
You know, before I started Pure Cooking Joy, the thought of making homemade mayonnaise from scratch felt like something reserved for professional chefs. I used to just grab the biggest jar from the store without even looking at the ingredients list. Seriously, my life was corporate burnout, and the last thing I needed was a complicated cooking task! But everything changed when I realized how much joy I could find in making simple kitchen staples. Trust me when I say: ditch the jarred stuff! My secret weapon? The immersion blender. It allows us to whip up the richest, creamiest, thick mayonnaise imaginable in honestly less than two minutes. It’s so quick and easy that it completely took the stress out of making from scratch condiments. I’m Alex, and I’m thrilled you’re here to discover how simple it is!
- Why This Foolproof Homemade Mayonnaise Recipe Works So Well
- Ingredients for Perfect Homemade Mayonnaise
- Step-by-Step Instructions for Quick Mayonnaise
- Troubleshooting Common Homemade Mayonnaise Issues
- Flavor Variations for Your Homemade Mayonnaise
- Storage and Shelf Life of Homemade Mayo
- Serving Suggestions for Your Creamy Mayonnaise
- Frequently Asked Questions About Homemade Mayonnaise
- Your Next Steps in Creating Kitchen Staples
Why This Foolproof Homemade Mayonnaise Recipe Works So Well
I know what you’re thinking: Homemade mayo must mean endless whisking and dealing with separated, sad oil puddles. Not with this method! That’s why I call this my foolproof Easy Mayo Recipe. Because we use the immersion blender, we skip all the scary steps everyone associates with making mayonnaise at home. Within seconds, you have that gorgeously thick, smooth texture you dream about for sandwiches and dips.
This isn’t just faster; it’s scientifically sound! The power of that immersion blender head, pressed right against the heavy yolk mixture, immediately stabilizes the emulsion when you turn it on high. It forces the oil and yolk to bind perfectly from the very first second. It’s truly stunning to watch!
Achieving Creamy Mayonnaise in Under Two Minutes
Seriously, two minutes is generous. I’ve timed it. If you’re making this for lunch prep or because you ran out right before a big sandwich assembly, this is your hero recipe. You don’t need a fancy kitchen gadget; that stick blender you probably already own does all the emulsifying heavy lifting in the time it takes to boil water for tea.

Tips for Healthy Homemade Mayo Ingredient Choices
One of the biggest reasons I stopped buying jars was checking those ingredient labels—so many seed oils I wanted to avoid! This is where you take back control, making Healthy Homemade Mayo that fits your diet perfectly. For a neutral flavor, I absolutely love using avocado oil, which yields wonderful results. But feel free to experiment! You can certainly achieve incredible flavor with a light or refined olive oil. Just remember, the rule of thumb for great Avocado Oil Mayonnaise is using a neutral-tasting oil so the bright lemon and Dijon really shine through.
If you want to see how a simple swap like this can transform a basic cooking step, check out my thoughts on making incredible sides from scratch; it proves that quality ingredients always win!
Ingredients for Perfect Homemade Mayonnaise
Okay, let’s get the foundation right. Because this recipe moves so fast, the ingredients have to be ready to go. My biggest tip for any emulsion, especially when you make mayonnaise at home, is making sure they are at room temperature. Cold ingredients just don’t want to play nice with each other!
You only need five things to create this magic, and if you have them on hand, you can have fresh mayo ready before your toast pops up. Remember, using high-quality ingredients really does matter here because there aren’t that many hiding places for flavor!
- 1 large egg yolk (and I mean large! Crucially, this must be room temperature—take it out about 30 minutes before you start.)
- 1 teaspoon Dijon mustard (This is our stabilizer helper, don’t skip it!)
- 1 teaspoon fresh lemon juice or white vinegar (Lemon gives it a brighter taste, but vinegar works just fine.)
- 1/4 teaspoon fine sea salt (Taste and adjust later, but start here.)
- 1 cup neutral oil (For the truly healthy homemade mayo vibe, I love avocado oil. A light olive oil is also fantastic, but skip the extra virgin kind; it can taste bitter in raw applications like this.)
We are going to use all of this in one single jar, which is why this is such a game-changer for making from scratch condiments. If you’re looking for other simple sauce recipes that start with a perfect base, check out my guide to creamy garlic sauce—it’s another quick win!
Step-by-Step Instructions for Quick Mayonnaise
This is it—the moment of magic! Remember, this whole project takes maybe two minutes thanks to our immersion blender friend. I used to be terrified of the blending part, but once you see how easy it is to make superior homemade mayonnaise, you’ll never look back. We follow the steps exactly like this for the guaranteed thick, creamy texture.
Assembling the Base for Your Homemade Mayonnaise
Grab that tall, narrow jar you use for your immersion blender. This shape is key, trust me! First, gently add your room temperature egg yolk, the Dijon mustard, the lemon juice (or vinegar), and that small amount of salt right into the bottom. Don’t stir a thing yet. Next, and this is the big one, pour the entire cup of oil right over the top of that yolk mixture. You should see two distinct layers—oil floating on the heavier liquid base. It looks wrong, I know! But this layering prevents splashing and sets you up perfectly for the quick emulsion.
The Immersion Blender Technique for Thick Mayonnaise
Now for the payoff. Take your immersion blender and insert it all the way to the bottom of that jar. Make absolutely sure the blade head is completely covering the egg yolk sitting down there. Turn the blender on high—and here’s the crucial part for a perfect Easy Mayo Recipe—DO NOT lift it immediately! Hold that blender steady, right on the bottom, for about 15 to 20 seconds. You will see that creamy, opaque mayonnaise instantly start forming and creeping up the sides. Wow! Once you see about half the mixture has turned to mayo, then, and only then, slowly tilt and lift the blender up through the oil. Do this gradually until every last drop of oil is incorporated. The whole lifting process takes maybe ten seconds longer. That’s it! You’ve made incredible thick mayonnaise!

If you absolutely don’t have an immersion blender, you *can* use a food processor. You place all the ingredients in, just like we did above, but you must drizzle that oil in a painfully slow, steady, continuous stream while the machine is running. It takes much longer, and honestly, the immersion blender is far more foolproof for a perfect result every time. For more tips on streamlining your kitchen workflow, you might enjoy my thoughts on simple sauce recipes.
Troubleshooting Common Homemade Mayonnaise Issues
Okay, deep breaths. Even with this foolproof method, sometimes things go wrong. The number one disaster when you try to Make Mayonnaise at Home is the dreaded split. If your mixture looks oily, thin, and everything has separated instead of forming that gorgeous, thick ribbon, don’t panic and don’t throw it out!
Splitting usually happens because the oil was introduced too fast at the beginning, or if your ingredients were too cold and resisted that initial binding. The fix is nearly as fast as the original blend, so be prepared to save your batch! Grab a clean, small bowl—you’ll need a fresh egg yolk for this repair, or you can use a teaspoon of Dijon mustard if you don’t want to waste another yolk.
Take your new yolk (or mustard) and put it in that clean bowl. Turn your immersion blender on low, or start whisking vigorously by hand if you’re using a processor. Now, take that runny, broken mayo mixture and drizzle it—yes, drizzle it slowly, like you’re adding the initial oil—into the fresh yolk. Slowly, slowly, slowly! That strong, fresh base will grab onto the separated oil and bring the entire mixture back into a stable, creamy emulsion. It’s culinary triage, and it works every single time. Once it thickens up, you’ve rescued it!

If you love learning these little kitchen rescue moves that save your ingredients, you’ll want to check out my tips on other simple sauce recipes that can be saved quickly when they break.
Flavor Variations for Your Homemade Mayonnaise
Once you master the basic technique for making homemade mayonnaise, the world opens up! Seriously, this creamy base is perfect for whatever flavor mood strikes you. It stops being just a condiment and starts being a building block for amazing sauces. You’ve nailed the texture goal, so now we play with flavor to turn this into all kinds of wonderful condiment recipes.
You can infuse so much personality into this jar of goodness without changing the core quick mayonnaise method we just learned. Here are a couple of my absolute favorites to keep things interesting in the fridge:
- Garlic Aioli (The Classic Upgrade): This is so easy; you won’t believe you didn’t do it sooner. Just add about 1 or 2 cloves of roasted garlic—yes, roasted, because raw garlic is too sharp—to the immersion blender jar *with* your initial ingredients (yolk, mustard, etc.). When you blend everything up, the roast garlic breaks down into the paste, creating the most luxurious aioli imaginable. It’s completely different from the stuff you buy!
- Spicy Kick Mayo: If you like a little heat on your sandwiches or fries, stir in a teaspoon of your favorite hot sauce right at the end, after the mayonnaise has fully formed. I love using Sriracha or a good smoky chipotle sauce for depth. If you want to make a batch like this, make sure you save a tiny bit of the plain mayo first, just in case you want to keep some neutral for chicken salad recipes.
- Herbaceous Green Mayo: This one is fun and bright! Finely chop about two tablespoons of fresh soft herbs—think parsley, chives, and maybe a little tarragon if you’re feeling fancy—and stir them in right at the very end. You can also add a tiny squeeze of extra lemon juice to keep it bright. It makes fried eggs look instantly better!
Don’t be afraid to treat this like a blank canvas! If you love finding ways to build flavor quickly, you have to check out my guide on making creamy garlic sauce variation recipes. It’s the same philosophy: start simple and add personality!
Storage and Shelf Life of Homemade Mayo
So, you’ve successfully created the creamiest, most gorgeous homemade mayonnaise known to humankind in under two minutes. Congratulations! Now we need to talk about keeping that magic alive. Since this is real food made with real, fresh ingredients, it doesn’t have the shelf life of those tubs full of preservatives that sit on the shelf forever.
The rule here is simple, and I learned this quickly because I don’t want anyone wasting that beautiful process of making from scratch condiments. Your homemade mayo needs to be stored in an airtight container—a clean glass jar works perfectly—and kept in the back of the refrigerator. You should plan to use it up within one week, maximum. Seriously, don’t push it past seven days. It’s just not worth the risk when it tastes this good fresh!
This short shelf life is partly why the flavor is so incredible, though! You’re getting the bold taste of fresh lemon and Dijon without any stabilizers trying to keep it ‘fresh’ for months. This brings me to a critical trust point: the egg. Since we aren’t cooking the yolk, the quality of that primary ingredient matters a ton. For the absolute best and safest result in this recipe, please use the highest quality, freshest eggs you can find. Pasteurized eggs are an option if you are nervous, but if you trust your local farm eggs, those tend to be vibrant and perfect for this kind of application. Fresh ingredients mean better safety and way better flavor!
Serving Suggestions for Your Creamy Mayonnaise
Now that you’ve whipped up the most glorious, vibrant homemade mayonnaise, it’s time to put that beautiful, thick stuff to work! Honestly, I look at a fresh jar of this stuff and feel like I can conquer the world of lunchtime spreads. Forget grabbing a jar of questionable yellow stuff; this is the foundation for so many amazing things you can do around the kitchen. It’s not just a condiment; it’s the building block for amazing Simple Sauce Recipes!

Since this mayo is so rich and fresh, it elevates humble dishes instantly. You’ll find yourself reaching for it constantly:
- The Ultimate Sandwich Upgrade: This is the obvious one, but trust me, it’s a revelation. Slather it on turkey sandwiches, smear it on a burger bun, or use it as the base for a killer grilled cheese. That homemade tang cuts through richer flavors perfectly.
- Instant Creamy Salad Base: Need a quick salad dressing? Thin a scoop of your fresh mayo with a little water or a splash of vinegar until it’s pourable. Toss it with fresh chopped herbs (like parsley or dill) and you have an amazing dressing for potato salad or coleslaw in seconds. You won’t believe how much better it is than bottled ranch!
- The Perfect Dip for Fries and Veggies: Don’t limit it to sandwiches! Serve it alongside roasted potatoes or sweet potato fries. For an easy upgrade to a dipping sauce, mix it with a squeeze of ketchup and a pinch of smoked paprika for a quick spicy-smoky fry sauce.
- Elevating Chicken Salad: If you are making my favorite chicken salad, swap out the old mayo for this batch. The texture holds up beautifully, and the fresh ingredients make the whole salad taste brighter and cleaner.
See? It’s so versatile. Homemade mayo means you are just seconds away from incredible, fresh flavor additions to any meal!
Frequently Asked Questions About Homemade Mayonnaise
I know when you start diving into making things like homemade mayonnaise yourself, you usually have a ton of little questions popping up. Don’t worry, that’s totally normal! I had the same ones when I first traded in the jar for my immersion blender. This little condiment might seem simple, but getting that perfect texture requires knowing a few tricks. Here are the things I get asked most often when folks are trying this recipe for the first time.
Can I make Keto Mayonnaise or Paleo Mayo with this recipe?
Absolutely, you can! That’s one of the best parts of making your own from scratch condiments—you get to choose the fats. Since this recipe is naturally sugar-free and carbohydrate-free based on the yolk and oil, it fits right into those stricter eating plans. If you stick to an oil like avocado oil, which I highly recommend, your final product is a fantastic, rich Paleo Mayo. Similarly, for anyone eating low-carb, this is the perfect Keto Mayonnaise substitute you’ve been searching for. Just check your mustard, as sometimes Dijon adds a tiny bit of sugar, though usually not enough to worry about in this small quantity.
What is the secret to thick mayonnaise?
If you want that fantastic, almost buttery texture that looks stunning in the jar, you have to nail the initial set-up. The secret to thick mayonnaise isn’t about beating it harder or longer; it’s about setting up a strong initial trap for the oil. Remember how I told you to pour the entire cup of oil right over the top of the yolk mixture without stirring? That’s crucial! Then, when you put the immersion blender head down, you have to keep it absolutely still against the bottom of the container for those first 15 to 20 seconds.
This gives the powerful blade a concentrated area to start breaking down the egg yolk and binding it to the oil. Once that heavy, thick layer forms at the bottom, *that* is the stabilizing structure. Only when you see that tight ribbon forming do you slowly begin to lift the blender to draw in the rest of the oil. If you lift too soon, you just agitate the oil, and bam—you get a runny mess. Keep it low and slow at the start for thickness!
Is it safe to use raw egg yolk in homemade mayonnaise?
That’s a very fair question! Since we aren’t cooking the egg in this recipe, you are using raw yolk. I believe in transparency, so I always recommend using pasteurized eggs if you have any concerns about salmonella, especially if you are serving this to small children, pregnant women, or anyone with a compromised immune system. Personally, I source my eggs extremely carefully from local farmers I trust, which gives me peace of mind when I make my regular batches of homemade mayonnaise. Just know that because we aren’t cooking it, you should stick to that one-week storage rule, which mitigates any risk by encouraging you to consume it quickly.
Can I use a whole egg instead of just the yolk?
You technically *can*, but I really, really advise against it when you are making your first few batches using the immersion blender method. The yolk contains all the necessary fat and lecithin to create a strong, stable emulsion quickly. If you use a whole egg, you introduce the egg white, which is mostly water and protein, making the mixture much harder to blend into that perfect, creamy texture. The whole egg version often ends up thinner, feeling more like a very thick dressing than true mayonnaise.
If you watched my instructions above and still want to try a whole egg next time, you’ll definitely need to cut back on your oil slightly, maybe start with 3/4 cup, and be prepared to blend for longer and potentially whisk in that broken mixture if it slips up! Stick to the yolk for now; it makes the process foolproof. If you want to see how I approach another recipe where ingredient ratios are super strict, check out my post on creamy chicken and rice soup!
Your Next Steps in Creating Kitchen Staples
Well, friend, you did it! You’ve officially graduated from jarred condiments. You’ve mastered the art of making rich, unbelievably homemade mayonnaise using basically nothing but an immersion blender and about a minute of your time. How amazing is that? I really hope this shows you that making amazing food doesn’t have to feel complicated or stressful.
Now that you have this powerful new tool in your arsenal, I’d love to hear about it! Seriously, if this recipe changed how you view simple kitchen staples, please drop a comment below. Tell me what oil you used or what you slathered your first batch on—a burger? A crispy batch of fries? I live for those little updates!
If you’re feeling inspired to simplify more of your cooking routine and stop buying those specialty items at the store, poke around the rest of the site! I have a ton of accessible recipes designed to give you that same feeling of “I made that?!” mastery.
And hey, if you snap a picture of your perfectly thick mayo, tag me! You can find me over on Facebook sharing daily kitchen wins. Happy blending, everyone!
PrintFoolproof Homemade Mayonnaise Recipe Ready in Minutes
Hi, I’m Alex, and I’m so glad you’re here. I believe that incredible, soul-satisfying food doesn’t have to be complicated. Learn how to make rich, creamy homemade mayonnaise from scratch using an immersion blender. This quick recipe is perfect for beginners and results in a thick condiment that tastes much better than store-bought versions.
- Prep Time: 2 min
- Cook Time: 0 min
- Total Time: 2 min
- Yield: About 1 cup 1x
- Category: Condiment
- Method: Immersion Blending
- Cuisine: American
- Diet: Low Fat
Ingredients
- 1 large egg yolk (room temperature)
- 1 teaspoon Dijon mustard
- 1 teaspoon fresh lemon juice or white vinegar
- 1/4 teaspoon fine sea salt
- 1 cup neutral oil (such as avocado oil or light olive oil)
Instructions
- Place the egg yolk, Dijon mustard, lemon juice (or vinegar), and salt into the bottom of a tall, narrow container, like the jar that often comes with an immersion blender.
- Pour the entire 1 cup of oil over the top of the egg mixture. Do not stir or mix yet.
- Insert the head of the immersion blender all the way to the bottom of the container, ensuring it completely covers the egg yolk.
- Turn the blender on high speed and keep it steady at the bottom for about 15 to 20 seconds until you see the mayonnaise start to form and thicken.
- Slowly begin to tilt and lift the immersion blender up through the oil mixture, allowing the remaining oil to incorporate until the mixture is thick and creamy. This should take less than one minute total.
- Stop blending. Scrape down the sides if needed. Taste the mayonnaise and add more salt or a small squeeze of lemon juice if you want more tang.
- Transfer your homemade mayonnaise to an airtight container and refrigerate.
Notes
- Use room temperature ingredients for the best chance of a stable emulsion.
- If you do not have an immersion blender, you can use a food processor, but you must drizzle the oil in a very slow, steady stream while blending continuously.
- This healthy homemade mayo is best used within one week when stored in the refrigerator.
Nutrition
- Serving Size: 1 Tablespoon
- Calories: 90
- Sugar: 0
- Sodium: 60
- Fat: 10
- Saturated Fat: 1.5
- Unsaturated Fat: 8.5
- Trans Fat: 0
- Carbohydrates: 0
- Fiber: 0
- Protein: 0.5
- Cholesterol: 25
