 Skip to content

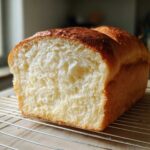
Oh my gosh, if there is one smell that instantly makes my house feel like home, it’s freshly baked bread. Seriously, it beats all the candles in the world! When I was stuck in that corporate grind, the thought of making a proper $\text{yeast bread}$ felt like climbing a mountain. But I promise you, folks, that struggle led me straight here, to my Foolproof Easy Yeast Bread Recipe. We’re talking super soft, unbelievably fluffy texture that’s perfect for slicing thick for toast. Because we’re using instant yeast, this beginner $\text{yeast bread}$ is on your table faster than you think, proving you don’t need a ton of time to create something truly wonderful. I want you to experience that same moment of pure joy I had when I finally got that perfect golden-brown loaf. Forget all the complicated tutorials; this is the $\text{yeast bread}$ recipe that truly changed everything for me, and I know it’ll do the same for you in your kitchen! If you want to know more about my cooking journey before we start, you can read all about it over at the About Me page.

- Why This Easy Homemade Bread Recipe Works So Well (Beginner Bread Baking)
- Gathering Ingredients for Your Classic Homemade Loaf Yeast Bread
- Step-by-Step Instructions: How to Bake Yeast Bread Perfectly
- Tips for Achieving Bakery Style Bread at Home
- Storage and Reheating Instructions for Your Quick Yeast Bread Recipe
- Making Variations of This Simple Yeast Recipe
- Frequently Asked Questions About Making Yeast Bread
- Nutritional Estimates for Your Fluffy Sandwich Bread
- Share Your Homemade Yeast Bread Success
Why This Easy Homemade Bread Recipe Works So Well (Beginner Bread Baking)
I totally get it—bread baking can look intimidating. People talk about long proofing times and complex folding techniques. But trust me, this recipe is designed to give you huge rewards without the headache. It’s the ultimate $\text{beginner bread baking}$ template! The entire goal here is success, which is why we lean heavily on the instant yeast. That speeds up our rising time considerably, making this a true $\text{quick yeast bread recipe}$.
The reason you get that incredible $\text{tender crumb bread}$ every single time comes down to the fat content—that soft butter we add up front! It coats the gluten strands just enough to keep the texture light and delicate, even though it’s sturdy enough to make amazing sandwiches. If you want more of my foundational baking thoughts, check out my deep dive on baking tips!
The Secret to Fluffy Sandwich Bread: Instant Yeast vs. Active Dry
This is where we save serious time, folks! Traditional recipes often call for active dry yeast, which needs that little rest period—the “proofing”—where you dissolve it gently in warm water and wait five minutes for it to get foamy. It’s cute, but who has time for that when you’re hungry?
We use instant yeast here. It’s already ground finer and has a little dried hydration booster in it. That means we just dump it right into the warm milk mixture with the sugar, and it starts working instantly. That’s your fast lane straight to a glorious, $\text{fluffy sandwich bread}$ without sacrificing any of that wonderful texture.
Gathering Ingredients for Your Classic Homemade Loaf Yeast Bread
Okay, time to gather our supplies! Whenever I bake this $\text{yeast bread}$, I always line up every single ingredient first. It keeps things moving smoothly, and you don’t want to realize mid-mix that you are short on butter! This recipe is built on simple, cozy ingredients, but the ratios are key to getting that classic, soft white loaf.
Here’s what you’ll need to round up:
- 1 cup warm milk (and I mean warm! We’re aiming for 105°F to 115°F, just barely warm to the touch. Too hot and you kill your yeast, too cold and they just snooze!
- 2 1/4 teaspoons instant yeast (That’s one standard packet, super easy!)
- 1/4 cup granulated sugar (This feeds the yeast and adds a little sweetness.)
- 1 teaspoon salt (Don’t skip this! It controls the yeast performance and flavor.)
- 1/4 cup unsalted butter, softened (Crucial! It needs to be truly soft, not melty liquid.)
- 3 to 3 1/2 cups all-purpose flour or bread flour (I usually start with 3 cups and adjust.)
- 1 large egg, lightly beaten
Ingredient Notes and Substitutions for Perfect Yeast Bread
Let’s talk flours, because this makes a difference in your final texture. You *can* use all-purpose flour, and you’ll still get a wonderful loaf. But if you have bread flour handy, use it! Bread flour has more protein which develops stronger gluten, lending itself to that slightly chewier texture that feels more like $\text{bakery style bread at home}$.
As for the milk temperature? Seriously, grab a thermometer if you can. That 105°F to 115°F range is the sweet spot for waking up that instant yeast. If the mixture doesn’t get foamy after five minutes, your yeast is probably dead, and you need to start over! Lesson learned the hard way!
And hey, if you love that sweeter, slightly nostalgic taste, just like those wonderful Amish white bread loaves everyone talks about, feel free to bump that sugar up to 1/3 cup. It feeds the yeast a little more, which can also result in a slightly faster rise, too!
Step-by-Step Instructions: How to Bake Yeast Bread Perfectly
Alright, we’ve got our ingredients lined up—that’s half the battle won! Baking a fantastic $\text{yeast bread}$ isn’t about magic; it’s just following a few simple, rhythmic steps. Don’t stress about everything being perfect right away. Just move methodically through these stages, and I guarantee you’ll have a beautiful loaf coming out of the oven that tastes like it was baked in a professional bakery.
Activating the Yeast and Mixing the Dough for Soft White Bread Loaf
First things first, make sure that milk is warm, not hot! Seriously, we need those little yeast guys to wake up happy. Mix the warm milk and the actual instant yeast together in a big bowl. Go pour yourself a cup of coffee or scroll through your favorite recipe sites, because you need to wait five minutes. We’re looking for foam on top—like a nice head on a cold beer! That foam means your yeast is alive and ready to do the heavy lifting for this $\text{soft white bread loaf}$.
Once you see that foam, stir in your sugar, salt, and softened butter until the butter starts melting a bit. Then just quickly whisk in that beaten egg. Now, start adding that flour slowly, maybe cup by cup. Stop adding flour as soon as the dough looks shaggy and is pulling away from the sides of the bowl. You might not need all the flour, so trust your eyes over the measurement!
Kneading and the First Rise for Tender Crumb Bread
This is where we build structure. Turn that shaggy ball out onto a lightly floured counter. You have to knead this dough for 5 to 7 full minutes. It sounds like a long time, but keep going! You’ll feel the dough change from sticky and sticky to smooth and elastic under your hands. That kneading is what creates the structure needed for that desired $\text{tender crumb bread}$.

Once it’s smooth, give it a quick wipe of oil in the bowl, cover it up, and put it somewhere warm. We let this first rise go for 45 to 60 minutes. We need it nice and plump before moving on. You are looking for it to double in size—no shortcuts on the rise time!
Shaping, Second Proof, and Baking Your Yeast Bread
When it’s doubled, gently punch the air out—it’s very therapeutic, trust me! Then, shape it into a neat log and tuck it into your greased 9×5 inch loaf pan. Cover it lightly again and let it nap for a second rise, about 30 to 40 minutes. The sign it’s ready to bake is when it peaks about an inch above the rim of the pan.
Preheat your oven to 375°F (190°C) while it’s doing that last little rise. Pop the bread in for 30 to 35 minutes until it’s deeply golden brown all over. If you want that extra beautiful shine, brush the top with some melted butter right when it comes out. Then, get it onto a wire rack right away so the bottom doesn’t get soggy!
If you want to see some of my favorite ways to flavor bread after baking, check out my ideas for cinnamon bread!
Tips for Achieving Bakery Style Bread at Home
We’ve made the dough, we’ve done the kneading, and soon we’ll have that beautiful shape in the oven. But how do we bridge the gap between ‘homemade’ and ‘that amazing loaf I got downtown’? It really comes down to a couple of little tricks that make all the difference in the final look and feel. These techniques aren’t complicated, but they certainly elevate your final product!
When I first started baking, I just threw the dough in and hoped for the best. Now, I know exactly what to look for to get that perfect, satisfying exterior. These little touches are what help us create that gorgeous $\text{soft white bread loaf}$ right in our own kitchen.
If you’re looking for ways to get amazing textures in other baked goods, I’ve got a fantastic guide on getting flaky pie crusts that uses some similar temperature logic!
Creating the Perfect Golden Crust on Your Yeast Bread
That shiny, deeply golden top is just gorgeous, right? It’s what screams, “I made this!” Achieving it involves paying close attention to the last few minutes of baking. Remember way back when we pulled the $\text{yeast bread}$ out of the oven? That little bit of melted butter brushed on top right away is definitely responsible for a lot of that beautiful sheen and helping keep the crust tender, not hard.
But the real key is oven temperature consistency. Make sure you preheat for a good 15 minutes before that bread goes in. If your oven runs cool, your bread might bake too slowly, leading to a dull crust. If you have an inexpensive oven thermometer, use it! Knowing the real temperature, especially when baking $\text{yeast bread}$, prevents under-baking and guarantees that gorgeous, satisfying golden color we are chasing.

Storage and Reheating Instructions for Your Quick Yeast Bread Recipe
So, you baked the best loaf of your life. Fantastic! Now, how do we keep that magic alive past day one? Freshly baked $\text{yeast bread}$ is always best on the day it comes out of the oven, no question. But we can certainly stretch that softness! The main enemy here is air exposure, so we need to wrap it up tight.
Once the loaf is completely cool—and I mean truly cool, don’t rush this—wrap it tightly in plastic wrap first, and then toss that whole package into an airtight zip-top bag or a bread box. If you do this right, you can expect this $\text{fluffy sandwich bread}$ to stay wonderfully soft for a solid three days at room temperature.
If you realize you won’t get through the whole loaf that fast, my absolute favorite trick is freezing! Slice the entire loaf first, then wrap the slices together in plastic wrap and foil. You can freeze it for up to three months. When you need a slice, just pop one or two straight from the freezer into the toaster. That’s the easiest way to enjoy this $\text{quick yeast bread recipe}$ anytime!
Now, if you’re looking to resurrect a day-old slice that’s maybe gone a *tiny* bit stiff, don’t reach for the microwave—that makes it chewy and weird. Instead, wrap the slice loosely in aluminum foil and pop it into a 350°F oven for about five to eight minutes. It gets steamy inside that foil packet, and by the time you pull it out, it’s soft and tastes almost freshly baked! This simple reheating trick makes leftovers delightful.
Making Variations of This Simple Yeast Recipe
The beauty of this foundational $\text{yeast bread}$ recipe is that it’s incredibly adaptable, which is perfect for when you get the urge to try something new without starting completely over. Once you nail the basic steps for that soft texture, you can whip up entirely new loaves using these minor tweaks. It opens up a whole world of $\text{simple yeast recipes}$!
I love experimenting once the dough is mixed, especially since we’re already using instant yeast and a quick workflow. Think of this recipe as your canvas for bakery-style greatness.
Honey and Sweet Variations
If you’re craving a little bit more sweetness—say you want the flavor profile of the Amish white bread or even a honey bread—the adjustment is super easy. Just follow Step 3 in the main instructions, but swap out some or all of that granulated sugar for honey. I suggest using 1/3 cup of honey total.
A little note on substitution: Honey is liquid, so it adds a bit of moisture. When adding honey, you might need to add just a tiny extra sprinkle of flour when you move to the kneading stage. When I make my favorite honey bread recipe, I usually add just an extra tablespoon of flour during the final mix to make sure the dough handles nicely. It’s all about balance!
Creating a Slightly Crustier Artisan Loaf Feel
So, you want that rustic crust but still need the softness of a sandwich loaf? That’s a tricky balance, but totally possible with technique! If you prefer baking a round loaf instead of putting it in the pan, you’ll mimic that crusty $\text{artisan loaf}$ better. After the final rise, shape it into a tight round—often called a boule—and instead of putting it in the pan, you’ll need to bake it differently.
The secret to that crackly crust is steam! Place a shallow pan on the bottom rack while you preheat the oven. When you slide your loaf onto the hot baking stone or sheet, quickly pour about a cup of very hot water into that shallow bottom pan. It creates a steamy microclimate for the first 15 minutes of baking. Be careful, it makes a *ton* of steam! This technique helps the crust form nicely before it dries out, giving you that slight crispness around the edges while the interior stays fluffy.
Adding Savory Twists and Mix-Ins
This dough is sturdy enough to handle some fun mix-ins, too! If you want a savory option, omit the sugar completely (the yeast still eats the flour, so it will rise, just slower) and add things in during the final stages of mixing, right before kneading.
I love making a quick cheddar and chive loaf. Try folding in 1/2 cup of shredded sharp cheddar cheese and about 2 tablespoons of finely chopped fresh chives. Make sure the cheese isn’t too cold before you add it, or it might seize up the dough distribution. It’s great for dipping in tomato soup, or just eating warm!
Frequently Asked Questions About Making Yeast Bread
I know when you’re first diving into baking yeast dough, you have a million little questions buzzing around in your head. That’s totally normal! I’ve compiled some of the things I always used to wonder about when I was learning how to make my first perfect $\text{yeast bread}$. Don’t worry if things don’t go exactly right the first time; that’s just part of the learning curve!
If you want to explore more of my basic kitchen troubleshooting articles while you’re here, feel free to check out the full blog archive!
Can I use Active Dry Yeast instead of Instant Yeast in this yeast bread?
Yes, you absolutely can! Active dry yeast is just a tiny bit slower because its granules are a bit larger. If you are swapping it for the instant yeast in this recipe, you need to adjust Step 1. Don’t just dump it in dry!
Instead, take your warm milk (keep it between 105°F and 115°F), sprinkle the active dry yeast on top along with a pinch of the sugar from the recipe, and let it sit undisturbed for about 5 to 10 minutes. You’re waiting for that foamy, bubbly layer to form on top. If it foams beautifully, your yeast is happy and ready! You can then proceed exactly as written in the recipe, adding the salt, butter, and egg before you start incorporating the flour.
My dough didn’t double in size. What went wrong with my yeast bread?
Oh, the dreaded flat dough! It breaks my heart every time because it usually means disappointment later. If your dough didn’t rise during that first proof, there are usually only two culprits, and both are easy to fix next time.
First and foremost: temperature. If your milk was too hot (over 130°F), you essentially killed the yeast before it even got started. If it was too cold, the yeast just got lazy and didn’t wake up. You need that sweet spot we talked about!
The second reason for a flat $\text{yeast bread}$ is usually old or dead yeast. That little packet of instant yeast has a shelf life! If you’ve had it sitting around in the back of your pantry for ages, it might be time for a new batch. That’s why we practice that foam check right at the start—it saves you from kneading and waiting for dough that will never cooperate.
How can I make this a no knead bread?
I love a good $\text{no knead bread}$ for weekends when I really don’t want to work the dough! It takes longer, but the results are often wonderfully rustic and crusty. To adapt this recipe for a $\text{no knead bread}$ method, you need to drastically change the first rise instructions.
After you mix in the last of the flour by hand (or with a wooden spoon), stop! Don’t turn it out to knead. Just scrape down the sides of the bowl, cover it tightly, and put it in a cool, draft-free place. Instead of 45 to 60 minutes, you’ll need to let this rise for at least 3 to 4 hours, maybe even longer, until it’s puffy and full of air. You still need that second shaping and rise before baking, but skipping that 5-7 minute knead saves your arms!
Nutritional Estimates for Your Fluffy Sandwich Bread
I always feel a little weird putting numbers on homemade food because I know exactly what goes into it, and I know you folks are making this with love—which can’t be quantified! But for those of you tracking things, I pulled together the estimates for one slice based on the ingredients listed. Remember, this is just a starting point! If you use bread flour instead of all-purpose, or if you use too much butter, those numbers will shift a bit.
Keep in mind these figures are based on dividing the entire loaf recipe into 16 equal slices. This gives you a good benchmark for fitting the best $\text{fluffy sandwich bread}$ into your daily goals!
- Serving Size: 1 slice
- Calories: About 150
- Fat: 4g
- Saturated Fat: 2g
- Carbohydrates: 26g
- Sugar: 3g
- Protein: 4g
- Sodium: Approximately 250mg
- Fiber: 1g
- Cholesterol: About 20mg
We keep the saturated fats low because we’re using just a quarter cup of butter for the whole loaf, which is really pretty responsible for a delicious, homemade white bread texture. It’s real food, made right, and that’s what matters most around here!

Share Your Homemade Yeast Bread Success
Now for my favorite part! I’ve given you all the secrets, all the tips to get that incredibly soft texture, and shown you how truly easy this $\text{yeast bread}$ is to conquer. But baking is a conversation, right? I genuinely need to know how it turned out for you!
Did you nail that golden crust? Were your slices fluffy enough for the ultimate sandwich? Please head down to the comments section below and leave me a rating! I check those every single day, and your feedback keeps me inspired to share more $\text{easy homemade bread}$ recipes.
And if you took a picture—and I really hope you did!—snap a shot of that beautiful loaf and tag me on social media! Seeing your success stories is what Pure Cooking Joy is really all about. You can find me over on my Facebook page at Pure Cooking Joy. Seeing your warm, freshly baked loaves makes my whole week!
Go on, get baking, and let me know how this $\text{quick yeast bread recipe}$ worked its magic in your kitchen!
PrintFoolproof Easy Yeast Bread Recipe for Soft, Fluffy Homemade Loaves
I’m Alex, and I want to show you how simple it is to bake truly exceptional, soft, and fluffy yeast bread. This beginner-friendly recipe uses instant yeast for quick results, giving you that perfect golden crust and tender crumb every time you bake from scratch.
- Prep Time: 20 min
- Cook Time: 35 min
- Total Time: 1 hour 50 min
- Yield: 1 loaf 1x
- Category: Baking
- Method: Kneading and Baking
- Cuisine: American
- Diet: Vegetarian
Ingredients
- 1 cup warm milk (about 105°F to 115°F)
- 2 1/4 teaspoons instant yeast
- 1/4 cup granulated sugar
- 1 teaspoon salt
- 1/4 cup unsalted butter, softened
- 3 to 3 1/2 cups all-purpose flour or bread flour
- 1 large egg, lightly beaten
Instructions
- Combine the warm milk and instant yeast in a large bowl. Let this mixture sit for 5 minutes until it becomes foamy. This confirms your yeast is active.
- Stir the sugar, salt, and softened butter into the yeast mixture until the butter starts to dissolve. Add the beaten egg and mix briefly.
- Gradually add the flour, one cup at a time, mixing until a shaggy dough forms. You may not need all the flour.
- Turn the dough out onto a lightly floured surface. Knead the dough for 5 to 7 minutes until it becomes smooth and elastic. This develops the gluten for a soft texture.
- Place the dough in a lightly oiled bowl, turning it once to coat. Cover the bowl with plastic wrap or a clean kitchen towel. Let the dough rise in a warm place for 45 to 60 minutes, or until it has doubled in size. This is your first proof.
- Gently punch down the risen dough. Shape it into a uniform loaf and place it into a greased 9×5 inch loaf pan.
- Cover the loaf pan loosely and let the dough rise again in a warm spot for 30 to 40 minutes, or until the dough has crested about 1 inch over the rim of the pan. This is your second proof.
- Preheat your oven to 375°F (190°C) about 15 minutes before the second rise finishes.
- Bake the bread for 30 to 35 minutes, or until the top is golden brown and the internal temperature reaches 200°F (93°C).
- Remove the bread from the pan immediately after baking and place it on a wire rack to cool completely before slicing. Cooling on a rack prevents a soggy bottom crust.
Notes
- For an extra golden crust, brush the top of the loaf lightly with melted butter right after it comes out of the oven.
- If you want a slightly sweeter loaf, similar to Amish white bread, increase the sugar to 1/3 cup.
- If your kitchen is cool, place the dough in the oven with just the light on to create a warm proofing spot.
Nutrition
- Serving Size: 1 slice
- Calories: 150
- Sugar: 3
- Sodium: 250
- Fat: 4
- Saturated Fat: 2
- Unsaturated Fat: 2
- Trans Fat: 0
- Carbohydrates: 26
- Fiber: 1
- Protein: 4
- Cholesterol: 20
