 Skip to content

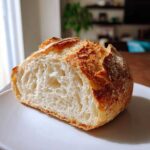
There’s nothing quite like pulling a loaf of truly magnificent bread from your own oven. That amazing sound of the crust crackling as it cools? Pure magic! I remember when I first started baking, stressed out from work, and trying to figure out how to make something good. Honestly, making crusty italian bread seemed impossible, like something only actual European grandmothers could pull off. But guess what? I cracked the code, and it took almost no effort on my part. This is my go-to, super reliable, no-knead recipe that guarantees you a golden, crisp exterior and an incredibly soft, airy interior every single time. It’s truly where I found my peace in the kitchen, and I know it’ll bring you joy, too. If you want bakery-style results without a single tough kneading session, stick with me! If you’re looking for more simple yeast recipes after this, check out the deep dive on my main bread baking page.
- Why This Easy No-Knead Crusty Italian Bread is Your New Favorite Loaf
- Gathering Ingredients for Your Crusty Italian Bread
- Step-by-Step Instructions for Homemade Italian Bread
- Expert Tips for Perfect **Artisan Bread at Home**
- Serving Suggestions for Your Italian Loaf Recipe
- Storage and Reheating for Lasting Crusty Italian Bread Flavor
- Frequently Asked Questions About Making Crusty Bread
- Nutritional Estimates for Your Fresh Baked Italian Loaf
- Share Your Perfect Crusty Italian Bread Creations
Why This Easy No-Knead Crusty Italian Bread is Your New Favorite Loaf
I know you’re looking for a reliable homemade Italian bread, and that’s exactly what this is. Forget those recipes that demand you spend twenty minutes wrestling with stiff dough! This method is trustworthy and truly beginner-friendly for anyone wanting easy crusty bread. It uses common pantry staples, and the result is that perfect textural contrast that makes people think you bought it from a fancy bakery. Trust me, once you nail this, you’ll be whipping up this artisan bread at home weekly. If you love this style, you should also check out my recipe for easy artisan bread with Parmesan and garlic!
Achieving the Perfect Crispy Bread Crust
The absolute crunch factor comes down to steam, plain and simple! That’s why we use the preheated Dutch oven. During the first half of the baking time, the lid traps all the moisture released by the dough. This creates a humid environment inside the pot, allowing the dough to stretch out fully before the crust sets hard. Once I lift that lid, BAM! Direct dry heat hits that wet surface, locking in that gorgeous, shatteringly crispy bread crust you dream about.
The Secret to a Soft Crumb Bread Interior
The magic here isn’t kneading; it’s time! Since we skip all that strenuous work, we let the yeast do the heavy lifting over 12 to 18 hours. This slow, cold fermentation develops amazing organic acids and traps tons of tiny gas bubbles. This long rest is what creates that wonderfully airy, chewy, and open structure we call that perfect soft crumb bread interior. It gives you a great chew without any effort!

Gathering Ingredients for Your Crusty Italian Bread
Now, this is the fun part because look at this list! It’s ridiculously short! Honestly, if you have flour, salt, yeast, and water, you are already 90% of the way to baking that beautiful, rustic loaf. I like to keep things simple whenever possible, and this crusty Italian bread recipe is proof that simple ingredients make the biggest impact. Just make sure you pay attention to the water temperature—it matters more than you think when you’re using instant yeast!
Ingredient Clarity and Specifics
When you lay everything out, measure carefully. This recipe is extremely forgiving, but precision helps us avoid that gummy center. Here’s what you’ll need ready to go:
- 3 cups all-purpose flour (no need for fancy bread flour here, standard stuff works great!)
- 1 1/2 teaspoons salt
- 1/4 teaspoon instant yeast (And I mean *instant* yeast, not the active dry kind—we’ll talk about that substitution later!)
- 1 1/2 cups cool water (Not warm, not cold tap water, but definitely cool!)
- 1 tablespoon olive oil (This goes into a separate bowl just to keep our main dough bowl from sticking later!)
Step-by-Step Instructions for Homemade Italian Bread
Okay, are you ready? Because this is where the magic happens, and I promise you, it’s about as easy as it gets. Since this is a no-knead recipe, our main goal is to mix things just enough and then leave the dough alone to develop flavor and structure on its own. Don’t try to mix this until it looks smooth; it simply won’t, and that’s absolutely fine! We need that shaggy mess for the long rest. This whole process relies on patience, not elbow grease.
Mixing and the Long Rise for Easy Crusty Bread
First, grab that bowl with your flour, salt, and yeast. Whisk them together just to make friends. Now, pour in the cool water and mix it with a wooden spoon until you have a messy, sticky blob—we call this a shaggy dough. Don’t keep mixing! Scrape that dough into a separate bowl that you’ve oiled lightly. Cover it tight, and this is the hard part: you have to walk away for 12 to 18 hours. Seriously, make it the night before! That long fermentation is what gives us that incredible depth of flavor in our easy crusty bread.

Shaping and Preheating the Dutch Oven Bread
When your dough is jiggly and bubbly, gently scrape it out onto a floured counter. We aren’t kneading, remember? Just gently fold it a few times—think of folding a letter—to create a rough ball shape. Pop that ball onto a piece of parchment paper, cover it loosely, and let it nap for 30 minutes. While it’s resting, you need to get serious. Place your Dutch oven, lid and all, into the oven and crank the heat up to 450°F. It needs to be screaming hot when the dough meets the pot!
Baking for a Golden Brown Crusty Italian Bread
This is the moment of truth! Using the parchment paper as a sling, carefully lower your dough into that scorching hot pot—watch out! Put the lid back on and slide it back into the oven for 30 minutes. That trapped steam is what gives us the volume and the initial crust formation. After 30 minutes, take the lid off. Keep baking it uncovered for another 10 to 15 minutes. You are looking for a deep, rich, golden brown color. If it’s pale, it won’t have that satisfying crunch, so don’t be afraid to let it darkens up a bit! If you need more insight on general baking mechanics, my master guide to baking bread has all the details.
Expert Tips for Perfect **Artisan Bread at Home**
You’ve got the recipe, but mastering any no knead bread comes down to a few little secrets—things I learned after baking about a thousand pounds of flour! These simple tweaks take your loaf from “pretty good” to genuinely amazing. We’re talking about achieving that bakery quality right here in your kitchen. Don’t sweat the small stuff, though; this recipe is built tough, but a little finesse goes a long way in perfecting that airy interior and that gorgeous color. If you’re diving deep into yeast work, you might enjoy my tips on managing a sourdough starter too!
Temperature Control and Steam Creation
I can’t stress this enough: make sure that Dutch oven is scorching hot for the first 30 minutes of baking. If your pot isn’t hot enough, you lose that initial oven spring, and your loaf flattens out a bit. Now, if you don’t have a heavy Dutch oven, don’t panic! You can absolutely fake the steam. Just pop a shallow metal pan on the bottom rack while the oven preheats. When you put your loaf in (on a regular sheet pan or stone), quickly pour about a cup of boiling water into that hot bottom pan and shut the door fast. That burst of steam does exactly what the lid on the Dutch oven does!
The Importance of Cooling Completely
I know, I sound like a broken record, but trust me on this one. Right out of the oven, the bread is still cooking internally. If you slice into it right away, all that beautiful moisture inside—the steam that made your chewy interior bread—will rush out immediately. Not only will you lose moisture, but the structure hasn’t fully set yet, so you end up with a slightly gummy texture right in the middle. Seriously, put it on a wire rack and walk away for at least an hour. Wait for the crackling to stop before you even think about slicing!

Serving Suggestions for Your Italian Loaf Recipe
Since we put so much effort into getting that rustic crust just right, we have to eat this bread properly! This loaf isn’t just for looks, it’s truly the best bread for dipping you will ever make. Forget the fancy store-bought stuff. Slice up some crusty italian bread while it’s still slightly warm (once it’s cooled down a bit!) and serve it alongside a big bowl of marinara or my famous creamy garlic sauce. It’s spectacular for soaking up every last drop. Of course, it makes the most sturdy and flavorful base for any sandwich you can dream up too!
Storage and Reheating for Lasting Crusty Italian Bread Flavor
Because this is true artisan bread, it loves to breathe! If you wrap your beautiful loaf tightly in plastic wrap right away, you are basically steaming that marvelous crust you worked so hard for. Don’t do it! For keeping this crusty Italian bread fresh for a couple of days, place it cut-side down in a paper bag on the counter. The paper keeps crumbs contained but lets moisture escape, preserving that crunch.

But let’s be real, the best way to enjoy it later is to reheat it. When you’re ready for that irresistible crunch again, slice what you need and pop those pieces directly onto a baking sheet. Slide it into a 350°F oven for about 5 to 7 minutes. It brings back that fresh-from-the-oven crackle perfectly. Nobody wants sad, stale bread; a quick warm-up makes it taste like you just pulled it out of the Dutch oven!
Frequently Asked Questions About Making Crusty Bread
It’s totally normal to have questions when you start baking bread at home, especially when you are aiming for that professional bakery look! Don’t worry if you’re new to this; this whole no knead bread method is designed specifically for Beginner Bread Baking success. I’ve gathered the questions I get asked most often about getting that perfect loaf texture and color.
Can I use active dry yeast instead of instant yeast for this crusty italian bread?
That’s a great question about substitutions! You absolutely can use active dry yeast, but you can’t just toss it into the flour like you do with instant yeast. Active dry yeast needs to wake up first. You have to proof or “bloom” it. Mix your yeast with about a half cup of that 1 1/2 cups of water (making sure the water is warm, not hot—around 105–115°F) and a tiny pinch of sugar. Let it sit for about 5 to 10 minutes until it gets foamy on top. If it doesn’t bubble, your yeast is dead, so toss it and try again! Once it’s foamy, you use that liquid mixture in place of the cool water in the main recipe.
My crust didn’t get dark enough. What went wrong with my **Bakery Style Bread Recipe**?
Oh, that pale crust look! It’s usually one of two things, and it happens to all of us. First, make sure your oven temperature is truly accurate! If your oven runs cool, your loaf might not brown properly. Second, and this is key for that golden perfection, you absolutely need that full 10 to 15 minutes *uncovered* at the end. The steam is what lets the bread expand; the dry heat afterward is what browns and crisps it up. If you pull it out too soon because you’re worried it looks too dark, you miss out on that deep color that signals maximum crispness. Don’t be shy—go for deep mahogany!
How long can I let the dough rise if I need a shorter fermentation time?
This is the trade-off we make with no-knead bread: time equals flavor and texture. The 12 to 18-hour rise at room temperature is what gives this Italian loaf recipe its depth and contributes so much to the open crumb—it’s developing all those complex organic acids. If you absolutely must rush it, aim for a minimum of 10 hours. However, if you cut it much shorter than that, you’ll notice the flavor is a little flat, and the structure can sometimes be slightly denser. It’s worth the wait, truly! For more in-depth baking discussions, check out the general tips over on the Pure Cooking Joy blog.
Nutritional Estimates for Your Fresh Baked Italian Loaf
Okay, I know most of us aren’t baking this amazing loaf for the calorie count, but if you’re curious, here’s a quick snapshot of what’s inside. These numbers are estimates, remember, because how much salt sticks to your hands versus how much ends up in the final bread can change things slightly! This is based on 16 slices, by the way. It’s amazing how much flavor we get from so few ingredients.
- Serving Size: 1 slice
- Calories: 180
- Fat: 0.5g
- Carbohydrates: 37g
- Protein: 6g
- Sugar: 0.5g
- Sodium: 380mg
If you use a different brand of flour or add olive oil into the dough itself, those figures will shift a little. But for simple, honest eating, this is a fantastic, low-sugar option for homemade bread that tastes like it came straight from a beautiful Italian bakery!
Share Your Perfect Crusty Italian Bread Creations
I am honestly so excited for you to bake this! When you pull that loaf out of your Dutch oven and hear that sweet crackling sound, I want to know all about it. Please feel free to leave your rating right here below the recipe—and be sure to tell me how crunchy that crust got!
If you snap a picture of your golden-brown masterpiece, tag me! Seeing your beautiful crusty Italian bread in your kitchen makes my day. You can always share your successes over on the Pure Cooking Joy Facebook page, too right here. Happy baking, friends, and enjoy that incredible homemade bread!
PrintEasy No-Knead Crusty Italian Bread with Dutch Oven Baking
I am so glad you are here. This simple recipe proves you can make bakery-style crusty Italian bread at home. You get a golden, crisp exterior and a soft, airy interior using everyday ingredients and a Dutch oven.
- Prep Time: 15 min
- Cook Time: 45 min
- Total Time: 13 hours 0 min
- Yield: 1 large loaf 1x
- Category: Baking
- Method: No-Knead Baking
- Cuisine: Italian
- Diet: Vegetarian
Ingredients
- 3 cups all-purpose flour
- 1 1/2 teaspoons salt
- 1/4 teaspoon instant yeast
- 1 1/2 cups cool water
- 1 tablespoon olive oil (for the bowl)
Instructions
- In a large bowl, whisk together the flour, salt, and instant yeast.
- Pour in the cool water and mix with a wooden spoon or spatula until just combined. The dough will be shaggy and sticky. Do not overmix.
- Lightly coat a separate bowl with 1 tablespoon of olive oil. Scrape the dough into the oiled bowl and turn it over so the top is lightly coated.
- Cover the bowl tightly with plastic wrap. Let the dough rise at room temperature for 12 to 18 hours. The dough should be bubbly and have increased significantly in volume.
- Generously flour a work surface. Gently scrape the dough out of the bowl onto the flour. Fold the dough over itself a few times to form a rough ball shape.
- Place the dough ball onto a piece of parchment paper. Cover it loosely with plastic wrap or a clean kitchen towel. Let it rest for 30 minutes.
- About 20 minutes before the end of the rest period, place a Dutch oven (with the lid on) into your oven. Preheat the oven to 450 degrees Fahrenheit (232 degrees Celsius).
- Carefully remove the hot Dutch oven from the oven. Using the parchment paper as a sling, gently lower the dough into the hot pot.
- Cover the Dutch oven with the lid and place it back into the oven. Bake for 30 minutes with the lid on.
- Remove the lid and continue to bake for another 10 to 15 minutes, or until the crust is deep golden brown and crisp.
- Carefully remove the bread from the Dutch oven and transfer it to a wire rack to cool completely before slicing.
Notes
- Achieving that perfect, crackling crust comes from the steam trapped inside the Dutch oven during the first part of the bake.
- This bread is wonderful for dipping in olive oil or serving alongside your favorite pasta dishes.
- If you do not have a Dutch oven, you can bake this on a baking stone or sheet pan, but place a shallow pan of hot water on the bottom rack to create steam.
- Wait until the loaf is fully cooled before slicing to prevent a gummy interior texture.
Nutrition
- Serving Size: 1 slice
- Calories: 180
- Sugar: 0.5
- Sodium: 380
- Fat: 0.5
- Saturated Fat: 0.1
- Unsaturated Fat: 0.4
- Trans Fat: 0
- Carbohydrates: 37
- Fiber: 1
- Protein: 6
- Cholesterol: 0
