 Skip to content

Oh, do I have a showstopper for you today! You know how sometimes you just need a dessert that screams ‘special occasion’ without taking up your entire day in the kitchen? Well, stop your search right now. We are diving deep into the world of truly indulgent baking with these incredible cheesecake stuffed red velvet cookies. Seriously, baking is my passion now, and creating something this impressive makes me feel like I’m back in my corporate days, only this time the results are edible and delicious!
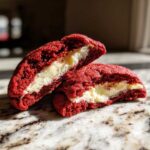
This recipe delivers the ultimate one-two punch: you get a perfectly soft, chewy red velvet cookie exterior, and the moment you bite through, you find a rich, tangy, and perfectly set cheesecake center. I know, it sounds like a lot of work, but I promise you, the process is easier than you think, and the payoff? Absolute pure joy.

If you’re looking to wow your friends or have the star item at your next holiday cookie swap, trust me, you need this recipe in your rotation. Ready to see how we make these little miracles? You can read a little more about my baking journey over on my About Page if you’re curious!
- Why These Cheesecake Stuffed Red Velvet Cookies Are Your Next Obsession
- Gathering Ingredients for Perfect Cheesecake Stuffed Red Velvet Cookies
- Step-by-Step Guide to Baking Cheesecake Stuffed Red Velvet Cookies
- Expert Tips for Perfect Cheesecake Stuffed Cookies
- Storage and Making Ahead for Your Cheesecake Stuffed Red Velvet Cookies
- Serving Suggestions for This Decadent Dessert
- Frequently Asked Questions About Red Velvet Cookies Recipe
- Nutritional Estimates for Your Cheesecake Stuffed Red Velvet Cookies
- Share Your Homemade Stuffed Treats!
Why These Cheesecake Stuffed Red Velvet Cookies Are Your Next Obsession
I get asked all the time what the absolute winner is when people drop by unannounced—and it’s these cookies, hands down. They look like they came straight out of a gourmet bakery case, but they came right out of my kitchen! They are definitely my go-to for a showstopper dessert when I want to impress without spending a whole weekend baking.
When you master these, you have a secret weapon. Why? Because these cheesecake stuffed red velvet cookies tick every single box for a perfect treat:
- You get deep, rich cocoa flavor from the red velvet dough.
- The interior is a pocket of tangy, cool cream cheese goodness.
- They are surprisingly simple to assemble once you get the hang of the freezing method!
The Perfect Texture Combination
Listen, you want that amazing contrast, and these deliver it perfectly. The outside bakes up to be wonderfully soft and chewy—seriously rich, almost fudgy—and then BAM! You hit that smooth, cool, creamy center. They truly feel like they melt in your mouth. That combination is what makes them so addictive!

Making Cheesecake Stuffed Red Velvet Cookies for Any Occasion
While they scream Valentine’s Day—that gorgeous crimson color is just perfect—I make them all year long. Think Christmas cookie swaps or just a Tuesday when I need a little pick-me-up. They are such an impressive cookie recipe because cutting one open reveals that hidden surprise inside. People always ask for the recipe!
Gathering Ingredients for Perfect Cheesecake Stuffed Red Velvet Cookies
Okay, ingredient gathering time! For these amazing cheesecake stuffed red velvet cookies to turn out perfectly—that contrast between the rich red dough and the tangy filling—we need to be precise with what we grab. Don’t sweat it, though; these are all standard things, but the quality matters, especially that coloring. If you need a stabilizer recipe for other fillings later on, I love this basic cream cheese frosting recipe, but for this filling, we keep it very simple.
For the Creamy Center: Cheesecake Filling Ingredients
This part is super easy, but remember the cardinal rule: the cream cheese needs to be fully softened so you don’t end up with lumps. That’s no good when you’re trying to freeze perfect little spheres!
- 6 ounces cream cheese, softened (This is key!)
- 1/2 cup powdered sugar
- 1/2 teaspoon vanilla extract
For the Crimson Cookie Dough: Red Velvet Cookies Recipe Needs
When it comes to the dough, notice we’re using both brown and white sugar for that soft and chewy texture we talked about. Also, grab the gel food coloring—it gives you that deep, vibrant crimson color without watering down the dough, which helps keep these cookies looking bakery style.
- 1/2 cup unsalted butter, softened
- 1/2 cup light brown sugar, packed
- 1/2 cup granulated sugar
- 1 large egg, room temperature
- 1 large egg yolk, room temperature
- 2 teaspoons vanilla extract
- 1 teaspoon red gel food coloring
- 1/3 cup Dutch processed cocoa powder (For that deep cocoa note!)
- 1 3/4 cups all-purpose flour
- 1 teaspoon baking powder
- 1/4 teaspoon baking soda
- 1/2 teaspoon salt
- 1/2 cup granulated sugar, for rolling
Step-by-Step Guide to Baking Cheesecake Stuffed Red Velvet Cookies
This really is where the magic happens, and I want to make sure you feel 100% confident putting that creamy filling right inside that stunning red dough. Following these steps ensures you get those gorgeous, perfectly formed cheesecake stuffed red velvet cookies without any leaks or messy centers. I’ve worked out the kinks over the years so you don’t have to!
Preparing and Freezing the Cream Cheese Filling
First things first, we tackle the center! Grab that softened block of cream cheese, and beat it up with the powdered sugar and vanilla until it’s totally smooth—no lumps allowed, please! Next, this is the most important non-negotiable part: scoop the mixture into tiny balls, about a teaspoon each, onto some parchment paper. Pop that tray into the freezer for at least one full hour. They have to be rock solid before we wrap them! If they are even slightly soft, they will melt out while baking, and we’ll miss out on that gorgeous surprise center.
Mixing the Red Velvet Dough and Chilling
While those little filling wonders are freezing away, we make the dough. Start by creaming your softened butter with both sugars until it’s light and fluffy. Then, beat in the egg, that extra yolk, vanilla, and the red gel coloring until everything looks beautifully crimson. Now, whisk your dry stuff—flour, cocoa, baking soda, etc.—in another bowl. Add this dry mix to the wet ingredients slowly, just until they combine. Seriously, stop mixing as soon as you don’t see streaks of flour anymore! Pop that whole bowl into the fridge; it needs a 30-minute chill for easier handling later on.
Assembling and Rolling Your Stuffed Cookie Dough Balls
Okay, freezer check! When the cheesecake centers are frozen solid, take out your chilled dough. Scoop out about 1.5 tablespoons of the red dough and flatten it gently in your palm. Take one frozen cheesecake ball and set it right in the middle. Now, wrap the dough up and around the filling super carefully, making sure the dough completely seals the cheesecake in. Pinch any seams closed! Once you have a perfect, sealed ball, quickly roll it in that final 1/2 cup of granulated sugar for a nice little crunch. Place these coated balls on a parchment-lined sheet.

Baking and Cooling for Soft and Chewy Cookies
Preheat your oven to 350 degrees F. Bake these showstoppers for just 10 to 12 minutes. Remember, we are aiming for those bakery-style cookies! That means you should pull them out when the edges look *set* but the very center still looks a tiny bit soft—don’t wait until they look fully done. Let them sit right on that hot baking sheet for about five minutes after they come out. This lets them set up gently. Then, move them carefully to a wire rack to cool completely. As they cool, that center firms up beautifully into the creamiest bite imaginable!
Expert Tips for Perfect Cheesecake Stuffed Cookies
You know, baking is all about little tricks, and these cheesecake stuffed red velvet cookies are no exception. Once you nail the technique, you’ll be churning these out perfectly every time. I’ve learned a few things over the years that I want to pass along so you save yourself the trouble of sticky messes!
Achieving Vibrant Red Color in Your Cheesecake Stuffed Red Velvet Cookies
If you want that deep, velvety crimson color that makes these cookies pop, listen to me: ditch the liquid food coloring! I tried it once, and it made my dough way too wet, resulting in sad, flat cookies. You absolutely must use red gel food coloring. Just a teaspoon gets you that gorgeous, intense hue without throwing off the flour-to-fat ratio. It keeps the texture just right!
Troubleshooting: Why Your Filling Leaked
This is the number one reason people get discouraged with stuffed cookie recipes, but it’s easy to fix! If your cheesecake leaks out during baking, it almost always means the dough wasn’t sealed properly around the filling. When you wrap the dough around that frozen center, you need total coverage. Pinch every little seam closed, and then gently re-roll it into a perfect sphere. If the dough barely touches the surrounding dough, that little gap will be where the creamy center escapes. Just take your time wrapping them up tightly!

I love sharing my kitchen adventures with you all; sometimes, you just need that little nudge to go from a decent cookie to an absolutely show-stopping one. Check out my main blog page for more simple baking inspiration!
Storage and Making Ahead for Your Cheesecake Stuffed Red Velvet Cookies
Since these have that lovely cream cheese filling inside, storage is a little different than for a regular peanut butter cookie! The great news is you can totally make these ahead if you’ve got a big party coming up. You can bake them, let them cool completely, and then store them in an airtight container at room temperature for about two days. But if you want them to stay absolutely perfect, I always recommend popping them in the fridge for up to a week.
If you want to prep way ahead of time, you can freeze the completely assembled *and* sugared dough balls! Just place them on a tray, freeze until solid, and transfer them to a freezer bag. When you’re ready to bake, just add about 2 or 3 extra minutes to the baking time. They are fantastic when you need a quick, impressive treat without the prep mess. I know you’ll love having these ready to go—check out how I make my soft corn tortillas ahead of time too; always good to have staples prepped!
Serving Suggestions for This Decadent Dessert
Now that you have pulled off the ultimate bake, how should you present this decadent dessert? The rich cocoa and tangy cream cheese combo is incredible on its own, but you can elevate it even further. Nothing beats the contrast of something warm and cold, right?
I love serving these slightly warm—they feel extra gooey that way—with a scoop of good vanilla bean ice cream melting right beside them. For a cozy afternoon vibe, pair them with a glass of milk or, even better, a rich mug of my homemade hot cocoa, which you can find the recipe for right here. That pairing is pure comfort, trust me!
Frequently Asked Questions About Red Velvet Cookies Recipe
I always love hearing your questions after you try a fun recipe like this! It’s the best part of being in this community, honestly. Here are a few things folks usually wonder about when they are getting ready to bake these vibrant treats. If you are looking for other fun bakes, you should browse through my collection of easy cookie recipes!
Can I use liquid food coloring instead of gel for these cookies?
You technically *can*, but please don’t if you want those bakery-style cookies we were talking about! With liquid coloring, you have to add so much more just to get a decent color payoff, and that extra liquid messes with our delicate flour ratios. We want that beautiful, intense crimson hue so it stands out against the cream cheese filling. Gel coloring gives you maximum color with minimum liquid, keeping your cookies perfectly structured and soft.
What is the best way to store leftover cheesecake stuffed cookies?
Because we’ve got that delightful cream cheese filling tucked inside, these aren’t quite as sturdy on the counter as a regular chocolate chip cookie. If you plan to eat them within a day or so, an airtight container at room temperature is fine. However, if you want them to last longer, you absolutely have to refrigerate them. They stay fresh and delicious for up to a week in the fridge, and honestly, I think the flavor of the dough deepens nicely overnight!
How do I ensure the cookie dough is soft and chewy?
This comes down to two things we talked about: the mix-ins and the bake time. For the softest texture, make sure your butter, egg, and extra yolk are fully at room temperature before you mix them—that helps create the best structure during creaming. But the biggest secret to that melt-in-your-mouth feel is underbaking! I pull these out when the edges look done but the middle still looks a touch jiggly. They come out looking slightly underdone but firm right up as they cool on the hot pan. Trust me on this one; don’t bake them until they look dry!
Nutritional Estimates for Your Cheesecake Stuffed Red Velvet Cookies
I always like to give you folks an idea of what you are enjoying when you bake something this rich. Since these are such a decadent treat, they definitely aren’t an everyday snack, but they are worth every single bite!
Please remember these figures are just estimates based on the recipe details I provided, and small ingredient swaps will change them. For roughly 18 cheesecake stuffed red velvet cookies, here’s what we are looking at per serving:
- Calories: 280
- Sugar: 25g
- Fat: 16g
- Protein: 4g
Lots of sugar and fat in here, which is what makes them taste so amazing, right? Baked sweets are all about balance, and saving these for a special occasion makes every calorie count!
Share Your Homemade Stuffed Treats!
I really, truly, can’t wait to hear what you think! Once you’ve made these amazing cheesecake stuffed red velvet cookies, do me a huge favor and come back here to leave a rating and let me know how it went. Did the filling stay perfectly tucked in? Were they the hit of the party?
Pictures make my day, so if you snap a photo, feel free to tag me! It helps me know that these recipes are bringing pure cooking joy to your kitchen. If you need to reach out with specific questions, you can always use my Contact Page!
PrintCheesecake Stuffed Red Velvet Cookies
Make these decadent Cheesecake Stuffed Red Velvet Cookies. You get a soft, chewy red velvet cookie wrapped around a creamy, tangy cheesecake center for an impressive homemade treat.
- Prep Time: 30 min
- Cook Time: 12 min
- Total Time: 1 hour 42 min
- Yield: About 18 cookies 1x
- Category: Dessert
- Method: Baking
- Cuisine: American
- Diet: Vegetarian
Ingredients
- For the Cheesecake Filling: 6 ounces cream cheese, softened
- 1/2 cup powdered sugar
- 1/2 teaspoon vanilla extract
- For the Red Velvet Cookies: 1/2 cup unsalted butter, softened
- 1/2 cup light brown sugar, packed
- 1/2 cup granulated sugar
- 1 large egg, room temperature
- 1 large egg yolk, room temperature
- 2 teaspoons vanilla extract
- 1 teaspoon red gel food coloring
- 1/3 cup Dutch processed cocoa powder
- 1 3/4 cups all-purpose flour
- 1 teaspoon baking powder
- 1/4 teaspoon baking soda
- 1/2 teaspoon salt
- 1/2 cup granulated sugar, for rolling
Instructions
- Prepare the cheesecake filling: Beat the softened cream cheese, powdered sugar, and vanilla extract in a small bowl until smooth.
- Scoop the filling into small balls (about 1 teaspoon each) onto a parchment-lined plate. Freeze these filling balls for at least 1 hour until solid.
- Prepare the cookie dough: In a large bowl, beat the butter, brown sugar, and granulated sugar until light and fluffy.
- Beat in the egg, egg yolk, vanilla extract, and red food coloring until combined.
- In a separate bowl, whisk together the cocoa powder, flour, baking powder, baking soda, and salt.
- Gradually add the dry ingredients to the wet ingredients, mixing on low speed until just combined. Do not overmix.
- Place the cookie dough in the refrigerator to chill for 30 minutes.
- Preheat your oven to 350 degrees Fahrenheit. Line baking sheets with parchment paper.
- Scoop the chilled cookie dough into balls (about 1.5 tablespoons each). Flatten one dough ball slightly in your palm.
- Place one frozen cheesecake ball in the center of the flattened dough. Carefully wrap the dough around the filling, completely sealing the cheesecake inside. Roll the dough into a smooth ball.
- Roll each sealed dough ball in the remaining 1/2 cup of granulated sugar.
- Place the coated balls on the prepared baking sheets, leaving space between them.
- Bake for 10 to 12 minutes. The edges should look set, but the centers will look slightly underdone.
- Let the cookies cool on the baking sheet for 5 minutes before transferring them to a wire rack to cool completely. The cheesecake center will firm up as they cool.
Notes
- Use high-quality red gel food coloring for the best, most vibrant color in your red velvet dough.
- Make sure the cheesecake filling is completely frozen before stuffing the cookies; this prevents it from leaking out during baking.
- For bakery-style cookies, slightly underbake them. They will continue to set up as they cool.
Nutrition
- Serving Size: 1 cookie
- Calories: 280
- Sugar: 25
- Sodium: 150
- Fat: 16
- Saturated Fat: 9
- Unsaturated Fat: 7
- Trans Fat: 0.2
- Carbohydrates: 32
- Fiber: 1
- Protein: 4
- Cholesterol: 55
