 Skip to content

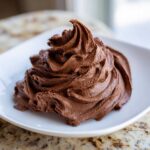
Hi there, I’m Alex, and I’m so glad you’re here! For years, I thought making bakery-quality frosting at home was impossible—it was always too soft or grainy. But, ever since I started finding joy in the simple act of cooking instead of letting it stress me out, I cracked the code. This recipe for the Ultimate Silky & Stable chocolate buttercream frosting is the result of that discovery. It proves that truly soul-satisfying food doesn’t have to be complicated. If you love the idea of achieving bakery results but want something simple, you might also love my guide on how to make the easy vanilla buttercream recipe. Trust me, once you taste this rich, deeply flavorful homemade frosting, you’ll never go back to the tubs again. It’s pure cooking joy, bottled!
- Why This is the Ultimate Chocolate Buttercream Frosting Recipe (E-E-A-T Focus)
- Gathering Ingredients for Your Creamy Chocolate Icing
- Step-by-Step Guide: How to Make Chocolate Buttercream
- Tips for Perfect Chocolate Buttercream Frosting Consistency
- Ingredient Notes and Substitutions for Chocolate Buttercream Frosting
- Serving Suggestions for Your Easy Chocolate Frosting Recipe
- Storage and Handling of Chocolate Buttercream Frosting
- Frequently Asked Questions About Chocolate Buttercream Frosting
- Sharing Your Chocolate Buttercream Frosting Creations
Why This is the Ultimate Chocolate Buttercream Frosting Recipe (E-E-A-T Focus)
When I was first trying to master this, I struggled with that gritty, overly sweet texture you get from subpar recipes. That’s why this version is considered the ultimate chocolate buttercream frosting! We focus on building that gorgeous, silky texture that holds up perfectly—it pipes like a dream and won’t deflate on your counter. You get intense chocolate flavor without that artificial sweetness. If you’re looking for a stable frosting that truly sings on top of anything, you’ve found it. This recipe is based on techniques learned over years of trial and error, much like the delicious crust I perfected for my chocolate cheesecake recipe.
Achieving That Perfect Smooth Chocolate Buttercream Texture
Texture is everything, right? Nobody wants grainy frosting! The secret to that incredibly smooth chocolate buttercream is twofold: we must start with perfectly room-temperature butter, and we absolutely must sift our dry ingredients. Skipping the sifting means you’re inviting lumps into your beautiful batch. Follow this technique, and you’ll have that desirable, professional, bakery style chocolate frosting finish every single time. It’s simple, but non-negotiable for success!

Simple Ingredients for Rich Dark Chocolate Frosting
Another thing I love about this recipe is that it relies on pantry staples. You don’t need any fancy stabilizers for this rich dark chocolate frosting. We get depth from high-quality cocoa powder. If you really want to elevate the flavor profile, definitely splurge on Dutch-processed cocoa; it makes the chocolate taste deeper and less acidic than the natural kind. It’s amazing what you can create with just butter, sugar, cocoa, and cream!
Gathering Ingredients for Your Creamy Chocolate Icing
Okay, let’s talk about what you need to pull together this amazing creamy chocolate icing. Because we are aiming for that smooth, perfect texture, the preparation of these ingredients is just as important as the ingredients themselves! Don’t just eyeball anything here; precision is key when you’re making any fantastic homemade chocolate frosting. For instance, make sure your butter has been sitting out long enough to be truly room temperature—cold butter is the enemy of smooth frosting.
Here is exactly what you’ll need on your counter before the mixer even turns on. Remember, if you want that silky result, every component needs careful handling. I also have a recipe for homemade silky chocolate sauce if you are looking for a different way to incorporate deep chocolate flavor down the road!
- 1 cup (that’s two full sticks) of unsalted butter, softened perfectly to room temperature. This is critical!
- 3 1/2 cups of powdered sugar, and yes, you absolutely must sift this. No lumps allowed!
- 3/4 cup of unsweetened cocoa powder, also sifted thoroughly.
- 1 teaspoon of pure vanilla extract—use the good stuff if you have it!
- 1/4 teaspoon of salt to keep the sweetness from completely taking over.
- 3 to 5 tablespoons of heavy cream or whole milk, depending on how thick you want this chocolate buttercream frosting to be.
Step-by-Step Guide: How to Make Chocolate Buttercream
Alright, this is where the magic happens to create that incredible chocolate buttercream frosting. We aren’t just mixing things; we are building structure and incorporating air! Make sure you have your mixer scraper handy because tapping down the sides of the bowl is *essential* for getting a consistent, creamy result. Don’t worry if you think you’re over-mixing at one point—that whipping stage is what makes the difference between a good topping and a truly exceptional one.
We’re following the steps exactly as written because this sequence guarantees an amazing texture. If you want to learn more about the science behind this incredible buttercream frosting guide, I’ve got a deep dive on my main frosting page!
Preparing the Butter Base for Pipeable Chocolate Frosting
First things first: grab your stand mixer with the paddle attachment. We are beating that softened butter solo for a solid two minutes on medium speed until it looks completely creamy, not oily or lumpy. Seriously stop and scrape down the sides! Getting this butter stage perfect is the non-negotiable first step for achieving that beautiful pipeable chocolate frosting that looks so professional on cakes and cupcakes.

Incorporating Sugar and Cocoa for Homemade Chocolate Frosting
Next, we bring in the dry things, but slowly! Add the sifted powdered sugar one cup at a time, keeping the mixer on low speed so you don’t end up with a sugar cloud explosion in your kitchen—trust me, I learned that the hard way! Once the sugar is in, we add the sifted cocoa powder, vanilla, and salt. Mix that all together on low until it just looks incorporated. We don’t want to whip it yet; we are just making sure all parts of this homemade chocolate frosting are acquainted before we bring in the heavy cream.
Tips for Perfect Chocolate Buttercream Frosting Consistency
This is the part where people sometimes panic, but don’t you worry! If your amazing chocolate buttercream frosting isn’t quite behaving the way you want, remember that we can fix almost anything with a little patience. If you followed Step 4 but still want a lighter, airier look—that truly fluffy chocolate topping—just keep whipping it on medium-high speed for a minute or two longer, adding that last splash of cream only if you dare. We want that light, airy texture!

But what if things go the other way? If your frosting seems too soft or soupy, that usually means you added too much liquid, or maybe your kitchen is just way too warm. If that happens, step away! Pop the bowl into the fridge for about fifteen minutes. Then, bring it out and give it a quick, aggressive beat again. It stiffens right up! This flexibility is why this recipe is fantastic for decorating cakes since you can adjust it easily. For other stable options, I highly recommend checking out my easy cream cheese frosting recipe—it handles heat really well too!
Ingredient Notes and Substitutions for Chocolate Buttercream Frosting
I want to talk for a second about the ingredients because that’s how we guarantee you get the best chocolate buttercream frosting possible—not just today, but every time you make it. The temperature of your butter is absolutely non-negotiable! If it’s even slightly cold, you’ll end up fighting lumps the entire time, making it impossible to get that dreamy, smooth chocolate buttercream. You’re looking for butter that yields gently when pressed but isn’t greasy.
Also, when shopping for cocoa, you’ll notice natural versus Dutch-processed versions. If you want that deep, nearly black color and that rich, mellow chocolate flavor (like in my easy vanilla buttercream frosting), go Dutch-processed. It cuts down on the bitterness. We get about three cups of amazing frosting from this batch, which is perfect for generously coating that 9-inch layer cake or maybe 18 decadent cupcakes. It’s just the right amount of homemade chocolate frosting for most projects!
Serving Suggestions for Your Easy Chocolate Frosting Recipe
Now that you have this perfect, pipeable chocolate frosting ready to go, you’re probably wondering what decadent thing to put it on! Honestly, you could just eat this chocolate buttercream frosting with a spoon, but I highly recommend pairing it with my recipes. It’s fantastic spread thick over my ultimate moist chocolate cake recipe—the richness is just unmatched.
It’s also the ultimate chocolate cupcake topping, of course, and it holds its shape beautifully for swirls. Don’t forget about brownies, either! A thick layer of this on some fudgy squares makes for a simple dessert topping fit for a celebration. It always turns out so beautifully, doesn’t it?

Storage and Handling of Chocolate Buttercream Frosting
You made a huge batch of this unbelievably perfect chocolate buttercream frosting, and now you have leftovers—hooray! Good news: this is a stable frosting. While I prefer to use it right away, you can store it at room temperature, covered tightly, for a day or two, especially if your kitchen is cool. This helps maintain that beautiful best frosting texture.
If you need to keep it longer, wrap it well and pop it in the fridge for up to a week. The absolute key when bringing chilled frosting back to life? Don’t just let it sit on the counter until it softens! You need to give it a quick beat with the mixer once it comes to room temperature. That re-whipping step incorporates the air back in, ensuring you don’t end up with dense, sad icing. For more general kitchen wisdom, check out my latest musings on the Pure Cooking Joy blog!
Frequently Asked Questions About Chocolate Buttercream Frosting
I know you might still have a few little tweaks kicking around in your mind, so let’s tackle the common questions I get about whipping up this amazing batch of chocolate buttercream frosting. Getting the texture and color just right is what turns a good dessert into a showstopper!
Can I make this buttercream frosting dairy-free?
Oh, absolutely! That’s one component that is super easy to swap out. For a dairy-free version, just swap your standard butter for a good quality, hard-stick plant-based butter alternative—the sticks work much better than soft tubs. Use a creamy non-dairy milk or heavy cream substitute, like oat or cashew cream, in place of the dairy cream. The process for your creamy chocolate icing stays exactly the same!
How do I get a fudgy chocolate frosting recipe result?
That’s a great question! This recipe is specifically designed for that incredibly fluffy chocolate topping, meaning we use a good amount of liquid to keep it airy and light for piping. If you secretly crave that dense, spoon-worthy, fudgy chocolate frosting recipe outcome, the trick is to reduce the heavy cream slightly—maybe start with just 2 tablespoons—and increase your sifted cocoa powder by a tablespoon or two. It will result in a slightly stiffer, darker frosting!
When I’m making this for a cake that needs to look incredibly neat and holds its shape perfectly, sometimes I just decrease the cream by one tablespoon an start whipping; you’ll be stunned how much control you have over the final texture. It’s all part of the fun of mastering this easy chocolate frosting recipe, much like getting the consistency right on my Boston Cream Pie filling!
Why does my chocolate buttercream taste grainy?
Graininess is the number one texture killer, and it almost always comes down to improper mixing of the sugar or the butter. Sugar crystals haven’t fully dissolved. Make sure your butter is truly room temperature and thoroughly creamed first. Then, always mix on low speed when adding the powdered sugar so it incorporates without splashing. If you still have tiny gritty bits, just keep beating it! Sometimes that smooth chocolate buttercream texture takes that full 5 minutes of whipping to fully develop.
How do I make my frosting darker?
To get that deep, dramatic color fitting for a rich dark chocolate frosting, you must use Dutch-processed cocoa powder, as I mentioned before. It’s treated differently, which gives it a deeper color and mellow flavor. Also, remember that the frosting color will lighten slightly as you whip air into it, so if it looks perfectly dark before whipping, expect it to lighten up a shade or two once fluffy!
Sharing Your Chocolate Buttercream Frosting Creations
I truly can’t wait to see what you create with this chocolate buttercream frosting! If you found this recipe easy and delicious, please come back and drop a five-star rating below; it helps other bakers find the best recipes. If you need to reach out with specific questions, you can always use my contact page. I’d also love to see your masterpieces—tag me on Facebook at Pure Cooking Joy! Happy decorating!
PrintUltimate Silky & Stable Chocolate Buttercream Frosting (Bakery Quality)
This is the best chocolate buttercream frosting recipe you will make. You get a smooth, creamy, and rich homemade chocolate frosting that pipes beautifully and tastes better than store-bought options.
- Prep Time: 10 min
- Cook Time: 0 min
- Total Time: 10 min
- Yield: About 3 cups 1x
- Category: Dessert Topping
- Method: Mixing
- Cuisine: American
- Diet: Vegetarian
Ingredients
- 1 cup (2 sticks) unsalted butter, softened to room temperature
- 3 1/2 cups powdered sugar, sifted
- 3/4 cup unsweetened cocoa powder, sifted
- 1 teaspoon vanilla extract
- 1/4 teaspoon salt
- 3 to 5 tablespoons heavy cream or milk
Instructions
- Place the softened butter in the bowl of a stand mixer fitted with the paddle attachment. Beat the butter on medium speed until it is completely smooth and creamy, about 2 minutes. Scrape down the sides of the bowl.
- Gradually add the sifted powdered sugar, one cup at a time, mixing on low speed until just combined after each addition. Scrape down the sides frequently.
- Add the sifted cocoa powder, vanilla extract, and salt. Mix on low speed until the dry ingredients are incorporated into the butter mixture.
- Increase the mixer speed to medium-high. Add 3 tablespoons of heavy cream. Beat the frosting for 3 to 5 minutes until it becomes light, fluffy, and smooth. This whipping time is key for the best texture.
- If the frosting seems too stiff for spreading or piping, add the remaining cream, one tablespoon at a time, until you reach your desired consistency for your cake or cupcakes.
- If the frosting seems too soft, chill it in the refrigerator for 15 minutes, then briefly beat it again before using.
Notes
- Use room temperature butter; cold butter causes lumps and a grainy texture in your smooth chocolate buttercream.
- Sifting the powdered sugar and cocoa powder prevents lumps and helps you achieve a silky chocolate icing.
- For a richer, darker color and flavor, use Dutch-processed cocoa powder.
- This recipe makes enough creamy chocolate icing to generously frost one 9-inch layer cake or about 18 cupcakes.
Nutrition
- Serving Size: 1/4 cup
- Calories: 350
- Sugar: 45g
- Sodium: 60mg
- Fat: 19g
- Saturated Fat: 12g
- Unsaturated Fat: 7g
- Trans Fat: 0.5g
- Carbohydrates: 48g
- Fiber: 1g
- Protein: 2g
- Cholesterol: 60mg
