 Skip to content

There is nothing—and I mean *nothing*—that captures the feeling of a holiday dinner better than the aroma of herbs and roasting bread filling your entire house. If you grew up thinking stuffing came exclusively from a box, prepare yourself, because that changes today! We are making the best homemade stuffing from scratch, and I promise you, once you try this, you’ll never go back. My goal here is simple but mighty: we want that incredible textural contrast. I’m talking about an interior that is perfectly moist, savory, and rich, completely surrounded by a golden, shatteringly crisp top layer. This homemade stuffing recipe, especially when we load it up with fresh sausage and herbs, tastes a million times better than anything you can pour out of a plastic bag. For the ultimate guide on nailing the moist and herby technique, check out my ultimate masterclass here: masterclass on moist stuffing. Trust me on this one; it’s pure cooking joy!
- Why This Classic Homemade Stuffing Recipe is the Best
- Ingredients for Your Homemade Stuffing
- Essential Equipment for Perfect Homemade Stuffing
- How to Prepare the Best Homemade Stuffing Step-by-Step
- Baking and Browning: The Secret to Crispy Top Stuffing
- Tips and Ingredient Notes for Superior Homemade Stuffing
- Serving Suggestions for Your Classic Stuffing Recipe
- Storage and Reheating Instructions for Homemade Stuffing
- Frequently Asked Questions About Stuffing vs Dressing
Why This Classic Homemade Stuffing Recipe is the Best
I’ve tried every shortcut out there, but nothing beats the depth of flavor you get when you build your best homemade stuffing from the ground up starting with real ingredients. Forget anything dry or spongy! For a deep dive into the whole process that results in this spectacular dish, make sure you check out my main post on the classic homemade stuffing recipe.

- We use a ton of fresh herbs—not that dusty dried stuff.
- The flavor profile is perfectly savory, balanced by plenty of butter.
- It delivers that incredible textural contrast every single time.
This is easily the greatest moist stuffing recipe I’ve ever developed for the holidays.
Achieving the Crispy Top Stuffing Texture
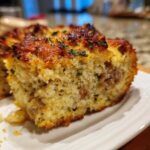
That golden layer on top? That’s my favorite part, and it’s non-negotiable. We achieve that beautiful crispy top stuffing texture by keeping the dish covered tightly for the first half of the bake. This steams the inside, keeping it fluffy. Then, we strip off the foil and let the top broil slightly until it’s crunchy perfection. Simple science!
Ingredients for Your Homemade Stuffing
Okay, gathering your supplies is maybe the calmest part of the whole process, and it’s where we start ensuring this homemade stuffing isn’t like anything you’ve had before. I like to think of this list as a flavor bomb ready to happen!
Because we are building amazing taste from scratch, those fresh herbs are absolutely key. Don’t get lazy here; the fresh rosemary and sage make all the difference in creating that savory depth we are aiming for. Here’s what you need to pull together:
- 1 pound dried bread cubes (about 10 cups total), and I highly recommend using day-old sourdough or French bread for the best structure.
- 1/2 cup (that’s one full stick!) unsalted butter. Don’t skimp on the good stuff!
- 1 large yellow onion, just coarsely chopped up.
- 2 crisp celery stalks, also chopped.
- 8 ounces bulk savory sausage, if you’re including meat—it adds so much richness.
- 2 cloves garlic, minced so finely it practically disappears into the butter.
- 1 tablespoon fresh sage, chopped up beautifully.
- 1 teaspoon fresh thyme leaves.
- 1 teaspoon fresh rosemary, finely chopped—this is potent, so be precise!
- 1/2 cup fresh parsley, roughly chopped for brightness.
- 1 teaspoon salt and 1/2 teaspoon black pepper, mixed together.
- 1 3/4 cups good quality chicken or turkey broth.
- 2 large eggs, just lightly whisked—they help hold everything together later.
Essential Equipment for Perfect Homemade Stuffing
Before we get too deep into the chopping and sautéing, let’s make sure your mise en place is ready to go. Having the right tools just makes the whole process of making stuffing from scratch so much smoother. You don’t need anything fancy, trust me, but you do need capacity!
You will definitely want:
- A really large mixing bowl—we need space for tossing without making a giant mess.
- A large skillet for sweating down those onions and celery.
- A standard 9×13 inch baking dish. This is the perfect size for getting that fluffy interior and crispy surface area we love.
That’s honestly it! No fancy tools needed, just grab what you have and let’s get cooking.
How to Prepare the Best Homemade Stuffing Step-by-Step
Now we get to the fun part—turning those ingredients into the comforting side dish everyone waits for! Follow these steps closely, and you’ll have the best homemade stuffing imaginable. Taking the time to do this right is why this stuffing from scratch beats any mix, hands down. We are going to build flavor layer by layer, so stay with me! If you are looking for other great ways to use savory fillings, check out my recipe for sausage-stuffed mushrooms later!
Prepping the Bread Base for Homemade Stuffing
Step one is crucial for texture, so pay attention! If your bread cubes aren’t already rock hard, spread them out on a baking sheet and pop them into a 300-degree oven for about 15 minutes. We need them dry so they can soak up all the beautiful butter and broth later without turning to mush. Dry bread is happy bread!
Sautéing Aromatics and Building Flavor in Your Homemade Stuffing
Grab that big skillet and melt your butter over medium heat. Toss in the chopped onion and celery and let them soften up—that takes about 5 to 7 minutes. If you’re using sausage, this is when it goes in until it’s perfectly browned, and you should drain off any extra fat, please! Once that’s done, hit it with the garlic, sage, thyme, and rosemary. Cook those herbs just for a minute until you can really smell them—that’s your signature savory herb stuffing aroma starting to bloom!
Next, take that skillet right off the heat. In your truly enormous mixing bowl, combine the dried bread cubes, the wonderfully flavored veggie/sausage mix, the parsley, salt, and pepper. Gently toss everything around until it’s mostly mixed. Then, in a separate bowl, whisk those two eggs lightly and mix them right into the broth. Pour that liquid evenly over the bread mixture and toss again—but gently! Seriously, don’t overmix this part. Finally, scrape *all* of that glorious mixture into your greased 9×13 dish. Cover the dish tightly with foil before you forget!

Baking and Browning: The Secret to Crispy Top Stuffing
Okay, we’ve mixed everything, it’s nestled cozily in the baking dish, and now it needs the oven’s magic. This is where the two-stage baking process comes in, and it is absolutely vital if you want that iconic texture in your homemade stuffing. We want to steam the inside perfectly while building the crust outside.
First things first: Preheat your oven to 350 degrees F. Pop that tightly covered dish in for 30 minutes. Covering it traps the heat and steam, which ensures the inside cube gets wonderfully soft and saturated with all those savory flavors. This step is crucial for a moist stuffing recipe!
When the timer goes off, this is the big moment! Take that foil off completely. Back it goes, uncovered this time, for another 15 to 20 minutes. You are looking for that beautiful golden color and a definite, satisfying crispness on the surface. That’s your prize-winning crispy top stuffing right there! Once it looks golden and smells heavenly, pull it out. You must let it rest uncovered for about 10 minutes before you even think about scooping it. That resting time locks in just a little more moisture.

If you want to bake these beauties separately from the turkey next time, you can even learn to roll them into delicious stuffing balls!
Tips and Ingredient Notes for Superior Homemade Stuffing
I always say that the difference between good stuffing and legendary homemade stuffing comes down to those small, expert details. I learned these tricks over years of kitchen trial-and-error, so take advantage of my mistakes! Knowing these little secrets helps us avoid the dreaded dry holiday side dish. For those of you who want the full lowdown on chilling out on the big day, I even dedicated a whole post to my make ahead stuffing guide.
Make Ahead Stuffing Instructions for Less Holiday Stress
Listen, we all know the big day gets hectic, so making ahead is your best friend! You can mix everything right up until the point where you pour the broth mixture over the bread (that’s Step 6). Cover that mixture tightly and tuck it into the fridge for up to 24 hours. When you’re ready to bake, just let it sit on the counter for about 30 minutes to warm up slightly, and then add about 10 extra minutes to the covered baking time. Simple!
Also, a quick note on broth quantity: If you are cooking this entirely outside the turkey and calling it dressing, you might want to bump that broth up to 2 full cups. We want the homemade stuffing extra moist, and since it’s not cooking inside the bird, it has less gentle steam working on it!
Serving Suggestions for Your Classic Stuffing Recipe
This homemade stuffing is robust enough to be the star of the show, but of course, it shines brightest next to the main event! I always try to pair it with something creamy to balance out that fantastic crispness we worked so hard to achieve on top. It’s the hero of any Thanksgiving stuffing spread, naturally.

It pairs perfectly alongside a beautifully roasted chicken or, if we’re going big for the holidays, that gorgeous turkey. If you want to make sure your plate is full of comfort, you absolutely have to try my creamy garlic mashed potatoes right alongside this dish. They are a guaranteed hit for your next Christmas side dish featuring this classic stuffing recipe! Find my potato masterpiece here: creamy garlic mashed potatoes.
Storage and Reheating Instructions for Homemade Stuffing
Good news! This homemade stuffing actually tastes even better the next day—if you have any left, that is! You can absolutely store leftovers airtight in the fridge for up to four days. When it’s time to reheat, don’t just microwave it, or you’ll lose that lovely crust.
The trick to enjoying your leftovers is to add a little splash of broth or water—maybe a teaspoon per cup of stuffing—before baking it again. Pop it back into a 350-degree oven in a baking dish, covered with foil, for about 20 minutes until it’s heated through. Then, ditch the foil for the last five minutes to crisp up that top again!
Frequently Asked Questions About Stuffing vs Dressing
I get asked the same few questions over and over again whenever the holidays roll around. It’s all about getting that perfect homemade stuffing just right! Don’t hesitate to reach out if you ever have a question pop up while you’re cooking; you can always check out my general blog here, or even send me a message on Facebook at Pure Cooking Joy!
What is the difference between stuffing and dressing in this homemade stuffing recipe?
That’s such a classic holiday query! Honestly, for this recipe, it’s all about geography. If you pack this glorious mixture *inside* the turkey cavity to cook, it’s stuffing. If we bake it separately in a dish like we do here, it’s technically a traditional dressing recipe. This version is designed outside the bird for safety and to get that amazing crispy crust!
Can I make this Traditional Dressing Recipe vegetarian?
Absolutely, you can! Omitting the sausage turns this into a lovely vegetarian base for your homemade stuffing—easy peasy. Since you lose the fat and flavor from the meat, I always suggest substituting by using vegetable broth instead of chicken broth, and maybe sautéing a cup of chopped mushrooms along with your onions and celery. That adds some nice earthiness back in!
PrintThe Best Homemade Stuffing: Moist Interior & Crispy Top
This classic homemade stuffing recipe uses savory sausage and fresh herbs to guarantee a perfectly moist interior and a beautifully crispy top. It is an essential holiday side dish.
- Prep Time: 20 min
- Cook Time: 50 min
- Total Time: 70 min
- Yield: 10 servings 1x
- Category: Side Dish
- Method: Baking
- Cuisine: American
- Diet: Vegetarian
Ingredients
- 1 pound dried bread cubes (about 10 cups), preferably sourdough or French bread
- 1/2 cup (1 stick) unsalted butter
- 1 large yellow onion, chopped
- 2 celery stalks, chopped
- 8 ounces bulk savory sausage (optional)
- 2 cloves garlic, minced
- 1 tablespoon fresh sage, chopped
- 1 teaspoon fresh thyme leaves
- 1 teaspoon fresh rosemary, chopped
- 1/2 cup fresh parsley, chopped
- 1 teaspoon salt
- 1/2 teaspoon black pepper
- 1 3/4 cups chicken or turkey broth
- 2 large eggs, lightly beaten
Instructions
- If your bread cubes are not dry, spread them on a baking sheet and bake at 300 degrees F for 10 to 15 minutes until dry but not browned. Set aside.
- Melt the butter in a large skillet over medium heat. Add the onion and celery. Cook until softened, about 5 to 7 minutes.
- If using sausage, add it to the skillet and cook, breaking it up with a spoon, until browned. Drain off excess fat.
- Add the minced garlic, sage, thyme, and rosemary to the skillet. Cook for 1 minute until fragrant. Remove the skillet from the heat.
- In a very large bowl, combine the dried bread cubes, the cooked vegetable and sausage mixture, parsley, salt, and pepper. Toss gently to combine.
- In a separate medium bowl, whisk together the chicken broth and the beaten eggs.
- Pour the broth mixture evenly over the bread mixture. Toss everything gently until the bread is evenly moistened. Do not overmix.
- Transfer the stuffing mixture to a greased 9×13 inch baking dish. Cover the dish tightly with foil.
- Bake at 350 degrees F for 30 minutes covered.
- Remove the foil and bake for another 15 to 20 minutes, or until the top is golden brown and crispy.
- Let the stuffing rest for 10 minutes before serving.
Notes
- For a make-ahead option, prepare the stuffing completely through Step 6, cover, and refrigerate for up to 24 hours. When ready to bake, let it sit at room temperature for 30 minutes before proceeding with Step 7, adding about 10 minutes to the covered baking time.
- If you prefer a dressing cooked outside the bird, use 2 cups of broth instead of 1 3/4 cups for a moister result.
- For a crispier top, you can bake the uncovered stuffing for an extra 10 minutes.
Nutrition
- Serving Size: 1 cup
- Calories: 320
- Sugar: 3
- Sodium: 450
- Fat: 18
- Saturated Fat: 8
- Unsaturated Fat: 10
- Trans Fat: 0
- Carbohydrates: 35
- Fiber: 2
- Protein: 8
- Cholesterol: 65
