 Skip to content

Listen, I love a beautiful, flaky, traditional cherry pie. I really do. But sometimes? Sometimes you just don’t have the time, or the patience, to deal with all that fussy top crust business, especially when you’re making something for a crowd. That’s exactly why I am so thrilled to share these cherry pie bars with you today. They capture every bit of that sweet, tart cherry goodness you crave, but in a sturdy, easy-to-serve square. For me, finding joy in simple, shareable desserts like these **cherry pie bars** is what Pure Cooking Joy is all about. As I talk about more on my About Page, simple satisfaction in the kitchen is my main goal. Trust me, these bars are revolutionary for potlucks!
- Why These Cherry Pie Bars Are Your New Favorite Simple Cherry Dessert
- Gathering Ingredients for Your Buttery Shortbread Bars
- Step-by-Step Guide to Perfect **Cherry Pie Filling Bars**
- Expert Tips for Making the Best Homemade Cherry Pie Bars
- Making Cherry Dessert Bars Ahead of Time for Gatherings
- Ingredient Substitutions for Your **Cherry Pie Bars**
- Frequently Asked Questions About These **Cherry Dessert Bars**
- Estimated Nutrition for Your Simple Cherry Dessert
- Share Your **Cherry Pie Bars** Creations
Why These Cherry Pie Bars Are Your New Favorite Simple Cherry Dessert
I know you’re busy, just like I was when I started cooking again. That’s why these cherry pie bars are my go-to when I need something amazing fast. They capture every bit of that sweet, tart cherry goodness you crave, but in a sturdy, easy-to-serve square. For me, finding joy in simple, shareable desserts like these **cherry pie bars** is what Pure Cooking Joy is all about. Anytime I host an event, these are my secret weapon for easy entertaining. Trust me, these bars are revolutionary for potlucks!
The secret weapon here is balance. You get texture, flavor, and speed all in one pan. If you’re looking for fantastic Dessert Bars for Gatherings, look no further. Here’s what makes this Simple Cherry Dessert a winner:
- The crust is pure buttery shortbread—no rolling pin required!
- We lean on high-quality canned cherry pie filling for instant, juicy results.
- Total time is right around 60 minutes, meaning you can bake them right after dinner prep.
Quick Prep Time for Easy Cherry Pie Bars
Seriously, the prep time here is only about 20 minutes. Twenty minutes! This isn’t one of those fussy recipes that demands you chill the butter for hours or sift flour three times. We’re beating everything together, pressing it in the pan, and tossing it into the oven. If you love a Quick Cherry Recipe that delivers maximum reward for minimum effort, this is it. You get that beautiful, rich shortbread base that just sings alongside the tart cherries.

Gathering Ingredients for Your Buttery Shortbread Bars
Okay, let’s talk ingredients! Since we are aiming for speed and that incredible buttery shortbread flavor that holds up so well, precision here matters, even if the ingredients themselves are super simple. This recipe is really designed around using a few pantry staples exceptionally well. I always lay everything out before I start mixing; it’s my number one rule and keeps me from forgetting that tiny dash of salt!
For the crust, which is really the backbone of these Buttery Shortbread Bars, make sure your butter is truly softened—you want it pliable, not melted or greasy. We need those key flavor boosters too: granulated sugar, two large eggs, a good splash of vanilla extract, and just a hint of almond extract. Don’t skip the almond, seriously; it brightens up the cherry flavor beautifully. Then, of course, 2 1/2 cups of all-purpose flour to bring it all together.
For the star of the show, the filling, we’re keeping it incredibly straightforward: one standard 21-ounce can of cherry pie filling. That’s it! You don’t need to simmer cherries or worry about sugar ratios; the can has done all the hard work for us. If you want to see my thoughts on traditional shortbread bases, you can pop over to my shortbread cookie post, but for these bars, the canned filling is our shortcut to success.
Finally, for that drizzle? We need powdered sugar—one cup is what I start with—and just enough milk, maybe one or two tablespoons, to get it perfectly drizzly. A tiny bit more vanilla goes in here, too. Seeing all these components ready on the counter just makes me excited to get baking!

Step-by-Step Guide to Perfect **Cherry Pie Filling Bars**
This is where the magic happens, and honestly, it’s more about rhythm than complexity. We’re making the dough in two parts: the base that packs down nicely and the crumble topping. Remember what I always say about not overmixing? That applies heavily here for the crust. You want that buttery texture, not a tough cookie. Overmixing develops gluten, and we want a tender shortbread, not a hockey puck!
First, make sure your oven is at 350°F and your 9×13 pan is ready with parchment paper hanging over those edges—this makes cleanup ridiculously easy and ensures you can lift the whole dessert out later. Keep that oven temperature in mind; we don’t want these to brown too fast. A good foundation here is key, much like when I learned how to bake bread; see my tips on baking bread if you ever need help with basic dough structure!
Preparing the Buttery Crust and Filling Layer
Once the dough is mixed (remember: just until the flour streaks mostly disappear!), take two-thirds of it and press it firmly into the bottom of your prepared pan. Get it nice and even, wall-to-wall. Then, you just gently spread that entire can of sweet Cherry Pie Filling Bars mixture right over the top of that crust base. Don’t worry about getting it perfectly flat; it will bake evenly.
Now for the topping: take the remaining one-third of the dough and just crumble it over the cherry layer using your fingers. You want little clumps and bits, not a solid sheet. This gives you those fantastic pockets of buttery dough contrasting with the juicy filling underneath. If you’re thinking about texture, this crumbly approach is essential.
Baking and Finishing Your **Glazed Cherry Bars**
Pop that pan into the oven for about 35 to 40 minutes. Watch for the edges of the crumble topping to turn just lightly golden brown. It should smell absolutely heavenly in your kitchen! The most important thing now, and I mean it, is patience: let these cool completely. If you try to glaze them warm—and I’ve made this mistake, trust me—the glaze melts right through them. They need to chill out completely on a wire rack.

When cooled, whisk up your glaze. I usually start with the powdered sugar and one tablespoon of milk, then add the second tablespoon slowly until it drips off the whisk in a nice, slow ribbon. It shouldn’t be watery, just easily pourable. Drizzle that gorgeous glaze over the top. For an extra touch of brilliance, you can look up my thoughts on stable vanilla glazes for tips on getting that perfect shine. Let that glaze set up, and then dive in!
Expert Tips for Making the Best Homemade Cherry Pie Bars
If you want these **Homemade Cherry Pie Bars** to be remembered, you need to treat this simple recipe with a little bit of love and trust the process. I’ve leaned on a few things I learned the hard way, and some actual notes scribbled on my original recipe card, to make sure these turn out incredible every single time, especially when they’re destined for a party.
First off, if you’re making these for a gathering, you absolutely can and should make them ahead of time. They store beautifully at room temperature for up to three days, sealed tight. This means less stress on the day of the event, which is always worth it! For an extra layer of that buttery shortbread texture, I actually learned that chilling the dough briefly—maybe just 15 minutes—before pressing it into the pan helps prevent any shrinkage while baking. It keeps those edges nice and straight.
Also, don’t be afraid to experiment slightly with the flavor profile. If you’re not keen on almond, that note from the source material is spot on: substituting the almond extract with lemon extract introduces a beautiful brightness that pairs wonderfully with cherry. You can check out some of my other baking adventures over on the Pure Cooking Joy blog for more inspiration!
Finally, if you’re looking for a change from the simple crumble topping, try that brown sugar swap I saw mentioned—it leans them more towards a **Sweet Cherry Crumble Bars** vibe. Reserve about half a cup of your dry flour mixture and mix it with about 1/4 cup of packed brown sugar before sprinkling it over the cherries. That molasses flavor adds a whole new dimension!
Making Cherry Dessert Bars Ahead of Time for Gatherings
One of the biggest wins with these **cherry pie bars** is that they are fantastic make-ahead material. Honestly, I think they taste even better the next day once everything settles in, which is a dream scenario when you’re planning a big spread for **Potluck Desserts** or a family get-together. You want flavor built up, not stress mounting the morning of the event, right?
Here’s my rule for preparing these **Cherry Dessert Bars** early: only bake them fully. You want them completely cooled—and I mean *absolutely* room temperature, no residual warmth anywhere—before you even think about cutting them or glazing them. If you try to cut warm bars, they will fall apart on you, and nobody wants sad, crumbly bars.
If you are making them a day ahead for your easy entertaining plans, you have two options for the glaze. Option one, and my favorite choice for ease, is to wait until the day you plan to serve them. Bake them, cool them completely, cover them loosely with foil or plastic wrap, and leave them on the counter. Then, whip up the glaze right before you need to serve and drizzle away! This keeps the glaze looking fresh and shiny.

Option two is for when you need maximum time savings. You can fully bake, cool, and glaze the bars. Once the glaze is set hard (give it an hour or two at room temperature to firm up), you can cover them tightly. Store them in an airtight container at room temperature for up to three days. They hold their shape really well! If you decide to freeze them (which works great!), skip the glaze until they are fully thawed; the glaze doesn’t love the freezer as much as the shortbread structure does. It’s always so nice knowing that a stellar dessert is ready to go when you check in on my Facebook page over on Facebook!
Ingredient Substitutions for Your **Cherry Pie Bars**
I always encourage folks to make a recipe their own, especially when it comes to flavoring. These cherry pie bars are flexible, but we have to be smart about the swaps so we don’t mess up that perfect shortbread structure. The base needs that fat content and structure to support the juicy filling, so we usually leave the flour and butter alone.
When we talk about flavor extracts, you have a little wiggle room. If you aren’t a fan of almond, or maybe you just don’t have it on hand, you can absolutely substitute it with something else. My suggestion, as I mentioned earlier, is to use lemon extract instead. Just use the same amount—about 1/2 teaspoon—in that crust mixture where the almond usually goes. The lemon is wonderfully bright and doesn’t compete with the cherry at all; it actually enhances it! It keeps things sunny and tart.
Now, if you’re leaning into that idea of making something richer and closer to a **Sweet Cherry Crumble Bars** texture rather than the simple crumb topping, we can tweak the topping mixture. Instead of just crumbling the remaining raw dough over the cherries, take that last third of your dough mixture and treat it a bit differently. Mix it with about 1/4 cup of packed brown sugar right before you crumble it over the top.
What this does is add that deep molasses note from the brown sugar. It keeps the topping soft and chewy rather than slightly crisp like a classic streusel. It’s a small change, but it adds a depth of flavor that makes people ask what your secret ingredient is. Just make sure you mix that brown sugar in thoroughly with the reserved dough bits before sprinkling it over your canned cherry pie filling. Simple adjustments leading to big, delicious payoffs—that’s the Pure Cooking Joy way!
Frequently Asked Questions About These **Cherry Dessert Bars**
I always get so many great questions when people first try a new bar recipe, which tells me you’re really invested in making these perfect! That’s awesome. Whether this is your first time making **Dessert Bars for Gatherings** or you’re a seasoned pro, here are the things I hear most often about how to nail these **Cherry Dessert Bars**.
Can I use fresh cherries instead of canned filling in these **cherry pie bars**?
That’s a great question, and I totally get wanting to use peak season fresh cherries! The main reason I lean on the good old canned filling here is speed and insurance. When you use fresh cherries, you have to pit them, cook them down, and then thicken them yourself. That process adds a good chunk of time—way more than the 20 minutes of prep these bars boast! If you want that shortcut magic, stick to the can. If you have time to play around and want to learn how to make a chunky, homemade filling from scratch, you can check out my guidance on making cherry pie filling, but for this specific bar recipe, the canned stuff is truly your best **Simple Cherry Dessert** helper.
How do I get the glaze to set properly on my **Glazed Cherry Bars**?
The glaze is usually the last thing to worry about, but getting it right can make these look store-bought perfect! The absolute most important thing, and this is key for beautiful **Glazed Cherry Bars**, is that the bars have to be *completely* cool. I mean room temperature solid. If there is even a whisper of warmth in that crust or filling, the glaze will melt right into the shortbread, and you’ll end up with sticky puddles instead of a nice, clean drizzle.
If you’ve cooled it all down and your glaze still seems too thin—running off like water instead of drizzling slowly—don’t panic! Just whisk in another half-tablespoon of powdered sugar at a time until you get that perfect, thick, but pourable consistency. Patience with the cooling process and slow addition of milk are your two best friends for a flawless finish. If anything else comes up while you’re baking, don’t hesitate to reach out to me on the Contact Page!
Estimated Nutrition for Your Simple Cherry Dessert
I always include nutrition estimates because I believe in knowing what goes into the food we create and share. As a home cook committed to transparency, I want to be upfront that these numbers are based on using the exact ingredients listed and dividing the entire 9×13 pan into 16 even servings. Remember, every oven runs a little differently, and brands vary, so consider this your best guide for these **cherry pie bars**!
For those tracking things closely, here’s the estimated breakdown per bar:
- Calories: Around 310
- Fat: Approximately 16 grams (mostly from that glorious buttery shortbread!)
- Carbohydrates: Roughly 40 grams
- Sugar: About 28 grams (that’s the filling and crust mingling!)
- Protein: A modest 3 grams
This recipe uses standard measurements, but if you start adding extra crumbles or making a thicker glaze, those numbers will nudge up a bit. If you need to see the sources or have questions about how I calculate these things for my recipes, feel free to check out the detailed information on my Disclaimer Page. Ultimately, these **Simple Cherry Dessert** bars are meant to be enjoyed as a special treat!
Share Your **Cherry Pie Bars** Creations
Well, that’s it! We’ve taken simple ingredients and turned them into the most satisfying, easy-to-serve **cherry pie bars**. Doesn’t it feel good to know you can whip up something so crowd-pleasing in about an hour? I truly hope you loved making these buttery shortbread treats just as much as I love sharing them with you. Cooking is meant to be a shared joy, not a secret treasure!
Now, I’m dying to know how they turned out for you! Seriously, hit that rating section below and let me know if you loved the almond note or if you swapped it out for lemon—I’m always curious about how you customize things in your own pure cooking joy space.
Please, please leave me a comment telling me what gathering these **cherry pie bars** ended up at. Did the kids attack them first? Were they the star of the potluck? Seeing your creations is the best part of this whole process! If you snap a picture, tag me on social media—I always look at every tag!
If you have any lingering questions about how the glaze set or why your crust crumbled just right, don’t hesitate to pop over to my Contact Page. Happy baking until next time!
PrintEasy Cherry Pie Bars with Buttery Shortbread Crust
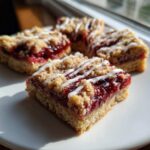
I am happy you found this recipe. These cherry pie bars capture the flavor of classic cherry pie in a simple, shareable bar form. They feature a rich, buttery shortbread crust and a sweet cherry filling, perfect for potlucks or family treats.
- Prep Time: 20 min
- Cook Time: 40 min
- Total Time: 60 min
- Yield: 16 servings 1x
- Category: Dessert
- Method: Baking
- Cuisine: American
- Diet: Vegetarian
Ingredients
- 1 cup unsalted butter, softened
- 1 cup granulated sugar
- 1/4 teaspoon salt
- 2 large eggs
- 1 teaspoon vanilla extract
- 1/2 teaspoon almond extract
- 2 1/2 cups all-purpose flour
- 1 (21-ounce) can cherry pie filling
- 1 cup powdered sugar (for glaze)
- 1–2 tablespoons milk (for glaze)
- 1/2 teaspoon vanilla extract (for glaze)
Instructions
- Preheat your oven to 350°F (175°C). Line a 9×13 inch baking pan with parchment paper, leaving an overhang on the sides for easy removal.
- In a large bowl, beat the softened butter, granulated sugar, and salt until light and fluffy.
- Beat in the eggs one at a time, mixing well after each addition. Stir in the 1 teaspoon vanilla extract and 1/2 teaspoon almond extract.
- Gradually mix in the all-purpose flour until just combined. Do not overmix the dough.
- Press two-thirds of the dough evenly into the bottom of the prepared baking pan to form the crust.
- Spread the entire can of cherry pie filling evenly over the crust layer.
- Crumble the remaining one-third of the dough over the cherry filling.
- Bake for 35 to 40 minutes, or until the topping is lightly golden brown.
- Let the bars cool completely in the pan on a wire rack. Cooling is important before glazing.
- Prepare the glaze: Whisk together the powdered sugar, milk, and 1/2 teaspoon vanilla extract until smooth. Add milk slowly to reach a drizzly consistency.
- Drizzle the glaze over the cooled bars. Let the glaze set before cutting into squares.
Notes
- You can make these dessert bars for a gathering ahead of time; they store well at room temperature for up to three days.
- For a slightly different flavor, substitute the almond extract with lemon extract in the crust mixture.
- If you prefer a crumb topping instead of a crumbled topping, reserve 1/2 cup of the flour mixture and mix it with 1/4 cup of packed brown sugar before sprinkling over the filling.
Nutrition
- Serving Size: 1 bar
- Calories: 310
- Sugar: 28
- Sodium: 110
- Fat: 16
- Saturated Fat: 9
- Unsaturated Fat: 7
- Trans Fat: 0
- Carbohydrates: 40
- Fiber: 1
- Protein: 3
- Cholesterol: 55
