 Skip to content

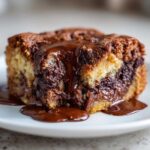
When that craving hits for something truly decadent and warm—straight from the oven—you need something that delivers deep chocolate flavor without demanding you pull out the heavy-duty mixer. Trust me, I get it; sometimes the spirit is willing but the energy for complicated baking is just not there! That’s why I’m so thrilled to share my absolute favorite recipe for this Old-Fashioned Self-Saucing Chocolate Cobbler. It’s pure magic! You dump the ingredients together, and while it bakes, this dessert actually creates its own rich, gooey fudge sauce hiding right underneath that simple, cake-like top. This chocolate cobbler is the ultimate proof that soulful, satisfying food never has to be complicated.
- Why This Old-Fashioned Chocolate Cobbler is Your New Favorite Comfort Food Desserts
- Ingredients for the Best Chocolate Cobbler
- How to Make a Self Saucing Chocolate Cobbler
- Tips for the Perfect Gooey Chocolate Cake Bottom
- Serving Suggestions for Your Warm Chocolate Pudding Cake
- Storage and Reheating Instructions for this Decadent Chocolate Treat
- Frequently Asked Questions about the Chocolate Cobbler Recipe
- Nutritional Estimates for Your Homemade Chocolate Treat
- Share Your Experience Making This Chocolate Cobbler
Why This Old-Fashioned Chocolate Cobbler is Your New Favorite Comfort Food Desserts
If you’re looking for a recipe that screams home and happiness, this is it. I think of this Old Fashioned Cobbler as peak Comfort Food Desserts because it tricks you into thinking you did a ton of work when you really just used a spoon and a bowl. Seriously, the end result is just mind-blowing.
Here’s why you need this in your rotation immediately:
- The unbelievable self saucing chocolate cobbler magic—that molten fudge layer forms all on its own.
- You really don’t need a mixer! It’s perfectly happy with just a whisk and a bowl, making cleanup a breeze.
- The texture is exactly what you want: a light cake top giving way to that warm and gooey, chocolatey bottom.
- It truly captures that down-home, Southern chocolate dessert vibe without any fussy techniques.
We’ve made so many simple recipes here on Pure Cooking Joy, but this one always tops the list when I need a guaranteed crowd-pleaser. You can find some of my other cozy staples over at my page dedicated to the best comfort food recipes.
Ingredients for the Best Chocolate Cobbler
Okay, let’s get organized! This is the best part because you probably have most of this stuff on hand already. Remember, you don’t need a fancy mixer for this; just a sturdy spoon and a bowl is all you need to get this chocolate cobbler ready for the oven. Seeing these simple items together really shows you how this amazing dessert comes together without any fuss.
For the Chocolate Cobbler Batter
- 1 1/2 cups all-purpose flour
- 1 1/2 cups granulated sugar
- 1/2 cup unsweetened cocoa powder
- 1 teaspoon baking soda
- 1/2 teaspoon salt
- 1 cup milk (room temperature is great, but honestly, whatever you have works!)
- 1/2 cup vegetable oil
- 1 teaspoon vanilla extract
For the Gooey Fudge Bottom Sauce
This is where the magic starts! That rich, fudgy chocolate dessert texture underneath begins right here with these darker, richer ingredients.
- 1 cup packed brown sugar
- 1/2 cup unsweetened cocoa powder (yes, more cocoa!)
- 1 cup boiling water (be careful with this part!)
How to Make a Self Saucing Chocolate Cobbler
Now that we have everything measured out, let’s get this chocolate cobbler into the oven! This is where the real fun happens because you don’t have to worry about making a separate homemade chocolate sauce. It’s all built right in, which is just brilliant. Remember what I said about keeping things easy? We’re sticking to that—no mixer needed here. Just grab a spoon and let’s go!
Mixing the Easy Chocolate Cobbler Batter
First things first, make sure your oven is set to 350 degrees F, and lightly grease that 8×8 inch baking dish. Now, take all those dry batter ingredients (flour, granulated sugar, cocoa, baking soda, salt) and whisk them together really well in a big bowl. Whisking dry ingredients first ensures everything is evenly distributed. Next, pour in the wet stuff: the milk, oil, and vanilla. Mix with your spoon until it’s *just* combined. I mean it—stop mixing the second you don’t see any more flour streaks. Overmixing is the enemy if you want that light, cakey top!
Creating the Molten Chocolate Dessert Layers
This step is the absolute secret sauce, literally! In a separate bowl, whisk your sauce ingredients: the brown sugar and the remaining cocoa powder. Then, you’ll carefully pour in 1 cup of that boiling water and stir until the sugar dissolves completely. You end up with a thin, dark chocolate syrup. Now, take this hot liquid and, very gently, pour it slowly over the top of the unbaked batter in your dish. The batter is lighter, so it will float right on top! That temperature difference is what creates the layers perfectly.

Baking and Resting the Chocolate Cobbler
Pop that dish into the oven for about 30 to 35 minutes. You’re looking for the top to set up and look dry, kind of like a thin brownie or cake. You shouldn’t see any wet batter, but don’t overbake it, or you lose the goo! Once it’s out, resist temptation for just 10 minutes. Letting it rest makes that fudge layer stay thick and spoonable. If you want to try making a simple dip to go with it sometime, I have a great recipe for an easy chocolate dip that’s great for dipping cake scraps!

Tips for the Perfect Gooey Chocolate Cake Bottom
Even though this chocolate cobbler is incredibly simple, a couple of little tweaks can take that bottom layer from good to absolutely unforgettable. We are aiming for peak decadence here—that rich, fudgy chocolate dessert layer that oozes out when you scoop it. Getting that two-layer effect, with the light cake on top and the molten bottom, is all about understanding how the liquid behaves.
Understanding the Self Saucing Chocolate Cobbler Science
Honestly, the science behind this Gooey Chocolate Cake effect is so cool, even though it feels like pure alchemy! When you pour that very hot, heavy sugar/cocoa syrup mixture over the light, room-temperature batter, the syrup is denser. As it bakes, it sinks right to the bottom of the dish, while the lighter flour batter floats up to the top to form the cake crust. It’s the simplest form of density separation, and it’s exactly why you must use boiling water for the sauce!

Ingredient Temperature Check for Easy Chocolate Bake
I mentioned that you don’t need a mixer, and that’s true, but if you happen to remember, let your cup of milk sit out on the counter for about 20 minutes before you start. Cold milk hitting dry flour ingredients can sometimes make mixing a little sluggish and might result in tiny lumps. Using room-temperature milk helps everything combine smoothly with just a spoon, ensuring you don’t overwork the batter while you try to smooth things out. It’s a small detail for this Easy Chocolate Bake recipe, but small details matter when chasing perfection!
If you want to dive deeper into general cake science—like why creaming matters in other bakes—you can check out some of my more technical posts on chocolate cake secrets.
Serving Suggestions for Your Warm Chocolate Pudding Cake
Okay, here is the moment of truth! You’ve pulled your chocolate cobbler out, let it rest for those crucial ten minutes, and now you’re ready to dig in. If you take away just one thing from this recipe, let it be this: You absolutely, positively must serve this warm. That hot, gooey center just won’t be the same if you let it sit too long.
The classic pairing? A big, beautiful scoop of good quality vanilla ice cream plopped right on top. Seriously, the cold creaminess against that warm, rich fudge is what dreams are made of. If you feel like making things extra special—and why wouldn’t you?—a drizzle of homemade caramel sauce or maybe a dollop of real whipped cream works wonders too. My recipe for fluffy vanilla buttercream could even take a backseat to a simple, stiffly whipped cream here!
Storage and Reheating Instructions for this Decadent Chocolate Treat
Let’s be real, this chocolate cobbler tastes best when it’s still warm and the fudge sauce is absolutely molten, but leftovers happen! If you manage to have any delicious bits left over, the best way to store them is covered tightly, either at cool room temperature or tucked away in the fridge. Just know that when it chills, that wonderful sauce layer is going to firm right up.

The good news is reheating is super easy! For the best effect, pop a serving into the microwave for about 20 to 30 seconds. That usually brings back the lovely warmth without drying out the cake top. If you’re reheating a bigger piece, wrap it loosely in foil and warm it gently in a 300°F oven until it’s heated through. That way, you get that perfect, oozy center back again. Enjoy your second helping of this decadent chocolate treat!
Frequently Asked Questions about the Chocolate Cobbler Recipe
I always get so many lovely questions after folks try this dessert! Since this chocolate cobbler is a bit unique with its self-saucing action, I wanted to clear up a few things right here so you feel totally confident pulling this off. It’s all about getting that perfect texture every single time. If you’ve got more questions after reading these, pop over to my main blog page—or even send me a message on Facebook—I love hearing from you!
Can I make this Southern Chocolate Dessert ahead of time?
That’s a great question for when you’re planning a party! While I strongly believe this Southern Chocolate Dessert is best eaten straight from the oven, you absolutely can prep it ahead. Here’s my advice: Assemble everything—mix the batter, pour it in the dish, and mix the *sauce* ingredients (but DON’T add the boiling water yet). Cover that dish and stick it in the fridge. When you’re ready to bake, preheat the oven and just proceed with the recipe, adding that final cup of boiling water right before it goes in. Just be warned, if you chill the actual finished, baked cobbler, that fudgy layer will solidify. You’ll need to reheat it gently to get that ooze back!
What is the difference between this and a Warm Chocolate Pudding Cake?
Honestly, not much at all, which is why some folks call it both! When I learned this recipe, it was always called an Old Fashioned Cobbler. But you’re right, the result is very similar to a ‘Warm Chocolate Pudding Cake‘—a cakey top layer that sits above a rich, almost molten pudding layer. The magic in both comes from that hot water poured over the top causing the separation. For me, calling it a chocolate cobbler just feels a little more traditional and Southern, but functionally, you get that incredible, rich, gooey layering either way!
Can I use different sugar in the sauce for this Quick Chocolate Recipe?
I really wouldn’t recommend it for the sauce layer in this Quick Chocolate Recipe, especially when you are aiming for that signature gooey bottom. The brown sugar is heavy, high in molasses, and it’s crucial for achieving the right density and deep caramel flavor once it mixes with the boiling water. If you swap it out for granulated sugar, the sauce won’t set up quite the same way, and you might end up with more of a thin, watery chocolate liquid instead of that thick, fudgy sauce we are after. Stick to the dark brown sugar here for guaranteed success!
Nutritional Estimates for Your Homemade Chocolate Treat
I always want to be upfront about what’s in the food we make, even the wonderfully indulgent stuff like this chocolate cobbler! Because we’re focused on real ingredients here, these numbers are just estimates, okay? They can zip up or down depending on the exact brands of milk or oil you use. This is a rich bite, so enjoy every spoonful!
- Serving Size: 1 serving
- Calories: 450
- Sugar: 55g
- Sodium: 250mg
- Fat: 20g
- Protein: 5g
Keep in mind these numbers reflect the cobbler portion itself, before you pile on that extra scoop of ice cream—and trust me, you should always pile on the ice cream!
Share Your Experience Making This Chocolate Cobbler
Now that you have the secret to the best chocolate cobbler—the one that makes its own sauce—I truly hope you give this a go the next time you need a simple, decadent dessert in your life. I put my heart into these recipes, striving to make sure they are approachable and genuinely joyful whenever you step into the kitchen.
Once you’ve baked this for your family, please come back and leave a star rating right here on the recipe card. Stars help other home cooks like you feel confident diving into something new! It really means the world to me when I hear how much joy a recipe brought to your table.
If you take a gorgeous picture of that gooey fudge layer oozing out, be sure to tag me on social media! I love seeing your creations. My goal here at Pure Cooking Joy is exactly that—to share delicious food that connects us all. Happy baking!
Warmly,
Alex Hayes
PrintOld-Fashioned Self-Saucing Chocolate Cobbler with Gooey Fudge Bottom
This old-fashioned chocolate cobbler creates its own rich, gooey fudge sauce underneath a simple, cake-like top while it bakes. It is an easy, comforting dessert perfect for serving warm with vanilla ice cream.
- Prep Time: 10 min
- Cook Time: 35 min
- Total Time: 45 min
- Yield: 6 servings 1x
- Category: Dessert
- Method: Baking
- Cuisine: American
- Diet: Vegetarian
Ingredients
- 1 1/2 cups all-purpose flour
- 1 1/2 cups granulated sugar
- 1/2 cup unsweetened cocoa powder
- 1 teaspoon baking soda
- 1/2 teaspoon salt
- 1 cup milk
- 1/2 cup vegetable oil
- 1 teaspoon vanilla extract
- 1 cup boiling water
- 1 cup packed brown sugar (for sauce)
- 1/2 cup unsweetened cocoa powder (for sauce)
- 1/2 cup boiling water (for sauce)
Instructions
- Preheat your oven to 350 degrees F. Lightly grease an 8×8 inch baking dish.
- In a large bowl, whisk together the flour, granulated sugar, 1/2 cup cocoa powder, baking soda, and salt.
- Add the milk, vegetable oil, and vanilla extract to the dry ingredients. Mix with a spoon until just combined. Do not overmix.
- Pour the batter evenly into the prepared baking dish.
- In a separate medium bowl, whisk together the brown sugar and the remaining 1/2 cup cocoa powder for the sauce.
- Carefully pour 1 cup of boiling water over the sugar and cocoa mixture and stir until the sugar dissolves, creating a thin chocolate syrup.
- Slowly and gently pour this hot chocolate syrup over the top of the batter in the baking dish. The batter will float on top of the liquid.
- Bake for 30 to 35 minutes. The top will look set and cake-like, and you will see the dark, thick fudge sauce forming underneath.
- Remove from the oven and let it cool slightly for about 10 minutes before serving warm.
- Serve your warm chocolate cobbler with a scoop of vanilla ice cream for the best experience.
Notes
- You do not need a mixer for this recipe; a spoon works perfectly for combining the batter.
- The hot water poured over the top is what separates the layers, creating the self-saucing effect. Pour slowly.
- This dessert is best eaten the day it is made while the fudge sauce is warm and molten.
Nutrition
- Serving Size: 1 serving
- Calories: 450
- Sugar: 55
- Sodium: 250
- Fat: 20
- Saturated Fat: 4
- Unsaturated Fat: 16
- Trans Fat: 0
- Carbohydrates: 70
- Fiber: 4
- Protein: 5
- Cholesterol: 10
