 Skip to content

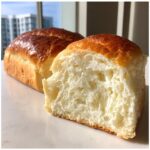
If you’ve ever dreamed of pulling a loaf of bread from your own oven that feels like a cloud—soft, tender, and just sweet enough—then stick with me. For years, bread intimidated me. It felt fiddly, and frankly, my early attempts were anything but fluffy. But I’ve learned that the secret weapon for guaranteed success and bakery-quality results is often hiding right in your pantry: sweetened condensed milk. That’s why I’m so excited for you to try my Easy Fluffy Sweetened Condensed Milk Bread Loaf. This recipe takes all the guesswork out of achieving that incredible tenderness. Trust me, once you see how easy this Sweetened Condensed Milk Bread is, you’ll be baking loaves every weekend. If you are looking to build your general bread confidence, checking out my guide on baking bread can provide a great foundation, but this loaf is truly simple. You’ve got this!

- Why This Condensed Milk Bread Recipe Delivers Cloud Soft Bread
- Gathering Ingredients for Your Easy Condensed Milk Loaf
- Step-by-Step Instructions for Perfect Condensed Milk Bread
- Baking Tips for Tender Homemade Bread
- Variations: From Condensed Milk Rolls Recipe to Machine Use
- Storing and Serving Your Sweet Breakfast Bread
- Frequently Asked Questions About Baking with Condensed Milk
- Nutritional Estimate for One Slice
- Share Your Baking Success
Why This Condensed Milk Bread Recipe Delivers Cloud Soft Bread
What really sets this bread apart is swapping out some of the sugar and some of the milk for that magical can of sweetened condensed milk. Honestly, it’s a shortcut to heaven! The high fat and sugar content wrap around the gluten strands in the dough, which is exactly what gives you that melt-in-your-mouth feel. If you’ve struggled to get that truly Soft Fluffy Bread Recipe texture before, this is your game changer. It keeps the bread incredibly moist even the next day, making it the kind of Pillowy Milk Bread everyone asks for seconds of.
Benefits of Making Sweet Homemade Bread
- Superior, lasting softness that rivals bakery versions.
- A gentle, comforting sweetness perfect for toast or snacking.
- It’s genuinely beginner-friendly—the condensed milk does most of the heavy lifting!
- Tastes exponentially better than anything store-bought, which is why we bake, right?
Gathering Ingredients for Your Easy Condensed Milk Loaf
Okay, let’s get our ingredients lined up. For the best results with this Easy Condensed Milk Loaf, precision matters, even though the recipe itself is so forgiving. You’ll need a can of that sweet, glorious condensed milk, of course! Make sure your milk is truly warm—we are talking 105°F to 115°F, just slightly warmer than body temperature. If it’s too hot, you’ll kill your yeast, and nobody wants dormant yeast on their hands. Also, ensure your butter is fully melted before mixing it with the wet stuff.
Here’s the list of everything you need to get that tender result:
- 1 cup warm milk (about 105-115°F)
- 1/2 cup sweetened condensed milk
- 1 large egg
- 3 tablespoons unsalted butter, melted
- 3 cups all-purpose flour
- 2 1/4 teaspoons active dry yeast
- 1/2 teaspoon salt
- 1 tablespoon granulated sugar (optional, for slight extra sweetness)
Ingredient Notes and Substitutions for Condensed Milk Bread
A quick note on your yeast: Active dry yeast needs to be woken up! Mix it right in with the warm milk and a tiny bit of that sugar before you combine everything else. This blooming step confirms it’s alive and ready to work its magic. If you leave out that optional tablespoon of granulated sugar, don’t worry—the condensed milk has plenty of sweetness! But I find that tiny boost helps the yeast move a little faster. And here’s my pro tip: If you can use whole milk instead of 2% in the recipe notes, do it. The higher fat content translates directly to a richer, more decadent crumb. It’s worth the splurge for this Sweet Homemade Bread!
Step-by-Step Instructions for Perfect Condensed Milk Bread
Alright, time to dive into the mixing! This process is straightforward, but remember what I always say: the rhythm of mixing is key to that beautiful texture. First things first, grab a large bowl and whisk together all your liquids: the warm milk, the condensed milk, the melted butter, and that egg. Get it nice and combined.
In a separate bowl, you need to whisk your dry team—flour, salt, and that yeast mixture we talked about supporting earlier. Now, we add the dry to the wet gradually. Don’t dump it all in at once, or you create pockets of dry flour that are a pain to mix in later! Mix until it looks like a shaggy mass. Then, it’s time for what I personally find therapeutic: the kneading. Turn the dough out onto a lightly floured counter. You’re looking for that sweet spot—it should take about 8 to 10 minutes by hand until the dough is smooth and elastic—it won’t be sticky anymore, but it should still feel soft and slightly pillowy to the touch. If you’re feeling nervous about working with yeast generally, learning about the science in my guide on baking bread can really build your confidence for high-hydration breads like this one!
Achieving the Ideal First Rise for Your Sweet Yeast Bread
Once you’ve kneaded until all your tension has worked itself out, lightly grease a clean bowl, tuck the dough ball in, and cover it up tight. This is the first proof, and it’s where the yeast really gets to work making your loaf light. You need a warm environment for this—maybe near a sunny window or just in a slightly warm spot in your kitchen. You’re waiting for the dough to double in size. That usually takes about an hour to an hour-and-a-half. Don’t rush this step; if it hasn’t doubled, it hasn’t finished developing those lovely gases that make it light.
Shaping and Second Proofing for Your Fluffy Sandwich Bread
When it’s doubled, gently deflate the dough—don’t punch it hard, just gently press the air out. Shape it neatly into a tight log (this helps it rise up instead of out), and tuck it snugly into your greased 9×5 inch loaf pan. This second rise is critical for that amazing oven spring you want in your Fluffy Sandwich Bread. Cover it loosely again and let it relax for about 45 to 60 minutes. The goal here is that excellent crown: the dough should look puffy and be peaking about one inch over the top rim of the pan. If you’re already thinking about your oven settings, make sure you have that 350°F oven preheating during the last 15 minutes of this rise. Timing is everything for that soft, pillowy texture!

Baking Tips for Tender Homemade Bread
We’ve mixed, we’ve kneaded, and we’ve waited (patiently!) for the dual rises. Now comes the best part: opening that oven door to golden perfection! Getting that beautiful color on your Tender Homemade Bread is easy, but knowing when it’s *actually* done baking is an art. We’re looking for a beautiful, rich golden-brown color on top, which usually takes about 30 to 35 minutes at 350°F in a standard loaf pan.
However, looks can sometimes be deceiving, especially with a sweet dough like this. Here’s the expert tip I learned the hard way: don’t just rely on the color or the toothpick test. For absolute certainty that the interior is cooked through without drying out, you really need to check the internal temperature. Aim for 200°F (93°C) right in the center. Anything less, and you risk a gummy crumb; anything more, and you start sacrificing that lovely softness we worked so hard for.
The biggest mistake home bakers make happens *after* the loaf comes out of the oven, and this is where you must listen to me! You have to remove the loaf from the hot pan immediately—like, right away! Seriously, don’t let it sit in the pan for even five minutes. The residual heat trapped inside that metal will continue to steam the bottom and sides, and you’ll end up with a damp, slightly gummy bottom crust. Gently turn the pan over onto a wire cooling rack, and let it come completely to room temperature before you even think about slicing it. Slicing warm bread just crushes those delicate air pockets we created during the rise. Resist the urge! Just let it cool completely on the rack so the steam can escape properly. If you ever want to share your finished loaf or ask baking questions, feel free to connect with me over on Facebook at Pure Cooking Joy!

Variations: From Condensed Milk Rolls Recipe to Machine Use
The beauty of a great, soft dough like this is how easily it adapts! I know not everyone has the time (or desire!) to stand over a loaf while it’s rising, and sometimes you just really want those soft, pull-apart rolls for dinner. Good news: we absolutely can pivot this recipe, and the deliciousness factor stays high.
If you feel like making rolls instead—maybe for a big family brunch or just because you love that perfect crust-to-soft-center ratio found in a great Condensed Milk Rolls Recipe—it’s super easy. After that first rise where the dough doubles, gently punch it down like usual, but instead of shaping a single loaf, divide that entire dough mass into 12 equal pieces. Roll each piece into a neat little ball, making sure to tuck the edges underneath to create surface tension. Place those balls snugly into a greased 9×13 inch baking dish. They will puff up together beautifully as they complete the second rise. Just remember, rolls bake faster than a dense loaf, so keep an eye on them; around 20 to 25 minutes should do the trick!
Now, for those of you who consider hands-on kneading an extra chore, let’s talk about the bread machine. It handles the initial manual labor so you don’t have to! You can absolutely use the dough cycle on your machine. Just toss in all your wet ingredients first, followed by your dry ones, and select the dough setting. The machine mixes and kneads everything perfectly. Once the cycle is done, you’ll still need to shape the dough into your loaf pan or rolls and let it finish its two proofs by hand, but this takes all the hard work out of developing the gluten. It’s a fantastic, approachable way to make Sweet Yeast Bread when you are short on time. Speaking of sweet doughs, if you are ever looking to swap out traditional flour for cornmeal in some recipes, I have a great guide on making soft corn tortillas that’s surprisingly simple, too!
Storing and Serving Your Sweet Breakfast Bread
The excitement of baking something this soft is often followed by the dread of it going stale! Since this loaf relies on that wonderful moisture from the condensed milk, proper storage is key to keeping that Cloud Soft Bread magic alive for days. The best thing you can do is keep it sealed up tight at room temperature. Once it’s completely cool—and remember, we talked about waiting for that cooling!), wrap the entire loaf well in plastic wrap or slide it into an airtight reusable bag. This bread should stay absolutely heavenly for three to four days this way.
Now, I know what you’re thinking: should I freeze it? Yes, absolutely, especially if you know you won’t get through the whole loaf in a few days. Slice it first, and then wrap those individual slices tightly in plastic wrap, followed by a layer of foil or a freezer-safe bag. It freezes beautifully for up to three months! When you want a slice, just pop it straight into the toaster. No need to thaw it first; the toaster takes care of reheating and crisping it up all at once. That’s my favorite way to enjoy this Sweet Breakfast Bread!
Serving-wise, this bread is so versatile, it barely needs dressing up. If you’re eating it plain, a light spread of good quality butter is heavenly. It makes the most incredible base for French toast because the slight sweetness permeates the egg mixture perfectly. And honestly, it shines as a sandwich bread, too! It’s sturdy enough not to fall apart under lunch fillings but soft enough to feel luxurious. It pairs naturally with creamy things—think smashed avocado, or maybe even a bowl of my easy overnight chia pudding if you need a quick, healthy side to your morning slice. Honestly, this Sweet Homemade Bread is just as good coming straight out of the bag with a cup of strong black coffee as it is toasted!

Frequently Asked Questions About Baking with Condensed Milk
It’s totally normal to have questions when you start playing with new ingredients, especially when you’re aiming for that perfect, Pillowy Milk Bread texture. I’ve gathered some of the bits and pieces that used to trip me up when I was mastering this dough. Don’t hesitate to ask your own questions in the comments below—it’s how we all learn! If you’re looking for more general troubleshooting tips, always feel free to peek around the Pure Cooking Joy blog archives.
Can I substitute evaporated milk for condensed milk in this bread recipe?
That is kind of you to ask, but the answer is a definite no, not directly! You cannot swap evaporated milk evenly for sweetened condensed milk here. Why? Because evaporated milk is just plain milk that’s had about 60% of its water removed; there’s no sugar in it at all. If you used it straight across, your dough wouldn’t rise right, and it would taste completely unsweetened, losing that signature richness we are aiming for in this Sweet Homemade Bread.
If you *only* have evaporated milk on hand, here’s the adjustment: For every 1/2 cup of sweetened condensed milk the recipe calls for, you need to use about 1/3 cup of evaporated milk AND add roughly 1/2 cup of granulated sugar to compensate. See? It’s much easier just to grab the correct can! If you skip that extra sugar, you end up with a less tender crumb because you haven’t replaced the necessary sugar solids.
How do I know if my condensed milk bread is done baking?
This is the most crucial question to master your timing! We want that perfect balance—baked fully but still wonderfully soft. First, look for deep, even golden brown color across the entire surface of the loaf. That signals the exterior sugars have caramelized nicely, which helps seal in moisture for that Tender Homemade Bread.
But the true certainty comes from temperature, just like I mentioned earlier. Once you think it looks done, quickly and carefully insert an instant-read thermometer into the very center of the loaf. If you see 200°F (93°C), pull it out immediately. That internal temperature ensures the yeast activity has stopped and the starches have fully gelled, giving you that beautiful, springy texture without being gummy or raw inside. It’s the best way to ensure success for your Beginner Bread Baking attempts!
Nutritional Estimate for One Slice
Okay, let’s be honest: when we pull a loaf of this incredible, pillowy bread from the oven, we aren’t usually reaching for the calculator! This recipe is all about comfort and pure indulgence, so please don’t stress too much about the numbers. However, because I believe in transparency—and because you might be curious about how much goodness you’re packing into that first slice—I’ve put together a basic estimate for you.
It’s super important for you to know that these figures are just estimates based on the quantities listed in the recipe and the standard ingredients available. If you use a different brand of sweetened condensed milk or swap out the flour, the final counts will change. Treat this more as a guide than an exact science!
Here is the approximate breakdown for a single slice of our Sweetened Condensed Milk Bread:
- Serving Size: 1 slice
- Calories: 180
- Fat: 4g
- Saturated Fat: 2g
- Carbohydrates: 30g
- Sugar: 8g
- Protein: 5g
- Sodium: 150mg
As you can see, you get a decent hit of protein and the sugar content is naturally higher because of the star ingredient! But hey, that little bit of sugar is what makes this such a wonderful Sweet Homemade Bread and gives us that gorgeous golden crust. Enjoy it, knowing you made it with love right in your own kitchen!
Share Your Baking Success
Well, that’s it! We’ve mixed, proofed, and baked one of the softest loaves of bread you’ll ever have the pleasure of slicing. I truly hope this Easy Condensed Milk Loaf brings a little sunshine into your kitchen, just like it does mine every time I make a batch. You’ve mastered the art of creating that pillowy, slightly sweet dough, and now it’s time to celebrate!
I would absolutely love, love, love if you came back here and dropped a rating below. If this recipe earned five stars in your book for being a truly Soft Fluffy Bread Recipe, please let others know! And if you had any fun moments, silly mishaps, or absolute triumphs while baking, share them in the comments section underneath this post. I read every single one, and it helps me know what kind of recipes you all want to see next.
If you snapped a photo of your beautifully crowned loaf or maybe those incredible homemade rolls, please consider sharing it on Instagram or Pinterest and tagging me! It makes my day to see my recipes out in the wild, being enjoyed by people who appreciate good, simple cooking. When you share, you help other beginners feel the courage to tackle yeast bread for the first time. If you ever need to send me a direct message about ingredients or need help troubleshooting, my contact page is always open. Happy baking, friends!
PrintEasy Fluffy Sweetened Condensed Milk Bread Loaf
Make this incredibly soft and slightly sweet bread loaf using sweetened condensed milk for a tender crumb. This recipe is beginner-friendly and yields a pillowy texture perfect for breakfast or snacks.
- Prep Time: 20 min
- Cook Time: 35 min
- Total Time: 2 hours 5 minutes
- Yield: 1 loaf (about 12 slices) 1x
- Category: Baking
- Method: Yeast Baking
- Cuisine: American
- Diet: Vegetarian
Ingredients
- 1 cup warm milk (about 105-115°F)
- 1/2 cup sweetened condensed milk
- 1 large egg
- 3 tablespoons unsalted butter, melted
- 3 cups all-purpose flour
- 2 1/4 teaspoons active dry yeast
- 1/2 teaspoon salt
- 1 tablespoon granulated sugar (optional, for slight extra sweetness)
Instructions
- In a large bowl, combine the warm milk, sweetened condensed milk, egg, and melted butter. Whisk until combined.
- In a separate bowl, whisk together the flour, yeast, salt, and optional sugar.
- Gradually add the dry ingredients to the wet ingredients, mixing until a shaggy dough forms.
- Turn the dough out onto a lightly floured surface. Knead for 8 to 10 minutes until the dough is smooth and elastic. It should feel soft.
- Lightly grease a clean bowl. Place the dough in the bowl, turning once to coat. Cover the bowl with plastic wrap or a clean kitchen towel.
- Let the dough rise in a warm place for 1 to 1.5 hours, or until doubled in size. This is your first proof.
- Gently punch down the dough. Shape it into a loaf and place it into a greased 9×5 inch loaf pan.
- Cover the pan loosely and let the dough rise again in a warm spot for 45 to 60 minutes, or until the dough has crowned about 1 inch above the rim of the pan. This is your second proof.
- Preheat your oven to 350°F (175°C) during the last 15 minutes of the second rise.
- Bake for 30 to 35 minutes, or until the top is golden brown and the internal temperature reaches 200°F (93°C).
- Remove the loaf from the pan immediately after baking and let it cool completely on a wire rack before slicing.
Notes
- For an even softer crust, brush the top of the loaf with melted butter immediately after removing it from the oven.
- If you prefer rolls instead of a loaf, divide the dough into 12 equal pieces after the first rise, shape into balls, and place them in a greased 9×13 inch baking dish. Adjust baking time to about 20-25 minutes.
- You can use the dough cycle on your bread machine for the initial mixing and kneading if you prefer hands-off preparation.
Nutrition
- Serving Size: 1 slice
- Calories: 180
- Sugar: 8
- Sodium: 150
- Fat: 4
- Saturated Fat: 2
- Unsaturated Fat: 2
- Trans Fat: 0
- Carbohydrates: 30
- Fiber: 1
- Protein: 5
- Cholesterol: 25
