 Skip to content

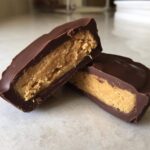
If you ever hit that wall around 3 PM where only pure, unadulterated chocolate and peanut butter can save the day, I have the recipe for you! Forget running to the store; we’re making the best homemade peanut butter cups right here, right now, and I promise they’re better than anything you can buy. When I first started cooking to de-stress from my corporate days, simple, satisfying treats like these were my anchors of joy. This no-bake peanut butter cups recipe is so easy, it proves that incredible flavor doesn’t need complicated techniques. Get ready for pure cooking joy!
- Why You Will Love These Homemade Peanut Butter Cups
- The Essential Ingredients for Perfect Peanut Butter Cups
- Step-by-Step Guide to Making Easy Peanut Butter Cups
- Tips for Perfect Chocolate Coating on Your Peanut Butter Cups
- Variations for Your No Bake Peanut Butter Cups
- Storage and Making Ahead for Your Easy Candy Recipes
- Frequently Asked Questions About Homemade Peanut Butter Cups
- Nutritional Snapshot of These Peanut Butter Cups
- Share Your Joy in Making Peanut Butter Cups
Why You Will Love These Homemade Peanut Butter Cups
Honestly, making these is less about cooking and more about assembly, which is exactly what I need after a busy week. This recipe is designed to give you maximum reward for minimal effort. You’ll see why I put this in the folder labeled easy candy recipes!
- Truly No-Bake: Seriously, the oven stays off! We just use the freezer to set things up, perfect for hot days or when you need a dessert fast.
- Better Than Store-Bought: That chalky texture you sometimes get in store-bought cups? Gone. Our creamy filling and smooth chocolate coating beat it every single time.
- Just a Few Ingredients: We rely on staple pantry items. You likely have almost everything needed to whip up a batch of these delicious homemade peanut butter cups right now.
- Perfect Portion Control: Using the muffin tin gives you those lovely, signature cups. It’s nearly impossible to stop at just one, but at least you know exactly how much deliciousness you’re getting.
If you’re looking for another quick, no-fuss treat that requires zero baking, check out my recipe for no-bake peanut butter protein balls!
The Essential Ingredients for Perfect Peanut Butter Cups
When it comes to these heavenly treats, precision matters, especially when we’re aiming for that perfect texture that rivals the original. I call this my “almost” 5 ingredient peanut butter cups recipe—that tiny extra ingredient makes all the difference in the chocolate shine!
- 1 cup creamy peanut butter (it needs to be smooth, trust me!)
- 1/2 cup unsalted butter, softened completely (room temperature is key here)
- 1/2 cup powdered sugar, sifted if it’s lumpy
- 1 teaspoon vanilla extract
- 12 ounces milk chocolate or semi-sweet chocolate chips
- 1 tablespoon coconut oil (this is my secret weapon for a silky finish)
Make sure your butter is truly soft, practically spreadable, so everything mixes into that beautiful, uniform filling.
Step-by-Step Guide to Making Easy Peanut Butter Cups
The beauty of these peanut butter cups is how intuitive they are. You’re essentially layering two easy components. Just follow these steps closely, and pay attention to the chilling times—that’s where the no-bake magic sets in!
Preparing the Molds and Chocolate Base
First things first, grab your 12-cup muffin tin and line it with paper or foil liners. Trust me, lining them makes removal so much easier later on. Next, measure out about one teaspoon of the chocolate chips into the bottom of each cup. I quickly melt mine in the microwave in 20-second bursts, stirring well between each burst until it’s totally smooth. If you add that optional coconut oil here, it really helps thin the chocolate down for that silky outer coating.
Creating the Fudgy Peanut Butter Filling
Now for the heart of the cup! Take the softened butter, peanut butter, powdered sugar, and vanilla extract. You really need to beat these together until they look light and creamy. My pro tip here is waiting until the butter is just right—if it’s too cold, your filling will be clumpy, and if it’s greasy warm, you won’t get that perfect fudgy peanut butter filling.

Assembling and Chilling Your Homemade Peanut Butter Cups
Pop your chocolate-lined tins into the freezer for just five minutes so that base sets hard. Then, carefully spoon your peanut butter mixture on top—about one tablespoon per cup. Once the filling is down, spoon the rest of your melted chocolate over the top to seal it all in. Give the whole tin a gentle tap on the counter; this gets rid of any silly air bubbles and gives the tops a professional, smooth finish. Back into the freezer they go for at least 30 minutes until they look firm and ready!

For more ideas on coating things perfectly, check out my guide for the easiest chocolate dip recipe!
Tips for Perfect Chocolate Coating on Your Peanut Butter Cups
Okay, let’s talk chocolate. This is where most people struggle when making homemade peanut butter cups, and honestly, I get it! Nothing is more frustrating than perfectly creamy filling ruined by dull, streaky, or grainy chocolate on top. If you want that shiny, snappy finish, you need to treat your chocolate right.
My number one rule for great chocolate coating tips is adding just a tiny bit of fat to the chips before melting. That tablespoon of coconut oil I put in the ingredients list isn’t just for show! It lowers the overall viscosity of the chocolate, resulting in a coating that sets up beautifully smooth and shiny, even if you’re using the microwave.

If you melt it low and slow, you get the best texture. If you’re using a double boiler, keep the heat gentle under the bowl. If you’re microwaving, remember those 20-second bursts are your friend. Never, ever let steam get into the chocolate, or it will seize up on you instantly. Keep everything dry, keep the heat low, and you win the chocolate game!
Variations for Your No Bake Peanut Butter Cups
Even though this recipe for peanut butter cups is pretty much perfected—hello, copycat status!—I totally get that sometimes you need to switch things up based on what you have in the pantry or what your sweet tooth is craving that day. That’s the joy of simple home cooking; you can riff on the classic!
For a richer, slightly more grown-up flavor, try swapping out the milk chocolate chips for semi-sweet or even dark chocolate chips for the coating. It really cuts through the sweetness of the filling nicely. Another super popular move is sprinkling just a few flakes of flaky sea salt right on top of the final layer of melted chocolate before it sets. That salty-sweet crunch is just addictive!

If you happen to love peanut butter but are out of peanut butter, don’t panic! You can absolutely use almond butter or sunflower seed butter in the filling. They both work wonderfully, though you might need to adjust the powdered sugar just a tiny bit depending on how runny the alternative butter is. If you want to see another recipe involving rich peanut butter bars, you might love my fudgy Buckeye Brownies!
Making Healthy Peanut Butter Cups Substitutions
I often get asked how to make treats like this work for different dietary needs. Since this is already a no bake peanut butter cups recipe, it’s a great foundation for cleaner ingredients! If you’re looking for healthy peanut butter cups, the filling is where you can make the biggest change.
You can swap out the powdered sugar for a granular sugar replacement like monk fruit or erythritol if you’re cutting sugar, but you have to make sure you beat it really well so it doesn’t feel sandy in the filling. Also, if you want to sneak in some extra goodness, you can add a scoop of vanilla protein powder, just like I do in my protein banana bread recipe. You usually need about 1/4 cup, and it makes the filling even firmer and adds a great nutritional bump!
Storage and Making Ahead for Your Easy Candy Recipes
You did the hard part making these quick dessert treats, so now we need to keep them perfect! Because of the butter in the filling, I always recommend storing your finished peanut butter cups in an airtight container in the refrigerator. They’ll stay wonderfully fresh and firm for about a week—maybe longer if you can resist eating them!
If you’re planning way ahead for holidays or a big party, the freezer is your best friend. You can freeze them for up to two months! I usually just pop the whole tin (minus the paper liners, of course) into a freezer bag. When you crave one, let it sit on the counter for about 10 minutes before enjoying that perfect chill. It makes prepping for entertaining so much less stressful!
For other make-ahead ideas that save you stress later, you should absolutely check out my recipe for easy overnight chia seed pudding; breakfast is sorted for the week!
Frequently Asked Questions About Homemade Peanut Butter Cups
When I first started making these, I must have called my mom three times asking simple questions! It’s totally normal to have a few burning inquiries when you’re trying a copycat Reese’s recipe for the first time. Here are the most common things I hear about these easy peanut butter cups.
Can I use natural, runny peanut butter in this Reese’s cups recipe?
That’s a good question! Natural peanut butter, the kind that separates and needs stirring, can be tricky because it often has too much oil. This can make the filling runny and cause the layers to slide around inside the chocolate shell. If that’s all you have, make sure you stir the oil back in completely. My trick is to add just a teaspoon of extra powdered sugar to firm it back up, or even a quarter teaspoon of melted coconut oil to help stabilize it before mixing it with the butter.
What is the trick to getting that classic ridged edge on peanut butter cups?
Ah, you want that bakery-perfect look! The paper liners absolutely do most of the work here, especially if you use the standard fluted ones. When you pour the final layer of melted chocolate over the peanut butter filling, don’t spread it right up to the edges of the liner instantly. Instead, gently spoon it so it covers the filling, and then very lightly use the back of your spoon or a small offset spatula to smooth the top layer. The final, crucial step is the gentle tap I mentioned earlier—tapping the muffin tin on the counter releases air and helps that top chocolate layer settle evenly around the edges of the liner, creating a clean line when it sets.
I hope these answers help you feel really confident heading into your kitchen! For more quick baking tips, check out my guide on easy pumpkin bread!
Nutritional Snapshot of These Peanut Butter Cups
Now, I won’t pretend these decadent peanut butter cups are a health food—they are absolutely a treat! But when you make them at home, you control every single ingredient that goes in, which feels much better than grabbing a cellophane-wrapped version from the checkout line, right?
This information is based on the standard recipe above, assuming 12 perfectly sized cups, and remember, these numbers are always estimates. If you swap milk chocolate for dark, or use almond butter instead of peanut butter, things will shift a little. But it gives you a good baseline for enjoying this wonderful sweet snack!
- Serving Size: 1 cup
- Calories: 250
- Fat: 18g (7g Saturated Fat)
- Carbohydrates: 22g
- Sugar: 18g
- Protein: 6g
- Sodium: 110mg
See? Not terrible for a homemade candy! Enjoying food mindfully is part of the joy of cooking, and these are definitely worth it!
Share Your Joy in Making Peanut Butter Cups
That’s it, my friends! You now have everything you need to make what I truly believe are the best homemade peanut butter cups out there. Seriously, try these and tell me you’re running back to the store for the pre-packaged kind—I dare you!
When you make something this delicious, it just feels right to share that joy, doesn’t it? Whether you keep them all to yourself (I don’t judge!) or bring them to a gathering, I would absolutely love to hear how they turned out for you. Did the chocolate set perfectly shiny? Was the filling as creamy as you hoped?
Please leave a review right here on the blog—those stars and comments really help other busy home cooks like us find great, easy recipes. If you snap a picture while you’re enjoying these sweet snacks, tag me on social media! You can find me over on Facebook sharing my daily cooking adventures and kitchen wins; come say hello at Pure Cooking Joy on Facebook.
Keep cooking with joy, keep sharing your creations, and just remember that incredible food doesn’t have to be tough. Thanks for stopping by, and don’t forget to check out the rest of the kitchen inspiration waiting for you on the Pure Cooking Joy blog!
PrintThe Ultimate Easy No-Bake Homemade Peanut Butter Cups (Reese’s Copycat)
Make these decadent chocolate peanut butter cups at home. This easy, no-bake recipe delivers the classic creamy peanut butter filling and rich chocolate coating you love, tasting better than the store-bought version.
- Prep Time: 15 min
- Cook Time: 5 min
- Total Time: 20 min
- Yield: 12 servings 1x
- Category: Dessert
- Method: No-Bake
- Cuisine: American
- Diet: Vegetarian
Ingredients
- 1 cup creamy peanut butter
- 1/2 cup unsalted butter, softened
- 1/2 cup powdered sugar
- 1 teaspoon vanilla extract
- 12 ounces milk chocolate or semi-sweet chocolate chips
- 1 tablespoon coconut oil (optional, for smoother coating)
Instructions
- Prepare your molds: Line a standard 12-cup muffin tin with paper or foil liners. Set aside.
- Make the peanut butter filling: In a medium bowl, beat together the creamy peanut butter, softened butter, powdered sugar, and vanilla extract until the mixture is smooth and creamy.
- Form the base layer: Place about 1 teaspoon of the chocolate chips into the bottom of each liner. Microwave in 20-second intervals, stirring between each interval, until the chocolate is melted and smooth. Alternatively, melt the chocolate using a double boiler. Stir in the coconut oil if using.
- Create the chocolate shell: Spoon about 1 teaspoon of the melted chocolate over the chips in each liner, tilting the tin to coat the bottom evenly. Place the tin in the freezer for 5 minutes to set the chocolate base.
- Add the filling: Spoon about 1 tablespoon of the peanut butter mixture evenly over the set chocolate layer in each liner. Gently press down to level the filling.
- Top with chocolate: Spoon the remaining melted chocolate over the peanut butter filling, ensuring the filling is completely covered. Gently tap the muffin tin on the counter to release any air bubbles and smooth the tops.
- Chill: Return the muffin tin to the freezer for at least 30 minutes, or until the peanut butter cups are completely firm.
- Serve: Remove the paper liners and serve your homemade chocolate peanut butter candy immediately, or store them in an airtight container in the refrigerator.
Notes
- For a richer chocolate flavor, use dark chocolate chips for the coating.
- If you want a slightly saltier filling, add a small pinch of salt to the peanut butter mixture.
- If you do not have a muffin tin, you can press the layers into a small, lined square pan and cut them into squares once set.
Nutrition
- Serving Size: 1 cup
- Calories: 250
- Sugar: 18
- Sodium: 110
- Fat: 18
- Saturated Fat: 7
- Unsaturated Fat: 11
- Trans Fat: 0
- Carbohydrates: 22
- Fiber: 1
- Protein: 6
- Cholesterol: 15
