 Skip to content

I don’t know about you, but sometimes I crave that truly indulgent Italian dessert experience, but I absolutely do not have the patience (or the time!) to deep-fry pastry shells. That’s where the magic of these cannoli cookies comes in! Seriously, these little bites capture every ounce of that wonderful flavor—the creamy ricotta, the sweet chocolate chips, the hint of vanilla—all tucked inside a perfectly buttery, easy-to-bake cookie. When I was recovering from the corporate burnout days, finding simple, joyful baking projects like this was my therapy. These cannoli cookies are proof that the most satisfying desserts are often the ones that look complex but are actually surprisingly simple to whip up right here in your own kitchen.
- Why These Cannoli Cookies Are Your New Favorite Italian Cookie Recipes (E-E-A-T)
- Gathering Ingredients for Your Easy Cannoli Cookies Recipe
- Step-by-Step Instructions to Make Perfect Cannoli Cookies
- Ingredient Notes and Tips for Perfect Cannoli Cookies
- Storage and Serving Suggestions for Your Cannoli Cookies
- Frequently Asked Questions About Making Cannoli Cookies
- Estimated Nutritional Data for These Cannoli Cookies
- Share Your Homemade Cannoli Cookies Creations
Why These Cannoli Cookies Are Your New Favorite Italian Cookie Recipes (E-E-A-T)
If you’ve ever wanted that authentic, sunny Italian flavor without wrestling with pastry dough or worrying about filling consistency, then these cannoli cookies were made for you. Honestly, when I first developed this recipe, my main goal was to take the best parts of that classic treat and make it stress-free. That’s the joy of Pure Cooking Joy, right? Giving you exceptional flavor without the fuss. If you love other Italian cookie recipes, I know these will jump to the top of your list.
Here’s why these are the absolute best:
- Incredible Ease: They come together faster than you’d think. No deep frying, ever!
- Perfect Texture Contrast: You get that sturdy, buttery cookie shell meeting the dreamy, sweet ricotta center.
- Flavor Authenticity: I spent time getting the filling just right so it sings with that classic cannoli taste. For more ricotta inspiration, you might want to check out my post on classic Italian ricotta cookies!
The Secret to Bakery Style Cookies at Home
The texture is everything here. The shell recipe is simple—just good, softened butter and the right amount of flour—giving you a delicate, melt-in-your-mouth base rather than something hard. But the real victory is the filling. I triple-checked the process for draining the ricotta so your filling will be thick, creamy, and hold its shape beautifully, just like the professionals do. Trust me when I say this attention to the filling pays off huge!
Gathering Ingredients for Your Easy Cannoli Cookies Recipe
Okay, let’s get organized! Since we want these cannoli cookies to taste just like the real deal coming out of a top-tier Italian bakery, the quality of your ingredients matters, even though the list itself is super manageable. I’ve broken it down so you can shop smart and make sure you have everything ready before you even think about turning on the mixer.
If you’re looking to elevate your decorating game later on, maybe check out my post on a simple cookie icing recipe, but for now, let’s focus on the core components that make these shells and filling sing.
For the Buttery Cookie Shells
You need a few things for the cookie base that forms our crispy exterior. Remember, the butter has to be softened! This is crucial for that light, airy mix we talked about earlier so you don’t end up with heavy discs.
- 1 cup (2 sticks) unsalted butter, softened
- 1 cup granulated sugar
- 1 large egg
- 1 teaspoon vanilla extract
- 2 1/2 cups all-purpose flour
- 1 teaspoon baking powder
- 1/4 teaspoon salt
For the Creamy Ricotta Cookies Filling
This is the heart of the cookie! The absolute main rule here is that your ricotta cheese needs to be well drained. I mean it—no excess water allowed! That’s the difference between a creamy, perfect filling and a soupy mess.
- 1 cup whole milk ricotta cheese, well drained (Seriously, drain this!)
- 1/2 cup powdered sugar
- 1/4 teaspoon almond extract (This gives it that authentic Italian backdrop flavor!)
- 1/2 cup mini chocolate chips (optional, but you know you want them)
Don’t forget the optional garnish of finely chopped pistachios! It just makes them look stunning on a holiday cookie tray.

Step-by-Step Instructions to Make Perfect Cannoli Cookies
Time to get our hands dirty! These directions are designed to be super clear so you feel confident putting together these cannoli cookies. We move from making the dough to baking the shells, and then finally, we bring in that amazing creamy filling. I recommend pouring yourself a glass of water or maybe even some wine, putting on some good music, and just enjoying the process. If you’re looking for a general confidence boost in the baking department, my simple cookie baking guide has some foundational tips that really help!
Preparing and Chilling the Cookie Dough
First thing: cream that softened butter and sugar until it’s light, fluffy, and looking pale yellow. That aeration is key! Then beat in your egg and vanilla. Next up, gently mix your dry ingredients—the flour, baking powder, and salt—separately. Now, add the flour mixture to the wet stuff slowly. Do not overmix here! I mean it: stop mixing as soon as you see the last few streaks of flour disappear. Overmixing makes tough cookies, and we want tender shells! Cover the dough tightly and send it to hang out in the fridge for at least 30 minutes. This chilling period is absolutely mandatory.
Shaping and Baking the Buttery Cookie Shells Recipe
Get your oven heated up to 350°F (175°C) and line those baking sheets—don’t skip the parchment paper, it saves so much cleanup later! Take the dough out and roll it into small, neat balls, about an inch wide. Place them on the sheet with some breathing room. Now for the flattening: take the bottom of a drinking glass (a flat one works best!) and gently press each ball down just a little bit. Bake these beautiful buttery cookie shells recipe components for 10 to 12 minutes. You want edges that are just kissing golden brown. Let them cool completely right on the sheet before you even touch them.
Whipping Up the No-Bake Cannoli Filling
While those shells cool down (patience!), we tackle the filling. Remember that crucial step about draining the ricotta? Make sure that’s done well! In a bowl, whisk together your drained ricotta, powdered sugar, and the wonderful almond extract. Keep mixing until you have a completely smooth, creamy texture. If, for some reason, your filling feels just a little too soft after mixing—maybe your ricotta wasn’t quite as dry as you hoped—don’t panic! Pop the bowl in the fridge for about 15 minutes to firm up a bit. If you’re adding those mini chocolate chips, fold them in gently now.

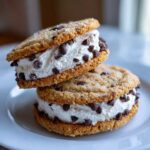
Assembling and Finishing Your Cannoli Cookies
This is the fun part! Make absolutely certain your cookie shells are totally cool—if they’re warm, that creamy filling will melt into a puddle, and nobody wants that disaster! Take one cookie, plop a nice spoonful of filling right in the center, and gently press the second cookie on top, making a classic sandwich shape. Repeat until you’re out of shells or filling. For the extra fancy touch, take the edges of that creamy center and roll them in chopped pistachios or extra chocolate chips. Finally, arrange your finished creamy filled cookies on a tray and chill them for at least an hour. This final chill sets the filling up perfectly for serving!

Ingredient Notes and Tips for Perfect Cannoli Cookies
Now that you know the steps, I want to talk a little bit about dialing in the ingredients because that’s really what separates a good cookie from a truly memorable one—the kind that tastes like it came from a fantastic Italian bakery. When you’re working with fresh dairy like ricotta, a few small tweaks make a huge difference; it’s like how getting the right fat content makes or breaks a perfect pie crust, which I talk about in my recipe for flaky pie crust.
The Essential Step: Draining Ricotta for Creamy Filled Cookies
Listen to me closely on this: You absolutely *must* drain your ricotta cheese. If you skip this, your beautiful creamy filled cookies will turn the cookies soggy within hours, or worse, the filling will weep right out when you try to sandwich them. Ricotta seems solid, but it holds a ton of water, especially whole milk varieties. To get that thick, luscious texture we want, I always use a fine-mesh sieve. You line that sieve with a layer or two of cheesecloth (or even a clean coffee filter in a pinch), pile the ricotta in, set the whole thing over a bowl, and stick it in the fridge to drain for at least two hours—overnight is even better!
This step guarantees that when you mix it with the powdered sugar, you get that perfect, almost pipe-able consistency without adding extra sugar just to try and stiffen it up.
Variations for Your Cannoli Cookies
Once you master the basics of these cannoli cookies, you can absolutely start playing around. I love keeping things simple, but here are a few ways I’ve jazzed them up for parties. First, add a teaspoon of fresh orange zest right into the cookie dough mixture with your vanilla. The citrus brightens up the entire buttery shell and plays wonderfully against the ricotta.
If you aren’t a huge fan of chocolate chips inside, try swapping them out for finely diced candied orange peel or glace cherries. They give a gorgeous color pop! And if you want that authentic, piped look instead of sandwiching two cookies together, just load your filling into a piping bag fitted with a large star tip. Pipe a big mound right onto the top of a single baked shell, garnish, and then chill. It makes for a really elegant presentation on your party dessert spread.
Storage and Serving Suggestions for Your Cannoli Cookies
We’ve worked so hard to get these cannoli cookies perfect—the crisp shell, the creamy ricotta filling—so we absolutely need to treat them right when it comes to storage! Because we used real, fresh dairy in the filling, these aren’t your standard shelf-stable cookies. You can’t just leave them on the counter for days hoping for the best, but thankfully, keeping them fresh for up to three days is easy if you follow one simple rule.
Speaking of serving, one batch yields about 18 lovely cookies, which is perfect for a smaller gathering, but honestly, once people realize what these are, they disappear fast! They make an incredible addition to any holiday cookie tray or are just the perfect sophisticated bite when you’re hosting a casual get-together. If you need more inspiration for stress-free hosting, I share tons of ideas on my easy entertaining page.
Keeping Your Cannoli Cookies Fresh
Here’s the deal: Refrigeration is required because of that amazing, fresh ricotta filling. If you aren’t eating them the day you make them, pop them into an airtight container. I always try to layer them with parchment paper between layers if I’m stacking more than one row high, just to make sure those delicate cookie edges don’t press against each other and smash down.
Stored properly in the fridge, these creamy filled cookies stay delicious for about three days. They will firm up even more overnight—which some people prefer! Just be sure to take them out about 15 to 20 minutes before you plan to serve them, especially if you baked them for a party. That little bit of time out of the cold helps soften the cookie shell just slightly so you get that perfect melt-in-your-mouth texture again. If you want to share pictures of your beautiful Italian dessert creations, you can always tag me over on Facebook!
Come say hello on Facebook and tell everyone how easy these turned out to be!
Frequently Asked Questions About Making Cannoli Cookies
It’s totally normal to have questions when you’re diving into a new recipe adventure! I get asked tons of things about these cannoli cookies, mostly because people want to make sure the fresh filling behaves itself. You asked, and I answered! Here are some of the common things that pop up when baking these beauties.
Can I make the cookie shells ahead of time?
Oh, absolutely, and I highly recommend it! Making the shells first is a great way to break up the process, especially if you are adding these buttery cookie shells recipe components to a busy holiday cookie tray. Once they are completely cooled, store the baked shells in an airtight container at room temperature. They hold up beautifully for several days. Just remember: don’t fill them until you are ready to serve or within a few hours of serving. That fresh filling is best paired with the shell right before slicing!
How do I prevent the filling from weeping or becoming watery in my cannoli cookies?
This is the number one question I get about any cookie recipe with ricotta! The weeping is caused by excess moisture from the cheese. Seriously, this is non-negotiable: you must drain your whole milk ricotta—and I mean *thoroughly*. Use the cheesecloth or fine-mesh sieve method I talked about earlier and let it sit for hours, if possible. If you skip this, you are tempting fate, and those Ricotta cookies will end up swimming in liquid. A well-drained ricotta means a perfectly thick, creamy filling that stays put.

Are these considered easy Italian desserts to transport?
Compared to traditional cannoli, yes, these are miles easier to move around! They are much sturdier since they are essentially a sandwich cookie. If you’re taking them to a potluck or party, pack them gently. Use a sturdy container, and try to keep them in a single layer with parchment paper dividers if you need to stack. Since the filling is fresh, you should definitely keep them chilled during transport if it’s a long drive, so they stay firm. These are fantastic easy Italian desserts for sharing!
Estimated Nutritional Data for These Cannoli Cookies
I always like to give a little heads-up on nutrition information, just so you know what you’re getting into with these wonderfully indulgent cannoli cookies. I’ve calculated an estimate based on the recipe ingredients we used to make about 18 cookies. Remember, these are just ballpark figures!
Since we use real butter and whole milk ricotta in our creamy filling, these are definitely a treat to enjoy in moderation, but honestly, tasting one bite makes the numbers irrelevant for a moment, doesn’t it?
- Serving Size: 1 cookie
- Calories: 210
- Fat: 12g
- Saturated Fat: 7g
- Carbohydrates: 23g
- Sugar: 18g
- Protein: 4g
- Cholesterol: 45mg
- Sodium: 85mg
A quick note, though! The exact brands of butter, flour, or even the type of chocolate chips you grab off the shelf can change things slightly. These figures are based on standard measurements for a serving of one of these amazing creamy filled cookies. Don’t stress too much over the numbers; just focus on how happy they make you!
Share Your Homemade Cannoli Cookies Creations
Well, we did it! We took the beautiful, classic flavors of an Italian cannoli and squeezed them perfectly into a simple, buttery cookie format. I truly hope you enjoyed making these cannoli cookies as much as I enjoy eating them! Seriously, baking should always feel this rewarding, and I want to see what you’ve created in your kitchen! When you share something you made using one of my recipes, it just lights me up.
When you finish your tray of these incredible treats, I would be so thrilled if you hopped over to my contact page and let me know how it went. Tell me your favorite part—was it the crispness of the shell or the smoothness of that creamy ricotta filling?
If you managed to snap a lovely picture of these jewels cooling on the rack or looking gorgeous on your dessert platter, please share it! Tag me online so I can marvel at your beautiful work. Hearing your success stories—especially when you make something that looks totally bakery style at home—is the whole reason I created Pure Cooking Joy.
Don’t feel like you need to be perfect. If you forgot the almond extract or swapped pistachios for sprinkles, that’s okay! It’s about the joy of sharing something delicious you made with your own two hands. Happy baking, friends, and I can’t wait to see your spin on these fantastic creamy filled cookies!
PrintThe Ultimate Easy Cannoli Cookies Recipe
Make these irresistible cannoli cookies that capture the classic Italian flavor in a simple, buttery cookie format with a creamy ricotta filling.
- Prep Time: 25 min
- Cook Time: 12 min
- Total Time: 1 hour 37 min
- Yield: 18 cookies 1x
- Category: Dessert
- Method: Baking
- Cuisine: Italian
- Diet: Vegetarian
Ingredients
- 1 cup (2 sticks) unsalted butter, softened
- 1 cup granulated sugar
- 1 large egg
- 1 teaspoon vanilla extract
- 2 1/2 cups all-purpose flour
- 1 teaspoon baking powder
- 1/4 teaspoon salt
- 1 cup whole milk ricotta cheese, well drained
- 1/2 cup powdered sugar
- 1/4 teaspoon almond extract
- 1/2 cup mini chocolate chips (optional)
- 1/4 cup finely chopped pistachios (optional, for garnish)
Instructions
- Prepare the cookie dough: In a large bowl, beat the softened butter and granulated sugar until light and fluffy. Beat in the egg and vanilla extract. In a separate bowl, whisk together the flour, baking powder, and salt. Gradually add the dry ingredients to the wet ingredients, mixing until just combined. Cover the dough and chill for at least 30 minutes.
- Shape and bake the shells: Preheat your oven to 350°F (175°C). Line baking sheets with parchment paper. Roll the chilled dough into small balls (about 1 inch) and place them on the prepared sheets, leaving space between them. Flatten each ball slightly with the bottom of a glass. Bake for 10 to 12 minutes, or until the edges are lightly golden. Let the cookies cool completely on the baking sheet.
- Prepare the creamy filling: In a medium bowl, combine the well-drained ricotta cheese, powdered sugar, and almond extract. Mix until the filling is smooth and creamy. If the filling seems too soft, chill it for 15 minutes. Fold in the mini chocolate chips if you are using them.
- Fill the cookies: Once the cookies are completely cool, take two cookies and place a spoonful of the ricotta filling on the flat side of one cookie. Gently press the second cookie on top to create a sandwich. Repeat with the remaining cookies and filling.
- Finish and chill: If desired, dip the edges of the filled cookies into extra mini chocolate chips or chopped pistachios. Place the finished cannoli cookies on a tray and chill in the refrigerator for at least 1 hour before serving. This helps the filling set.
- Serve your bakery style cookies at home.
Notes
- Drain the ricotta cheese well. Place the ricotta in a fine-mesh sieve lined with cheesecloth over a bowl and let it drain in the refrigerator for at least 2 hours, or overnight, to prevent a watery filling.
- For a classic look, you can pipe the filling into the center of the cookies instead of making sandwiches.
- These Italian cookie recipes are best stored in an airtight container in the refrigerator due to the fresh ricotta filling.
Nutrition
- Serving Size: 1 cookie
- Calories: 210
- Sugar: 18
- Sodium: 85
- Fat: 12
- Saturated Fat: 7
- Unsaturated Fat: 5
- Trans Fat: 0
- Carbohydrates: 23
- Fiber: 1
- Protein: 4
- Cholesterol: 45
