 Skip to content

When I think about those iconic American desserts that just scream comfort and celebration, the Boston Cream Pie is absolutely right at the top of the list. Seriously, what’s not to love? It feels like a grand, bakery-worthy treat, but I promise you, making it from scratch is where the real joy is found. For years, I felt intimidated by layered desserts, but mastering this classic homemade boston cream pie recipe was one of the first big steps in my own journey here at Pure Cooking Joy. If you want to read a little more about why I believe in tackling these classics, you can check out my story here. It’s all about taking those simple, quality ingredients—fluffy cake, creamy filling, shiny chocolate—and putting them together with love. Trust me, you’re going to gain so much confidence making this stunning dessert!
- Why This Classic Boston Cream Pie Recipe Stands Out
- Gathering Ingredients for Your Homemade Boston Cream Pie
- Step-by-Step Instructions for the Boston Cream Pie
- Tips for a Bakery-Style Boston Cream Pie Success
- Storage and Serving Suggestions for Your Boston Cream Pie
- Boston Cream Pie Variations for Home Bakers
- Frequently Asked Questions About Boston Cream Pie
- Nutritional Estimates for This American Classic Dessert
- Share Your Homemade Boston Cream Pie Creations
Why This Classic Boston Cream Pie Recipe Stands Out
You’ve probably seen versions of this dessert that use a boxed mix or just plain instant vanilla pudding. And hey, sometimes we need that shortcut! But if you want that “bakery-style desserts” quality, you need to put in a little bit of elbow grease. This boston cream pie recipe focuses on making every component count. These elements are what make it a true showpiece, not just another weeknight treat. If you’re interested in another showstopper that really pushes your baking skills, check out my guide to a great chocolate cake recipe!
The Tender Sponge Cake Base
The base layer is everything here. We aren’t dealing with a dense, heavy cake. We are aiming for a *sponge cake recipe* that is light, almost airy, but sturdy enough to hold up to that rich filling. My method ensures it stays incredibly moist without collapsing. It’s the backbone of the perfect slice, and it’s what separates a decent dessert from an unforgettable boston cream pie.
Silky Pastry Cream Filling Recipe
This is where most home versions fail, in my opinion! Forget the watery pudding; we are making a real *pastry cream filling* from scratch. This cooked *vanilla custard filling recipe* sets up beautifully thick and creamy, providing that luxurious mouthfeel. It’s decadent without being heavy, and it complements the chocolate top perfectly.

Gathering Ingredients for Your Homemade Boston Cream Pie
Okay, putting together a homemade boston cream pie from scratch means we have three distinct lists to tackle. Don’t let the length scare you; these are basic pantry staples, and when you get organized, it all comes together so smoothly. Remember, organization is half the battle when you’re making something this grand. If you’re looking for other recipes that share common staples, maybe check out my guide to vanilla buttercream—you probably have half the stuff already!
For the Sponge Cake Layers
- 1 1/2 cups all-purpose flour
- 1 1/2 teaspoons baking powder
- 1/4 teaspoon salt
- 1/2 cup unsalted butter, softened (make sure it’s nicely softened!)
- 1 cup granulated sugar
- 2 large eggs
- 1 teaspoon vanilla extract
- 1/2 cup whole milk
For the Vanilla Pastry Cream Filling Recipe
- 1/2 cup granulated sugar
- 1/4 cup cornstarch (this is vital for that thick *pastry cream filling*)
- 1/4 teaspoon salt
- 2 large egg yolks
- 1 1/2 cups whole milk
- 2 tablespoons unsalted butter
- 1 teaspoon vanilla extract
For the Chocolate Ganache Topping
- 4 ounces semi-sweet chocolate, chopped (use good quality!)
- 1/2 cup heavy cream
- 1 tablespoon light corn syrup (optional—this is just for that extra mirror shine if you want that bakery look)
Step-by-Step Instructions for the Boston Cream Pie
We’ve got the ingredients ready, so now it’s time for the fun part—bringing this magical dessert to life! We’re breaking this down into three clear processes. If you take your time, especially with the cream, you’ll end up with the best boston cream cake in your neighborhood, I promise. I always check my pantry for any leftover chocolate after making toppings for things, like my chocolate cheesecake recipe, because you need that lovely chocolate for the finale here!
Baking the Perfect Sponge Cake for Boston Cream Pie
First things first, start by preheating that oven to 350°F (175°C). Get your 9-inch round pan greased and floured well; we don’t want any sticking drama later! Whisk your dry stuff—flour, baking powder, and salt—and set that bowl aside.
In your main bowl, cream that softened butter and sugar until it looks pale and fluffy. This is important for any cake, but especially here. Beat in your eggs one at a time, then mix in the vanilla. Now, listen closely to this classic technique: alternate adding the dry mixture with the milk. Start and end with the dry ingredients. Mix only until everything just comes together. Overmixing kills the sponge! Pour it into your pan and bake for about 30 to 35 minutes. When a toothpick comes out clean, pull it out. Let it relax in the pan for 10 minutes before flipping it onto a wire rack to cool completely. We can’t assemble a warm cake, trust me on that one!
Making the Silky Vanilla Custard Filling Recipe
While that sponge is cooling, let’s make magic with the filling. In a saucepan, whisk together the sugar, cornstarch, and salt. Slowly pull in the egg yolks until it’s smooth, then whisk in the milk until it’s all uniform. Put this over medium heat. You have to whisk constantly here—don’t walk away! Keep whisking until it gets thick and, this is the key part, it comes to a boil. Let it boil for a full minute while you’re whisking; this cooks out that cornstarch taste and activates the starch properly for that perfect *vanilla custard filling recipe* consistency.
Once it boils, take it off the heat right away. Stir in the butter and vanilla until everything melts smooth. Now, the crucial chilling step: press plastic wrap directly onto the surface of the cream. I mean, touch it! This stops a skin from forming. Pop it in the fridge for at least two hours until it’s completely cold and firm.
Assembling Your Classic Boston Cream Pie
Once your cake is totally cool and your cream is chilled, you’re ready for assembly. Carefully slice that cake horizontally right in half to get two even layers.
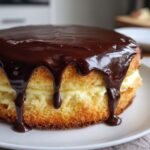
Place the bottom layer on your serving plate. Take that nice, cold cream and spread it everywhere evenly. Don’t be shy! Pop the top layer on. Now for the exciting finish: the chocolate. In a bowl, put your chopped chocolate. Heat the cream (and corn syrup, if you’re using it for extra shine) until barely simmering, then pour that hot cream right over the chocolate. Leave it alone for five full minutes! This lets the heat do the work. After resting, whisk from the middle outwards until you have a beautiful, glossy pourable mixture. This is the final moment for your boston cream pie! Pour it gently over the top center, letting it drip its own route down the sides. Let it set up, and then get ready to slice!

Tips for a Bakery-Style Boston Cream Pie Success
We want this boston cream pie to look like you bought it from a famous local bakery, right? It’s all about those final touches that seem small but make a huge difference in presentation and texture. Honestly, mastering that chocolate layer is my favorite part of the whole process, and I usually make an extra little batch of dip for my strawberries because it’s just too good to waste! For general dipping confidence, check out my easy chocolate dip recipe.
Achieving the Glossy Chocolate Ganache Topping
- Wait for the ganache to cool down slightly before you pour it. If it’s too hot, it will soak into the cake layer instead of setting into that beautiful, smooth top coat we are looking for. You want it pourable, not runny!
- If you are using corn syrup, it’s not just for looks; those tiny bits of sugar help stabilize the glaze so it sets up firm but still smooth when you slice through it. It keeps that mirror shine longer, which is amazing.
- Don’t try to spread the ganache much once it hits the cake. Just start pouring it in the middle and let gravity do the work pulling it over the edges. A little nudge is fine, but too much fussing creates streaks!

Storage and Serving Suggestions for Your Boston Cream Pie
So, you’ve made this stunning homemade boston cream pie! Now, let’s talk about keeping it perfect. Because we used that rich, real pastry cream, this pie—well, cake—really loves the fridge. Cover it loosely with plastic wrap or just place it under a cake dome, and it’ll be great for about two days. If you leave it out on the counter, the custard might start to weep, and nobody wants a sad, soggy cake!
When it’s time to eat, pull it out of the fridge about 30 minutes before serving. That little bit of time lets the sponge soften up just right, making it easier to slice. This dessert is divine with a strong cup of coffee, which cuts through the sweetness of the chocolate perfectly. Or, if you’re serving it cold on a winter night, you can whip up a batch of my favorite best homemade hot cocoa recipe!
Boston Cream Pie Variations for Home Bakers
I really hope you dive into making this whole Boston Cream Pie from scratch because it’s worth every minute, but I also know life gets busy! Sometimes you need a fun, faster route, and that’s okay. This recipe shows you the ultimate way, but there are tons of wonderful boston cream pie variations out there if you’re short on time or just want to mix things up. It’s all about finding joy in your kitchen, speedy or slow!
Easy Boston Cream Pie Alternatives
If you are looking for a similar flavor profile but need less fuss, you absolutely have to look into the poke cake style. We’re talking about taking a nice shortcut, maybe using a good boxed cake mix, and then poking holes all over the top once it’s baked. Then, you pour in something creamy—like a smooth vanilla pudding—and top it with that rich chocolate. My recipe for easy jello poke cake recipe shares a similar *easy boston cream pie* philosophy where you quickly soak the cake layer. It gives you that flavor combo without needing to slice and layer two whole cakes!
Frequently Asked Questions About Boston Cream Pie
I get so many questions when people try tackling this classic for the first time, and that’s great! Building confidence in the kitchen is what we’re all about here. If you ever have something specific you’re struggling with, don’t hesitate to reach out on my contact page. Here are a few things people ask most often about making their first boston cream pie.
Is Boston Cream Pie Actually a Pie?
This is such a fun one! Despite having ‘pie’ right in the name, no, it’s technically not a pie at all. It’s a cake, plain and simple! It uses layers of sweet, tender sponge cake, which is why we focus so much on getting that *sponge cake recipe* perfect. The only reason it gets called a pie is because, way back when it was invented in Boston, the original baker was using pie pans for baking! It’s one of those fun little historical quirks of American cuisine.
Can I Make the Pastry Cream Ahead of Time?
Yes, you absolutely can, and I actually recommend it! Making the *pastry cream filling* ahead of time is totally smart. Once you’ve cooked it and sealed the surface with plastic wrap—don’t forget that step, or you’ll have green stuff on top of your beautiful cream—you can keep it in the fridge for up to three days for your homemade boston cream pie assembly. Just make sure it’s completely cold and whisked until smooth again before you layer it onto that cake!
What Makes This the Best Boston Cream Cake?
For me, what elevates this to the best boston cream cake is doing everything from scratch, as we did here. It’s the difference between a basic vanilla pudding and a rich, flavorful *vanilla custard filling recipe*. When you combine that truly tender sponge cake with the luscious, homemade filling and that decadent, glossy layer on top, you get that perfect bakery texture and flavor profile that shortcuts just can’t match. It’s all about using the best ingredients in the right way!

Nutritional Estimates for This American Classic Dessert
Now, I want to be upfront: when you make a decadent treat like this boston cream pie from scratch, it’s meant to be enjoyed! These numbers are just estimates for one generous slice, calculated based on the ingredients we used. As proud home cooks, we know every oven and every measuring spoon is slightly different, so take these figures as a guideline. For more site information regarding ingredient sourcing and transparency, please see my disclosure policy.
- Serving Size: 1 slice
- Calories: About 450
- Fat: Around 24g
- Carbohydrates: About 55g
- Protein: Roughly 6g
Share Your Homemade Boston Cream Pie Creations
Wow, I am genuinely so excited for you to finish this incredible classic boston cream pie recipe! Once you cut that first slice and admire that beautiful layering, please take a picture! I absolutely love seeing what you create in your own spaces. If you share it online, please tag us so I can see your beautiful work. If you want to jump back into the archives for more amazing from scratch desserts, you can always check out my main blog page.
And hey, if you loved how this turned out, leaving a quick rating right here on the recipe page helps other home cooks jump in with confidence! You can also connect right here on Facebook at Pure Cooking Joy. Happy baking, friend!
PrintClassic Homemade Boston Cream Pie Recipe
Make the iconic Boston Cream Pie from scratch. This recipe delivers tender vanilla sponge cake, silky vanilla pastry cream filling, and a glossy chocolate ganache topping for a bakery-style dessert.
- Prep Time: 45 min
- Cook Time: 35 min
- Total Time: 3 hours 20 min
- Yield: 8 servings 1x
- Category: Dessert
- Method: Baking
- Cuisine: American
- Diet: Vegetarian
Ingredients
- For the Sponge Cake: 1 1/2 cups all-purpose flour
- 1 1/2 teaspoons baking powder
- 1/4 teaspoon salt
- 1/2 cup unsalted butter, softened
- 1 cup granulated sugar
- 2 large eggs
- 1 teaspoon vanilla extract
- 1/2 cup whole milk
- For the Vanilla Pastry Cream Filling: 1/2 cup granulated sugar
- 1/4 cup cornstarch
- 1/4 teaspoon salt
- 2 large egg yolks
- 1 1/2 cups whole milk
- 2 tablespoons unsalted butter
- 1 teaspoon vanilla extract
- For the Chocolate Ganache Glaze: 4 ounces semi-sweet chocolate, chopped
- 1/2 cup heavy cream
- 1 tablespoon light corn syrup (optional, for shine)
Instructions
- Prepare the Cake: Preheat your oven to 350°F (175°C). Grease and flour one 9-inch round cake pan.
- Whisk together the flour, baking powder, and salt in a small bowl. Set aside.
- In a large bowl, cream the softened butter and sugar together until light and fluffy. Beat in the eggs one at a time, then stir in the vanilla extract.
- Alternate adding the dry ingredients and the milk to the butter mixture, beginning and ending with the dry ingredients. Mix until just combined. Do not overmix.
- Pour the batter into the prepared pan and bake for 30 to 35 minutes, or until a toothpick inserted into the center comes out clean. Let the cake cool in the pan for 10 minutes before inverting it onto a wire rack to cool completely.
- Prepare the Pastry Cream: In a medium saucepan, whisk together the sugar, cornstarch, and salt. Gradually whisk in the egg yolks until smooth.
- Slowly whisk in the milk until the mixture is uniform.
- Cook over medium heat, whisking constantly, until the mixture thickens significantly and comes to a boil. Continue to boil for 1 minute while whisking. Remove from heat.
- Stir in the butter and vanilla extract until smooth. Press plastic wrap directly onto the surface of the pastry cream to prevent a skin from forming. Chill in the refrigerator for at least 2 hours, or until completely cold.
- Assemble the Pie: Once the cake is cool, slice it horizontally into two even layers. Place the bottom layer on a serving plate.
- Spread the chilled pastry cream evenly over the bottom cake layer. Place the top cake layer over the filling.
- Prepare the Chocolate Ganache: Place the chopped chocolate in a heatproof bowl.
- Heat the heavy cream and corn syrup (if using) in a small saucepan until it just begins to simmer around the edges. Do not let it boil rapidly.
- Pour the hot cream mixture over the chopped chocolate. Let it sit undisturbed for 5 minutes.
- Whisk the mixture gently starting from the center until it becomes smooth and glossy. Let the ganache cool slightly until it is pourable but not hot.
- Pour the chocolate ganache over the top center of the assembled cake, allowing it to drip naturally down the sides. Let the ganache set before slicing and serving.
Notes
- For a perfectly level cake, you can trim the dome off the top layer before slicing.
- If you want a quicker filling, you can substitute the homemade pastry cream with a good quality vanilla pudding mix prepared according to package directions, but ensure it is fully chilled.
- This dessert is best served the day it is made for the best texture contrast between the cake and the filling.
Nutrition
- Serving Size: 1 slice
- Calories: 450
- Sugar: 45g
- Sodium: 250mg
- Fat: 24g
- Saturated Fat: 14g
- Unsaturated Fat: 10g
- Trans Fat: 0.5g
- Carbohydrates: 55g
- Fiber: 2g
- Protein: 6g
- Cholesterol: 110mg
