 Skip to content

Hi, I’m Alex, and I’m so glad you’re here. When my corporate life was eating all my free time, I thought I’d never find joy in quick meals. But that’s exactly where some of the best discoveries happen! If you’re anything like I was—craving something satisfying, packed with protein, but needing it on the table in under 20 minutes—then I have the absolute answer for you today. We are making the best **tuna rice balls** you’ve ever tasted, inspired by traditional Japanese Onigiri. These are so easy, taking only about 15 minutes if your rice is ready to go. They are perfect for grabbing on the way out the door, tucking into a weeknight dinner rotation, or just snacking satisfyingly. Trust me, mastering these savory rice bites is a total game-changer for busy schedules.
- Why You Will Love These Easy Tuna Rice Balls
- Gathering Ingredients for Your Tuna Rice Balls Recipe
- Step-by-Step Instructions: How to Make Onigiri Filling and Shape Tuna Rice Balls
- Expert Tips for Perfect Tuna Rice Balls Every Time
- Variations: Beyond Standard Tuna Mayo Balls
- Serving Suggestions and Storing Your Tuna Rice Balls
- Frequently Asked Questions About Tuna Onigiri
- Nutritional Snapshot for These Protein Packed Snacks
- Share Your Homemade Tuna Rice Balls
Why You Will Love These Easy Tuna Rice Balls
I know your time is precious, so I always cut straight to why a recipe should make it into your regular rotation. If you need fast, filling food that doesn’t taste like you rushed it, these are it. These **tuna rice balls** fit right into that sweet spot!
- Speedy Preparation: Seriously, if you have warm rice ready, you’re looking at about 15 minutes total to mix the fillings and shape these beauties. They are the definition of a quick lunch idea or savory snack.
- Unbelievable Portability: These are custom-made for life on the move! Wrap them individually in plastic wrap, and they are perfect for picnic baskets, packed lunches, or eating straight out of the fridge during a busy afternoon.
- Flavor Customization: We give you two powerhouse fillings—creamy classic Tuna Mayo and zesty Spicy Tuna. You can switch it up every single time you make them!
- Naturally Protein-Packed: Tuna is a fantastic source of protein, making these far more satisfying than reaching for empty carbs. They keep you full and focused, which I desperately needed back in my corporate days!
Gathering Ingredients for Your Tuna Rice Balls Recipe
You know how I feel about precision, even when making something as simple as **tuna rice balls**. When you’re relying on just a few key players, you really need to get the measurements right so the texture holds up when you shape them—especially since these are meant to be portable snacks for later! Everything here is geared toward maximum flavor in minimal time. Don’t skip draining that tuna well; that’s crucial for a filling that isn’t soggy!
For the Base Rice and Wrapping
For the base, we need sticky rice. I cannot stress this enough; Japanese short-grain rice is your best friend here because it loves to clump together beautifully. You’ll need 3 cups of that cooked rice, still warm when you season it. We also need about 1 teaspoon of salt sprinkled right over the warm rice for a foundational flavor—don’t just rely on the filling!
- 3 cups cooked Japanese short-grain rice (it must be warm!)
- 1 teaspoon salt (for seasoning the rice)
- 2 sheets nori seaweed, cut into nice thin strips for wrapping
- 1 tablespoon sesame seeds (optional, but they look so professional on top!)
For the Tuna Mayo Filling (Creamy Option)
This is the classic, mild, creamy version that kids and picky eaters absolutely love. The secret weapon here, if you can find it, is Kewpie mayonnaise. It’s richer and tangier than the standard stuff, okay? Drain your can of tuna completely—I mean, really squeeze that water out so our filling stays compact.
- 1 (5 ounce) can tuna in water, drained super well
- 3 tablespoons Kewpie mayonnaise (or regular mayo if you must!)
- 1 teaspoon soy sauce
For the Spicy Tuna Rice Balls Filling
Now, for my favorite version—the bold and zesty one! This is how I elevate my **spicy tuna rice balls**. The Sriracha gives it a perfect kick, but you can totally dial that back if you’re packing these for someone less prone to heat. The sesame oil adds a wonderful, nutty depth. Again, make sure that tuna is tight and dry before you mix!
- 1 (5 ounce) can tuna in water, drained well
- 2 tablespoons mayonnaise
- 1 to 2 teaspoons Sriracha (taste as you go!)
- 1/2 teaspoon sesame oil
Step-by-Step Instructions: How to Make Onigiri Filling and Shape Tuna Rice Balls
Alright, now for the fun part! This is where we turn those lovely ingredients into easy, portable treasures. I know shaping rice can look intimidating, like you need special skills, but I promise you, once you see **how to make onigiri** a couple of times, you’ll be a pro. Since we focus on quick results here at Pure Cooking Joy, we’re moving quickly, but methodically. Remember, these are meant to be perfect for weeknight dinner prep or lunchboxes!
Preparing the Seasoned Rice and Fillings
First thing’s first: we need to get our rice seasoned while it’s still got some heat in it. Take your 3 cups of cooked rice and sprinkle that teaspoon of salt over the top evenly. Use a spatula or a big spoon to gently fold it through. You don’t want to mash the grains; we need them slightly sticky but not gummy! Just fold until you can see the seasoning is distributed.
Next, tackle the fillings in their separate little bowls. For the Tuna Mayo batch, just stir that drained tuna, Kewpie mayo, and soy sauce together until it’s a comforting, creamy mass. Do the same for the spicy one—tuna, remaining mayo, Sriracha, and sesame oil—mix until everything clings together nicely. Set both aside. See? We’re already halfway there, and it’s barely taken any time!

Shaping Your Perfect Tuna Rice Balls
This is the part that requires a little finesse, but trust me, you’ve got this. Get a small bowl of water nearby. Wet your hands completely, and then sprinkle just a tiny pinch of salt right onto your palms. This prevents sticking and seasons the outside layer. Take about a third of a cup of that seasoned rice and flatten it out gently in one hand, making a small little disc.
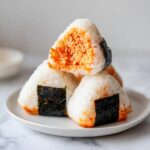
Now, take a tablespoon of the filling you decided on—Spicy or Mayo—and pop it right into the center of your rice disc. This next step is key for making great **tuna rice balls**: carefully fold the rice up and around the filling. Use your hands to gently cup the rice around the filling until it’s completely sealed inside. Then, start pressing and turning to form your shape. I usually go for a slightly rounded triangle, which is classic for onigiri, but a neat ball works just as well. Press firmly enough so the rice sticks together securely without mushing the actual rice grains. Once you have your shape, take one of those little nori strips and wrap it around the base—that’s your handle! Pop it on a plate and move straight to the next one!

Expert Tips for Perfect Tuna Rice Balls Every Time
Because these **tuna rice balls** are meant to travel—whether it’s across town to the office or just across the kitchen counter—the technique really matters! I’ve gathered a few insider secrets from my own testing to make sure yours are structurally sound, delicious when eaten cold, and never fall apart on you. Remember, we want satisfaction in every bite, not a pile of sticky rice!
My biggest takeaway when perfecting these was that texture is everything. You might be tempted to grab whatever rice is in the pantry, but stick with me here. For the best results that truly feel authentic and hold that lovely shape, use Japanese short-grain rice. It has the perfect starch content to become sticky, which is what makes a great onigiri.
Handling the Rice: Don’t Skimp on Water and Salt
If your hands start to feel too dry or the rice begins sticking stubbornly to your palms, stop immediately! That’s your cue to re-wet your hands. I keep a bowl of cool water right next to my shaping station. Wetting your hands keeps the rice from grabbing onto your skin, allowing you to mold it cleanly. Also, refresh that tiny sprinkle of salt on your palms regularly; it creates a thin, seasoned barrier.
If you decide to swap in brown rice (more on that later!), you might find it’s drier and less cooperative. When using brown rice, I always add just a tiny bit more water when I cook it, or I’ll even lightly drizzle a teaspoon of warm water over my hands more often. It’s all about managing that moisture!
Achieving the Right Filling-to-Rice Ratio
When you’re adding the filling, don’t get greedy! This is where most people go wrong. If you stuff too much spicy tuna or tuna mayo in the middle, your rice ball won’t seal properly, and we’ll end up with a disaster when we try to wrap it in the nori or eat it later. Stick to that tablespoon measurement, or just a little less. The goal is to have the rice gently cradle the filling, not overpower it.
When you fold the rice over the filling, take your time to ensure that seam is completely closed before you start the final shaping press. A good seal means a comfort food favorite that stays together!

Storage Secrets for Make-Ahead Lunches
These are wonderful for meal prep—they truly shine the next day! Once shaped, wrap each one tightly in plastic wrap. This keeps them from drying out in the fridge. They’ll keep well for up to two days, which is fantastic for quick grab-and-go lunches. Just one small note I’ve learned the hard way: never eat them ice-cold right out of the fridge. Let them sit on the counter for about 15 to 20 minutes before eating. That slight warming allows the rice to loosen up again and really brings out the flavor of that tuna filling.
Variations: Beyond Standard Tuna Mayo Balls
While the creamy Tuna Mayo and the zesty Spicy Tuna are total rockstars, half the fun of making **tuna rice balls** is playing around with the flavor profile! This is where you take a universally simple concept and make it totally *yours*. I love mixing things up to keep our weekly meal prep exciting, and luckily, the foundation of seasoned rice works with almost anything you throw at it. You might be looking for something lighter, or maybe something with a little crunch—we have easy ways to do that!
Making Healthy Rice Snacks with Brown Rice
I totally get that sometimes we want to boost the fiber content or use up that bag of whole grains we have sitting around. If you’re aiming for **healthy rice snacks**, swapping out the white short-grain rice for brown rice is super straightforward. The texture will be earthier and chewier, which is actually quite nice with savory fillings!
Just a quick heads-up: brown rice needs more water and definitely a longer cook time than the quick-cooking white stuff. If you make the switch, you’ll want to treat your hands with a little extra water while shaping, because brown rice grains don’t naturally want to stick together quite as lovingly as the starches in white rice do. You get a totally different — but still delicious — experience!
Ideas for Easy Onigiri Filling Swaps
If you’ve got someone who doesn’t love tuna, or you just used up the last can, don’t panic! These rice balls are built to swap fillings. Seriously, think of the classic Japanese fillings—they all work perfectly here. You can easily adapt this recipe for a non-tuna moment.
For instance, one of my favorite easy onigiri filling swaps is using cooked salmon flakes mixed with a little butter and soy sauce. It’s salty, rich, and incredibly flavorful. Another classic that brings a wonderful salty-sour punch is *umeboshi*—a pickled plum paste. You only need a tiny dab right in the center, and it cuts through the richness of the rice beautifully. If you want to keep it simple but add a nice texture, just stir 1 tablespoon of furikake seasoning right into your plain seasoned rice before you start shaping. It adds sesame crunch and seaweed flavor without needing a separate filling!

Serving Suggestions and Storing Your Tuna Rice Balls
One of the best features of these **tuna rice balls** is how phenomenal they are for planning ahead! Since my goal is always to make your life easier, I rely on these heavily for my easy meal prep routines. They are the ultimate portable snack because they hold their shape so well, but how you store and serve them makes a huge difference!
When you’re ready to pack them up, I recommend wrapping each one absolutely tightly in plastic wrap right after you shape it. This acts like a little humidity chamber and keeps the rice from drying out in the fridge. They’ll keep perfectly fine for about two days tucked away in there, which is perfect for using them up across a couple of busy workdays.
But here is the golden rule I learned: never eat them straight from the cold! Cold rice has a very firm, almost tough texture. It dulls all the flavor of that lovely spicy tuna or creamy mayo filling we worked so hard on. So, before you eat them (whether this is for lunch or a quick dinner), take them out of the fridge and let them sit on the counter for about 15 to 20 minutes. That little bit of time at room temperature lets the rice relax and brings the flavor right back to life!
For serving, they are fantastic all on their own—a complete, balanced bite! But if you’re setting them out on a platter or packing a bento box, they love having some sharp, acidic partners to cut through the richness of the tuna. Try serving them with a side of thinly sliced cucumber or maybe just a small dollop of pickled ginger. Even a tiny bit of salty, vinegary goodness makes the whole rice ball taste brighter. They are just so versatile!
Frequently Asked Questions About Tuna Onigiri
I always hear from folks after they try making these savory rice bites for the first time! It’s completely normal to have questions, especially when you’re venturing into shaping rice. Here are a few things I get asked all the time about my easy **tuna rice balls**!
Are these tuna rice balls safe to eat the next day for lunch?
Absolutely, they are fantastic for meal planning! They are one of my go-to make ahead lunch options. As long as you wrap them tightly in plastic wrap and keep them refrigerated, they are perfectly safe and delicious for up to two days. Remember my tip: let them warm up slightly on the counter before diving in for the best texture!
What is the best type of rice to use for these portable snacks?
For the structure needed to hold the filling and make them resilient as **portable snacks**, you really should use Japanese short-grain rice, often labeled as sushi rice. It has that natural stickiness we need. If you try to use long-grain rice like Basmati, it just won’t clump together the same way, and your balls will crumble easily, making them terrible for bento box ideas!
Can I bake or fry the tuna rice balls instead of eating them cold?
That’s a great question, especially if you like a little char! You totally can! While the most traditional way is cold, you can certainly grill or bake them slightly. If you want to pan-sear them (making a Yaki Onigiri), just brush the finished rice ball very lightly with a little extra soy sauce or sesame oil and cook it in a non-stick pan over medium heat for about 2 minutes per side until golden brown. They get crispy on the outside, which is divine!
Is the Kewpie mayo necessary in the filling?
I highly recommend it, but it’s not strictly mandatory. Kewpie mayo is richer because it uses egg yolks only and has a vinegar base which adds a beautiful background tang. This richness makes the tuna mayo filling extra creamy and satisfying. If you use regular mayo, you might find the flavor a little flatter, so maybe add just a tiny splash more soy sauce to compensate!
Nutritional Snapshot for These Protein Packed Snacks
I try not to obsess over numbers too much in the kitchen—honestly, the joy is in the eating! But since so many of us are looking for satisfying, **protein packed snacks** that fit into a balanced day, I pulled the estimates for you. Keep in mind that these numbers are based on one rice ball using the standard Tuna Mayo filling, so if you go heavy on the Sriracha version or load up on extra rice per ball, things might shift a little.
These little bites pack a good wallop for their size, providing that crucial protein lift you need to get through the afternoon slump without crashing. They’re a fantastic option when you need something convenient that you can feel genuinely good about eating!
- Serving Size: 1 rice ball
- Calories: Approximately 180
- Protein: 8 grams
- Total Fat: 6 grams
- Carbohydrates: 25 grams
- Sugar: Only 1 gram!
See? Great protein power in a small package. Please remember these are just estimates—the real magic is how happy they make you feel when you grab one for a quick lunch!
Share Your Homemade Tuna Rice Balls
Well, there you have it! We’ve gone from simple cooked rice to perfectly shaped **tuna rice balls** ready for lunchboxes, picnics, or just that moment when you need a truly satisfying, savory bite. I hope that seeing just how straightforward this Japanese rice ball technique is has made you feel confident about adding this to your regular cooking rotation.
Seriously, I can’t wait to hear how they turned out for you! Did you go spicy today, or stick with the classic creamy tuna mayo? Did you make little triangles or stick to perfect spheres? I really want to see them! If you snap a picture of your beautiful creation—maybe ready for a bento box or just sitting proudly on your counter—please tag me over on Facebook so I can check them out. You can find me doing all sorts of kitchen shenanigans over at Pure Cooking Joy on Facebook. Don’t be shy!
If this recipe brought a little bit of that pure cooking joy to your busy day, please take a moment to leave a star rating and a quick comment right below this post. Your feedback means the world to me. It helps other cooks who might be nervous about making their first onigiri feel brave enough to try it. Happy shaping!
PrintEasy Spicy Tuna Mayo Onigiri (Japanese Rice Balls)
Make these satisfying tuna rice balls, inspired by Japanese onigiri. This recipe provides simple steps for a quick lunch, portable snack, or protein-packed bite, including both creamy tuna mayo and spicy tuna filling options.
- Prep Time: 15 min
- Cook Time: 0 min
- Total Time: 15 min
- Yield: 6 to 8 servings 1x
- Category: Snack
- Method: Hand Shaping
- Cuisine: Japanese
- Diet: Vegetarian
Ingredients
- 3 cups cooked Japanese short-grain rice (warm)
- 1 teaspoon salt (for seasoning rice)
- 2 sheets nori seaweed, cut into thin strips
- 1 tablespoon sesame seeds (optional topping)
- For the Tuna Mayo Filling:
- 1 (5 ounce) can tuna in water, drained well
- 3 tablespoons Kewpie mayonnaise (or regular mayonnaise)
- 1 teaspoon soy sauce
- For the Spicy Tuna Filling:
- 1 (5 ounce) can tuna in water, drained well
- 2 tablespoons mayonnaise
- 1 to 2 teaspoons Sriracha (adjust to your spice preference)
- 1/2 teaspoon sesame oil
Instructions
- Prepare the Rice: While the rice is still warm, sprinkle it evenly with 1 teaspoon of salt. Mix gently to distribute the seasoning. Allow the rice to cool slightly so it is warm but safe to handle.
- Make the Tuna Mayo Filling: In a small bowl, combine the drained tuna, mayonnaise, and soy sauce. Mix until fully incorporated.
- Make the Spicy Tuna Filling: In a separate small bowl, combine the drained tuna, mayonnaise, Sriracha, and sesame oil. Mix well.
- Shape the Rice Balls: Wet your hands lightly with water and sprinkle a little salt on your palms. Take about 1/3 cup of seasoned rice and flatten it slightly in your hand.
- Add Filling: Place about 1 tablespoon of your chosen filling (Tuna Mayo or Spicy Tuna) in the center of the rice.
- Form the Ball: Gently fold the rice around the filling, using your hands to shape it into a triangle or round ball. Press firmly enough so the ball holds its shape but not so hard that the rice becomes mushy.
- Wrap with Nori: Take a thin strip of nori seaweed and wrap it around the bottom or middle of the rice ball. This acts as a handle and adds flavor.
- Finish: Sprinkle the finished rice balls with sesame seeds if desired. Serve immediately or wrap individually in plastic wrap for a portable snack or bento box lunch.
Notes
- Use Japanese short-grain rice for the best sticky texture needed for shaping. If using brown rice, you may need slightly more water when cooking.
- To make the shaping process easier, keep a small bowl of water nearby to dip your hands into frequently.
- These rice balls are excellent for meal prep and keep well in the refrigerator for up to two days. Bring them to room temperature before eating for the best texture.
Nutrition
- Serving Size: 1 rice ball
- Calories: 180
- Sugar: 1
- Sodium: 250
- Fat: 6
- Saturated Fat: 1
- Unsaturated Fat: 5
- Trans Fat: 0
- Carbohydrates: 25
- Fiber: 1
- Protein: 8
- Cholesterol: 15
