 Skip to content

Doesn’t that savory, sticky craving for perfect chicken wings hit you out of nowhere? I know mine does! For years, I thought achieving that restaurant-quality crunch meant diving into hot oil, which, let’s be honest, is a nightmare for cleanup. But what if I told you that this recipe for crispy baked chicken wings is the absolute best way to get that crackling skin and juicy meat without the fuss? Seriously, this honey garlic wings version—baked mind you—solves my game day dilemma every single time. It’s unbelievably simple, and once you master this secret technique, you won’t ever reach for the deep fryer again. I’m Alex, and welcome to Pure Cooking Joy!
- Why You Will Make These Crispy Baked Chicken Wings Again and Again
- The Essential Ingredients for Perfect Honey Garlic Chicken Wings
- Step-by-Step Guide to Making Crispy Baked Chicken Wings
- Expert Tips for the Best Crispy Baked Wings
- Flavor Variations for Your Next Batch of Chicken Wings
- Serving Suggestions for Game Day Chicken Wings
- Storage and Reheating Juicy Homemade Wings
- Frequently Asked Questions About Crispy Chicken Wings
- Recipe Details and Nutritional Estimates
Why You Will Make These Crispy Baked Chicken Wings Again and Again
I get it—you need food that tastes great but doesn’t take over your entire afternoon, especially when the game is on. That’s why I rely on these chicken wings constantly. They check every single box:
- You get the crunch! Seriously, these are truly crispy baked wings without the mess of frying.
- Incredibly juicy meat inside, which is the true test of a great recipe.
- The sweet and savory honey garlic glaze is just phenomenal—pure flavor heaven.
- They are foolproof and perfect for any gathering, big or small. You can even check out my thoughts on easy entertaining to see how I plan my party menus!
The Essential Ingredients for Perfect Honey Garlic Chicken Wings
Okay, listen up—the ingredients list might look simple, but trust me, every single item plays a huge role in making these the best chicken wings you’ve ever made at home. We aren’t just throwing things together; we are building texture! Before anything else, grab your paper towels and pat those wings completely dry. I mean bone-dry! If they’re wet, we can kiss that crispiness goodbye.
My secret weapon for the texture, which I always underline twice on my personal card, is the baking powder. It works magic when mixed with the salt and pepper to suck up surface moisture and help that skin absolutely crisp up in the oven. You’ll want aluminum-free if you can find it; it just gives a cleaner result when baking our crispy baked wings.
For the Crispy Chicken Wings Coating
This is the dry mix that sets the foundation for a great bake. Remember, wings must be completely dry before they meet this coating:
- 3 lbs chicken wings (flats and drumettes separated—we want even cooking!)
- 1 tablespoon baking powder (aluminum-free is best for crispiness)
- 1 teaspoon salt
- 1/2 teaspoon black pepper
For the Sticky Honey Garlic Sauce
This rich, sticky potion is what brings the sweet and savory punch to our chicken wings. It’s thick, aromatic, and coats everything beautifully after they come out of the oven.
- 1/2 cup honey
- 1/4 cup soy sauce
- 4 cloves garlic, minced (use fresh, please!)
- 2 tablespoons apple cider vinegar
- 1 tablespoon unsalted butter
Step-by-Step Guide to Making Crispy Baked Chicken Wings
This is where the magic happens, friends! Following these steps turns a simple tray of wings into the centerpiece of your next gathering. Remember how I talked about building flavor and texture? This process is all about that foundation. Since these are relatively quick, they fit perfectly into my philosophy for effortless weeknight dinners, even though they feel fancy enough for a party!
Preparation and Coating for Maximum Crispiness on Chicken Wings
First things first: Get that oven screaming hot! Preheat your oven to a blazing 425°F (220°C). While it heats up, grab your baking sheet and line it with parchment paper, then put a wire rack right on top. That rack is essential; it lets the air circulate underneath, which is how we mimic deep frying results! Trust me, don’t skip that rack setup. Then, toss those bone-dry wings with the baking powder, salt, and pepper. That baking powder is doing the heavy lifting—it pulls moisture right off the skin so we get that unbelievable crunch!
Baking Technique for Juicy Chicken Wings Recipe Results
Now, arrange your seasoned pieces onto that prepared rack. This is critical: make sure they are completely spaced out in a single layer. If they are touching, they’ll steam instead of crisp. Pop them in for 25 minutes. When the timer goes off, flip every single one over gently. Then, let them bake for another 20 to 25 minutes. You’re looking for them to be deep golden brown and feel seriously crispy when you nudge them. That’s how you know you nailed that juicy homemade wings recipe texture!

Creating and Applying the Honey Garlic Glaze to Your Chicken Wings
While those beauties are baking their best, let’s make the sauce. In a saucepan, gently heat the honey, soy sauce, minced garlic, and apple cider vinegar. Let it just simmer for about five minutes until it’s a little thicker—it should coat the back of a spoon slightly. Right at the end, take it off the heat and stir in that tablespoon of butter until it melts in, making the sticky glaze glossy. Once the wings are out of the oven, immediately dump them into a big bowl, pour that warm glaze over them, and toss gently until every single piece of chicken wing is coated. Dinner success achieved!

Expert Tips for the Best Crispy Baked Wings
If you want these chicken wings to truly sing, you have to pay attention to a few key details I learned the hard way. I remember the first time I tried to rush this recipe for a big family gathering. I totally crammed every wing onto one rack because I didn’t want to dirty a second pan. Big mistake! When they came out, the ones in the middle were essentially steamed and floppy. Never again! That failure taught me the gospel truth about maximizing crispiness in the oven.
The Secret to Non-Sticky Chicken Wings: Dryness is Key
This is the golden rule, seriously. If you want that amazing oven baked wings crispy no fry result, the surface of the chicken has to be bone dry before it even sees the baking powder. Use a whole stack of paper towels and blot, blot, blot! Once they are dry, don’t let them sit around while you chop garlic—get them coated and into the hot oven right away. And remember what happened to me? Never overcrowd them! If your wings are touching, they are going to steam, and steam is the enemy of crisp skin. If you think you need two baking sheets to get them in a proper single layer, use two sheets. It’s worth the extra cleanup, I promise you that.
Adjusting the Honey Garlic Wings Glaze Thickness
I know sometimes people get nervous when they read the sauce instructions. Is it supposed to be thick? Thin? Runny? It all depends on how you like your sticky glaze! Remember, the glaze thickens as it simmers because the water naturally evaporates. If you want a really thick, almost candy-like coating that really clings, let that sauce simmer for the full five minutes, or even a minute or two longer, watching carefully so it doesn’t scorch.
If you are someone who prefers things a little lighter and saucier—maybe you like dipping them more than coating them—just pull the sauce off the heat right when it starts to bubble nicely, say after only three minutes. Stir in the butter, and you’ll have a perfect, pourable coating that still has tons of flavor but won’t be overwhelmingly thick. For more culinary insights and tips like this, feel free to browse around my latest kitchen adventures here!
Flavor Variations for Your Next Batch of Chicken Wings
One of the things I love most about mastering the crispy baking technique is that your oven-baked chicken wings become the perfect canvas for almost any flavor you can dream up! This honey garlic glaze is amazing, but you shouldn’t stop there, especially when planning big party chicken wing ideas. Once you’ve pulled those beautifully golden, crispy pieces out of the oven—following the steps I laid out—you can pivot instantly to a completely different profile!
Making Garlic Parmesan Chicken Wings
If I’m craving something savory instead of sweet, this is my go-to switch. For Garlic Parmesan wings, you skip the entire honey garlic sauce-making process. Instead, immediately when the hot wings come out of the oven (and are in that large bowl), toss them in a mixture of melted butter, lots of fresh minced garlic, and heaps of good quality grated Parmesan cheese. The heat melts the cheese perfectly into the existing seasoned crust. It’s savory perfection!

Quick Dry Rub Chicken Wings Option
Sometimes, you just don’t want anything sticky, right? If you want those amazing crunchy exteriors but prefer a simple, bold flavor, skip the sauce step entirely. Instead of tossing them in the glaze, you can toss the hot wings in a flavorful dry rub chicken wings blend—maybe something smoky or spicy—while they are still hot. That little bit of residual moisture helps the dry rub adhere beautifully. Check out some of my favorite appetizers and snacks for more inspiration over on my appetizers page!

Serving Suggestions for Game Day Chicken Wings
Now that you have mastered the art of the crispy baked surface and the sticky glaze, we have to talk about presentation, right? These are your game day chicken wings, and they deserve a proper setup! Because these honey garlic wings hit that perfect balance of sweet and savory, they pair beautifully with light, cooling sides that cut through the richness.
I always serve them right out of the tossing bowl onto a big platter. You absolutely need celery and carrot sticks—they are mandatory for dipping. A nice side of cool Ranch or blue cheese dressing cools down the palate perfectly between bites. If you want to make the whole spread easy, check out my notes on easy entertaining. And, hey, if you make a batch, tag me on Facebook so I can see your setup! You can find me over at Pure Cooking Joy’s page.
Storage and Reheating Juicy Homemade Wings
These chicken wings are truly best eaten fresh, right out of that mixing bowl when they are hot and sticky. But let’s be real—sometimes you have glorious leftovers, and we can’t have them going to waste! The biggest tragedy with any leftover wing is waking up to a soggy texture the next day. But I have a few tricks up my sleeve to bring that crispiness back to life, ensuring you still get that juicy homemade wings recipe experience later on.
First, storage. Once they cool down completely, move them to an airtight container. Don’t worry if they were sauced; the honey garlic glaze actually helps preserve some moisture. You can safely keep them in the fridge for about three to four days. If you managed to save some plain ones (maybe you tossed half in a dry rub?), they might last a day longer, but seriously, these are hard to keep around!
Now, reheating. I’m going to level with you: the microwave is your enemy here. It equals steam, and steam equals sad, floppy wings. If you want that satisfying crunch back, you need dry heat. My favorite method is actually sticking them back in a toaster oven or a regular oven set to about 375°F (190°C). Line a small baking sheet with foil, spread the wings out in a single layer—remember that overcrowding rule, even for leftovers!—and bake for about 8 to 10 minutes.
This quick blast of heat dries the surface back out and reheats the meat perfectly, retaining most of that wonderful juiciness inside. If you want to try the air fryer for reheating, that works like a charm too! Just 350°F (175°C) for about 5 minutes should bring them right back to life. Trust me on this; skipping the microwave is the key to enjoying your leftovers!
Frequently Asked Questions About Crispy Chicken Wings
It’s natural to have questions when trying a new technique, especially when you’re breaking up with your deep fryer! I get so many great notes from readers trying out these crispy baked wings for the first time. Here are the top things folks ask me about achieving that perfect bite every time for their game day chicken wings.
Can I use an air fryer for this recipe?
Oh, absolutely! The air fryer is fantastic for achieving that super crispy skin, and it’s a great alternative if you’re looking for quick results. If you are making air fryer chicken wings, you’ll want to adjust your approach slightly. Skip the baking powder toss for now, as the air fryer already circulates air so well. Toss wings lightly with salt, pepper, and maybe a little oil, then air fry at 380°F (190°C) for about 20 minutes, shake halfway, and then toss with the honey garlic glaze at the end. You won’t have to bake them for a full hour like in the oven, which is a nice time saver!
What if I don’t have a wire rack? Will my wings still be crispy?
That wire rack setup is my personal secret for the oven baked wings crispy no fry look, because it lets heat hit every side of the wing as the fat drips away. If you truly don’t have one, don’t panic! You need to create space. Line your baking sheet with parchment paper, and then every 3 inches, scrunch up two pieces of heavy-duty aluminum foil into thick ‘logs.’ Rest your parchment on top of those foil logs. It creates a makeshift rack! It won’t be quite as perfect as a real rack, but it will elevate the wings enough to prevent that dreaded soggy bottom. This helps tremendously with getting a good juicy chicken wings recipe result.
How can I guarantee I get juicy chicken wings recipe results, not dry ones?
The juiciness really comes down to two things we cover in the main recipe! First, the baking powder coating helps crisp the outside quickly, effectively sealing in the juices during the initial bake. Second, make sure you are not overcooking them! Aim for that golden brown, “very crispy” texture at the 45-50 minute mark. If they look done, they are done! The residual heat while they sit waiting to be glazed will finish them off. If you want to explore more ways to build flavor while maintaining moisture, take a look at my post on comfort food favorites—the techniques often cross over!
Can I switch from honey garlic to a dry rub?
Yes, and I love that you’re thinking versatile! If you want to use a dry rub chicken wings blend instead of the sticky honey garlic sauce, the process is very straightforward. You coat the wings with the baking powder mixture as instructed, bake them until perfectly golden and crispy, and then you are done! You can toss them with a tablespoon of melted butter right at the end if you want a little sheen, but they will be incredible served dry. This is perfect for parties where people like to dip their wings in different sauces on the side, like ranch or a spicy mustard.
Recipe Details and Nutritional Estimates
I always keep the details organized right here so you can plan your time—whether it’s a quick weeknight meal or a marathon of game day chicken wings! We’ve already covered the prep and the baking time, but having it all laid out like this just makes everything feel professional, right? These Honey Garlic Wings are classified as an appetizer because, let’s be honest, nobody stops at just four wings!
I want to stress something important though: the nutrition facts at the bottom are just what my calculator spat out based on the ingredients I used. I’m not a certified nutritionist, so please view these as handy estimates. Food is about joy, not counting every gram, but it’s good to have a ballpark figure!
Here is the quick overview of how long this recipe takes and what it yields:
- Prep Time: 15 min
- Cook Time: 50 min
- Total Time: 65 min (Worth every minute for crispy wings!)
- Yield: 4 servings
- Category: Appetizer
- Method: Baking (The best oven baked wings crispy no fry method out there!)
- Cuisine: American
- Diet: Low Fat
Estimated Nutritional Information for Honey Garlic Chicken Wings
Here is the breakdown for approximately four wings per serving. Remember, this is based strictly on the ingredients listed above, using standard measurements. When you’re serving these up at a party, folks are probably grabbing more than four, so factor that in!
- Serving Size: 4 wings
- Calories: 350
- Fat: 20 grams
- Protein: 25 grams
- Carbohydrates: 20 grams
- Sugar: 18 grams (Hello, honey!)
Extra Crispy Baked Honey Garlic Chicken Wings
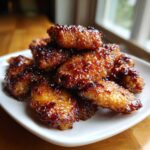
I am so glad you are here. I show you how to make extra crispy baked chicken wings in your oven that rival fried versions. These honey garlic wings are juicy inside, perfect for game day, and use simple techniques for big flavor.
- Prep Time: 15 min
- Cook Time: 50 min
- Total Time: 65 min
- Yield: 4 servings 1x
- Category: Appetizer
- Method: Baking
- Cuisine: American
- Diet: Low Fat
Ingredients
- 3 lbs chicken wings (flats and drumettes separated)
- 1 tablespoon baking powder (aluminum-free is best for crispiness)
- 1 teaspoon salt
- 1/2 teaspoon black pepper
- 1/2 cup honey
- 1/4 cup soy sauce
- 4 cloves garlic, minced
- 2 tablespoons apple cider vinegar
- 1 tablespoon unsalted butter
Instructions
- Preheat your oven to 425°F (220°C). Line a large baking sheet with parchment paper and place a wire rack on top of the sheet. This setup allows air to circulate for maximum crispiness.
- Pat the chicken wings completely dry using paper towels. This step is crucial for achieving crispy baked wings.
- In a medium bowl, toss the dry wings with the baking powder, salt, and pepper until evenly coated. The baking powder helps draw out moisture and promotes browning.
- Arrange the seasoned wings in a single layer on the wire rack. Do not let them touch.
- Bake for 25 minutes. Flip the wings over and bake for another 20 to 25 minutes, or until the skin is golden brown and very crispy.
- While the wings bake, prepare the honey garlic sauce. In a small saucepan over medium heat, combine the honey, soy sauce, minced garlic, and apple cider vinegar.
- Bring the mixture to a simmer, stirring occasionally. Cook for 3 to 5 minutes until the sauce thickens slightly. Remove from heat and stir in the butter until melted and smooth.
- Remove the crispy baked chicken wings from the oven. Place them in a large clean bowl.
- Pour the warm honey garlic sauce over the wings and toss gently until every piece is coated in the sticky glaze.
- Serve immediately as your best game day chicken wings or party chicken wing ideas.
Notes
- For the crispiest results, avoid overcrowding the baking sheet. Use two sheets if necessary.
- If you prefer a thicker glaze, let the sauce simmer slightly longer until it coats the back of a spoon.
- These wings are delicious tossed in a dry rub instead of sauce if you prefer a less sticky finish.
Nutrition
- Serving Size: 4 wings
- Calories: 350
- Sugar: 18
- Sodium: 650
- Fat: 20
- Saturated Fat: 6
- Unsaturated Fat: 14
- Trans Fat: 0
- Carbohydrates: 20
- Fiber: 0
- Protein: 25
- Cholesterol: 100
