 Skip to content

I’m Alex, and if you’re anything like I was just a few years ago, you probably think **cherry pie filling** means opening a can under pressure. But trust me when I say that’s a corporate convenience we can leave behind! Making your own filling from scratch is wildly simple, and the resulting flavor is just incomparable. This is my foolproof, thick, and juicy homemade cherry pie filling recipe. We’re ditching the goo and aiming for that perfect, glossy texture that makes every bite of pie—or whatever you’re topping—taste like pure joy. Seriously, once you taste this, you’ll never look back!
- Why This Homemade Cherry Pie Filling Recipe Beats the Can (E-E-A-T)
- Gathering Ingredients for Perfect Cherry Pie Filling
- How to Make Thick Cherry Pie Filling From Scratch
- Expert Tips for the Best Cherry Pie Filling Texture
- Ingredient Notes and Substitutions for Your Cherry Pie Filling
- Beyond the Pie: Using Your Homemade Cherry Pie Filling
- Storage and Reheating Instructions for Cherry Pie Filling
- Frequently Asked Questions About Cherry Pie Filling
- Nutritional Snapshot of This Sweet Tart Cherry Filling
Why This Homemade Cherry Pie Filling Recipe Beats the Can (E-E-A-T)
I used to think canned filling was the way to go because, well, it was just easier on my frantic weeknights. But when I finally made my first batch of **homemade cherry pie filling** from scratch, it was a total game-changer. The texture, the vibrant color—it was miles ahead of anything store-bought!
When you compare **canned vs homemade cherry pie filling**, the biggest difference is control. Those big industrial cans often rely on tons of corn syrup to keep things flowing, resulting in that overly sweet, sometimes slimy texture. By making it yourself, you control exactly how it sets up. That’s how we guarantee this is the **best cherry pie filling** around; we’re aiming for thick, juicy, and shiny, not runny lava.
I remember bringing my first homemade cherry pie to a work potluck. People were buzzing about how fresh the cherries tasted. One colleague actually asked if I’d used imported cherries! Nope, just a simple stovetop method and a little bit of love. That’s the power of cooking things simply. If you’ve mastered our easy steak pie recipe, you’re ready for this filling next! Mincemeat pie taught me that simple steps yield huge results, and this cherry filling follows that same rule.
Gathering Ingredients for Perfect Cherry Pie Filling
Okay, let’s talk about what you need. Good ingredients make all the difference, especially when you are chasing that beautiful, **glossy cherry pie filling** look. This recipe is really straightforward; it doesn’t require exotic things, just precise measurements! The secret sauce, literally, is how you combine the liquid and the starch before it hits the heat.
Don’t stress if you only have frozen cherries right now; we handle that in a minute! But for the best, brightest flavor, make sure everything is measured out right before you start cooking. It’s all about timing when we get to the thickening step.
Essential Components for Thick Cherry Pie Filling
- 3 cups fresh or frozen sweet or tart cherries, pitted
- 1 cup granulated sugar
- 1/4 cup cornstarch
- 1/4 cup water
- 1 tablespoon lemon juice
- 1/2 teaspoon almond extract
- 1/4 teaspoon salt
See that cornstarch and water? Whisking those two thoroughly until you have a **smooth slurry** is the first non-negotiable step if you want a **thick cherry pie filling**. Seriously, zero lumps!

How to Make Thick Cherry Pie Filling From Scratch
Alright, ditch the panic! This is honestly the very **easy cherry pie filling from scratch** method I use every single time. People ask me **how to make cherry pie filling thick**, and the secret isn’t magic; it’s just knowing when to add your thickener and giving it enough time to do its job. We’re keeping this fast, but we aren’t skipping any steps that promise that perfect set.
Step-by-Step Instructions for Juicy Cherry Pie Filling
First up, if you’re using frozen cherries—and I often do when fresh aren’t in season—don’t bother thawing them! Throw them right into the saucepan with your sugar. Cold fruit hitting the heat gradually helps release the juices perfectly.
- If using frozen cherries, do not thaw them first. Place the cherries and sugar in a medium saucepan.
- In a small bowl, whisk together the cornstarch and water until completely smooth. This step is key for a thick cherry pie filling.
- Place the saucepan over medium heat. Bring the cherry mixture to a gentle simmer, stirring occasionally.
- Once simmering, slowly pour the cornstarch slurry into the saucepan while whisking constantly.
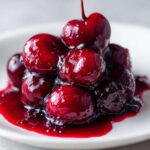
- Continue to cook, stirring constantly, until the mixture thickens significantly and begins to bubble, about 2 to 4 minutes. You are looking for a **glossy**, thick cherry filling.

Pro Tip for No Runny Pie Filling Tricks: See that bubbling in step 5? That’s crucial! You have to let the mixture boil briefly after adding the slurry. This cooks out the raw starch flavor and guarantees it sets up rock-solid once cooled. If it’s still looking thin, just keep that whisk moving for another minute!
Once it looks thick and glossy, take it off the heat immediately. Don’t let it sit on the hot burner! Stir in your flavor boosters—lemon juice, almond extract, and salt—to brighten everything up.
- Remove the pan from the heat. Stir in the lemon juice, almond extract, and salt.
- Transfer the **homemade cherry pie filling** to a heatproof bowl. Press plastic wrap directly onto the surface of the filling to prevent a skin from forming.
- Cool to room temperature, then chill completely in the refrigerator for at least 2 hours before using in your pie or dessert.
That final chill time is mandatory! It’s when the filling truly firms up. While you’re waiting for it to chill for your pie, check out my recipe for a wonderfully set triple-berry pie—it uses similar thickening magic!
Expert Tips for the Best Cherry Pie Filling Texture
Listen, texture is everything when it comes to fruit filling. If you want that beautiful sliceable set—the kind you see in bakery windows—you need to respect the thickener. That’s the main thing I learned when trying to figure out those **no runny pie filling tricks**.
The biggest takeaway? You absolutely must let that cornstarch/water slurry come to a boil. Giving it a good 30 to 60 seconds of rolling bubbles after you add it ensures the starch molecule is fully activated. If you pull it off the heat too soon because you’re worried about burning the cherries, you’ll end up with thin juice instead of a **juicy cherry dessert topping**.
Another small thing that helps that final glossy finish is stirring gently but constantly while it thickens. You aren’t whipping air in; you’re just making sure the heat distributes evenly around those sweet cherries. A little patience on the stove now saves you a soggy pie bottom later, I promise!

Ingredient Notes and Substitutions for Your Cherry Pie Filling
I always get questions about what cherries to use, and that’s fair! Getting the right kind of cherry makes a big difference in the final sweet-tart balance. For the brightest flavor, I naturally lean toward tart cherries, but if all you can find are sweet ones, don’t sweat it! Just toss in a bit more lemon juice to cut that sweetness, which helps keep things balanced for a truly vibrant filling.
Now, onto the thickener. While this recipe uses cornstarch because it gives you that gorgeous sheen, I know some of you are looking for a **pie filling recipe no cornstarch substitute**. If that’s you, you can swap it out for tapioca starch! You’ll need about 3 tablespoons of tapioca starch instead of the ¼ cup of cornstarch listed. It works wonders and provides a satisfying set.
And yes, this recipe is fantastic for **cherry pie filling with frozen cherries**. Remember what I said earlier? Don’t thaw them! Using them straight from the freezer works perfectly fine right into the sugar and onto the heat. That slight temperature shock when they hit the pan is half the fun!
Beyond the Pie: Using Your Homemade Cherry Pie Filling
I’m so glad you asked about using this filling for things other than a traditional pie! Honestly, once this **juicy cherry dessert topping** sets up, it’s way too good to use just once a year for a holiday pie. It’s thick, it’s bright, and it finishes beautifully on anything!
My absolute favorite way to use this up quickly is dolloped right over vanilla ice cream or a slice of my famous apple pie cheesecake—you can find those indulgent recipe notes here! It instantly elevates something simple into a gourmet experience.

If you’re making **cherry pie filling for cheesecakes**, you can actually fold in about half the batch into your cream cheese layer before baking, or just use the chilled filling on top once it’s cooled. It’s also divine spooned into crisp pastry shells to make gorgeous little **cherry pie filling for tarts**. Seriously, stop thinking pie and start thinking topping. We love showing off our creations over on Facebook too, so come say hi at my Facebook page!
Storage and Reheating Instructions for Cherry Pie Filling
One of the best parts about this recipe is that it makes a great batch size! You definitely need to chill it for at least two hours before using it in a pie shell, as that’s when it firms up properly. But if you have leftovers (which I rarely do, oops!), storing it is a breeze.
Keep any remaining **homemade cherry pie filling** in an airtight container in the fridge. It holds beautifully for about a week, maybe even ten days if you’re lucky. If you plan on pouring it warm over, say, waffles or a dollop of yogurt, just microwave a portion for about 30 seconds until it’s scoopable again. Remember, it’s already cooked, so you are just warming it through!
Frequently Asked Questions About Cherry Pie Filling
I always get a flood of questions after people try this recipe for the first time, and that’s awesome! Knowing the little details helps everyone nail that perfect texture. Here are some of the things I hear most often when folks are working on their **easy fruit pie filling** projects.
So, you want to know if you can use fresh or frozen cherries? Absolutely, yes! I covered that a bit earlier, but the short version is: use them straight from the freezer, no thawing required! Also, people frequently ask how to achieve that professional, high-shine look. That truly comes down to giving the cornstarch slurry a good, active boil once it hits the pot—that’s how you get that beautiful, **glossy cherry pie filling**.
And yes, you can totally make this ahead of time! That’s what makes it so handy for busy times. I often make a double batch and keep it chilled so I’m ready for an impromptu tart night. But what happens when things go wrong? That leads right into the trickiest scenario…
Troubleshooting Runny Homemade Cherry Pie Filling
Look, even I mess up sometimes, or maybe the altitude just messes with my measurements! If you pull your beautiful **cherry pie filling** out of the fridge and it’s just not setting up like you hoped—maybe it’s more of a soup than a pie filler—don’t panic or pour it down the drain! We can save it.
Here’s my best trick for rescuing a thin batch: Put the runny filling back into a saucepan over low heat. In a tiny separate cup, mix 1 teaspoon of cornstarch with 2 teaspoons of cold water to make a very smooth, super-thick slurry (this is your emergency thickener!). Pour this tiny bit in, whisking constantly, and bring it just to a gentle simmer. Keep stirring for about 30 seconds until you see it start to grab onto a spoon. Then, yank it off the heat, let it cool down again, and it should set perfectly the second time. It’s my ultimate **no runny pie filling tricks** safeguard!
For more great inspiration on how to build confidence in the kitchen, check out the rest of my baking adventures on the Pure Cooking Joy blog!
Nutritional Snapshot of This Sweet Tart Cherry Filling
Hey, I love talking about flavor and texture, but when we’re cooking from scratch, the nutritional side of things is always a bit tricky, right? Because every cherry is different—whether yours are sweet, tart, fresh, or frozen—the final breakdown changes slightly.
I always want you to feel confident about what you’re making, but I’m not a registered dietitian, so I treat nutritional data like a gentle guideline rather than gospel. All the numbers you might see floating around for this recipe are just estimates based on the ingredients listed!
For example, the amount of sugar you use versus the sugar naturally in the fruit makes a big difference, as does the exact size of the cherries! So, please view this information as truly preliminary. If you need exact tracking for dietary reasons, I really recommend plugging your specific amounts into your favorite nutrition tracker. For the details on how I generally approach health claims on the blog, you can take a look at my official disclaimer page!
PrintFoolproof Thick & Juicy Homemade Cherry Pie Filling (From Scratch)
Ditch the can and make the best cherry pie filling from scratch. This recipe guarantees a thick, glossy, non-runny filling perfect for pies, cheesecakes, or waffles.
- Prep Time: 10 min
- Cook Time: 15 min
- Total Time: 25 min
- Yield: About 4 cups 1x
- Category: Dessert Filling
- Method: Stovetop Cooking
- Cuisine: American
- Diet: Vegetarian
Ingredients
- 3 cups fresh or frozen sweet or tart cherries, pitted
- 1 cup granulated sugar
- 1/4 cup cornstarch
- 1/4 cup water
- 1 tablespoon lemon juice
- 1/2 teaspoon almond extract
- 1/4 teaspoon salt
Instructions
- If using frozen cherries, do not thaw them first. Place the cherries and sugar in a medium saucepan.
- In a small bowl, whisk together the cornstarch and water until completely smooth. This step is key for a thick cherry pie filling.
- Place the saucepan over medium heat. Bring the cherry mixture to a gentle simmer, stirring occasionally.
- Once simmering, slowly pour the cornstarch slurry into the saucepan while whisking constantly.
- Continue to cook, stirring constantly, until the mixture thickens significantly and begins to bubble, about 2 to 4 minutes. You are looking for a glossy, thick cherry filling.
- Remove the pan from the heat. Stir in the lemon juice, almond extract, and salt.
- Transfer the homemade cherry pie filling to a heatproof bowl. Press plastic wrap directly onto the surface of the filling to prevent a skin from forming.
- Cool to room temperature, then chill completely in the refrigerator for at least 2 hours before using in your pie or dessert.
Notes
- For a brighter color and flavor, use tart cherries. If you use only sweet cherries, you may need to increase the lemon juice slightly.
- This recipe works well for pies, tarts, or as a topping for cheesecake or ice cream.
- If you prefer not to use cornstarch, you can substitute it with 3 tablespoons of tapioca starch for a similar thickening effect.
Nutrition
- Serving Size: 1/2 cup
- Calories: 220
- Sugar: 35
- Sodium: 50
- Fat: 0.2
- Saturated Fat: 0
- Unsaturated Fat: 0.2
- Trans Fat: 0
- Carbohydrates: 56
- Fiber: 2
- Protein: 0.5
- Cholesterol: 0
