 Skip to content

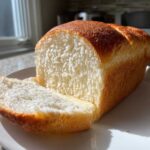
If you’ve ever visited a real Japanese bakery, you know that slice of bread seems to defy gravity—it’s impossibly soft, like eating a cloud. Well, I’m Alex Hayes, and I’m here to tell you that you absolutely do not need to fly to Tokyo or buy an expensive mixer to achieve that magic right in your kitchen. I truly believe that incredible, soul-satisfying food doesn’t have to be complicated. This recipe for Japanese milk bread cuts through all the confusion and gives you the exact steps, especially that famous Tangzhong method, to guarantee a pillowy, springy loaf. This is where we find happiness in the simple act of creating something truly delicious with our own two hands.

- Why This Foolproof Japanese Milk Bread Recipe Works (E-E-A-T Focus)
- Gathering Ingredients for Your Japanese Milk Bread Loaf
- Step-by-Step Tangzhong Method Bread Instructions
- Baking and Cooling Your Japanese Milk Bread
- Tips for Achieving Bakery Style Bread at Home
- Serving Suggestions for Japanese Sweet Bread
- Storage and Keeping Your Japanese Milk Bread Fresh
- Frequently Asked Questions About Shokupan Recipe
- Estimated Nutritional Information for Japanese Milk Bread
- Estimated Nutritional Information for Japanese Milk Bread
Why This Foolproof Japanese Milk Bread Recipe Works (E-E-A-T Focus)
People get intimidated by Japanese milk bread because they think it requires some impossible skill, but the real secret isn’t skill—it’s a technique called Tangzhong. This is why this recipe cuts through the noise and delivers real results every time. When I first started baking, I stuck to standard doughs and always ended up with something good, but never that cloud-like soft texture I craved. It took failing a few loaves before I committed to learning the Tangzhong method bread technique, and wow, that changed everything!
Once I understood how it worked, I realized I could create that incredible, moist crumb that stays soft for days. It’s about controlling moisture upfront, which gives me the confidence to share this process with you.
The Science Behind the Tangzhong Method for Japanese Milk Bread
The Tangzhong method is brilliant, honestly. You cook a small portion of your flour and liquid right on the stove until it thickens into a paste, which is pure gelatinized starch. When you add that paste back into your main dough, it acts like a giant sponge! This allows the dough to hold onto significantly more water without becoming sticky or unmanageable. That extra retained moisture is exactly what guarantees that signature bread that stays fresh quality we are after. It’s simple magic that makes all the difference.
Gathering Ingredients for Your Japanese Milk Bread Loaf
Okay, now that we know the secret weapon (Tangzhong!), let’s make sure we have everything ready before we even turn on the stove. Having all your components ready to go is the key to staying calm during the mixing process—I learned the hard way that scrambling for an ingredient mid-knead is a recipe for disaster! We need precise measurements here, because in baking, little things matter a ton. Please make sure your egg is at room temperature; it incorporates much better into the dough that way.
The final list looks short, which is nice, but every item plays a specific role in developing that amazing texture. Grab your bread flour, yeast, sugar, salt, butter (it must be soft!), and your liquids. We’re ready for the crucial prep work.
Ingredient Notes and Substitutions for Soft Japanese Bread
If you try to cheat on the flour, you’ll end up disappointed, trust me. You absolutely need to use bread flour here, not simple all-purpose. Bread flour has higher protein, which means better gluten development, and that gluten is what gives your final loaf that incredibly strong, yet tender, structure. Don’t skip it!
Also, pay attention to temperature. Your milk for the yeast needs to be warm—think bathwater, not scalding hot—or you’ll shock the yeast. And that egg? Pull it out of the fridge a good hour before you start so it’s nice and room temperature. These little details are how we ensure we get that perfect, soft Japanese bread every single time.
Step-by-Step Tangzhong Method Bread Instructions
This is where the magic really happens, folks, but don’t panic! Even though we are using a special technique, I’ve broken this down into simple parts so you can feel confident tackling this fluffy bread tutorial. Remember, mastering this is the secret to amazing easy Shokupan baking. We start with our little paste and then move into the main dough. Follow this sequence, and you’ll be holding a beautiful, soft loaf before you know it. Once you get this down, you’ll want to explore more fun baking projects, like learning about general techniques here: baking bread.
Preparing the Tangzhong Paste
First things first: the Tangzhong! In a small saucepan—nothing fancy needed—whisk together the small amount of bread flour, water, and that single tablespoon of milk. Whisk it until it looks perfectly smooth, like a slurry. Now, put it over low heat. This step requires your attention! You need to stir it constantly. Seriously, don’t walk away! After about five to seven minutes, you’ll notice it starting to transform. It thickens up rapidly and starts looking exactly like super-thick mashed potatoes or maybe thick pudding. That’s your sign to get it off the heat!
Immediately transfer that hot paste to a small bowl. This next point is critical: place plastic wrap right on the surface of the paste—like, touching it. If you don’t, a dry skin will form, and you don’t want that dry skin mixing into your beautiful dough later. Let this cool completely down to room temperature before you move on. I usually make this paste first thing in the morning before anything else, so it sits on the counter cooling while I get organized.
Mixing and Kneading the Homemade Milk Bread Dough
Once your Tangzhong is cool (and only when it’s cool!), activate your yeast in the warm milk until it gets foamy. Then, toss in that cooled paste, the room-temperature egg, the sugar, and the salt into your mixer bowl. Give it a quick stir just to combine it a little. Now, start adding your bulk flour, about a cup at a time, mixing on low until it looks rough and shaggy.
Time to knead! Increase the speed just a little and let the mixer work for about five minutes. The dough will start coming together, but it’s not ready yet. This is the crucial phase where we add the softened butter. Add it in very slowly—one tablespoon at a time—and stop the mixer to make sure the previous piece is incorporated before you add the next. Once the butter is all in, keep kneading for another 10 to 15 minutes. How do you know when to stop? You are aiming for the windowpane test. Take a small pinch of dough and gently stretch it between your fingers. If you can stretch it thin enough that light passes through it without the dough tearing, you’ve hit that perfect, elastic gluten development. That means you’re ready for the rise!

Shaping the Pillowy Soft Loaf
Once your dough has doubled after the first rise—give it a gentle punch down to deflate it—turn it out onto an *unfloured* surface; we want it slightly tacky, not tight! Divide that beautiful mass into three equal pieces. Don’t stress about perfect precision here; just eyeball getting three similar-sized portions. Roll each portion roughly into a smooth little ball and let them sit for about 10 minutes. This short rest relaxes the gluten so shaping is easier.
Now for the shaping technique that defines the structure of this pillowy soft loaf. Take one dough ball and flatten it gently. Roll it up tightly, like you’re rolling a jelly roll, making sure you push out any trapped air as you go. You want a tight log. Do this for all three pieces. Finally, line up those three logs side-by-side and place them into your greased 9×5 inch loaf pan, making sure the final seam side is down against the bottom of the pan. This ensures that when they rise and bake, they fuse together into that classic, beautiful pull-apart loaf top.
Baking and Cooling Your Japanese Milk Bread
It’s time for the moment of truth! Before you even think about putting that shaped loaf in the oven, get your oven preheated to 350°F (175°C). Patience pays off, but not when it comes to oven temp—we need it steady!
Before it goes in, take a tiny bit of milk (I use a pastry brush) and gently sweep it over the top surface of the dough. This little milk wash is what gives our Japanese Milk Bread that gorgeous, golden-brown crust we see in the bakeries. Pop it into the oven and set your timer for 30 to 35 minutes.

Now, here is a pro tip I picked up: a visual check is great, but relying on temperature is even better for accuracy. If you have a quick-read thermometer, pull the loaf out when the internal temperature hits 200°F (93°C). That’s your signal that the interior structure is set perfectly. The absolute, non-negotiable final step? As soon as it comes out, get that hot bread immediately out of the loaf pan and place it on a wire rack to cool. If you leave it sitting in that hot metal pan, the trapped steam will condense, and the bottom crust will go wonderfully soft to sadly soggy in seconds. Just let it breathe!
Tips for Achieving Bakery Style Bread at Home
I know this feels like an advanced loaf, but I promise you, if you follow the Tangzhong, you’ve already mastered the hardest part. To truly reach that bakery style bread at home perfection, we need to focus on process refinement now. Think of these final tweaks as polishing something already great. It’s about making sure every single slice feels like a treat, not just a functional piece of toast.
Don’t be intimidated; this process actually makes it a fantastic beginner bread recipe soft enough to follow successfully. If you are curious about more advanced dough techniques, check out this guide on making ultra-soft homemade loaf recipes for more inspiration.
Whenever I pull my loaf out, I immediately brush the top with a little melted butter, just like I read about in this great technique breakdown from some other bakers there. That quick coat sinks into the hot crust and adds shine and an extra layer of richness. That, combined with the perfect slow cooling, is how you get that professional finish.
Serving Suggestions for Japanese Sweet Bread
The hardest part is waiting for it to cool, but once you slice into this beautiful loaf, you realize its potential! While it’s wonderful all on its own because it’s a naturally Japanese sweet bread, it shines when used for other things. Seriously, make yourself some real sandwiches! The slight sweetness and unmatched tenderness make unparalleled milk bread for sandwiches—way better than the stuff you buy in a plastic bag.

My favorite way to enjoy the very first slice, though? A thick slab, toasted perfectly, slathered with my homemade cinnamon butter recipe. If you want more ideas on how to treat this perfect loaf, check out some delicious serving inspiration from my friends here. You can also serve it alongside dinner because its mild flavor complements savory dishes beautifully!
Storage and Keeping Your Japanese Milk Bread Fresh
Remember how I told you the Tangzhong paste helps this loaf stay moist for days? That promise is real! When it comes to storage, keep the bread wrapped up tightly. I usually use aluminum foil first, then place the whole thing into a large zip-top bag. This keeps the air out and locks in that incredible softness we worked so hard to create.
Keep your fully cooled loaf at room temperature—never the fridge, as that will dry it out faster! If, by day three, it still hasn’t fully disappeared (unlikely in my house!), just slice what you need and give it a quick toast or a 30-second zap in the microwave to bring that pillowy texture right back. Trust me, this method keeps my Shokupan recipe tasting bakery-fresh!
Frequently Asked Questions About Shokupan Recipe
I know baking bread can bring up a bunch of little worries, especially when you’re aiming for that perfect cloud texture! Don’t sweat it; I get asked these same kinds of questions all the time. I’ve pulled together the most common things I hear about mastering the Shokupan recipe, so you can skip worrying and get back to enjoying your fresh loaf.
Can I use the Yudane method instead of Tangzhong for this bread?
That’s a great question! The Yudane method is very similar to Tangzhong, but it uses boiling water instead of low-heat cooking. It absolutely works in principle to give you that soft result! The main difference is that Tangzhong tends to produce a slightly more *tender* crumb, which is what I think achieves that ultimate ‘pillowy soft loaf’ melt-in-your-mouth feeling that defines classic Shokupan. Either way, you’re using a technique that locks in moisture!
What if I don’t have a stand mixer for kneading?
You can definitely do this by hand! It’s going to take some serious elbow grease, though. Kneading for the full time required to pass the windowpane test will probably take you 20 to 25 minutes of dedicated work. Just lightly oil your countertop and embrace the process. It’s a fantastic workout, and you’ll feel amazing when you finally achieve that smooth dough!
Can I freeze this homemade milk bread?
Yes, this bread freezes beautifully! Once the entire loaf is completely cooled, slice it into the thickness you prefer for toast or sandwiches. Wrap the slices tightly—I suggest double wrapping them in plastic wrap followed by a layer of foil—and toss them in your freezer. When you want a slice, just pop it straight into the toaster or microwave for those few seconds you need. It’s the best way to preserve your soft Japanese bread.
Can I make Hokkaido Milk Bread variations from this dough?
Absolutely! This dough is the perfect base for a Hokkaido milk bread variation. If you want rolls instead of a big loaf, simply divide the dough into 9 or 12 equal portions after the first rise. Roll each piece into a smooth ball and place them close together in a buttered baking pan (like a square or round cake pan). They will rise together and bake into pull-apart rolls. Just make sure to reduce your baking time since the pieces are smaller!
If you have any other troubleshooting questions about your baking journey, please don’t hesitate to reach out to me on my contact page!
Estimated Nutritional Information for Japanese Milk Bread
When you’re looking at baked goods, it’s good to have a general idea of what you’re preparing, even though these numbers are just estimates based on my specific ingredient measurements. Remember, nutrition changes based on exact flour types and sugar amounts used, but this gives you a starting point for your Shokupan recipe servings.
- Serving Size: 1 slice
- Calories: 180
- Sugar: 6g
- Sodium: 150mg
- Fat: 4g
- Carbohydrates: 30g
- Protein: 5g
Keep in mind that this bread is rich in carbohydrates because of the high flour content, but it’s made with simple, whole ingredients, which is why I love it so much!
PrintFoolproof Japanese Milk Bread (Shokupan) with Tangzhong Method for Ultimate Fluffiness
You can make bakery-style, cloud-like Japanese Milk Bread at home. This recipe uses the Tangzhong method to guarantee an incredibly soft, pillowy texture that stays fresh for days, perfect for your next batch of sandwiches or toast.
- Prep Time: 45 min
- Cook Time: 35 min
- Total Time: 3 hr 20 min
- Yield: 1 loaf
- Category: Baking
- Method: Baking
- Cuisine: Japanese
- Diet: Vegetarian
Ingredients
- For the Tangzhong (Paste): 3 Tablespoons Bread Flour, 1/4 cup Water, 1 Tablespoon Milk
- For the Dough: 2 1/4 teaspoons Active Dry Yeast, 1/4 cup Milk (warm), 1 large Egg (room temperature), 1/4 cup Granulated Sugar, 1 teaspoon Salt, 2 1/2 cups Bread Flour (plus more for dusting), 3 Tablespoons Unsalted Butter (softened)
Instructions
- Prepare the Tangzhong: Whisk the flour, water, and 1 tablespoon of milk in a small saucepan until smooth. Cook over low heat, stirring constantly, until the mixture thickens into a paste, resembling mashed potatoes (about 5-7 minutes). Remove from heat, cover the surface with plastic wrap to prevent a skin from forming, and let it cool completely to room temperature.
- Activate the Yeast: In a large bowl or the bowl of a stand mixer, combine the warm milk and yeast. Let it sit for 5 minutes until foamy.
- Mix the Dough: Add the cooled Tangzhong, egg, sugar, and salt to the yeast mixture. Mix briefly. Gradually add the 2 1/2 cups of bread flour. Mix on low speed until a shaggy dough forms.
- Knead: Increase the mixer speed to medium-low and knead for 5 minutes. Add the softened butter, one tablespoon at a time, waiting until each piece is incorporated before adding the next. Continue kneading for another 10-15 minutes until the dough is smooth, elastic, and passes the windowpane test.
- First Rise: Place the dough in a lightly oiled bowl, turning to coat. Cover and let it rise in a warm place until doubled in size, about 1 to 1.5 hours.
- Shape the Loaf: Gently punch down the dough. Turn it out onto a lightly floured surface and divide it into three equal pieces. Roll each piece into a smooth ball. Let the balls rest for 10 minutes.
- Final Shaping: Flatten each ball into a rectangle. Roll each rectangle tightly into a log shape. Place the three logs side-by-side, seam-down, into a greased 9×5 inch loaf pan.
- Second Rise: Cover the pan loosely and let the dough rise again in a warm spot until it has nearly doubled and crests about 1 inch over the rim of the pan, about 45-60 minutes.
- Bake: Preheat your oven to 350°F (175°C). Brush the top of the dough lightly with milk for a better crust color. Bake for 30-35 minutes, or until the top is golden brown and the internal temperature reaches 200°F (93°C).
- Cool: Immediately remove the bread from the pan and cool completely on a wire rack before slicing.
Notes
- The Tangzhong method is the secret to that pillowy soft texture and helps your bread stay moist for several days.
- Use high-protein bread flour for the best structure and fluffiness.
- For a shiny top crust, brush the loaf with melted butter immediately after it comes out of the oven.
Nutrition
- Serving Size: 1 slice
- Calories: 180
- Sugar: 6
- Sodium: 150
- Fat: 4
- Saturated Fat: 2
- Unsaturated Fat: 2
- Trans Fat: 0
- Carbohydrates: 30
- Fiber: 1
- Protein: 5
- Cholesterol: 25
